Maven 中maven-assembly-plugin插件的使用笔记 SpringBoot环境
首先创建一个多模块的SpringBoot项目

项目结构
父pom的内容如下:
<?xml version="1.0" encoding="UTF-8"?>

<project xmlns="http://maven.apache.org/POM/4.0.0"

         xmlns:xsi="http://www.w3.org/2001/XMLSchema-instance"

         xsi:schemaLocation="http://maven.apache.org/POM/4.0.0 http://maven.apache.org/xsd/maven-4.0.0.xsd">

    <modelVersion>4.0.0</modelVersion>

    <groupId>com.shanghai.abcd</groupId>

    <artifactId>content-service</artifactId>

    <packaging>pom</packaging>

    <version>1.0.1-SNAPSHOT</version>

    <modules>

        <module>web-service</module>

        <module>config-service</module>

        <module>common-service</module>

        <module>biz-service</module>

        <module>dal-service</module>

        <module>deploy-service</module>

    </modules>

    <parent>

        <groupId>org.springframework.boot</groupId>

        <artifactId>spring-boot-starter-parent</artifactId>

        <version>1.5.4.RELEASE</version>

        <relativePath/>

    </parent>

    <properties>

        <project.build.sourceEncoding>UTF-8</project.build.sourceEncoding>

        <junit.version>4.9</junit.version>

        <java.version>1.8</java.version>

        <source.encoding>UTF-8</source.encoding>

    </properties>

    <dependencies>

        <!-- https://mvnrepository.com/artifact/org.springframework.boot/spring-boot-starter-test -->

        <dependency>

            <groupId>org.springframework.boot</groupId>

            <artifactId>spring-boot-starter-test</artifactId>

            <version>1.5.4.RELEASE</version>

            <scope>test</scope>

        </dependency>

    </dependencies>

</project>
子模块web模块的pom文件内容如下:
<?xml version="1.0" encoding="UTF-8"?>

<project xmlns="http://maven.apache.org/POM/4.0.0"

         xmlns:xsi="http://www.w3.org/2001/XMLSchema-instance"

         xsi:schemaLocation="http://maven.apache.org/POM/4.0.0 http://maven.apache.org/xsd/maven-4.0.0.xsd">

    <parent>

        <artifactId>content-service</artifactId>

        <groupId>com.shanghai.abcd</groupId>

        <version>1.0.1-SNAPSHOT</version>

    </parent>

    <modelVersion>4.0.0</modelVersion>

    <artifactId>web-service</artifactId>

    <dependencies>

        <dependency>

            <groupId>org.springframework.boot</groupId>

            <artifactId>spring-boot-starter-web</artifactId>

        </dependency>

        <dependency>

            <groupId>com.shanghai.abcd</groupId>

            <artifactId>biz-service</artifactId>

            <version>1.0.1-SNAPSHOT</version>

        </dependency>

    </dependencies>

    <build>

        <finalName>content</finalName>

        <plugins>

            <plugin>

                <groupId>org.apache.maven.plugins</groupId>

                <artifactId>maven-compiler-plugin</artifactId>

                <configuration>

                    <source>${java.version}</source>

                    <target>${java.version}</target>

                </configuration>

            </plugin>

            <plugin>

                <groupId>org.apache.maven.plugins</groupId>

                <artifactId>maven-resources-plugin</artifactId>

                <configuration>

                    <encoding>${source.encoding}</encoding>

                </configuration>

            </plugin>

            <!--spring boot 的编译插件 -->

            <plugin>

                <groupId>org.springframework.boot</groupId>

                <artifactId>spring-boot-maven-plugin</artifactId>

                <executions>

                    <execution>

                        <goals>

                            <goal>repackage</goal>

                        </goals>

                    </execution>

                </executions>

            </plugin>

        </plugins>

    </build>

</project>
web模块中main启动文件
package com.shanghai.abcd.content;

import org.springframework.boot.SpringApplication;

import org.springframework.boot.autoconfigure.SpringBootApplication;

import org.springframework.boot.context.properties.ConfigurationProperties;

import org.springframework.context.annotation.ComponentScan;

/**

 * @Auther:

 * @Date: 2018/5/25 15:26

 * @Description: PACKAGE_NAME

 */

@SpringBootApplication

@ConfigurationProperties(value = "classpath:application.properties")

@ComponentScan("com.shanghai.abcd.content")

public class ContentApplication {

    public static void main(String[] args) {

        SpringApplication.run(ContentApplication.class, args);

    }

}
重点是在deploy-service模块,项目的部署文件都是在该模块维护的,文件结构如下:
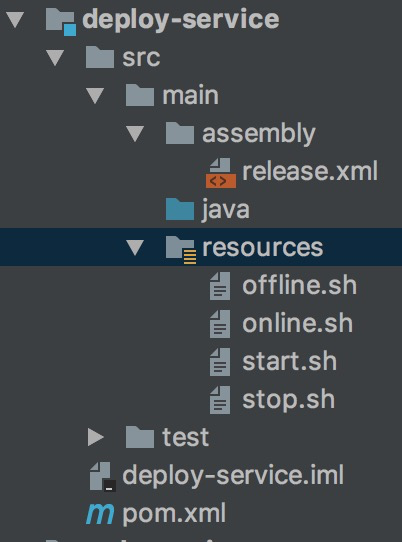
deploy-service子模块文件结构
deploy模块的pom.xml:
<?xml version="1.0" encoding="UTF-8"?>

<project xmlns="http://maven.apache.org/POM/4.0.0"

         xmlns:xsi="http://www.w3.org/2001/XMLSchema-instance"

         xsi:schemaLocation="http://maven.apache.org/POM/4.0.0 http://maven.apache.org/xsd/maven-4.0.0.xsd">

    <parent>

        <artifactId>content-service</artifactId>

        <groupId>com.shanghai.abcd</groupId>

        <version>1.0.1-SNAPSHOT</version>

    </parent>

    <modelVersion>4.0.0</modelVersion>

    <artifactId>deploy-service</artifactId>

    <build>

        <plugins>

            <plugin>

                <groupId>org.apache.maven.plugins</groupId>

                <artifactId>maven-assembly-plugin</artifactId>

                <version>2.4</version>

                <configuration>

                    <finalName>content</finalName>

                    <appendAssemblyId>false</appendAssemblyId>  <!-- 如果只想有finalName,不需要连接release.xml中的id -->

                    <tarLongFileMode>posix</tarLongFileMode>  <!-- 解决tar大小的限制问题 -->

                    <descriptors>

                        <descriptor>src/main/assembly/release.xml</descriptor>

                    </descriptors>

                    <outputDirectory>../output</outputDirectory>

                    <attach>false</attach>

                </configuration>

                <executions>

                    <execution>

                        <phase>package</phase>

                        <goals>

                            <goal>single</goal>

                        </goals>

                    </execution>

                </executions>

            </plugin>

        </plugins>

    </build>

</project>
release.xml文件:
<assembly xmlns="http://maven.apache.org/ASSEMBLY/2.0.0"

          xmlns:xsi="http://www.w3.org/2001/XMLSchema-instance"

          xsi:schemaLocation="http://maven.apache.org/ASSEMBLY/2.0.0 http://maven.apache.org/xsd/assembly-2.0.0.xsd">

    <id>content</id>

    <formats>

        <format>tar.gz</format>

    </formats>

    <includeBaseDirectory>false</includeBaseDirectory>

    <fileSets>

        <!-- 程序运行的jar包 -->

        <fileSet>

            <directory>../web-service/target/</directory> <!--需要打包的项目文件目录 -->

            <outputDirectory>bin</outputDirectory>  <!-- 打包后输出的路径,生成bin目录 -->

            <includes>

                <include>**/*.jar</include>

            </includes>

            <fileMode>0755</fileMode>  <!--文件执行权限-->

        </fileSet>

        <!-- 程序运行的启动脚本 -->

        <fileSet>

            <directory>target/classes/bin</directory>  <!-- 指定要包含的目录,必须是目录 -->

            <outputDirectory>bin</outputDirectory>   <!-- 打包的文件解压后放在该目录下 -->

            <includes>

                <include>**/*.sh</include>

            </includes>

            <fileMode>0755</fileMode>   <!--文件执行权限-->

        </fileSet>

        <fileSet>

            <!-- 配置文件 -->

            <directory>../config-service/target/classes</directory>  <!-- 指定要包含的目录,必须是目录 -->

            <outputDirectory>conf</outputDirectory>   <!-- 指定当前要包含的目录的目的地 -->

            <includes>

                <include>**/*.properties</include>

            </includes>

            <fileMode>0755</fileMode>   <!--文件执行权限-->

        </fileSet>

    </fileSets>

    <dependencySets>

        <!-- 项目的依赖包 -->

        <dependencySet>

            <outputDirectory>lib</outputDirectory><!-- 依赖jar包放置目录-->

            <useProjectArtifact>true</useProjectArtifact> <!-- 当前项目构件是否包含在这个依赖集合里 -->

        </dependencySet>

    </dependencySets>

</assembly>
配置文件是统一放在config-service模块的,该模块的目录结构如下:
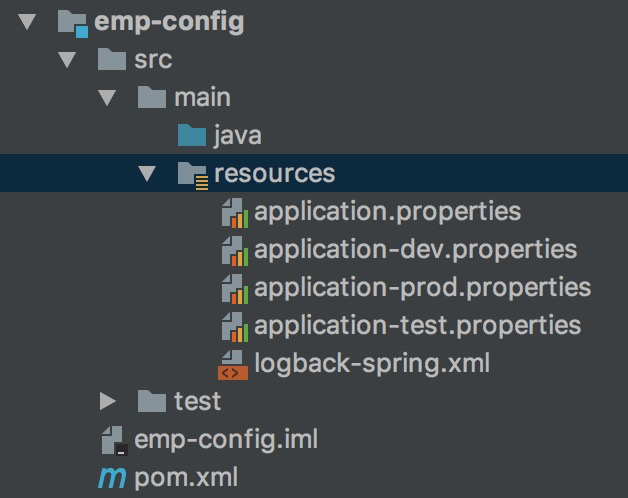
config-service模块的目录结构
config模块的pom.xml文件如下:
<?xml version="1.0" encoding="UTF-8"?>

<project xmlns="http://maven.apache.org/POM/4.0.0"

         xmlns:xsi="http://www.w3.org/2001/XMLSchema-instance"

         xsi:schemaLocation="http://maven.apache.org/POM/4.0.0 http://maven.apache.org/xsd/maven-4.0.0.xsd">

    <parent>

        <artifactId>content-service</artifactId>

        <groupId>com.shanghai.abcd</groupId>

        <version>1.0.1-SNAPSHOT</version>

    </parent>

    <modelVersion>4.0.0</modelVersion>

    <artifactId>config-service</artifactId>

    <dependencies>

        <dependency>

            <groupId>org.springframework.boot</groupId>

            <artifactId>spring-boot-configuration-processor</artifactId>

            <optional>true</optional>

        </dependency>

    </dependencies>

    <profiles>

        <profile>

            <id>dev</id>

            <properties>

                <environment>dev</environment>

            </properties>

            <activation>

                <activeByDefault>true</activeByDefault> <!-- 默认是dev环境 -->

            </activation>

        </profile>

        <profile>

            <id>test</id>

            <properties>

                <environment>test</environment>

            </properties>

        </profile>

        <profile>

            <id>prod</id>

            <properties>

                <environment>prod</environment>

            </properties>

        </profile>

    </profiles>

    <build>

        <resources>

            <resource>

                <filtering>true</filtering>

                <directory>src/main/resources</directory>

                <excludes>

                    <exclude>application-dev.properties</exclude>

                    <exclude>application-test.properties</exclude>

                    <exclude>application-prod.properties</exclude>

                    <exclude>application.properties</exclude>

                </excludes>

            </resource>

            <resource>

                <filtering>true</filtering>  <!-- 为了能让profiles中的内容能让resources中的文件使用到,需要resources插件将filtering设置为true -->

                <directory>src/main/resources</directory>

                <includes>

                    <include>application-${environment}.properties</include>

                    <include>application.properties</include>

                </includes>

            </resource>

        </resources>

    </build>

</project>
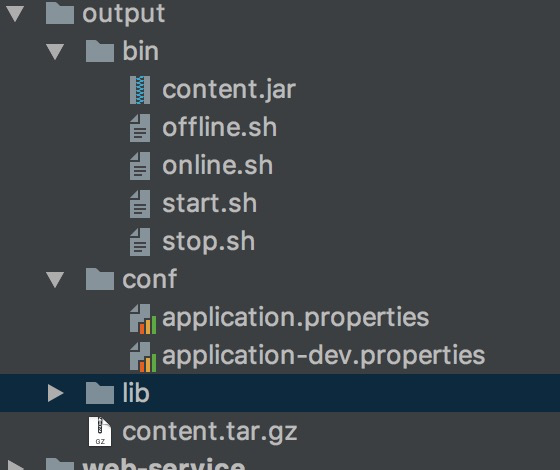
最后通过 mvn clean package -Pdev命令来打包项目,在项目根目录下生成一个output文件

cd output 后解压该项目:
tar -zxvf content.tar.gz
得到如下目录:
Maven 中maven-assembly-plugin插件的使用笔记 SpringBoot环境的更多相关文章
- maven中maven dependencies中依赖出现了项目
maven 中maven dependencies中依赖出现了项目,把依赖的项目关掉,项目消失,但是还是无法打包 ,出现的错误如图.说明:依赖的项目为project-dao 打包的项目为projec ...
- maven中添加jetty运行插件
maven项目,用jetty插件运行,对热部署的支持比较好.maven的pom文件加入下面代码 <plugin> <groupId>org.mortbay.je ...
- maven中经常使用的插件
tomcat插件:非常实用,特点就是不用配置tomcat,可以任意修改端口号. <plugin> <groupId>org.apache.tomcat.maven</gr ...
- maven中可以直接引用的java系统属性和环境变量属性
一.查看命令: 1 mvn help :system 二.引用 在pom文件中通过 ${变量名}来引用 1 2 3 4 5 6 7 8 9 10 11 12 13 14 15 16 17 18 19 ...
- jenkins中Email Extersion Plugin插件使用说明点
在jenkins中使用第3方邮件插件Email Extersion Plugin时,根据网上教程,发现每次都没有生成模板 再次查看,发现 $HOME_jenkins下没有templeate文件夹,查阅 ...
- java IDE 中安装 lombok plugin 插件,并使用 @Slf4j 注解打印日志初体验
lombok 插件介绍: IntelliJ IDEA官方插件页面:https://plugins.jetbrains.com/plugin/6317-lombok-plugin 使用lombok之后, ...
- 在Eclipse中手动安装pydev插件,eclipse开发python环境配置
最近在学习Python,因为我是做java的,用惯了eclipse,所以就想用eclipse开发python,但是配置开发环境的时候发现按照网上的配置大多不行,而且都是用的在线安装,很垃圾,没办法,自 ...
- 记录一次maven打包时将test目录下的类打包到jar中,Maven Assembly Plugin的使用
今天有人问我打包后找不到主类,运行的类写在test中.按照常规,test目录下的文件不会打包到jar包中.(但是我测试一个springboot工程就可以,这里之后再研究) 具体解决如下 第一步:在po ...
- Maven中基于POM.xml的Profile来动态切换配置信息
[转载:https://blog.csdn.net/blueheart20/article/details/52838093] 1. Maven中的profile设置 Maven是目前主流的项目代码结 ...
随机推荐
- leetcode Word Break-单词划分
题目描述: 给定一个字符串s和一组单词,确定这个字符串是否能够进行这样一种划分,划分后所有的子字符串均来自给定的单词组.例如s = “leetcode” ,dict = {“leet”,“code”} ...
- QT时钟绘制
Demo的效果 资源占用还能接受 运行久一点内存就下去了 下面是Demo的代码 #include "mainwindow.h" #include "ui_mainwind ...
- [hdu6201]transaction transaction transaction(树形dp)
题意:某人在一棵树中在某处买物品,价格为i,在某处卖物品,价格为j,每单位距离花费价格1,求最大赚钱数. 解题关键:两次树形dp,分别求出每个点作为被减和被加情况下的最大值,最后取一下max即可. 该 ...
- web性能并发测试工具(转)
导读:随着Web 2.0技术的迅速发展,许多公司都开发了一些基于Web的网站服务,通常在设计开发Web应用系统的时候很难模拟出大量用户同时访问系统的实际情况,因此,当Web网站遇到访问高峰时,容易发生 ...
- 《Java多线程编程核心技术》读后感(十六)
线程组 线程组的作用是,可以批量的管理线程或线程组对象,有效地对线程或线程组对象进行组织 线程对象关联线程组:1级关联 package Seven; public class ThreadA exte ...
- ue4 delegate event
官网相关 https://docs.unrealengine.com/latest/CHN/Programming/UnrealArchitecture/Delegates/index.html wi ...
- HTML+CSS注意点
1. 对于中文网页,需要在header中使用<meta charset="utf-8">声明编码,否则会出现乱码. 2. 属性 属性 描述 class 为html元素定 ...
- IntelliJ IDEA 打包Maven 构建的 Java 项目
方法 2,一键生成方便到哭 打开maven项目路径 一键生成 3.生成jar 目标文件在 path/target/xx.jar下面 方法 1 选中Java项目工程名称,在菜单中选择 F ...
- 微信小程序 笔记
1.Input 输入控件 <input type='digit' placeholder='0.00'></input> 如果要使用单纯的数字控件,使那么可以将type设置为d ...
- Java带token验证的注册登录
http://blog.csdn.net/huqingpeng321/article/details/52900550 http://blog.csdn.net/l18710006370/articl ...