Vuex 学习笔记
Vuex 是什么?
Vuex 是一个专为 Vue.js应用程序开发的状态管理模式。由于SPA应用的模块化,每个组件都有它各自的数据(state)、视图(view)和方法(actions),当项目内容越来越多时,每个组件中的状态就变得很难管理。Vuex 就是采用集中式存储管理应用的所有组件的状态,并以相应的规则保证状态以一种可预测的方式发生变化。
1、单个组件中的状态
看一下官网提供的计数示例:
- <template>
- <div>
- <button class="btn btn-success" @click="increment">increment</button>
- view: {{count}}
- </div>
- </template>
- <script>
- export default {
- // state
- data () {
- return {
- count: 0
- }
- },
- // actions
- methods: {
- increment () {
- this.count++
- }
- }
- }
- </script>
运行结果:

从效果图中可以直观的看到,每点击一次按钮触发添加事件(actions),数据count(state)就会发生改变,然后映射到视图界面(view)中。
下图可以表示 “ 单项数据流 ” 理念的极简示意:

这个状态管理应用包含以下几个部分:
• state:驱动应用的数据源
• view:以声明方式将 state 映射到视图
• actions:响应在 view 上的用户输入导致的状态变化
2、多个组件中的状态
当我们的应用遇到 多个组件共享状态 时,单向数据流的简洁性很容易被破坏:
• 多个视图依赖于同一状态
• 来自不同视图的行为需要变更同一状态
同样是计数器,我们现在更换一种场景,两个相同的组件A和B,共享一个数据count,并且都有一个方法可以操作这个count(是不是跟上面提到的多组件共享状态描述的一样呢)
- // 组件A
- <template>
- <div>
- {{ $store.state.count }}
- <button @click="increment">组件A</button>
- </div>
- </template>
- <script>
- export default {
- methods: {
- increment () {
- this.$store.commit('increment')
- }
- }
- }
- </script>
- //组件B
- <template>
- <div>
- {{ $store.state.count }}
- <button @click="increment">组件B</button>
- </div>
- </template>
- <script>
- export default {
- methods: {
- increment () {
- this.$store.commit('increment')
- }
- }
- }
- </script>
运行效果:

从图中可以看到,“组件A” 和 “组件B” 两个按钮 会同时改变两个 count 的数据,因为数据源 count 和 方法increment 都是全局的。如下图所示,我们把 全局数据源 state,改变数据源的方法 mutations 和 异步操作方法 actions 提取出来放到 store 中,实现全局数据状态单独管理的功能

安装
1、使用 npm 安装并保存到 package.json 中
- npm install vuex --save
package.json
- "dependencies": {
- ...,
- ...,
- ...,
- "vuex": "^2.4.1"
- },
2、配置
- // 如果在模块化构建系统中,请确保在开头调用了 Vue.use(Vuex)
- import Vue from 'vue'
- import Vuex from 'vuex'
- Vue.use(Vuex)
- //创建Store实例
- const store = new Vuex.Store({
- // 存储状态值
- state: {
- ...
- },
- // 状态值的改变方法,操作状态值
- // 提交mutations是更改Vuex状态的唯一方法
- mutations: {
- ...
- },
- // 在store中定义getters(可以认为是store的计算属性)。Getters接收state作为其第一个函数
- getters: {
- ...
- },
- actions: {
- ...
- }
- })
- // 要改变状态值只能通过提交mutations来完成
- /* eslint-disable no-new */
- const app = new Vue({
- router,
- i18n,
- // 将 store 实例注入到根组件下的所有子组件中,子组件通过 this.$store 来访问store
- store,
- ...App
- })
- app.$mount('#app')
看一下官网提供的例子:
- <template>
- <div>
- <p>{{ count }}</p>
- <p>
- <button @click="increment">+</button>
- <button @click="decrement">-</button>
- </p>
- </div>
- </template>
- <script>
- export default {
- computed: {
- count () {
- // 通过 store.state 来获取状态对象
- return this.$store.state.count
- }
- },
- methods: {
- increment () {
- // 通过 store.commit 方法触发状态变更
- this.$store.commit('increment')
- },
- decrement () {
- this.$store.commit('decrement')
- }
- }
- }
- </script>
- // 创建 Store 实例
- const store = new Vuex.Store({
- // 存储状态值
- state: {
- count: 0
- },
- // 状态值的改变方法,操作状态值
- // 提交 mutations 是更改Vuex状态的唯一方法
- mutations: {
- increment: state => state.count++,
- decrement: state => state.count--
- }
- })
运行效果:

核心概念
1、State
state 就是全局的状态(数据源),从前面的例子中看到我们可以按如下方式获取 Vuex 的state 状态
- // html 中
- {{ $store.state.count }}
- // js 中
- this.$store.state.count
2、Getter
getter 可以认为是 store 的计算属性,跟计算属性一样,getter 的返回值会根据它的依赖被缓存起来,且只有当它的依赖值发生了改变才会重新计算
如下官网提供的案例:
- computed: {
- doneTodosCount () {
- return this.$store.state.todos.filter(todo => todo.done).length
- }
- }
如果有多个组件需要用到此属性,我们要么复制这个函数,或者抽取到一个共享函数然后在多处导入它,然而这两种方法都不是很理想,最佳方式当然是使用 getter 了
我们尝试使用下getter
(1)、定义 getter
- const store = new Vuex.Store({
- state: {
- count: 0
- },
- getters: {
- formatMoney: state => {
- return '¥'+state.count.toFixed(2)+'元'
- }
- },
- mutations: {
- increment: state => state.count++
- }
- })
(2)、在组件中引用 getter
- export default {
- methods: {
- increment () {
- this.$store.commit('increment')
- // 这里为了更清楚的看到计算后的值
- let aaa = document.getElementById('aaa')
- let p = document.createElement('p')
- p.innerHTML = this.$store.getters.formatMoney
- aaa.appendChild(p)
- }
- },
- computed: {
- formatMoney() {
- return this.$store.getters.formatMoney
- }
- }
- }
效果:

3、Mutation
更改 Vuex 的 store 中的状态的唯一方法就是提交 mutation。Vuex 中的 mutation 非常类似于事件:每个 mutation 都有一个字符串的 事件类型(type)和一个 回调函数(handler),这个回调函数就是我们实际进行状态更改的地方,并且它会接受 state 作为第一个参数:
- const store = new Vuex.Store({
- state: {
- count: 1
- },
- mutations: {
- increment (state) {
- // 变更状态
- state.count++
- }
- }
- })
要唤醒一个 mutation handler,你需要以相应的 type 调用 store.commit 方法
- store.commit('increment')
(1)、提交载荷(Payload)
载荷(payload)就是说 可以向 store.commit 传入额外的参数
- // ...
- mutations: {
- increment (state, n) {
- state.count += n
- }
- }
- store.commit('increment', 10)
在大多数情况下,载荷应该是一个对象,这样可以包含多个字段并且记录的mutation会更易读:
- // ...
- mutations: {
- increment (state, payload) {
- state.count += payload.amount
- }
- }
- store.commit('increment', {
- amount: 10
- })
4、Action
Vuex 中一条重要的原则就是 mutation 必须是同步函数, action 类似于 mutation,不同之处在于:
• Action 提交的是 mutation,而不是直接变更状态
• Action 可以包含任意异步操作
- const store = new Vuex.Store({
- state: {
- count: 0
- },
- mutations: {
- increment (state) {
- state.count++
- }
- },
- actions: {
- increment (context) {
- context.commit('increment')
- },
- // 异步
- incrementAsync (context) {
- // 延时1秒
- setTimeout(() => {
- context.commit('increment')
- }, 1000)
- }
- }
- })
Action 函数接受一个与 store 实例具有相同方法和属性的context对象,因此,可以有以下调用方法
• context.commit 提交一个 mutation
• context.state 获取 state
• context.getters 获取 getters
不同于 mutation 使用 commit 方法,action 使用 dispatch 方法
- store.dispatch('increment')
Actions 同样支持 载荷方式 和 对象方式 进行分发:
- // 以载荷形式分发
- store.dispatch('incrementAsync', {
- amount: 10
- })
- // 以对象形式分发
- store.dispatch({
- type: 'incrementAsync',
- amount: 10
- })
5、Module
由于使用单一状态树,应用的所有状态会集中到一个比较大的对象,当应用变得非常复杂时,store 对象就有可能变得非常臃肿。
为了解决以上问题,Vuex 允许我们将 store 分割成 模块(module),每个模块拥有自己的 state、mutation、getter、action,甚至是嵌套子模块 --- 从上至下进行同样方式的分割
- const moduleA = {
- state: { ... },
- mutations: { ... },
- actions: { ... },
- getters: { ... }
- }
- const moduleB = {
- state: { ... },
- mutations: { ... },
- actions: { ... }
- }
- const store = new Vuex.Store({
- modules: {
- a: moduleA,
- b: moduleB
- }
- })
- store.state.a // -> moduleA 的状态
- store.state.b // -> moduleB 的状态
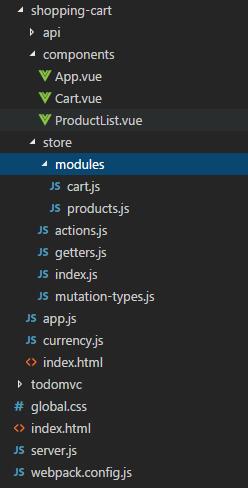
关于项目结构,我们可以看看官网提供的示例:
- ├── index.html
- ├── main.js
- ├── api
- │ └── ... # 抽取出API请求
- ├── components
- │ ├── App.vue
- │ └── ...
- └── store
- ├── index.js # 我们组装模块并导出 store 的地方
- ├── actions.js # 根级别的 action
- ├── mutations.js # 根级别的 mutation
- └── modules
- ├── cart.js # 购物车模块
- └── products.js # 产品模块
官网同时也提供了一个 购物车 示例:

app.js 文件如下:
- import 'babel-polyfill'
- import Vue from 'vue'
- import App from './components/App.vue'
- import store from './store'
- import { currency } from './currency'
- Vue.filter('currency', currency)
- new Vue({
- el: '#app',
- store,
- render: h => h(App)
- })
index.js 文件如下:
- import Vue from 'vue'
- import Vuex from 'vuex'
- import * as actions from './actions'
- import * as getters from './getters'
- import cart from './modules/cart'
- import products from './modules/products'
- import createLogger from '../../../src/plugins/logger'
- Vue.use(Vuex)
- const debug = process.env.NODE_ENV !== 'production'
- export default new Vuex.Store({
- actions,
- getters,
- modules: {
- cart,
- products
- },
- strict: debug,
- plugins: debug ? [createLogger()] : []
- })
getters.js 文件如下:
- export const cartProducts = state => {
- return state.cart.added.map(({ id, quantity }) => {
- const product = state.products.all.find(p => p.id === id)
- return {
- title: product.title,
- price: product.price,
- quantity
- }
- })
- }
actions.js 文件如下:
- import * as types from './mutation-types'
- export const addToCart = ({ commit }, product) => {
- if (product.inventory > 0) {
- commit(types.ADD_TO_CART, {
- id: product.id
- })
- }
- }
mutation-type.js 文件如下:
- export const ADD_TO_CART = 'ADD_TO_CART'
- export const CHECKOUT_REQUEST = 'CHECKOUT_REQUEST'
- export const CHECKOUT_SUCCESS = 'CHECKOUT_SUCCESS'
- export const CHECKOUT_FAILURE = 'CHECKOUT_FAILURE'
- export const RECEIVE_PRODUCTS = 'RECEIVE_PRODUCTS'
cart.js 文件如下:
- import shop from '../../api/shop'
- import * as types from '../mutation-types'
- // initial state
- // shape: [{ id, quantity }]
- const state = {
- added: [],
- checkoutStatus: null
- }
- // getters
- const getters = {
- checkoutStatus: state => state.checkoutStatus
- }
- // actions
- const actions = {
- checkout ({ commit, state }, products) {
- const savedCartItems = [...state.added]
- commit(types.CHECKOUT_REQUEST)
- shop.buyProducts(
- products,
- () => commit(types.CHECKOUT_SUCCESS),
- () => commit(types.CHECKOUT_FAILURE, { savedCartItems })
- )
- }
- }
- // mutations
- const mutations = {
- [types.ADD_TO_CART] (state, { id }) {
- state.lastCheckout = null
- const record = state.added.find(p => p.id === id)
- if (!record) {
- state.added.push({
- id,
- quantity: 1
- })
- } else {
- record.quantity++
- }
- },
- [types.CHECKOUT_REQUEST] (state) {
- // clear cart
- state.added = []
- state.checkoutStatus = null
- },
- [types.CHECKOUT_SUCCESS] (state) {
- state.checkoutStatus = 'successful'
- },
- [types.CHECKOUT_FAILURE] (state, { savedCartItems }) {
- // rollback to the cart saved before sending the request
- state.added = savedCartItems
- state.checkoutStatus = 'failed'
- }
- }
- export default {
- state,
- getters,
- actions,
- mutations
- }
products.js 文件如下:
- import shop from '../../api/shop'
- import * as types from '../mutation-types'
- // initial state
- const state = {
- all: []
- }
- // getters
- const getters = {
- allProducts: state => state.all
- }
- // actions
- const actions = {
- getAllProducts ({ commit }) {
- shop.getProducts(products => {
- commit(types.RECEIVE_PRODUCTS, { products })
- })
- }
- }
- // mutations
- const mutations = {
- [types.RECEIVE_PRODUCTS] (state, { products }) {
- state.all = products
- },
- [types.ADD_TO_CART] (state, { id }) {
- state.all.find(p => p.id === id).inventory--
- }
- }
- export default {
- state,
- getters,
- actions,
- mutations
- }
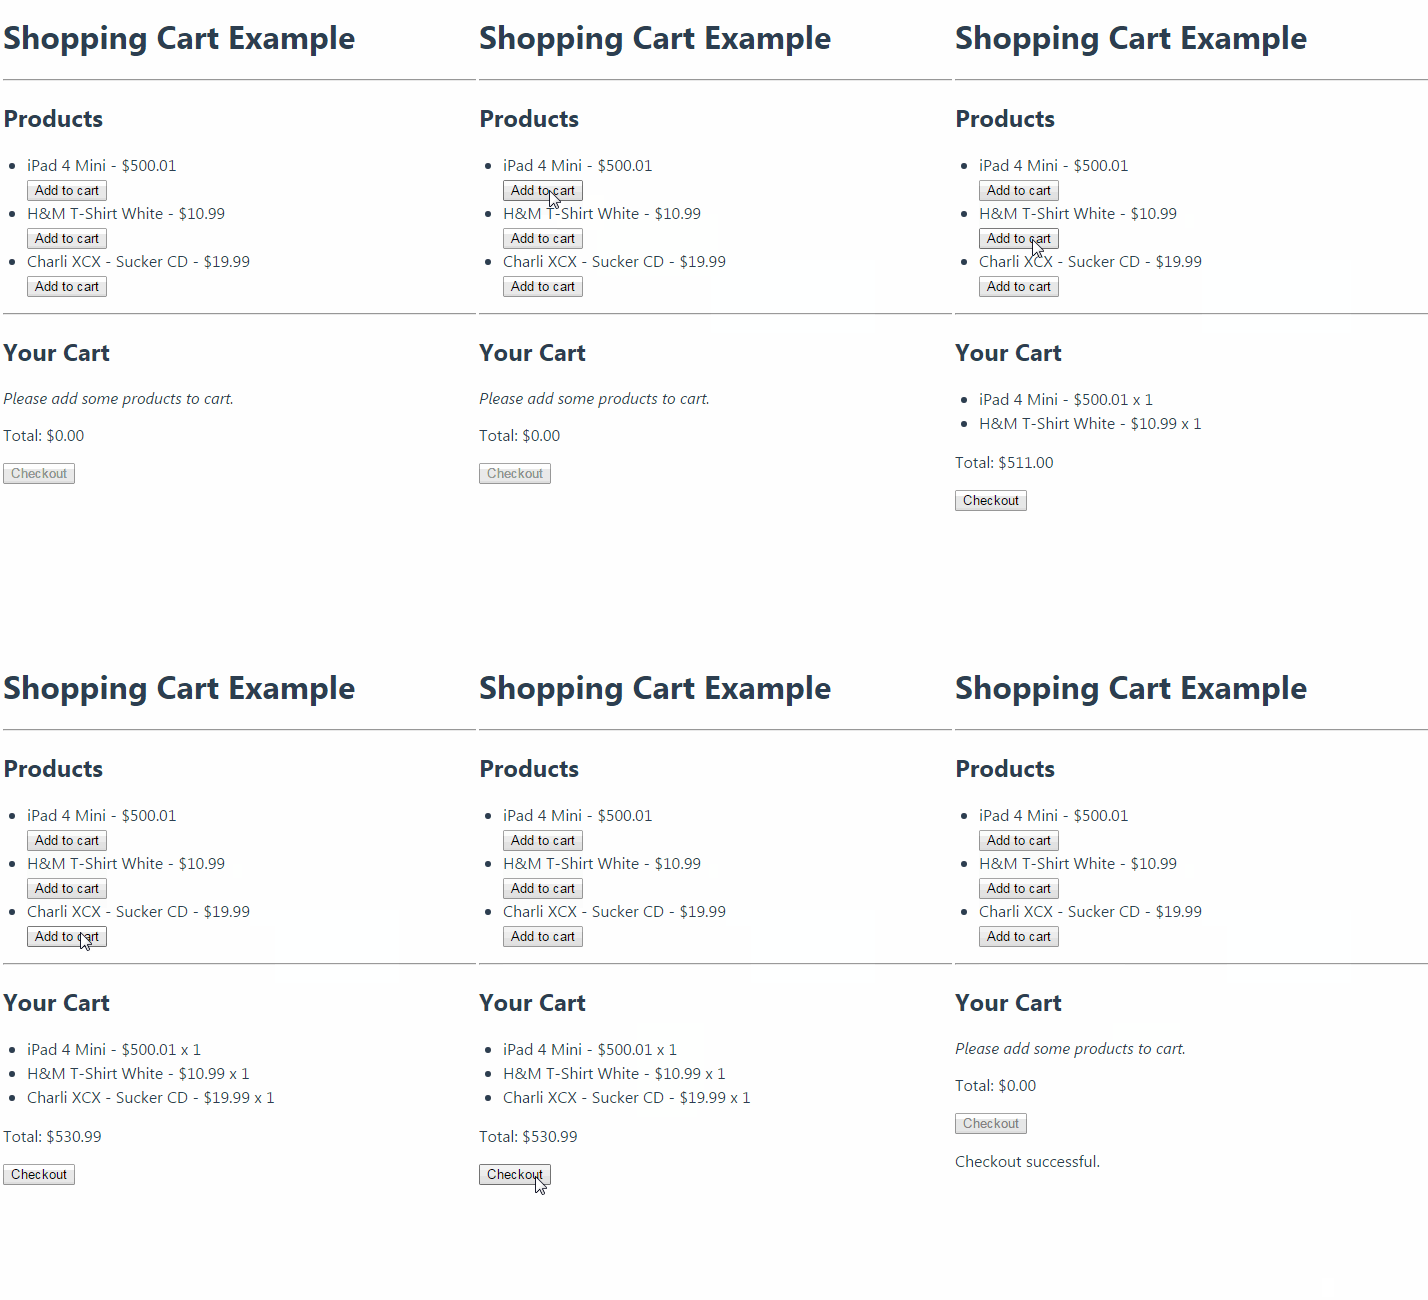
购物车运行效果:

Vuex 学习笔记的更多相关文章
- vuex学习笔记
一.vuex的目的 把组件的共享状态抽取出来,以一个全局单例模式管理.在这种模式下,组件树构成了一个巨大的视图,不管在树的哪个位置,任何组件都能获取状态或触发行为. 二.vuex集中式管理数据 安装 ...
- Vuex学习笔记(-)安装vuex
什么是Vuex? vuex是一个专门为vue.js应用程序开发的状态管理模式.即data中属性同时有一个或几个组件同时使用,就是data中共用的属性. 安装vuex(前提是已经安装好vue-cli脚手 ...
- Vuex 学习笔记一
一.定义 Vuex是一个专为Vue.js应用程序开发的状态管理模式. 状态管理模式 简单的demo new Vue({ // state data () { return { count: 0 } } ...
- Vue学习—— Vuex学习笔记
组件是Vue最强大的功能之一,而组件实例的作用域是相互独立的,意味着不同组件之间的数据是无法相互使用.组件间如何传递数据就显得至关重要,这篇文章主要是介绍Vuex.尽量以通俗易懂的实例讲述这其中的差别 ...
- 【整理】解决vue不相关组件之间的数据传递----vuex的学习笔记,解决报错this.$store.commit is not a function
解决vue不相关组件之间的数据传递----vuex的学习笔记,解决报错this.$store.commit is not a function https://www.cnblogs.com/jaso ...
- 【Vue学习笔记】—— vuex的语法 { }
学习笔记 作者:o_Ming vuex Vuex ++ state ++ (用于存储全局数据) 组件访问 state 中的全局数据的方式1: this.$store.state.全局数据 组件访问 s ...
- 7 种 Javascript 常用设计模式学习笔记
7 种 Javascript 常用设计模式学习笔记 由于 JS 或者前端的场景限制,并不是 23 种设计模式都常用. 有的是没有使用场景,有的模式使用场景非常少,所以只是列举 7 个常见的模式 本文的 ...
- vuex学习详细解(主页目录
学习vuex过程中,通过 vue-cli命令来配置和使用vuex笔记整理 vue-cli中配置vuex流程和注意事项 vuex目录配置 vuex的states.js vuex的getters.js v ...
- Vue学习笔记-Vue.js-2.X 学习(四)===>脚手架Vue-CLI(基本工作和创建)
(五) 脚手架Vue-CLI 一 Vue-CLI前提(nodejs和webpack) 二 Vue学习-nodejs按装配置,Node.js 就是运行在服务端的 JavaScript. 1. 去nod ...
随机推荐
- 关于我立牌坊那个SSM项目
我这段时间有在写,但是我发现一个问题,就是我经常在做后面功能的时候要改前面一个东西,但是我博客已经发出来了,这让我很头疼.毕竟我博客基本都在纯贴代码. 所以决定暂时停更这个系列.等我写好了再上传到gi ...
- 归并排序—Java版
一开始做算法的时候,感觉递归算法很绕,所以我就在阅读别人代码的基础上,对代码每一步都添加自己的注解,方便我以后的学习. public class MergeSort { /** * 归并排序 * @p ...
- ascii codec can't decode byte 0xe8 in position 0:ordinal not in range(128) python代码报错
import sys reload(sys) sys.setdefaultencoding('utf-8')
- 一台电脑 一起跑python2 python3
我习惯使用python2.7,命令都是使用的python和pip,这时候装了python3.4,首先到python3下修改python.exe,pythonw.exe为python3.exe,pyth ...
- QT creator编程C++第一步,说“Hello world!”
这个学期选了计算机学院的<数字图像处理>,正好和我的图像识别项目有所关联,老师说不能用MATLAB来做,这让我一个没学过C++的孩纸欲哭无泪. 只好求助计算机学院的大佬,自学C++. 大佬 ...
- 转载 远程用户连接mysql授权
授权法: 在安装mysql的机器上运行: 1.d:\mysql\bin\>mysql -h localhost -u root //这样应该可以进入MySQL服务器 2.mysql> ...
- 总结各种排序算法【Java实现】
一.插入类排序 1.直接插入排序 思想:将第i个插入到前i-1个中的适当位置 时间复杂度:T(n) = O(n²). 空间复杂度:S(n) = O(1). 稳定性:稳定排序. 如果碰见一个和插入元素相 ...
- vim代码粘贴缩进混乱的问题[Linux]
详见: http://blog.yemou.net/article/query/info/tytfjhfascvhzxcytp76 直接在vim插入模式下粘贴: 直接粘贴,剪贴板上的每个字符都相当 ...
- makefile中":=","=","?=","+=" 之间的区别
区别: := 有关位置的等于,值取决于当时位置的值 = 无关位置的等于,值永远等于最后的值 ?= 是如果没有被赋值过就赋予等号后面的值+= 是添加等号后面的值 '=':无关位置的等于 比如: x = ...
- poj 3177-3352边双联通
买一送一啊 3177和3352的区别在于3177数据有重边!但是我先做3177的 那么就直接ctrl+c+v搞3352了~. 题意:给一个无向图,要令每个点之间至少有两条不重合的路,需要至少加多少 ...
