Xamarin.Forms学习系列之Android集成极光推送
一般App都会有消息推送的功能,如果是原生安卓或者IOS集成消息推送很容易,各大推送平台都有相关的Sample,但是关于Xamarin.Forms的消息推送集成的资料非常少,下面就说下Xamarin.Forms(Android)怎么集成极光推送
准备工作:
1、了解极光推送原理:https://docs.jiguang.cn/jpush/client/Android/android_sdk/
2、下载极光官方Android SDK :https://docs.jiguang.cn/jpush/resources//
3、注册极光账号,拿到AppKey和Master Secret
4、学习xamarin绑定jar包 :https://developer.xamarin.com/guides/android/advanced_topics/binding-a-java-library/binding-a-jar/
以上是准备工作,熟悉以上的内容之后,我们正式进入极光推送集成
一、把极光官方的jar包转换成Dll
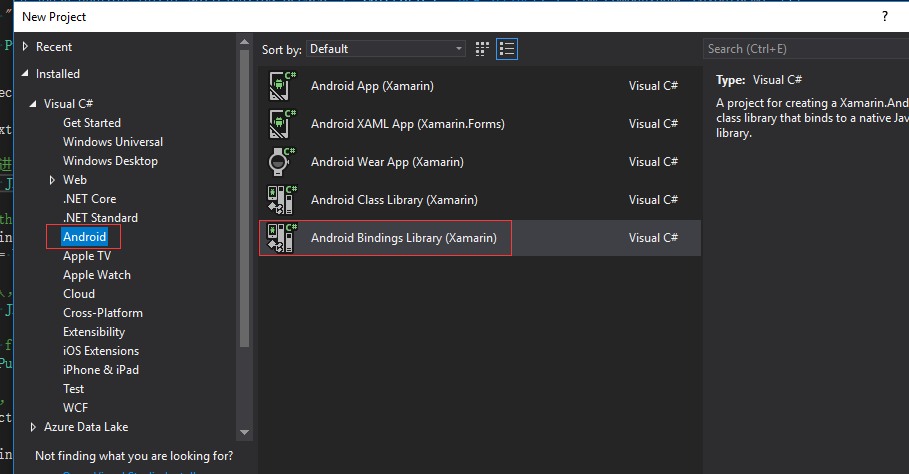
1、建立一个android Bindings Libary项目
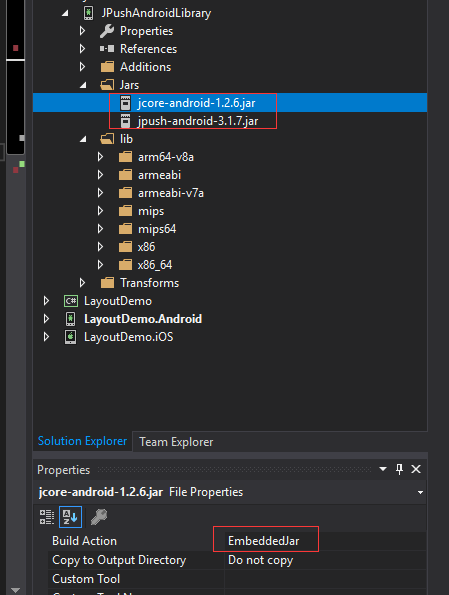
2、解压极光官方Android SDK,我下载的版本是3.1.7

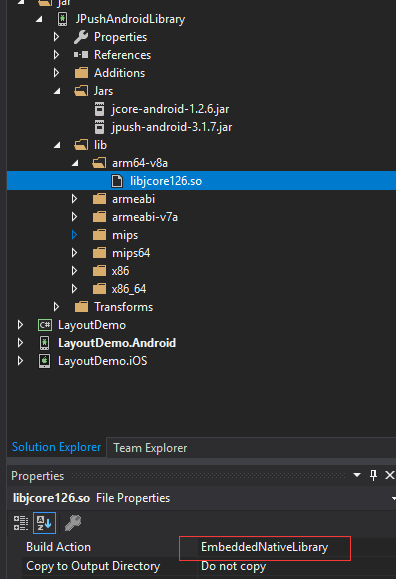
3、把jar包和so文件拷入对应文件夹下面,并设置Build Action,jar文件的Build Action设置为EmbeddedJar,so文件的Build Action设置为EmbeddedNativeLibrary,然后编译就OK了,我们可以在\bin\Debug目录看到dll了,可以用反编译工具检查下dll是否有效
二、修改AndroidManifest配置
我的配置并不是和极光官方Android SDK的AndroidManifest配置一样,我参考了网上的别人的代码,配置如下:
<?xml version="1.0" encoding="utf-8"?>

<manifest xmlns:android="http://schemas.android.com/apk/res/android" android:versionCode="" android:versionName="1.0" package="com.companyname.LayoutDemo">

  <uses-sdk android:minSdkVersion="" android:targetSdkVersion="" />

  <uses-permission android:name="android.permission.INTERNET" />

  <uses-permission android:name="android.permission.ACCESS_NETWORK_STATE" />

  <!--JPush Required-->

  <permission  android:name="com.companyname.LayoutDemo.permission.JPUSH_MESSAGE"  android:protectionLevel="signature" />

  <uses-permission android:name="com.companyname.LayoutDemo.permission.JPUSH_MESSAGE" />

  <uses-permission android:name="android.permission.RECEIVE_USER_PRESENT" />

  <uses-permission android:name="android.permission.INTERNET" />

  <uses-permission android:name="android.permission.WAKE_LOCK" />

  <uses-permission android:name="android.permission.READ_PHONE_STATE" />

  <uses-permission android:name="android.permission.WRITE_EXTERNAL_STORAGE" />

  <uses-permission android:name="android.permission.READ_EXTERNAL_STORAGE" />

  <uses-permission android:name="android.permission.VIBRATE" />

  <uses-permission android:name="android.permission.MOUNT_UNMOUNT_FILESYSTEMS" />

  <uses-permission android:name="android.permission.ACCESS_NETWORK_STATE" />

  <uses-permission android:name="android.permission.WRITE_SETTINGS" />

  <uses-permission android:name="android.permission.ACCESS_WIFI_STATE" />

  <application android:label="LayoutDemo" android:icon="@drawable/xamarin_logo">

    <!-- since 3.0. Required SDK-->

    <provider   android:authorities="com.companyname.LayoutDemo.DataProvider"   android:name="cn.jpush.android.service.DataProvider" android:exported="true"  />

    <!-- Required SDK 核心功能-->

    <!-- 可配置android:process参数将PushService放在其他进程中 -->

    <service   android:name="cn.jpush.android.service.PushService"     android:enabled="true"  android:exported="false" >

      <intent-filter>

        <action android:name="cn.jpush.android.intent.REGISTER" />

        <action android:name="cn.jpush.android.intent.REPORT" />

        <action android:name="cn.jpush.android.intent.PushService" />

        <action android:name="cn.jpush.android.intent.PUSH_TIME" />

      </intent-filter>

    </service>

    <!-- since 1.8. option 可选项。用于同一设备中不同应用的JPush服务相互拉起的功能。 -->

    <!-- 若不启用该功能可删除该组件,将不拉起其他应用也不能被其他应用拉起 -->

    <service

        android:name="cn.jpush.android.service.DaemonService"

        android:enabled="true"

        android:exported="true">

      <intent-filter >

        <action android:name="cn.jpush.android.intent.DaemonService" />

        <category android:name="com.companyname.LayoutDemo"/>

      </intent-filter>

    </service>

    <!-- Required SDK核心功能-->

    <receiver

        android:name="cn.jpush.android.service.PushReceiver"

        android:enabled="true" >

      <intent-filter android:priority="">

        <action android:name="cn.jpush.android.intent.NOTIFICATION_RECEIVED_PROXY" />

        <category android:name="com.companyname.LayoutDemo"/>

      </intent-filter>

      <intent-filter>

        <action android:name="android.intent.action.USER_PRESENT" />

        <action android:name="android.net.conn.CONNECTIVITY_CHANGE" />

      </intent-filter>

      <!-- Optional-->

      <intent-filter>

        <action android:name="android.intent.action.PACKAGE_ADDED" />

        <action android:name="android.intent.action.PACKAGE_REMOVED" />

        <data android:scheme="package" />

      </intent-filter>

    </receiver>

    <!-- Required SDK核心功能-->

    <activity

        android:name="cn.jpush.android.ui.PushActivity"

        android:configChanges="orientation|keyboardHidden"

        android:theme="@android:style/Theme.NoTitleBar"

        android:exported="false" >

      <intent-filter>

        <action android:name="cn.jpush.android.ui.PushActivity" />

        <category android:name="android.intent.category.DEFAULT" />

        <category android:name="com.companyname.LayoutDemo" />

      </intent-filter>

    </activity>

    <!-- SDK核心功能-->

    <activity

        android:name="cn.jpush.android.ui.PopWinActivity"

        android:configChanges="orientation|keyboardHidden"

        android:exported="false"

        android:theme="@android:style/Theme.NoTitleBar">

      <intent-filter>

        <category android:name="android.intent.category.DEFAULT" />

        <category android:name="com.companyname.LayoutDemo" />

      </intent-filter>

    </activity>

    <!-- Required SDK核心功能-->

    <service

        android:name="cn.jpush.android.service.DownloadService"

        android:enabled="true"

        android:exported="false" >

    </service>

    <!-- Required SDK核心功能-->

    <receiver android:name="cn.jpush.android.service.AlarmReceiver" />

    <!-- Required. For publish channel feature -->

    <!-- JPUSH_CHANNEL 是为了方便开发者统计APK分发渠道。-->

    <!-- 例如: -->

    <!-- 发到 Google Play 的APK可以设置为 google-play; -->

    <!-- 发到其他市场的 APK 可以设置为 xxx-market。 -->

    <!-- 目前这个渠道统计功能的报表还未开放。-->

    <meta-data android:name="JPUSH_CHANNEL" android:value="developer-default"/>

    <!-- Required. AppKey copied from Portal -->

    <meta-data android:name="JPUSH_APPKEY" android:value="替换成你的APPKEY"/>

  </application>

</manifest>
把配置中所有com.companyname.LayoutDemo替换成你自己的app包名,然后替换Appkey,就ok了
三、在Android 项目的MainActivity中初始化PushNotification
public class MainActivity : global::Xamarin.Forms.Platform.Android.FormsAppCompatActivity

    {

        protected override void OnCreate(Bundle savedInstanceState)

        {

            TabLayoutResource = Resource.Layout.Tabbar;

            ToolbarResource = Resource.Layout.Toolbar;

            base.OnCreate(savedInstanceState);

            initPushNotification();

            global::Xamarin.Forms.Forms.Init(this, savedInstanceState);

            LoadApplication(new App());

        }

        private void initPushNotification()

        {

            IntentFilter filter = new IntentFilter();

            filter.AddAction(JPushInterface.ActionNotificationOpened);

            filter.AddAction(JPushInterface.ActionNotificationReceived);

            filter.AddAction(JPushInterface.ActionMessageReceived);

            filter.AddAction(JPushInterface.ActionRegistrationId);

            filter.AddAction(JPushInterface.ActionConnectionChange);

            NotificationReceiver receiver = new NotificationReceiver();

            RegisterReceiver(receiver, filter);

            JPushInterface.SetDebugMode(true);

            JPushInterface.Init(this.ApplicationContext);

        }

    }
添加NotificationReceiver类,把配置中的IntentFilter放在了代码中,这里和官方sample有点不一样,这里也需要替换包名com.companyname.LayoutDemo
[BroadcastReceiver]

    [IntentFilter(new string[] { "cn.jpush.android.intent.REGISTRATION" }, Categories = new string[] { "com.companyname.LayoutDemo" })]

    [IntentFilter(new string[] { "cn.jpush.android.intent.MESSAGE_RECEIVED" }, Categories = new string[] { "com.companyname.LayoutDemo" })]

    [IntentFilter(new string[] { "cn.jpush.android.intent.NOTIFICATION_RECEIVED" }, Categories = new string[] { "com.companyname.LayoutDemo" })]

    [IntentFilter(new string[] { "cn.jpush.android.intent.NOTIFICATION_OPENED" }, Categories = new string[] { "com.companyname.LayoutDemo" })]

    [IntentFilter(new string[] { "cn.jpush.android.intent.CONNECTION" }, Categories = new string[] { "com.companyname.LayoutDemo" })]

    class NotificationReceiver : PushReceiver

    {

        public override void OnReceive(Context context, Intent intent)

        {

            base.OnReceive(context, intent);

            //当点击消息时进入,进入对应的页面

            if (intent.Action == JPushInterface.ActionNotificationOpened)

            {

                //When user tap the notification on notification center

                Bundle bundle = intent.Extras;

                string jsonData = bundle.GetString(JPushInterface.ExtraExtra);

            }

            //第一次安装app时进入,会拿到registrationID,保存registrationID,当用户登录之后把用户id和registrationID关联,方便之后一对一发送消息

            if (intent.Action == JPushInterface.ActionRegistrationId)

            {

                //Only call when first launch, get the registrationID

                string regID = JPushInterface.GetRegistrationID(context);

            }

            //当接收到信息时进入,弹出消息框

            if (JPushInterface.ActionMessageReceived.Equals(intent.Action))

            {

            }

 //当接收到信息时进入,弹出消息框

            if (JPushInterface.ActionNotificationReceived.Equals(intent.Action))

           {

            }

            if (JPushInterface.ActionNotificationReceived.Equals(intent.Action))

            {

            }

        }

    }
四、在极光推送网站注册,并测试发送
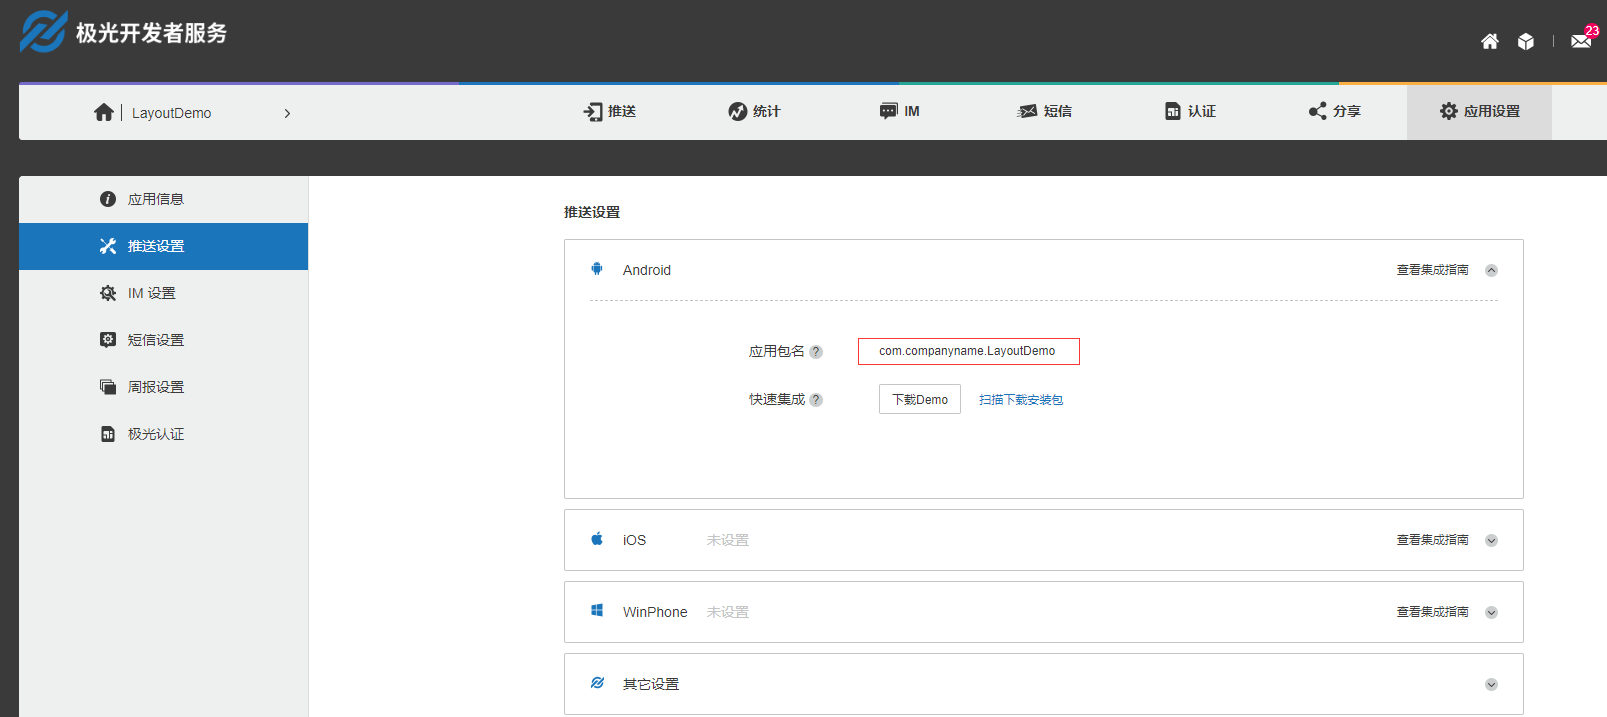
注意把所有的com.companyname.LayoutDemo替换成你自己的应用包名,应用包名必须和配置文件保持一致,极光推送根据应用包名和AppKey进行识别,这两个参数必须正确。
如果是真机测试,必须开启软件的通知权限。
坑:
项目在调试模式时,可以调用Jpush推送,但是打包APK之后发现消息推送接收不到,错误日志显示缺少libjcore126.so文件。
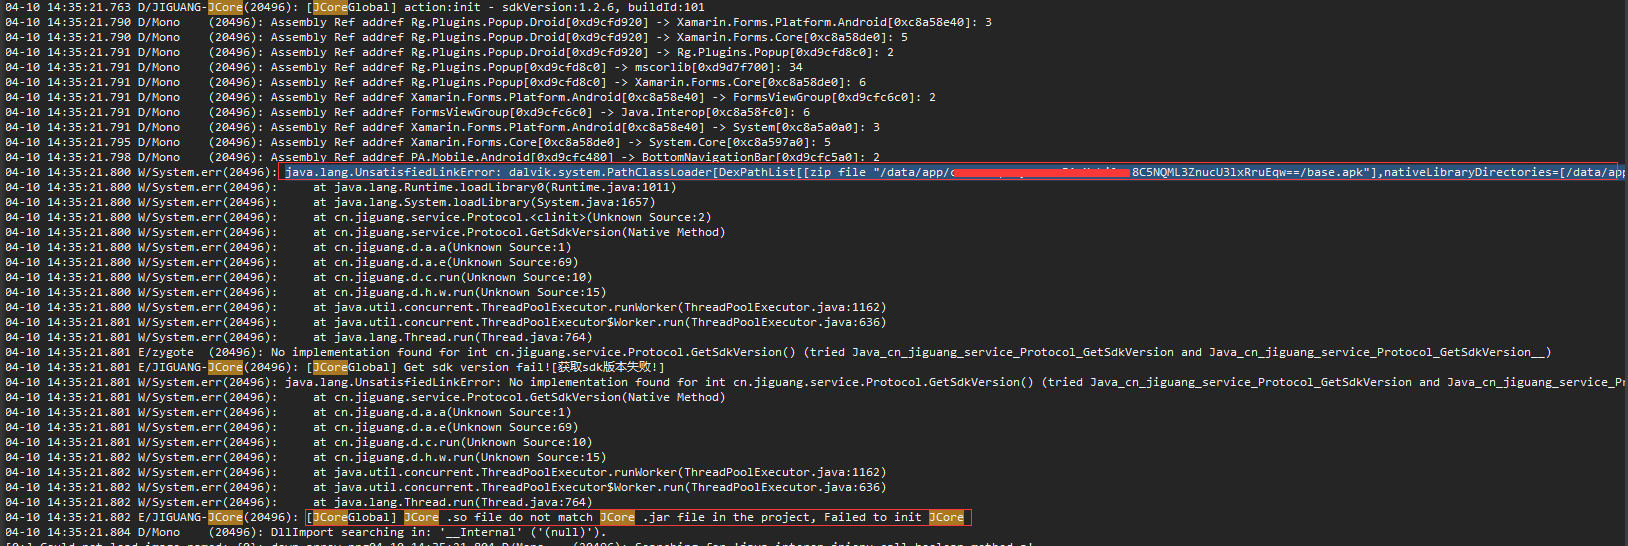

解决办法:在Android项目Assets文件夹下面加入libjcore126.so文件,并设置为AndroidNativeLibrary。 奇怪的是我新建一个项目,按照上述操作进行,无论调试模式还是打包APK都是OK的,不知道什么原因引起的。

参考文章:
https://www.jianshu.com/p/5abe3924acab
https://github.com/JimmyPun610/XamarinAndroidJiGuangPushNotification
Xamarin.Forms学习系列之Android集成极光推送的更多相关文章
- Android集成极光推送
要说学习极光推送,个人感觉官方文档就非常好啦,但是没法,人太懒啦,为了下次能够快速的将极光推送集成到项目中,故结合之前开发的项目和官方文档记录下简单的Android集成极光推送,在这之前,先上一张简单 ...
- 1、Android Studio集成极光推送(Jpush) 报错 java.lang.UnsatisfiedLinkError: cn.jpush.android.service.PushProtoco
Android studio 集成极光推送(Jpush) (华为手机)报错, E/JPush: [JPushGlobal] Get sdk version fail![获取sdk版本失败!] W/Sy ...
- C#—ASP.NET:集成极光推送(Push API v3)
C#—ASP.NET:集成极光推送(Push API v3) 原文地址: https://blog.csdn.net/CXLLLK/article/details/86489994 1.极光推送官 ...
- 李洪强iOS之集成极光推送一iOS SDK概述
李洪强iOS之集成极光推送一iOS SDK概述 JPush iOS 从上图可以看出,JPush iOS Push 包括 2 个部分,APNs 推送(代理),与 JPush 应用内消息. 红色部分是 A ...
- ionic2集成极光推送
ionic2集成极光推送: ionic2api:https://ionicframework.com/docs/ 极光推送官网:https://www.jiguang.cn android-怎么注册极 ...
- Swift3集成极光推送
现在很多程序都开始使用Swift开发了,但是第三方库大多数都是用OC写的,所以我们要使用Swift和OC混编.今天的内容主要讲Swift3.0集成极光推送. 1.准备工作 集成指南,极光上说的 ...
- 李洪强iOS之集成极光推送三iOS集成指南
李洪强iOS之集成极光推送三iOS集成指南 SDK说明 适用版本 本文匹配的 SDK版本:r2.1.5 以后.查看最近更新了解最新的SDK更新情况.使用Xcode 6及以上版本可以使用新版Push S ...
- 李洪强iOS之集成极光推送二iOS 证书 设置指南
李洪强iOS之集成极光推送二iOS 证书 设置指南 创建应用程序ID 登陆 iOS Dev Center 选择进入iOS Provisioning Portal. 在 iOS Provisioning ...
- ThinkPHP 3.2.x 集成极光推送指北
3.2版本已经过了维护生命周期,官方已经不再维护,请及时更新至5.0版本 -- ThinkPHP 官方仓库 以上,如果有条件,请关闭这个页面,然后升级至 ThinkPHP 5,如果由于各种各样的原因无 ...
随机推荐
- Linux安装h2数据库
安装H2数据库,为后面mybatisplus3J集成做铺垫 下载jar包 https://pan.baidu.com/s/1tPZQH5tum1CheDxumcN24g 运行jar包 [root@to ...
- Linux sh脚本用spool导出oracle数据库指定表表数据
脚本如下,已验证可用,可配合crontab使用. 1 #!/bin/bash cd /opt/oracle/datafor_kf #redirect environment variables sou ...
- 在ASP.NET Core中编写合格的中间件
这篇文章探讨了让不同的请求去使用不同的中间件,那么我们应该如何配置ASP.NET Core中间件?其实中间件只是在ASP.NET Core中处理Web请求的管道.所有ASP.NET Core应用程序至 ...
- Java匹马行天下之一顿操作猛如虎,框架作用知多少?
流行框架: 框架就是开发人员定义好的一套模板,程序员只需要往模板中添加响应的代码即可,填完代码,项目就完成了.所以框架存在的意义以及我们学习框架的目的就是想办法能够让程序员快速的完成整个项目的开发.理 ...
- 激活Sublime Text 3,亲测有效!
一.修改sunlime_text.exe 打开Sublime Text的安装目录,在修改之前要先备份一下sunlime_text.exe. 欢迎关注微信公众号:万猫学社,每周一分享Java技术干货. ...
- c++数据结构随笔(1)
创建数据结构单链表的时候,突然碰到基础不牢固的问题,指针问题.就当复习指针了. 问题是如果三个指针a和b和r, b=a; b->next = r; 那么a->next会不会变? 然后写了一 ...
- Numpy 中的聚合操作
# 导包 import numpy as np sum np.random.seed(10) L = np.random.random(100) sum(L) np.sum(L) min np.min ...
- Pandas IO 操作
数据分析过程中经常需要进行读写操作,Pandas实现了很多 IO 操作的API 格式类型 数据描述 Reader Writer text CSV read_csv to_csv text JSON r ...
- CSPS模拟 64
觉悟试炼场 暴力没打满有点遗憾 T2莫队没想到有点遗憾 T1 Trade 反悔贪心? 赛时猜了个解法,结果过样例过对拍就交了. 贪心依据:如果目前买入a有机会在b卖出赚钱,则a在任何最优方案中都被购买 ...
- Java把一个文件,输出成多个文件
前言:我有一个出租车轨迹的txt文本,其中包括多条轨迹.我想把这个文本按照单条轨迹输出出来,每条轨迹放在一个txt文本中. 思路:重要问题就集中在,如何动态的指定输出文件的名字.我想到了StringB ...