Spring IOC容器装配Bean_基于XML配置方式
开发所需jar包
实例化Bean的四种方式
1.无参数构造器 (最常用)
<?xml version="1.0" encoding="UTF-8"?>

<beans xmlns="http://www.springframework.org/schema/beans"

       xmlns:xsi="http://www.w3.org/2001/XMLSchema-instance"

       xsi:schemaLocation="http://www.springframework.org/schema/beans

        https://www.springframework.org/schema/beans/spring-beans.xsd">

    <!--1.无参构造函数

    在实例化的时候,自动调用默认的构造器,相当于MyBean mybean01 = new MyBean();

    -->

     <!--bean:告诉Spring容器,哪些对象(bean)需要交给Spring容器进行管理

    id/name:该bean的“唯一”标识符

    class:该bean的完整类名(spring容器底层可以使用反射创建对象)

    -->

    <bean id="mybean01" class="com.igeekhome.bean.MyBean"></bean>

</beans>
public class MyBean {

    public MyBean() {

        System.out.println("MyBean...无参构造函数被调用...");

    }

}
2.静态工厂方法
 <!--2.静态工厂方法

    MyFactory01.getBean()

    factory-method:指定静态的工厂方法

    -->

    <bean id="mybean02" class="com.igeekhome.bean.MyFactory01" factory-method="getBean"></bean>
public class MyFactory01 {

    //静态工厂方法

    public static MyBean getBean() {

        return new MyBean();

    }

}
3.实例(非静态)工厂方法
<!--3.非静态工厂方法

    new MyFatory02().getBean

    -->

    <bean id="myfatory" class="com.igeekhome.bean.MyFactory02"></bean>

    <!--

    factory-bean:工厂对象的引用

    factory-method: 工厂方法名称

    -->

    <bean id="mybean03" factory-bean="myfatory" factory-method="getBean"></bean>
public class MyFactory02 {

    //非静态工厂方法

    public MyBean02 getBean() {

        return new MyBean02();

    }

}
4.FactoryBean方式(底层源码用的多)
<!--4.FactoryBean

    MyFactoryBean:spring会先检查该类是否实现了FactoryBean接口,如果没有实现,则直接创建该对象并添加至容器中

    如果实现了FactoryBean接口,则调用getObject方法,并将该方法返回值对象添加至容器中

    -->

    <bean id="mybean04" class="com.igeekhome.bean.MyFactoryBean"></bean>
//创建工厂对象实现FactoryBean<Bean4>的接口

public class MyFactoryBean implements FactoryBean<MyBean03> {//泛型:你要返回什么类型的对象,泛型就是什么

    @Override

    public MyBean getObject() throws Exception {

        return new MyBean();

    }

    @Override

    public Class<?> getObjectType() {

        return MyBean.class;

    }

}
Bean的作用域
由spring创建的bean对象在什么情况下有效
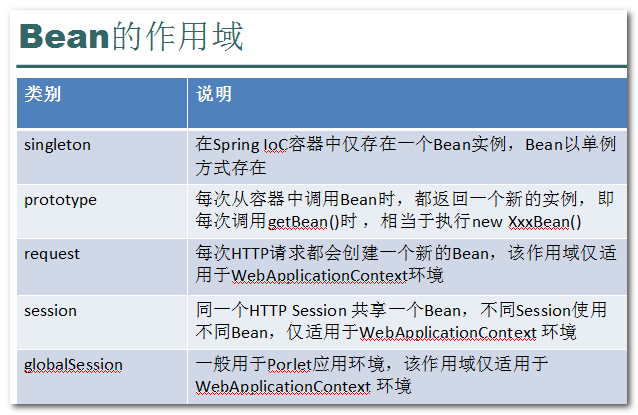
项目开发中通常会使用:singleton 单例、 prototype多例
- Singleton: 在一个spring容器中,对象只有一个实例(默认值)
- Prototype: 在一个spring容器中,存在多个实例,每次getBean 返回一个新的实例
<!-- bean的作用范围

       scope:配置作用范围的,默认值就是singleton单例

     -->

<!-- 单例 -->

<!-- <bean id="singletonBean" class="com.igeek.scope.SingletonBean"></bean> 等价于 -->

    <bean id="singletonBean" class="com.igeek.scope.SingletonBean"

    scope="singleton"></bean>

    <!-- 多例 -->

    <bean id="prototypeBean" class="com.igeek.scope.PrototypeBean"

scope="prototype"></bean>
Bean的初始化和销毁方法
通过 init-method属性 指定初始化后的调用方法
通过 destroy-method属性 指定销毁对象前的方法
 <!--

    init-method:指定初始化方法

    destroy-method: 指定销毁触发方法

    -->

    <bean id="lifecycle" class="com.igeekhome.bean.LifeCycleBean" scope="singleton" init-method="initMethod" destroy-method="destroyMethod"></bean>
public class LifeCycleBean {

    public LifeCycleBean() {

        System.out.println("构造函数...");

    }

    public void initMethod() {

        //...执行初始化操作

        System.out.println("init...method...");

    }

    public void destroyMethod() {

        System.out.println("destroy...method...");

    }

}
销毁方法的执行必须满足两个条件
- 单例(singleton)的bean才会可以手动销毁
- 必须手动关闭容器(调用close的方法)时,才会执行手动销毁的方法
测试初始化和销毁方法:
public class Test03 {

    private ApplicationContext ac = null;

    @Before

    public void before() {

        ac = new ClassPathXmlApplicationContext("applicationContext.xml");

    }

    @Test

    public void method01() {

        LifeCycleBean lifeCycleBean = ac.getBean("lifecycle", LifeCycleBean.class);

        //关闭ioc容器

        ((ClassPathXmlApplicationContext) ac).close();

    }

}
后处理Bean(BeanPostProcessor接口)
后处理Bean也称之为Bean的后处理器,作用是:在Bean初始化的前后,对Bean对象进行增强。它既可以增强一个指定的Bean,也可以增强所有的Bean,底层很多功能(如AOP等)的实现都是基于它的,Spring可以在容器中直接识别调用
////Bean的后处理器:对bean进行增强,可以实现,对所有,或某个bean的初始化进行增强

public class MyBeanPostProcessor implements BeanPostProcessor{

    /*bean实例化之前

       bean:对象

       beanName: bean的id/name

     */

    //初始化时(之前)调用的

    public Object postProcessBeforeInitialization(Object bean, String beanName)throws BeansException {

        //System.out.println(beanName+"在初始化前开始增强了");

       //如何只增强一个bean

       if(beanName.equals("lifeCycleBean")){

           System.out.println(beanName+"在初始化前开始增强了");

       }

       return bean;//放行

    }

    //初始化时(之后)调用

    public Object postProcessAfterInitialization(Object bean, String beanName)throws BeansException {

        //System.out.println(beanName+"在初始化后开始增强了");

       if(beanName.equals("lifeCycleBean")){

           System.out.println(beanName+"在初始化后开始增强了");

       }

       return bean;

    }

}
Bean属性的依赖注入(DI)
1.setter方法属性注入
public class Person {

    private int no;

    private String name;

    private boolean status;

    private Car car;

    public Person() {

    }

    public int getNo() {

        return no;

    }

    public void setNo(int no) {

        this.no = no;

    }

    public String getName() {

        return name;

    }

    public void setName(String name) {

        this.name = name;

    }

    public boolean isStatus() {

        return status;

    }

    public void setStatus(boolean status) {

        this.status = status;

    }

    public Car getCar() {

        return car;

    }

    public void setCar(Car car) {

        this.car = car;

    }

    @Override

    public String toString() {

        return "Person{" +

                "no=" + no +

                ", name='" + name + '\'' +

                ", status=" + status +

                ", car=" + car +

                '}';

    }

    public Person(int no, String name, boolean status, Car car) {

        this.no = no;

        this.name = name;

        this.status = status;

        this.car = car;

    }

}

public class Car {

    private String no;

    private String brand;

    private double price;

    public String getNo() {

        return no;

    }

    public void setNo(String no) {

        this.no = no;

    }

    public String getBrand() {

        return brand;

    }

    public void setBrand(String brand) {

        this.brand = brand;

    }

    public double getPrice() {

        return price;

    }

    public void setPrice(double price) {

        this.price = price;

    }

    @Override

    public String toString() {

        return "Car{" +

                "no='" + no + '\'' +

                ", brand='" + brand + '\'' +

                ", price=" + price +

                '}';

    }

    public Car() {

    }

    public Car(String brand, double price) {

        this.brand = brand;

        this.price = price;

    }

    public Car(String no, String brand, double price) {

        this.no = no;

        this.brand = brand;

        this.price = price;

    }

}
<?xml version="1.0" encoding="UTF-8"?>

<beans xmlns="http://www.springframework.org/schema/beans"

       xmlns:xsi="http://www.w3.org/2001/XMLSchema-instance"

       xsi:schemaLocation="http://www.springframework.org/schema/beans

        https://www.springframework.org/schema/beans/spring-beans.xsd">

    <bean id="person" class="com.igeekhome.di.Person">

        <!--setter注入:前提满足JavaBean规范(提供setter方法)-->

        <!--property:setter注入

            name:属性名称 (具体来说是set方法名的首字母小写)xyz -> 默认会调用setXyz()

            value:简单值

            ref:注入的bean的id 将容器中的一个bean注入到另外一个bean中

        -->

        <property name="no" value="123"></property>

        <property name="name" value="张三"></property>

        <property name="status" value="true"></property>

        <property name="car" ref="car"></property>

        <!--等价-->

        <!--<property name="car">

            <ref bean="car"></ref>

        </property>-->

    </bean>

    <bean id="car" class="com.igeekhome.di.Car">

        <property name="brand" value="宝马"></property>

        <property name="price" value="66666"></property>

    </bean>

</beans>
2.构造器参数注入
<?xml version="1.0" encoding="UTF-8"?>

<beans xmlns="http://www.springframework.org/schema/beans"

       xmlns:xsi="http://www.w3.org/2001/XMLSchema-instance"

       xsi:schemaLocation="http://www.springframework.org/schema/beans

        https://www.springframework.org/schema/beans/spring-beans.xsd">

    <bean id="car" class="com.igeekhome.di.Car">

        <!--使用constructor构造注入

        value:

        ref:  同上

        type: 构造参数类型 如果是引用 需要写完整类名 (每个字段不一致)

        index: 构造参数的索引位置 从0开始

        name: 构造参数的名称

        -->

        <constructor-arg name="brand" value="宝马"></constructor-arg>

        <constructor-arg name="price" value="66666"></constructor-arg>

        <constructor-arg name="no" value="001"></constructor-arg>

    </bean>

    <bean id="person" class="com.igeekhome.di.Person">

        <constructor-arg index="0" value="111"></constructor-arg>

        <constructor-arg index="1" value="李四"></constructor-arg>

        <constructor-arg index="2" value="false"></constructor-arg>

        <constructor-arg index="3" ref="car"></constructor-arg>

    </bean>

</beans>
3.p名称空间
为简化XML文件的配置,Spring2.5版本开始引入了一个新的p名称空间。简单的说,它的作用是为了简化setter方法属性依赖注入配置的,它不是真正的名称空间
它的使用方法:
p:<属性名>="xxx" 引入常量值

p:<属性名>-ref="xxx" 引用其它Bean对象
<?xml version="1.0" encoding="UTF-8"?>

<beans xmlns="http://www.springframework.org/schema/beans"

       xmlns:xsi="http://www.w3.org/2001/XMLSchema-instance" xmlns:p="http://www.springframework.org/schema/p"

       xsi:schemaLocation="http://www.springframework.org/schema/beans

        https://www.springframework.org/schema/beans/spring-beans.xsd">

    <!--p命名空间注入:

    前提:基于setter注入

    p:属性 = ""

    p:属性-ref = ""

    -->

    <bean id="person" class="com.igeekhome.di.Person" p:name="张三" p:no="002" p:status="false" p:car-ref="car">

    </bean>

    <bean id="car" class="com.igeekhome.di.Car" p:brand="qq" p:price="66666">

    </bean>

</beans>
4.spEL表达式
spEL(Spring Expression Language)是一种表达式语言,它是spring3.x版本的新特性。 它的作用是:支持在运行时操作和查询对象,其语法类似统一的EL语言,但是SpEL提供了额外的功能,功能更强大
语法: #{…} , 引用另一个Bean 、属性、 方法
SpEL表达式的使用功能比较多,Bean操作相关的通常有:
#{beanId} 引用Bean(具体对象)

#{beanId.属性} 引用Bean的属性

#{beanId.方法(参数)} 调用Bean的方法
<?xml version="1.0" encoding="UTF-8"?>

<beans xmlns="http://www.springframework.org/schema/beans"

       xmlns:xsi="http://www.w3.org/2001/XMLSchema-instance" xmlns:p="http://www.springframework.org/schema/p"

       xsi:schemaLocation="http://www.springframework.org/schema/beans

        https://www.springframework.org/schema/beans/spring-beans.xsd">

    <bean id="person" class="com.igeekhome.di.Person" p:name="张三" p:no="002" p:status="false" p:car="#{car2}">

    </bean>

    <bean id="car" class="com.igeekhome.di.Car" p:brand="qq" p:price="66666">

    </bean>

    <bean id="car2" class="com.igeekhome.di.Car" p:no="#{car.no}" p:brand="#{car.brand.toUpperCase()}" p:price="#{car.price}">

    </bean>

</beans>
Spring IOC容器装配Bean_基于XML配置方式的更多相关文章
- Spring IOC容器装配Bean_基于注解配置方式
bean的实例化 1.导入jar包(必不可少的) 2.实例化bean applicationContext.xml(xml的写法) <bean id="userDao" cl ...
- IoC容器装配Bean(xml配置方式)(Bean的生命周期)
1.Spring管理Bean,实例化Bean对象 三种方式 第一种:使用类构造器实例化(默认无参数) package cn.itcast.spring.initbean; /** * 使用构造方法 实 ...
- Unit03: Spring Web MVC简介 、 基于XML配置的MVC应用 、 基于注解配置的MVC应用
Unit03: Spring Web MVC简介 . 基于XML配置的MVC应用 . 基于注解配置的MVC应用 springmvc (1)springmvc是什么? 是一个mvc框架,用来简化基于mv ...
- Spring3.2 中 Bean 定义之基于 XML 配置方式的源码解析
Spring3.2 中 Bean 定义之基于 XML 配置方式的源码解析 本文简要介绍了基于 Spring 的 web project 的启动流程,详细分析了 Spring 框架将开发人员基于 XML ...
- struts_20_对Action中所有方法、某一个方法进行输入校验(基于XML配置方式实现输入校验)
第01步:导包 第02步:配置web.xml <?xml version="1.0" encoding="UTF-8"?> <web-app ...
- struts2视频学习笔记 22-23(基于XML配置方式实现对action的所有方法及部分方法进行校验)
课时22 基于XML配置方式实现对action的所有方法进行校验 使用基于XML配置方式实现输入校验时,Action也需要继承ActionSupport,并且提供校验文件,校验文件和action类 ...
- 转载 - Struts2基于XML配置方式实现对action的所有方法进行输入校验
出处:http://www.cnblogs.com/Laupaul/archive/2012/03/15/2398360.html http://www.blogjava.net/focusJ/arc ...
- 当你的Spring IOC 容器(即applicationContext.xml文件)忘记配到web.xml 文件中时
当你的Spring IOC 容器忘记配到web.xml 文件中时,启动服务器就会报错. 部分错误如下: Caused by: org.springframework.beans.factory.NoS ...
- Spring Aop(七)——基于XML配置的Spring Aop
转发:https://www.iteye.com/blog/elim-2396043 7 基于XML配置的Spring AOP 基于XML配置的Spring AOP需要引入AOP配置的Schema,然 ...
随机推荐
- 智学网电脑端查分小工具 已更新V2.2
特别鸣谢这段代码的源作者,我的大佬同学\(MetalkgLZH\).由于我没有做什么工作,这篇随笔基本不含相关技术细节. 再次强调,这个程序的主要部分由\(MetalkgLZH\)完成.技术细节与源码 ...
- 文件 File
文件 1. 文件的一些常用方法 package com.ljw.study; import java.io.File; import java.util.Arrays; import java.uti ...
- Redis开发与运维:SDS
STRING 我们会经常打交道的string类型,在redis中拥有广泛的使用.也是开启redis数据类型的基础. 在我最最开始接触的redis的时候,总是以为字符串类型就是值的类型是字符串. 比如: ...
- Scrapy爬虫day1——环境配置
安装 Scrapy pip install scrapy 配置虚拟环境 mkvirtualenv Spider 创建项目 在Spider的虚拟环境中运行 scrapy startproject Boo ...
- nginx篇高级之优化整理
优化思路: 一.修改连接数和工作线程让其支持更多的并发量. worker_processes 2; //与CPU核心数量一致 worker_connections ...
- js 重写a标签的href属性和onclick事件
适应场景:假如移动端拨打电话,需要给a标签添加href属性,但是由于需求,需要链接跳转的同时给a标签添加onclick事件,如果不做任何处理的话,默认执行点击事件,而不会跳转href属性的链接. 怎么 ...
- Java 博客系统 Tale
Tale Tale的英文含义为故事,我相信每个坚持写Blog的人都是有故事的:中文你叫它 塌了 也无所谓 . Tale 使用了轻量级mvc框架 Blade 开发,默认主题使用了漂亮的 pinghsu, ...
- RTX消息提醒工具设计文档
为什么要做 项目上线后,系统依然由各业务模块负责人自己维护.而后台运行的各种业务服务结果,不能及时反馈到业务负责人.而等到客户反馈时则会太被动.为了能及时发现并解决项目问题,设计了该工具. 可利用资源 ...
- 手把手教你如何在阿里云ECS搭建Python TensorFlow Jupyter
前段时间在阿里云买了一台服务器,准备部署网站,近期想玩一些深度学习项目,正好拿来用.TensorFlow官网的安装仅提及Ubuntu,但我的ECS操作系统是 CentOS 7.6 64位,搭建Pyth ...
- Python文件写入时的编码问题解决
如下代码: import sys import os import django root_dir = os.path.join(os.path.dirname(os.path.abspath(__f ...