JavaScript实例:运动的小球
本篇博文通过制作一个小球运动动画的实例,来学习在HTML5的画布上实现动画制作的方法,同时理解面向对象程序设计的基本思想。
1.绘制小球
先在HTML页面中设置一个画布。
<canvas id="myCanvas" width="400" height="300" style="border:3px double #996633;">
</canvas>
再将小球画在canvas(画布)上面。
可编写如下的HTML代码。
<!DOCTYPE html>
<head>
<title>运动的小球(一)</title>
</head>
<body>
<canvas id="myCanvas" width="400" height="300" style="border:3px double #996633;">
</canvas>
<script type="text/javascript">
var canvas = document.getElementById('myCanvas');
var context = canvas.getContext('2d');
var x=100, y=100,radius=25;
context.beginPath();
context.arc(x, y, radius, 0, Math.PI*2, true);
context.closePath();
context.fillStyle = "blue";
context.fill();
</script>
</body>
</html>
其中,变量x、y、radius分别是小球的圆心坐标(x,y)和半径radius。
将上述HTML代码保存到一个html文本文件中,再在浏览器中打开包含这段HTML代码的html文件,可以看到在浏览器窗口中出现一个蓝色的小球。这个小球没有什么特别的,实际上是一个简单的圆形,用arc()函数绘制出来的。
2.让小球动起来
添加一个animation函数,在函数中先用clearRect 清理掉画布里之前的小球圆形,然后重新绘制小球,之后修改小球的圆心坐标。再用window.requestAnimationFrame()控制动画。
设小球x坐标轴(水平方向)的移动速度为xspeed、y坐标轴(竖直方向)的移动速度为yspeed,则修改小球圆心坐标的方法为:x += xspeed; y +=yspeed; 。
重新编写的HTML代码如下。
<!DOCTYPE html>
<head>
<title>运动的小球(二)</title>
</head>
<body>
<canvas id="myCanvas" width="400" height="300" style="border:3px double #996633;">
</canvas>
<script type="text/javascript">
var canvas = document.getElementById('myCanvas');
var context = canvas.getContext('2d');
var x=100, y=100, xspeed=5, yspeed=1, radius=25;
function animation()
{
context.clearRect(0,0,canvas.width,canvas.height);
context.beginPath();
context.arc(x, y, radius, 0, Math.PI*2, true);
context.closePath();
context.fillStyle = "blue";
context.fill();
x += xspeed;
y += yspeed;
window.requestAnimationFrame(animation);
}
window.requestAnimationFrame(animation);
</script>
</body>
</html>
在浏览器中打开包含这段HTML代码的html文件,可以看到在浏览器窗口中出现一个蓝色的小球在运动。
3.边界碰撞处理
在浏览器中打开添加了animation函数的html文件,会发现小球很快会移出画布。这是由于animation函数中没有进行边界碰撞测试,因此,需要在修改小球圆心坐标后,判断小球按新的圆心坐标绘制时是否会超出画布的尺寸,并控制相应的速度量反转(增量变减量或者减量变增量)。修改后的animation函数如下:
function animation()
{
context.clearRect(0,0,canvas.width,canvas.height);
context.beginPath();
context.arc(x, y, radius, 0, Math.PI*2, true);
context.closePath();
context.fillStyle = "blue";
context.fill();
x += xspeed;
y += yspeed;
if (y+radius>=canvas.height || y-radius<=0)
yspeed = -yspeed;
if (x+ radius >= canvas.width || x-radius<= 0)
xspeed = -xspeed;
window.requestAnimationFrame(animation);
}
修改animation函数后,完整的HTML文件内容如下:
<!DOCTYPE html>
<head>
<title>运动的小球(三)</title>
</head>
<body>
<canvas id="myCanvas" width="400" height="300" style="border:3px double #996633;">
</canvas>
<script type="text/javascript">
var canvas = document.getElementById('myCanvas');
var context = canvas.getContext('2d');
var x=100, y=100, xspeed=5, yspeed=1, radius=25;
function animation()
{
context.clearRect(0,0,canvas.width,canvas.height);
context.beginPath();
context.arc(x, y, radius, 0, Math.PI*2, true);
context.closePath();
context.fillStyle = "blue";
context.fill();
x += xspeed;
y += yspeed;
if (y+radius>=canvas.height || y-radius<=0)
yspeed = -yspeed;
if (x+ radius >= canvas.width || x-radius<= 0)
xspeed = -xspeed;
window.requestAnimationFrame(animation);
}
window.requestAnimationFrame(animation);
</script>
</body>
</html>
在浏览器中打开包含这段HTML代码的html文件,可以看到在浏览器窗口中出现一个蓝色的小球在运动,并且小球在碰撞到边界后,会改变方向,这样小球继续在框中运动,不会出界。
4.再添加一个运动的小球
分别用 var x1=100, y1=100, xspeed1=5, yspeed1=1, radius1=25;
var x2=50, y2=50, xspeed2=3, yspeed2=1, radius2=15;来表示两个小球的数据。
然后将animation函数中有关小球的绘制和坐标修改语句复制一次并修改相应的变量名即可。
修改后的HTML代码如下。
<!DOCTYPE html>
<head>
<title>运动的小球(四)</title>
</head>
<body>
<canvas id="myCanvas" width="400" height="300" style="border:3px double #996633;">
</canvas>
<script type="text/javascript">
var canvas = document.getElementById('myCanvas');
var context = canvas.getContext('2d');
var x1=100, y1=100, xspeed1=5, yspeed1=1, radius1=25;
var x2=50, y2=50, xspeed2=3, yspeed2=1, radius2=15;
function animation()
{
context.clearRect(0,0,canvas.width,canvas.height);
context.beginPath();
context.arc(x1, y1, radius1, 0, Math.PI*2, true);
context.closePath();
context.fillStyle = "blue";
context.fill();
context.beginPath();
context.arc(x2, y2, radius2, 0, Math.PI*2, true);
context.closePath();
context.fillStyle = "red";
context.fill();
x1 += xspeed1;
y1 += yspeed1;
if (y1+radius1>=canvas.height || y1-radius1<=0)
yspeed1 = -yspeed1;
if (x1+ radius1 >= canvas.width || x1-radius1<= 0)
xspeed1 = -xspeed1;
x2 += xspeed2;
y2 += yspeed2;
if (y2+radius2>=canvas.height || y2-radius2<=0)
yspeed2 = -yspeed2;
if (x2+ radius2 >= canvas.width || x2-radius2<= 0)
xspeed2 = -xspeed2;
window.requestAnimationFrame(animation);
}
window.requestAnimationFrame(animation);
</script>
</body>
</html>
在浏览器中打开包含这段HTML代码的html文件,可以看到在浏览器窗口中出现一个蓝色和一个红色的小球在运动。
5.定义小球对象。
按上面的方法,如果再增加一个或多个小球,相应的代码会复制多次。实际上,小球是一个对象,它包括圆心坐标(x,y)、半径radius、水平方向的移动速度xspeed、竖直方向的移动速度yspeed和小球颜色等属性,以及绘制小球和小球移动一步(指圆心坐标变化)等操作。显然,将小球可以定义为一个对象更合适。
采用构造函数的方法定义小球对象的HTML代码如下。
<!DOCTYPE html>
<head>
<title>运动的小球(五)</title>
</head>
<body>
<canvas id="myCanvas" width="400" height="300" style="border:3px double #996633;"></canvas>
<script type="text/javascript">
var canvas = document.getElementById('myCanvas');
var context = canvas.getContext('2d');
// 定义小球对象
function Ball(x,y,xspeed,yspeed,radius,color){
this.x=x;
this.y=y;
this.xspeed=xspeed;
this.yspeed=yspeed;
this.radius=radius;
this.color=color;
this.draw=function()
{
context.beginPath();
context.arc(this.x,this.y,this.radius, 0, Math.PI*2, true);
context.closePath();
context.fillStyle =this.color;
context.fill();
}
this.step=function()
{
this.x += this.xspeed;
this.y += this.yspeed;
if (this.y+this.radius>=canvas.height || this.y-this.radius<=0)
this.yspeed = -this.yspeed;
if (this.x+ this.radius >= canvas.width || this.x-this.radius<= 0)
this.xspeed = -this.xspeed;
}
}
// 创建三个小球
var ball1=new Ball(100,100,5,3,25,"#0000FF");
var ball2=new Ball(50, 40,3,1,20,"#FF0000");
var ball3=new Ball(30, 30, 3, 2, 15,"#00FFFF");
function animation()
{
context.clearRect(0,0,canvas.width,canvas.height);
ball1.draw();
ball2.draw();
ball3.draw();
ball1.step();
ball2.step();
ball3.step();
window.requestAnimationFrame(animation);
}
window.requestAnimationFrame(animation);
</script>
</body>
</html>
在浏览器中打开包含这段HTML代码的html文件,可以看到在浏览器窗口中出现一个蓝色、一个红色和一个青色的三个小球在运动。
采用对象后,增加一个运动小球就很方便了,只需先创建一个小球对象
var ball4=new Ball(10, 20, 3, 2, 15,"#FFFF00");
再添加两条语句 ball4.draw();和 ball4.step();即可。
6.给小球一个长尾效果。
如果将animation函数中的语句 context.clearRect(0,0,canvas.width,canvas.height);改写为如下两条语句:
context.fillStyle = 'rgba(255,255,255,0.3)';
context.fillRect(0,0,canvas.width,canvas.height);
这样在清除前一帧动画时,由于是用一个半透明的fillRect函数填充画布,可以为每个小球增加一个长尾效果。
添加了长尾效果的小球运动动画HTML文档内容如下:
<!DOCTYPE html>
<head>
<title>运动的小球(六)</title>
</head>
<body>
<canvas id="myCanvas" width="400" height="300" style="border:3px double #996633;"></canvas>
<script type="text/javascript">
var canvas = document.getElementById('myCanvas');
var context = canvas.getContext('2d');
// 定义小球对象
function Ball(x,y,xspeed,yspeed,radius,color){
this.x=x;
this.y=y;
this.xspeed=xspeed;
this.yspeed=yspeed;
this.radius=radius;
this.color=color;
this.draw=function()
{
context.beginPath();
context.arc(this.x,this.y,this.radius, 0, Math.PI*2, true);
context.closePath();
context.fillStyle =this.color;
context.fill();
}
this.step=function()
{
this.x += this.xspeed;
this.y += this.yspeed;
if (this.y+this.radius>=canvas.height || this.y-this.radius<=0)
this.yspeed = -this.yspeed;
if (this.x+ this.radius >= canvas.width || this.x-this.radius<= 0)
this.xspeed = -this.xspeed;
}
}
// 创建三个小球
var ball1=new Ball(100,100,5,3,25,"#0000FF");
var ball2=new Ball(50, 40,3,1,20,"#FF0000");
var ball3=new Ball(30, 30, 3, 2, 15,"#00FFFF");
function animation()
{
context.fillStyle = 'rgba(255,255,255,0.3)';
context.fillRect(0,0,canvas.width,canvas.height);
ball1.draw();
ball2.draw();
ball3.draw();
ball1.step();
ball2.step();
ball3.step();
window.requestAnimationFrame(animation);
}
window.requestAnimationFrame(animation);
</script>
</body>
</html>
在浏览器中打开包含这段HTML代码的html文件,可以看到在浏览器窗口中出现一个蓝色、一个红色和一个青色的三个小球在运动,并且每个小球运动时带有长尾效果,如图1所示。
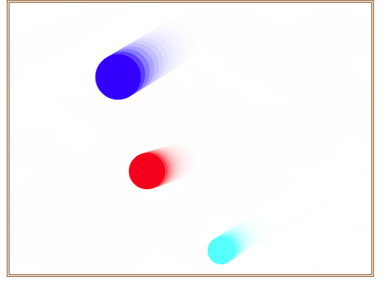
图1 带有长尾效果的运动小球
7.为画布中的动画添加开始和结束控制。
为了对小球运动的开始和结束进行控制,可以在页面中增加“开始”和“停止”两个按钮,单击相应的按钮产生相应的操作。
添加按钮操作后的HTML代码如下。
<!DOCTYPE html>
<head>
<title>运动的小球(七)</title>
</head>
<body>
<canvas id="myCanvas" width="400" height="300" style="border:3px double #996633;">
</canvas>
<br/><input id="start" type="button" value="开始">
<input id="stop" type="button" value="停止">
<script type="text/javascript">
var canvas = document.getElementById('myCanvas');
var context = canvas.getContext('2d');
var handle=0;
// 定义小球对象
function Ball(x,y,xspeed,yspeed,radius,color){
this.x=x;
this.y=y;
this.xspeed=xspeed;
this.yspeed=yspeed;
this.radius=radius;
this.color=color;
this.draw=function()
{
context.beginPath();
context.arc(this.x,this.y,this.radius, 0, Math.PI*2, true);
context.closePath();
context.fillStyle =this.color;
context.fill();
}
this.step=function()
{
this.x += this.xspeed;
this.y += this.yspeed;
if (this.y+this.radius>=canvas.height || this.y-this.radius<=0)
this.yspeed = -this.yspeed;
if (this.x+ this.radius >= canvas.width || this.x-this.radius<= 0)
this.xspeed = -this.xspeed;
}
}
// 创建三个小球
var ball1=new Ball(100,100,5,3,25,"#0000FF");
var ball2=new Ball(50, 50,3,1,20,"#FF0000");
var ball3=new Ball(20, 20, 3, 2, 15,"#00FFFF");
ball1.draw();
ball2.draw();
ball3.draw();
function animation()
{
context.fillStyle = 'rgba(255,255,255,0.3)';
context.fillRect(0,0,canvas.width,canvas.height);
ball1.draw();
ball2.draw();
ball3.draw();
ball1.step();
ball2.step();
ball3.step();
handle=window.requestAnimationFrame(animation);
}
var running=false;
var startBtn=document.getElementById('start');
var stopBtn=document.getElementById('stop');
startBtn.addEventListener('click', function () {
if (!running)
{
handle=requestAnimationFrame(animation);
running=true;
}
});
stopBtn.addEventListener('click', function () {
cancelAnimationFrame(handle);
handle=null;
running=false;
});
</script>
</body>
</html>
在浏览器中打开包含这段HTML代码的html文件,可以看到在浏览器窗口中出现一个蓝色、一个红色和一个青色的三个小球,这三个小球初始时静止。单击“开始”按钮后,小球开始运动,单击“停止”按钮,小球停止运动,在当前位置静止不动。再单击“开始”按钮,小球又开始运动。
JavaScript实例:运动的小球的更多相关文章
- 自定义View,随着手指运动的小球
这个实例是自定的view的初步介绍,要设计的是一个随着手指运动的小球.原理是随时获取手指的坐标,然后在这个坐标上面实时改变自定义view的坐标.这个view仅仅是画了一个圆形而已. 自定义的view ...
- JavaScript实例
<!DOCTYPE html PUBLIC "-//W3C//DTD XHTML 1.0 Strict//EN" "http://www.w3.org/TR/xht ...
- 每天一个JavaScript实例-从一个div元素删除一个段落
<!DOCTYPE html> <html> <head> <meta http-equiv="Content-Type" content ...
- 每天一个JavaScript实例-推断图片是否载入完毕
<!doctype html> <html lang="en"> <head> <meta charset="utf-8&quo ...
- 每天一个JavaScript实例-动态省份选择城市
<!DOCTYPE html> <html> <head> <meta http-equiv="Content-Type" content ...
- 每天一个JavaScript实例-递归实现反转数组字符串
<!DOCTYPE html> <html> <head> <meta http-equiv="Content-Type" content ...
- 每天一个JavaScript实例-html5拖拽
<!DOCTYPE html> <html> <head> <meta http-equiv="Content-Type" content ...
- 每天一个JavaScript实例-canvas绘图
<!DOCTYPE html> <html> <head> <meta http-equiv="Content-Type" content ...
- 一些有用的javascript实例分析(三)
原文:一些有用的javascript实例分析(三) 10 输入两个数字,比较大小 window.onload = function () { var aInput = document.getElem ...
随机推荐
- 运维常用 MySQL 命令
目录 设置用户密码 方法一 方法二 丢失root密码找回 添加用户 设置用户密码 方法一 SET PASSWORD FOR 'root'@'localhost' = PASSWORD('NewPass ...
- gganimate|创建可视化动图,让你的图表会说话
本文首发于“生信补给站”公众号,https://mp.weixin.qq.com/s/kKQ2670FBiDqVCMuLBL9NQ 更多关于R语言,ggplot2绘图,生信分析的内容,敬请关注小号. ...
- js鼠标划过事件
js鼠标划过事件一般有两对 onmouseover/onmouseout onmouseenter/onmouseleave 区别: 1.onmouseover/onmouseout 鼠标经过自身会触 ...
- 【Python成长之路】从零学GUI -- 制作智能聊天机器人
[写在前面] 鹏哥:最近老惹小燕同学不开心,结果都没人陪我聊天了.哎,好无聊呀! 肥宅男:女朋友什么的最无聊了,还没我的图灵机器人好玩. 鹏哥:图灵?好巧,和我部门同名. [效果如下] [实现过程] ...
- android 点击无效验证
背景 在写一个东西滑动删除列表的时候,出现了一个问题.我的需求是,左滑然后出现delete,然后点击delete,让该滑块消失. 我在点列表的第一行的时候,左滑,出现delete,点击删除,ok的,完 ...
- luogu P2401 不等数列 |动态规划
题目描述 将1到n任意排列,然后在排列的每两个数之间根据他们的大小关系插入">"和"<".问在所有排列中,有多少个排列恰好有k个"< ...
- 和为k的倍数
小b喜欢和为K的倍数的序列. 现在有一个长度为n的序列A,请问A有多少个非空连续子序列是小b喜欢的. #include<cstdio> #include<iostream> # ...
- 2018HDU多校二 -F 题 Naive Operations(线段树)
题目链接:http://acm.hdu.edu.cn/showproblem.php?pid=6315 In a galaxy far, far away, there are two integer ...
- (全国多校重现赛一) J-Two strings
Giving two strings and you should judge if they are matched. The first string contains lowercase le ...
- 3- 设置断点修改Response
以下是借鉴别人的知识分享.我在这里转载,如有冒犯,还请告知. 只要你会设置断点修改请求内容的话,这个设置断点修改响应内容的方法也是一样的,只需要修改一下命令即可. 修改响应内容也有两种方法: 第一种: ...