Cognitive Graph for Multi-Hop Reading Comprehension at Scale(ACL2019) 阅读笔记与源码解析
论文地址为:Cognitive Graph for Multi-Hop Reading Comprehension at Scale
github地址:CogQA
背景
假设你手边有一个维基百科的搜索引擎,可以用来获取实体对应的文本段落,那么如何来回答下面这个复杂的问题呢?
“谁是某部在2003年取景于洛杉矶Quality cafe的电影的导演?”
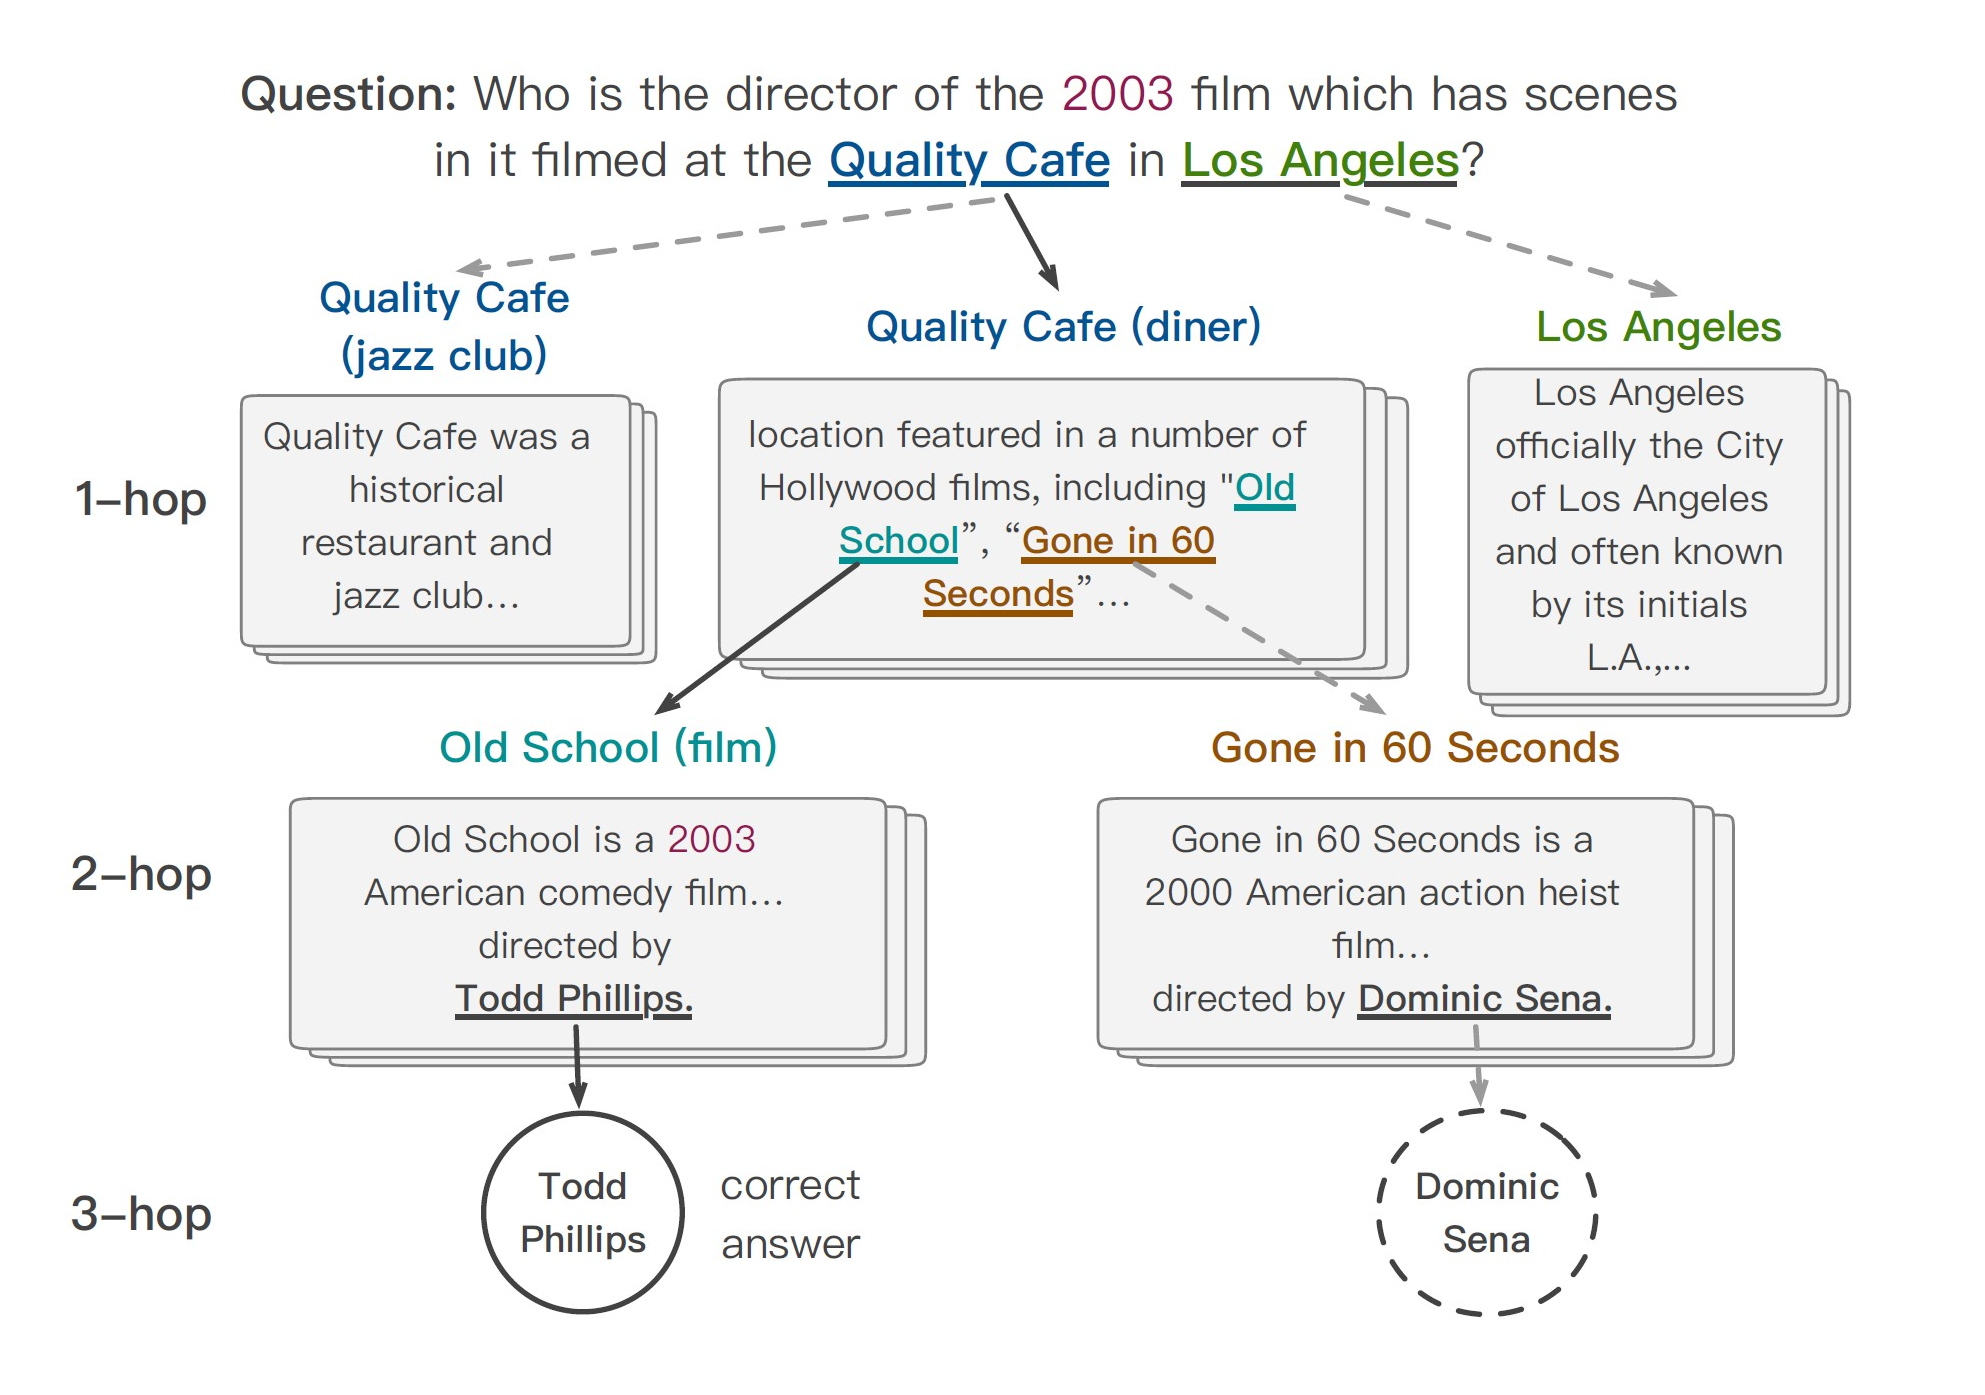
很自然地,我们将会从例如Quality cafe这样的“相关实体”入手,通过维基百科查询相关介绍,并在其中讲到好莱坞电影的时候迅速定位到“Old School”“Gone in 60 Seconds”这两部电影,通过继续查询两部电影相关的介绍,我们找到他们的导演。最后一步是判断到底是哪位导演,这需要我们自己分析句子的语意和限定词,在了解到电影是2003年之后,我们可以做出最后判断——Todd Phillips是我们想要的答案。
事实上,“快速将注意力定位到相关实体”和“分析句子语意进行推断”是两种不同的思维过程。
在认知学里,著名的“双过程理论(dual process theory)”认为,人的认知分为两个系统,系统一(System 1)是基于直觉的、无知觉的思考系统,其运作依赖于经验和关联;而系统二(System 2)则是人类特有的逻辑推理能力,此系统利用工作记忆(working memory)中的知识进行慢速但是可靠的逻辑推理,系统二是显式的,需要意识控制的,是人类高级智能的体现。
论文详情
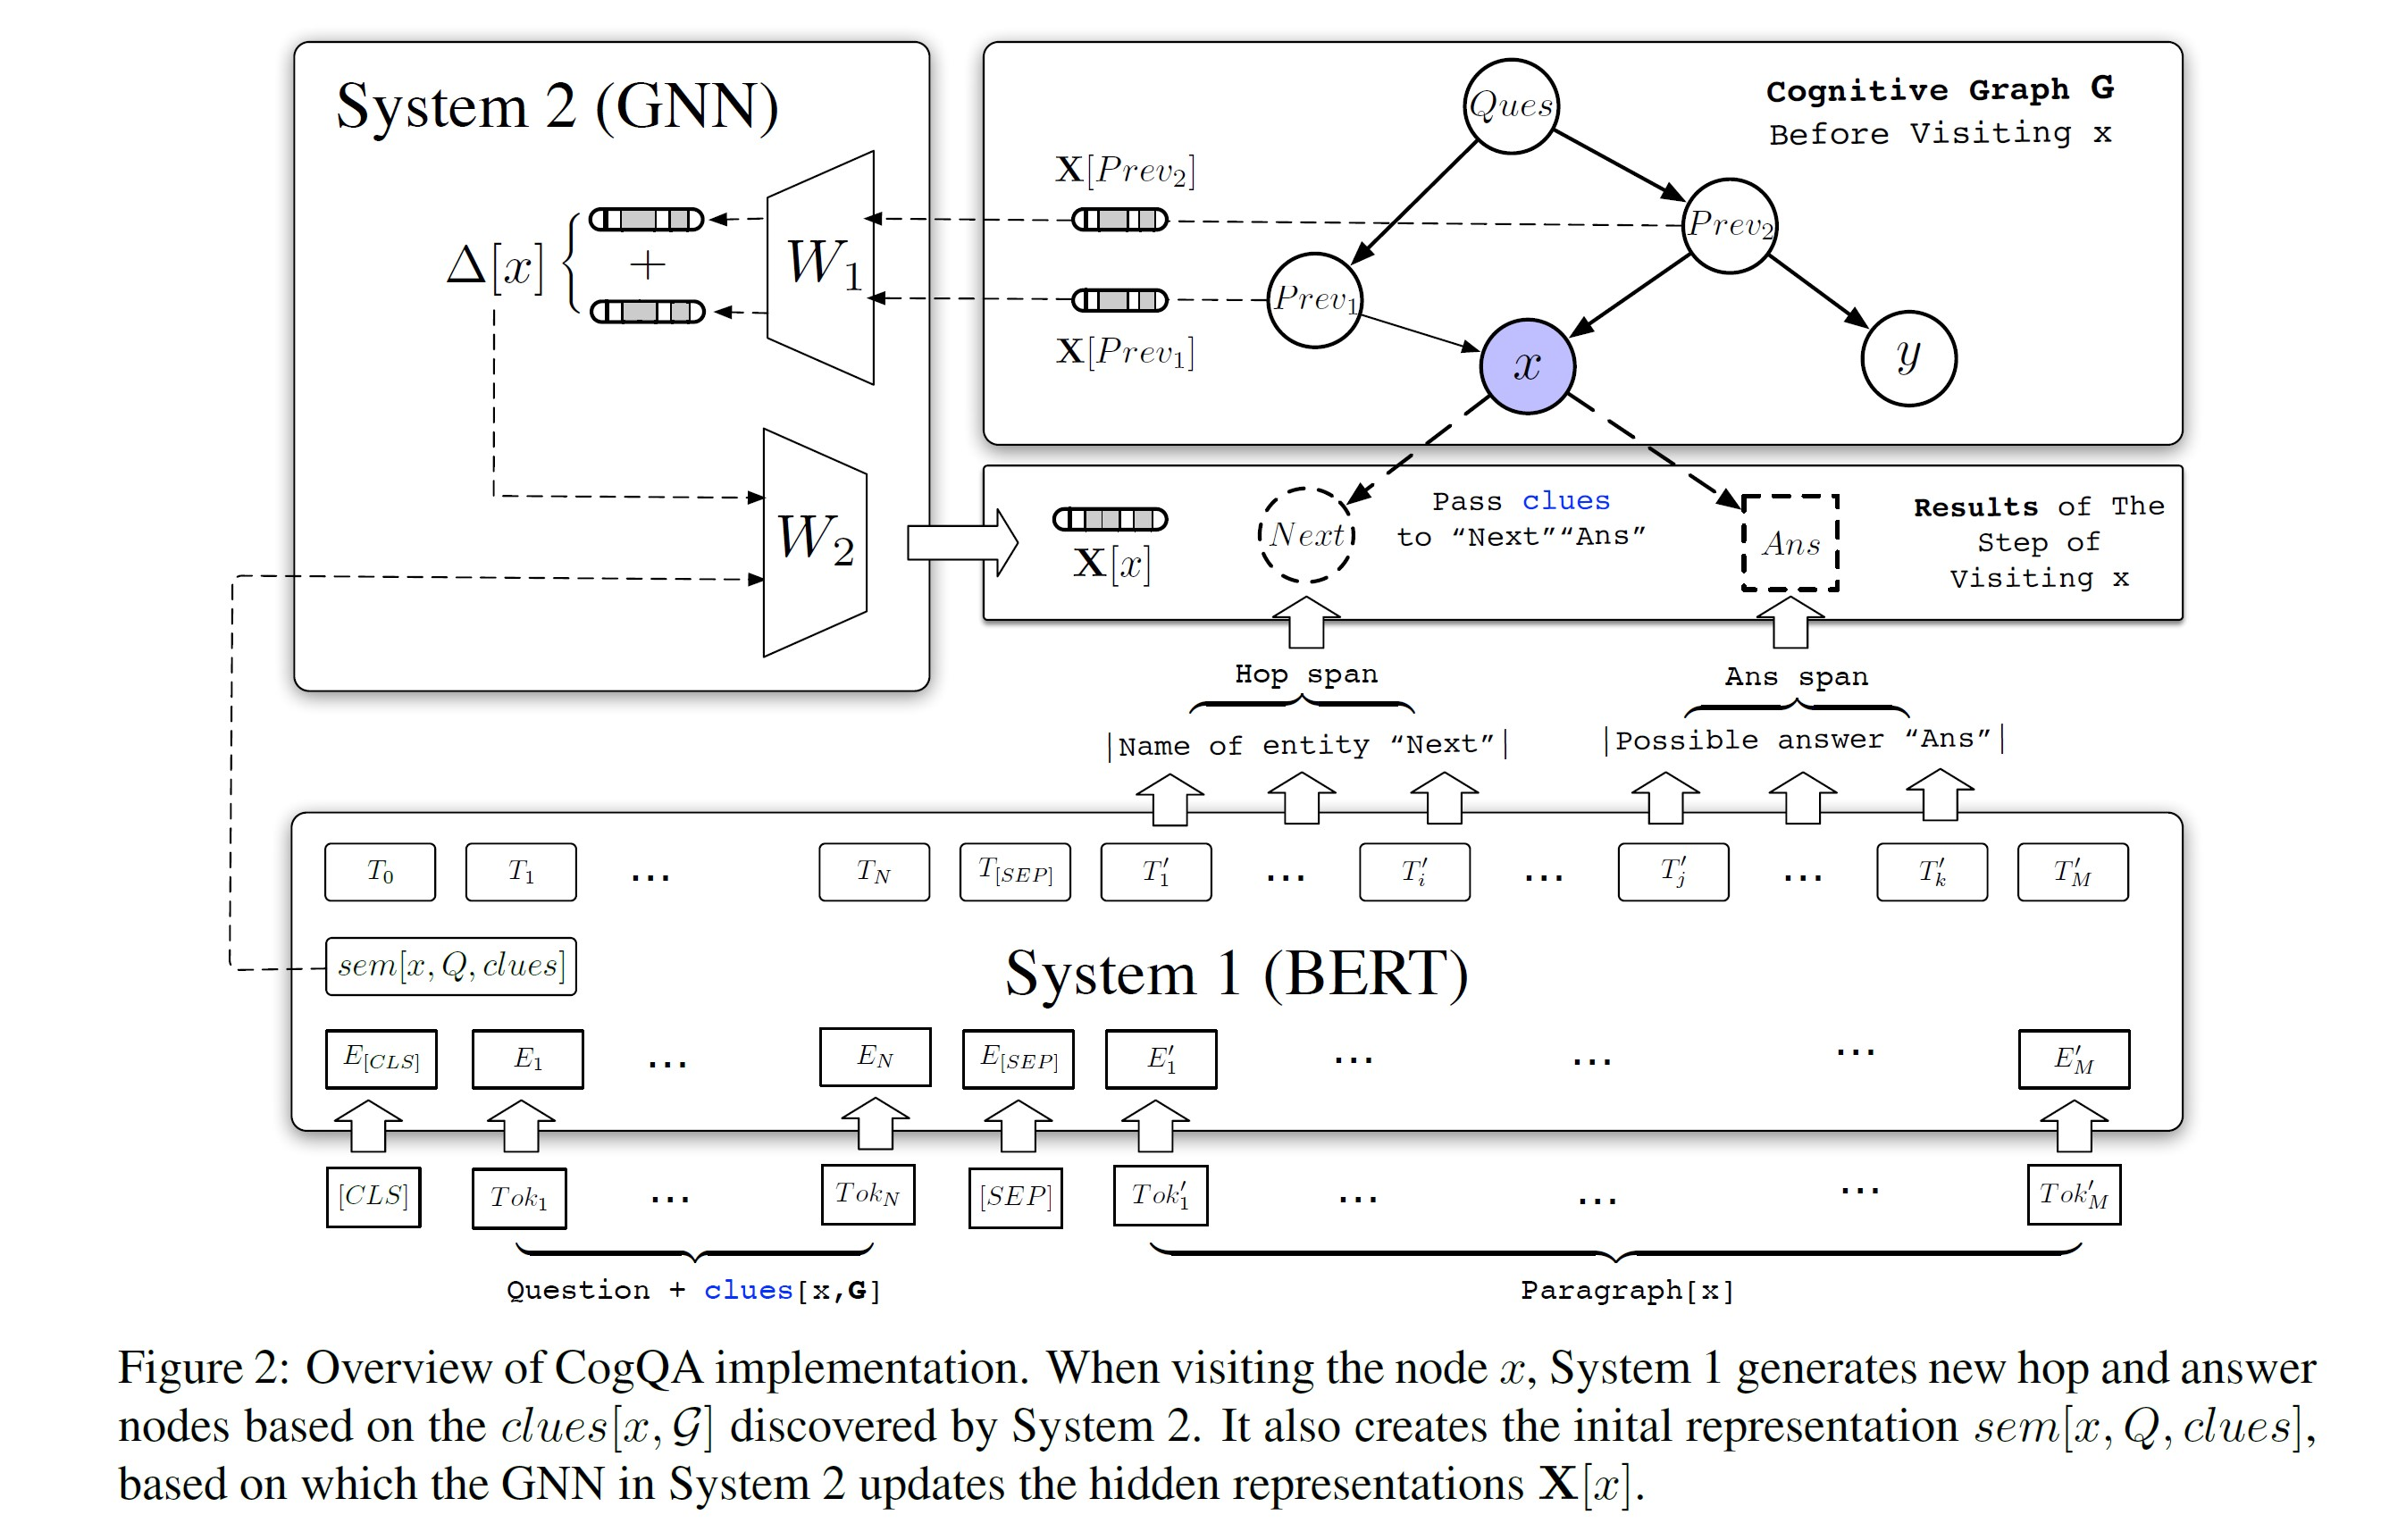
因此,本文提出一种新颖的迭代框架:算法使用两个系统来维护一张认知图谱(Cognitive Graph):
- 系统一在文本中抽取与问题相关的实体名称并扩展节点和汇总语义向量,
- 系统二利用图神经网络在认知图谱上进行推理计算。
正如之前提到的,人类的系统一是无知觉(unconscious),CogQA中的系统一也是流行的NLP黑盒模型,例如BERT。
在文章的实现中,系统一的输入分为三部分:
- 问题本身
- 从前面段落中找到的“线索(clues)”
- 关于某个实体x的维基百科文档
系统一的目标是抽取文档中的“下一跳实体名称(hop span)”和“答案候选(ans span)”。
这些抽取的到的实体和答案候选将作为节点添加到认知图谱中。此外,系统一还将计算当前实体 x 的语意向量,这将在系统二中用作关系推理的初始值。
模型架构图如下:
源码解析(主要是model.py文件)分为七大模块
1. 导入相应的库代码,主要是bert模块,有些库model.py没有用到,这块就不做相应解释了。(utils是文章作者写的模块)
 from pytorch_pretrained_bert.modeling import (

     BertPreTrainedModel as PreTrainedBertModel,

     BertModel,

     BertLayerNorm,

     gelu,

     BertEncoder,

     BertPooler,

 )

 import torch

 from torch import nn

 import re

 import pdb

 from pytorch_pretrained_bert.tokenization import (

     whitespace_tokenize,

     BasicTokenizer,

     BertTokenizer,

 )

 from utils import (

     fuzzy_find,

     find_start_end_after_tokenized,

     find_start_end_before_tokenized,

     bundle_part_to_batch,

 )
2. MLP模块
该模块较为简单,就是简单的多层感知机,如果大于两层,会加入相应的dropout 和 LayerNorm,并采用了bert所特有的gelu激活函数。
 class MLP(nn.Module):

     def __init__(self, input_sizes, dropout_prob=0.2, bias=False):

         super(MLP, self).__init__()

         self.layers = nn.ModuleList()

         for i in range(1, len(input_sizes)):

             self.layers.append(nn.Linear(input_sizes[i-1], input_sizes[i], bias=bias))

         self.norm_layers = nn.ModuleList()

         if len(input_sizes) > 2:

             for i in range(1, len(input_sizes) - 1):

                 self.norm_layers.append(nn.LayerNorm(input_sizes[i]))

         self.drop_out = nn.Dropout(p=dropout_prob)

     def forward(self, x):

         for i, layer in enumerate(self.layers):

             x = layer(self.drop_out(x))

             if i < len(self.layers) - 1:

                 x = gelu(x)

                 if len(self.norm_layers):

                     x = self.norm_layers[i](x)

         return x
3. GCN模块
这里采用最基础的GCN,没有使用任何GCN库,速度可能较慢,但是考虑到主要时间限制在bert模型,所以这里的时间效率下降可忽略。
 class GCN(nn.Module):

     def init_weights(self, module):

         if isinstance(module, (nn.Linear, nn.Embedding)):

             module.weight.data.normal_(mean=0.0, std=0.05)

     def __init__(self, input_size):

         super(GCN, self).__init__()

         self.diffusion = nn.Linear(input_size, input_size, bias=False)  # diffusion线性变换

         self.retained = nn.Linear(input_size, input_size, bias=False)   # retaine线性变换

         self.predict = MLP(input_sizes=(input_size, input_size, 1))

         self.apply(self.init_weights)   #  参数矩阵赋予初始化权重(正态分布)

     def forward(self, A, x):

         layer1_diffusion = A.t().mm(gelu(self.diffusion(x)))   # t() 转置

         # A为邻接矩阵(n, n) *  (n, input_size)   ==> (n, input_size)

         x = gelu(self.retained(x) + layer1_diffusion)   # (n, input_size)

         layer2_diffusion = A.t().mm(gelu(self.diffusion(x)))   # (n, input_size)

         x = gelu(self.retained(x) +layer2_diffusion)    # (n, input_size)

         return self.predict(x).sqeeze(-1)   # (n, )
4. bert embedding模块 (具体见注释)
 class BertEmbeddingsPlus(nn.Module):

     """ 构建word embeddings, position embeddings, token_type embeddings.

     """

     def __init__(self, config, max_sentence_type=30):

         super(BertEmbeddingsPlus, self).__init__()

         self.word_embeddings = nn.Embedding(config.vocab_size, config.hidden_size)

         self.position_embeddings = nn.Embedding(

             config.max_position_embeddings, config.hidden_size

         )   # shape (位置embedding的种类,隐层大小)

         self.token_type_embeddings = nn.Embedding(

             config.type_vocab_size, config.hidden_size

         )   # (2, hidden_size)  A/B segment

         self.sentence_type_embeddings = nn.Embedding(

             max_sentence_type, config.hidden_size

         )   # 句子类型embedding  (30, hidden_size)

         self.LayerNorm = BertLayerNorm(config.hidden_size, eps=1e-12)  # bert LN层

         self.dropout = nn.Dropout(config.hidden_dropout_prob)

     def forward(self, input_ids, token_type_ids=None):

         """

         :param input_ids: (n, seq_length)   n 就是 batch_size

         :param token_type_ids: (n, seq_length)

         :return:

         """

         seq_length = input_ids.size(1)  # 文本序列长度

         position_ids = torch.arange(seq_length, dtype=torch.long, device=input_ids.device)

         # [5] => [0,1,2,3,4]

         position_ids = position_ids.unsqueeze(0).expand_as(input_ids)

         # shape变化:(seq_length) => (1, seq_length)  => (n, seq_length)

         if token_type_ids is None:

             token_type_ids = torch.zeros_like(input_ids)

         word_embeddings = self.word_embeddings(input_ids)

         position_embeddings = self.position_embeddings(position_ids)

         token_type_embeddings = self.token_type_embeddings((token_type_ids > 0).long())

         #  token_type_embeddings, 分为 A/B,segment bert输入模式

         sentences_type_embeddings = self.sentence_type_embeddings(token_type_ids)

         #  这才是对token_type进行embedding

         embeddings = (word_embeddings + position_embeddings

                       + token_type_embeddings + sentences_type_embeddings)

         # 四个embedding相加,充分考虑各种信息

         embeddings = self.LayerNorm(embeddings)

         embeddings = self.dropout(embeddings)

         return embeddings
5 bert模型编码模块
输入input_ids,输出bert的最后的编码结果,和指定哪一层的编码结果(下层偏语法,上层偏语义)
 class BertModelPlus(BertModel):

     def __init__(self, config):

         super(BertModelPlus, self).__init__()

         self.embeddings = BertEmbeddingsPlus(config)

         self.encoder = BertEncoder(config)   # bert 编码器

         self.pooler = BertPooler(config)     # bert 池化器

         self.apply(self.init_bert_weights)   # BertModel 的初始权重参数

     def forward(self, input_ids, token_type_ids=None, attention_mask=None, output_hidden=-4):

         if attention_mask is None:

             attention_mask = torch.ones_like(input_ids)  # (n, seq_length), n is batch_size

         if token_type_ids is None:

             token_type_ids = torch.zeros_like(input_ids)

         extended_attention_mask = attention_mask.unsqueeze(1).unsqueeze(2)

         # (n, seq_length) => (n, 1, 1, seq_length)

         extended_attention_mask = extended_attention_mask.to(

             dtype=next(self.parameters()).dtype

         )   # fp16   转换数值类型

         extended_attention_mask = (1.0 - extended_attention_mask) * (-10000.0)

         # 将attention_mask为0的变为-10000, 1变为0, 方便softmax求注意力后,

         # mask为0(也就是padding)的值完全消除(=0)

         # 例如[1, 1, 1, 0, 0]  ==> (0, 0, 0, -10000, -10000)

         embedding_output = self.embeddings(input_ids, token_type_ids)

         encoded_layers = self.encoder(

             embedding_output, extended_attention_mask, output_all_encoded_layers=True)

         # sequence_output = encoded_layers[-1]

         # pooled_output = self.pooler(sequence_output)

         encoded_layers, hidden_layers = (

             encoded_layers[-1], encoded_layers[output_hidden]  # -4 倒数第四层

         )

         return encoded_layers, hidden_layers   # shape (batch_size, hidden_size), (batch_size, hidden_size)
6. 多跳阅读理解模块
也就是论文中提到的系统一,即“下一跳实体名称”和“答案候选”的抽取,是通过预测每个位置是否是span开始或者结束的概率来确定,与BERT原文中的做法相同;
其中几个值得注意的细节,比如之所以将“下一跳实体名称”和“答案候选”分开,是因为前者更多关注语意相关性而后者则需要匹配疑问词;
第0个位置的输出被用来产生一个阈值,判断段落内是否包含有意义的“下一跳实体名称”或者“答案候选”。
该模块就是常规的抽取式阅读理解,解码出span的代码部分较为复杂~
注:这里没有用到GCN,GCN是用来作为系统二进行推理的模块。
 class BertForMultiHopQuestionAnswering(PreTrainedBertModel):

     def __init__(self, config):

         super(BertForMultiHopQuestionAnswering, self).__init__()

         self.bert = BertModelPlus(config)

         self.qa_outputs = nn.Linear(config.hidden_size, 4)

         self.apply(self.init_bert_weights)   # PreTrainedBertModel 初始化权重

     def forward(self, input_ids,

                 token_type_ids=None,

                 attention_mask=None,

                 sep_positions=None,

                 hop_start_weights=None,

                 hop_end_weights=None,

                 ans_start_weights=None,

                 ans_end_weights=None,

                 B_starts=None,

                 allow_limit=(0, 0),

                 ):

         """

         从系统1抽取span  (分为两个系统,具体看原文)

         :param input_ids:  LongTensor

             (batch_size, max_len)

         :param token_type_ids:  LongTensor

             The A/B Segmentation in BERTs. (batch, maxlen)

         :param attention_mask:  LongTensor

             指示该位置是token还是padding      (batch_size, maxlen)

         :param sep_positions:    LongTensor

             [SEP]的具体位置 主要用来发现支持段落的句子  (batch_size, max_seps)

         :param hop_start_weights:  Tensor(默认为FloatTensor)

             hop开始位置的标注情况

         :param hop_end_weights:    Tensor

             hop结束位置的标注情况  (ground truth)

         :param ans_start_weights:   Tensor

             答案标注开始位置的可能性(概率)

         :param ans_end_weights:     Tensor

             答案标注结束位置的可能性(概率)

         :param B_starts:

             句子B的开始位置

         :param allow_limit:

             An Offset for negative threshold (负阈值的偏移量)

         :return:

         """

         batch_size = input_ids.size()[0]

         device = input_ids.get_device() if input_ids.is_cuda else torch.device('cpu')

         sequence_output, hidden_output = self.bert(input_ids, token_type_ids, attention_mask)

         # 上面两者的shape都为: (batch_size, max_len, hidden_size)

         semantics = hidden_output[:, 0]   # shape: (batch_size, hidden_size)

         if sep_positions is None:

             return semantics   # 仅仅语义信息

         else:

             max_sep = sep_positions.size()[-1]    # max_seps

         if max_sep == 0:

             empty = torch.zeros(batch_size, 0, dtype=torch.long, device=device)  # mistake

             return (

                 empty,

                 empty,

                 semantics,

                 empty,

             )  # Only semantics, used in eval, the same ``empty'' variable is a mistake in general cases but simple

         # 预测span

         logits = self.qa_outputs(sequence_output)

         hop_start_logits, hop_end_logits, ans_start_logits, ans_end_logits = logits.split(

             split_size=1, dim=-1   # 前面的1代表单个分块的形状大小

         )  # 每个的形状为 (batch_size, max_len, 1)

         hop_start_logits = hop_start_logits.squeeze(-1)

         hop_end_logits = hop_end_logits.squeeze(-1)

         ans_start_logits = ans_start_logits.squeeze(-1)

         ans_end_logits = ans_end_logits.squeeze(-1)  # Shape: [batch_size, max_len]

         if hop_start_weights is not None:   # train mode (因为提供了标签信息:hop_start_weights等)

             lgsf = nn.LogSoftmax(dim=1)

             # 如果句子中没有目标span,start_weights = end_weights = 0(tensor)

             # 以下四个求二元交叉熵loss

             hop_start_loss = -torch.sum(hop_start_weights * lgsf(hop_start_logits), dim=-1)

             hop_end_loss = -torch.sum(hop_end_weights * lgsf(hop_end_logits), dim=-1)

             ans_start_loss = -torch.sum(ans_start_weights * lgsf(ans_start_logits), dim=-1)

             ans_end_loss = -torch.sum(ans_end_weights * lgsf(ans_end_logits), dim=-1)

             hop_loss = torch.mean((hop_start_loss + hop_end_loss)) / 2

             ans_loss = torch.mean((ans_start_loss + ans_end_loss)) / 2

         else:

             K_hop, K_ans = 3, 1

             hop_preds = torch.zeros(batch_size, K_hop, 3, dtype=torch.long, device=device)

             # (batch_size, 3, 3)

             ans_preds = torch.zeros(batch_size, K_ans, 3, dtype=torch.long, device=device)

             # (batch_size, 1, 3)

             ans_start_gap = torch.zeros(batch_size, device=device)

             for u, (start_logits, end_logits, preds, K, allow) in enumerate(

                 (

                     (

                         hop_start_logits,  # (batch_size, max_len)

                         hop_end_logits,

                         hop_preds,   # (batch_size, 3, 3)

                         K_hop,       #

                         allow_limit[0],

                     ),

                     (

                         ans_start_logits,

                         ans_end_logits,

                         ans_preds,   # (batch_size, 1, 3)

                         K_ans,       #

                         allow_limit[1],

                     ),

                 )

             ):

                 for i in range(batch_size):

                     # 对于batch_size里的每个样本,即每个文本

                     if sep_positions[i, 0] > 0:

                         values, indices = start_logits[i, B_starts[i]:].topk(K)

                         # B是文档,QA所对应的paragraph

                         # 取出前K大的概率值以及对应的位置index

                         for k, index in enumerate(indices):  # 3个 或 1个(answer)

                             if values[k] <= start_logits[i, 0] - allow:  # not golden

                                 # 小tip: start_logits[i, 0] 代表一个置信度或叫阈值

                                 # 来判断段落内是否有有意义的“下一跳实体名称”或者“答案候选”。

                                 if u == 1:  # For ans spans

                                     ans_start_gap[i] = start_logits[i, 0] - values[k]

                                 break

                             start = index + B_starts[i]   # 输入文本中span所在的开始位置

                             # find ending   找到span的结束位置

                             for j, ending in enumerate(sep_positions[i]):

                                 if ending > start or ending <= 0:

                                     break  # 找到ending所对应的支撑句子sep位置

                             if ending <= start:

                                 break

                             ending = min(ending, start + 10)

                             end = torch.argmax(end_logits[i, start:ending]) + start

                             # 得到end span在文本中的结束位置

                             preds[i, k, 0] = start

                             preds[i, k, 1] = end

                             preds[i, k, 2] = j

         return ((hop_loss, ans_loss, semantics)

                 if hop_start_weights is not None

                 else (hop_preds, ans_preds, semantics, ans_start_gap))
7. 认知图网络模块
 class CognitiveGCN(nn.Module):

     """

     在认知图谱上进行推理计算,使用GCN实现隐式推理计算——每一步迭代,前续节点将变换过的信息传递到下一跳节点,

     并更新目前的隐层表示。 在认知图谱扩展过程中,如果某被访问节点出现新的父节点(环状结构或汇集状结构),

     表明此点获得新的线索信息(clues),需要重新扩展计算。最终算法流程借助前沿点(frontier nodes)队列形式实现。

     """

     def __init__(self, hidden_size):

         super(CognitiveGCN, self).__init__()

         self.gcn = GCN(hidden_size)

         self.both_net = MLP((hidden_size, hidden_size, 1))

         self.select_net = MLP((hidden_size, hidden_size, 1))

     def forward(self, bundle, model, device):

         batch = bundle_part_to_batch(bundle)

         batch = tuple(t.to(device) for t in batch)

         hop_loss, ans_loss, semantics = model(

             *batch

         )  # Shape of semantics: [num_para, hidden_size]

         num_additional_nodes = len(bundle.additional_nodes)

         if num_additional_nodes > 0:

             max_length_additional = max([len(x) for x in bundle.additional_nodes])

             # 取出最大长度——max_len

             ids = torch.zeros(

                 (num_additional_nodes, max_length_additional),

                 dtype=torch.long,

                 device=device,

             )

             segment_ids = torch.zeros(

                 (num_additional_nodes, max_length_additional),

                 dtype=torch.long,

                 device=device,

             )

             input_mask = torch.zeros(

                 (num_additional_nodes, max_length_additional),

                 dtype=torch.long,

                 device=device,

             )

             # 得到对应的ids, segment_ids, input_mask

             for i in range(num_additional_nodes):

                 length = len(bundle.additional_nodes[i])    # 对于邻接结点

                 ids[i, :length] = torch.tensor(

                     bundle.additional_nodes[i], dtype=torch.long

                 )

                 input_mask[i, :length] = 1    # mask为1 padding段相应变为0

             additional_semantics = model(ids, segment_ids, input_mask)

             semantics = torch.cat((semantics, additional_semantics), dim=0)  # 二者相拼接

         assert semantics.size()[0] == bundle.adj.size()[0]  # 等于邻接矩阵的结点数

         if bundle.question_type == 0:  # Wh-

             pred = self.gcn(bundle.adj.to(device), semantics)

             ce = torch.nn.CrossEntropyLoss()

             final_loss = ce(

                 pred.unsqueeze(0),

                 torch.tensor([bundle.answer_id], dtype=torch.long, device=device),

             )

         else:

             x, y, ans = bundle.answer_id

             ans = torch.tensor(ans, dtype=torch.float, device=device)

             diff_sem = semantics[x] - semantics[y]

             classifier = self.both_net if bundle.question_type == 1 else self.select_net

             final_loss = 0.2 * torch.nn.functional.binary_cross_entropy_with_logits(

                 classifier(diff_sem).squeeze(-1), ans.to(device)

             )

         return hop_loss, ans_loss, final_loss
具体详情待进一步补充。
Cognitive Graph for Multi-Hop Reading Comprehension at Scale(ACL2019) 阅读笔记与源码解析的更多相关文章
- 机器阅读理解综述Neural Machine Reading Comprehension Methods and Trends(略读笔记)
标题:Neural Machine Reading Comprehension: Methods and Trends 作者:Shanshan Liu, Xin Zhang, Sheng Zhang, ...
- Reading Face, Read Health论文阅读笔记
摘要: 随着计算技术觉.人工智能和移动技术的发展,利用计算机读脸技术去识别每个人每天的健康是可行的.怎么去设计一个基于FRT(face reading technologies)的用于得到每天的保健实 ...
- HDU4990 Reading comprehension —— 递推、矩阵快速幂
题目链接:https://vjudge.net/problem/HDU-4990 Reading comprehension Time Limit: 2000/1000 MS (Java/Others ...
- hdu-4990 Reading comprehension(快速幂+乘法逆元)
题目链接: Reading comprehension Time Limit: 2000/1000 MS (Java/Others) Memory Limit: 32768/32768 K ( ...
- 论文选读二:Multi-Passage Machine Reading Comprehension with Cross-Passage Answer Verification
论文选读二:Multi-Passage Machine Reading Comprehension with Cross-Passage Answer Verification 目前,阅读理解通常会给出 ...
- Attention-over-Attention Neural Networks for Reading Comprehension论文总结
Attention-over-Attention Neural Networks for Reading Comprehension 论文地址:https://arxiv.org/pdf/1607.0 ...
- Deep Learning of Graph Matching 阅读笔记
Deep Learning of Graph Matching 阅读笔记 CVPR2018的一篇文章,主要提出了一种利用深度神经网络实现端到端图匹配(Graph Matching)的方法. 该篇文章理 ...
- [图解tensorflow源码] [原创] Tensorflow 图解分析 (Session, Graph, Kernels, Devices)
TF Prepare [图解tensorflow源码] 入门准备工作 [图解tensorflow源码] TF系统概述篇 Session篇 [图解tensorflow源码] Session::Run() ...
- openfalcon源码分析之graph
openfalcon源码分析之graph 本节内容 graph功能 graph源码分析 2.1 graph中重要的数据结构 2.2 graph的简要流程图 2.3 graph处理数据过程 2.4 gr ...
随机推荐
- Python编程系列---装饰器执行的底层原理及流程
代码中No.1 No.2 ...表示执行流程 """No.1 No.2 ...表示执行流程""" def set_func(func): ...
- Jenkins指定tag发布到k8s环境
Jenkins指定tag发布到k8s环境 1.Jenkins配置一个Pipeline 工程 首先要安装插件:https://www.cnblogs.com/Dev0ps/p/9125232.html ...
- [NOIP2013提高组]华容道
这道题第一眼看是暴力,然后发现直接暴力会TLE. 把问题转换一下:移动空格到处跑,如果空格跑到指定位置的棋子,交换位置. 这个可以设计一个状态:$[x1][y1][x2][y2]$,表示空格在$(x1 ...
- 你必须知道的容器监控 (2) cAdvisor
本篇已加入<.NET Core on K8S学习实践系列文章索引>,可以点击查看更多容器化技术相关系列文章.上一篇我们了解了docker自带的监控子命令以及开源监控工具Weave Scop ...
- FreeSql 已支持 .NetFramework 4.0、ODBC 访问
FreeSql 开源发布快一年了,目前主仓库代码量 64118 行,用 git 命令统计的命令如下: find . "(" -name "*.cs" " ...
- Just 5分钟!使用k3s部署轻量Kubernetes集群快速教程
大小仅有40MB的k3s为想要节省开销进行开发和测试的企业提供了一个很好的选择.本文将用一种极为简洁的方式,教你在5分钟之内使用k3s部署轻量Kubernetes集群. Kubernetes已经改变了 ...
- vue-cli添加bootstrap
如何引入bootstrap npm install --save-dev bootstrap 在main.js中引入 import 'bootstrap/dist/css/bootstrap.min. ...
- 设计模式C++描述----13.代理(Proxy)模式
一. 举例说明 我们有时打开一个网站时会发现有这样的现象,网站上的文字都显示出来了,但是上面的图片还没显示,要等一会才能显示. 这些未打开的图片的位置上,还是会有图片框和一些等待的信息的,这就是代理模 ...
- maven项目部署到tomcat方法
今天记录下,maven项目部署到服务器的过程 1.首先在ide中里将自己的maven项目打包 mvn clean install 2. 看是否需要修改war包的名字,如果要修改,就用命令 mv xxx ...
- 大事祭——MiserWeyte
2019.9.10 QHDYZ组建信奥集训队祭(我哪知道这个鶸学校为啥这个时候组队) 2019.9.11 成为集训队毒瘤出题人祭 2019.9.21 博客界面优化祭(终于不是白底蓝框了)“那个拿剑的就 ...