java架构之路-(spring源码篇)springIOC容器源码解析(上)
我们这次来叭叭一下Spring的源码,这次博客主要来说说Spring源码,先粗略的撸一遍,下篇博客选几个重点去说,由于过于复杂,我也是看了一点点,我们先来过一遍源码,然后上流程图,最后我们再回头总结一下,我们来循序渐进的叭叭一下。
我们来回顾一下上次Spring博客的内容,每次都有用到AnnotationConfigApplicationContext来加载我们的配置类,我们就从这里开始。
- /**
- * Create a new AnnotationConfigApplicationContext, deriving bean definitions
- * from the given annotated classes and automatically refreshing the context. 创建新的注释configapplicationcontext,获得bean定义并自动刷新上下文。
- * @param annotatedClasses one or more annotated classes, 我们的配置类
- * e.g. {@link Configuration @Configuration} classes
- */
- public AnnotationConfigApplicationContext(Class<?>... annotatedClasses) {
- this();
- register(annotatedClasses);
- refresh();
- }
翻译过来就是“创建新的注释configapplicationcontext,获得bean定义并自动刷新上下文”。三个方法,我们先来一个个看,优先看父类有没有构造方法。AnnotationConfigApplicationContext继承了GenericApplicationContext类,所以我们先看GenericApplicationContext类的构造方法。代码很简单
父类构造方法
- /**
- * Create a new GenericApplicationContext.
- * @see #registerBeanDefinition
- * @see #refresh
- */
- public GenericApplicationContext() {
- this.beanFactory = new DefaultListableBeanFactory();
- }
这里创建了一个新的DefaultListableBeanFactory对象,也是我们熟悉的beanFactory对象,记住是DefaultListableBeanFactory对象。我们回到AnnotationConfigApplicationContext的this方法。
this
- /**
- * Create a new AnnotationConfigApplicationContext that needs to be populated
- * through {@link #register} calls and then manually {@linkplain #refresh refreshed}.
- */
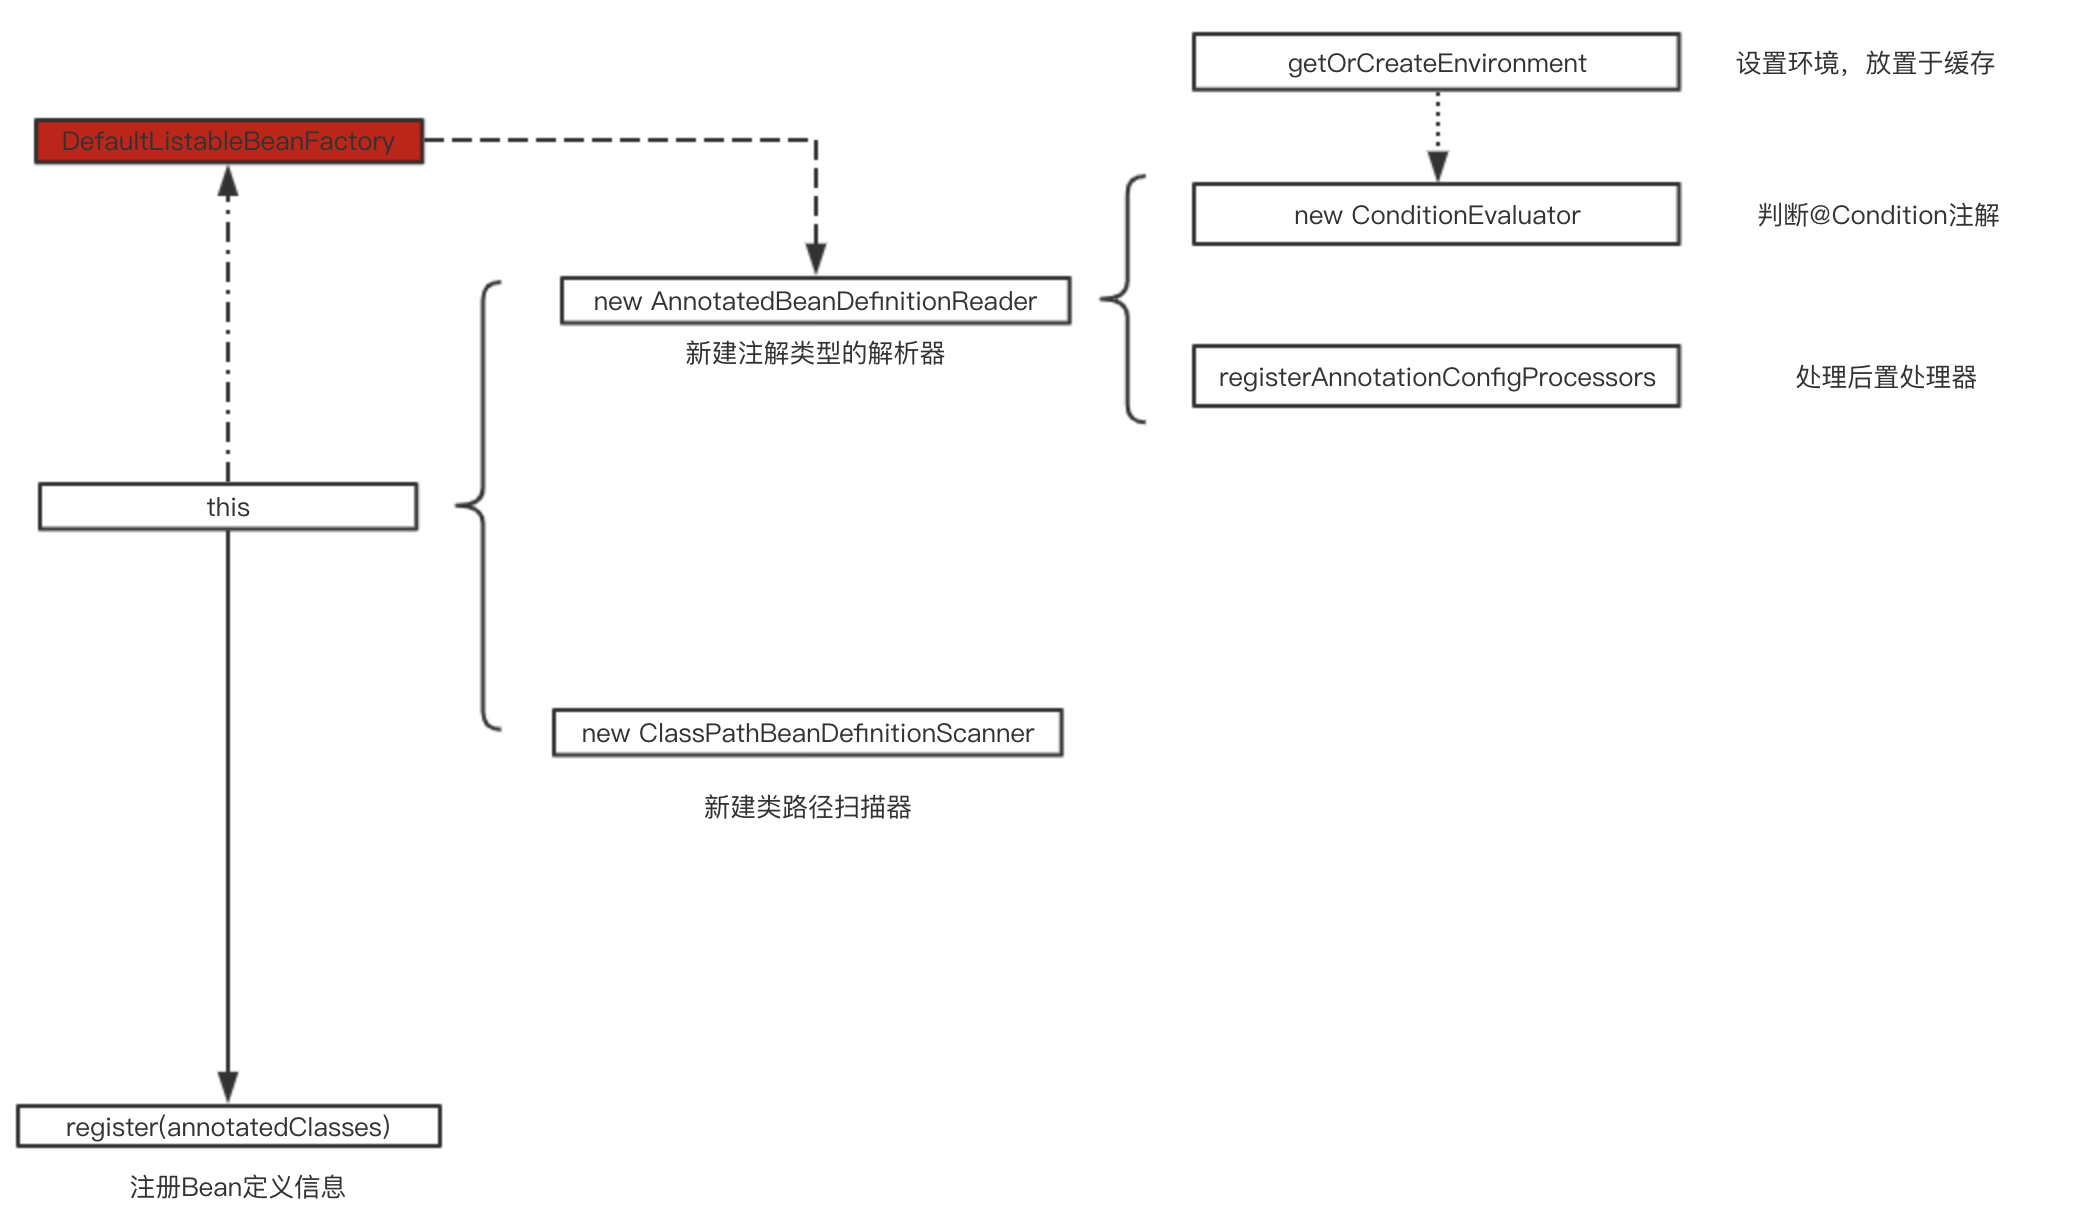
- public AnnotationConfigApplicationContext() {
- this.reader = new AnnotatedBeanDefinitionReader(this);//注解类型的解析器
- this.scanner = new ClassPathBeanDefinitionScanner(this);//包扫描器
- }
再往下扒一层。看一下那个AnnotatedBeanDefinitionReader注解类型的解析器是怎么创建的,里面都有什么。
- /**
- * Create a new {@code AnnotatedBeanDefinitionReader} for the given registry.
- * If the registry is {@link EnvironmentCapable}, e.g. is an {@code ApplicationContext},
- * the {@link Environment} will be inherited, otherwise a new
- * {@link StandardEnvironment} will be created and used.
- * @param registry the {@code BeanFactory} to load bean definitions into,
- * in the form of a {@code BeanDefinitionRegistry}
- * @see #AnnotatedBeanDefinitionReader(BeanDefinitionRegistry, Environment)
- * @see #setEnvironment(Environment)
- */
- public AnnotatedBeanDefinitionReader(BeanDefinitionRegistry registry) {
- this(registry, getOrCreateEnvironment(registry)); //优先设置了环境并存在缓存内
- }
设置了环境,将我们的beanFactory作为参数,做了this调用,
- /**
- * Create a new {@code AnnotatedBeanDefinitionReader} for the given registry and using
- * the given {@link Environment}. 用registry和Environment创建一个新的AnnnotatedBeanDefinitionReader
- * @param registry the {@code BeanFactory} to load bean definitions into,
- * in the form of a {@code BeanDefinitionRegistry}
- * @param environment the {@code Environment} to use when evaluating bean definition
- * profiles.
- * @since 3.1
- */
- public AnnotatedBeanDefinitionReader(BeanDefinitionRegistry registry, Environment environment) {
- Assert.notNull(registry, "BeanDefinitionRegistry must not be null");
- Assert.notNull(environment, "Environment must not be null");
- this.registry = registry;
- this.conditionEvaluator = new ConditionEvaluator(registry, environment, null);
- AnnotationConfigUtils.registerAnnotationConfigProcessors(this.registry);
- }
前三行不用看,第四行是用来解析我们@Conditional注解的。可以自己打开瞧瞧源代码。我们直接看第五行AnnotationConfigUtils.registerAnnotationConfigProcessors(this.registry); 也是很重要的代码,我们继续叭叭。
- /**
- * Register all relevant annotation post processors in the given registry.
- * @param registry the registry to operate on
- * @param source the configuration source element (already extracted)
- * that this registration was triggered from. May be {@code null}.
- * @return a Set of BeanDefinitionHolders, containing all bean definitions
- * that have actually been registered by this call
- */
- public static Set<BeanDefinitionHolder> registerAnnotationConfigProcessors(
- BeanDefinitionRegistry registry, @Nullable Object source) {
- DefaultListableBeanFactory beanFactory = unwrapDefaultListableBeanFactory(registry);
- if (beanFactory != null) {
- if (!(beanFactory.getDependencyComparator() instanceof AnnotationAwareOrderComparator)) {
- beanFactory.setDependencyComparator(AnnotationAwareOrderComparator.INSTANCE);
- }
- if (!(beanFactory.getAutowireCandidateResolver() instanceof ContextAnnotationAutowireCandidateResolver)) {
- beanFactory.setAutowireCandidateResolver(new ContextAnnotationAutowireCandidateResolver());
- }
- }
- Set<BeanDefinitionHolder> beanDefs = new LinkedHashSet<>(8);
- if (!registry.containsBeanDefinition(CONFIGURATION_ANNOTATION_PROCESSOR_BEAN_NAME)) {
- RootBeanDefinition def = new RootBeanDefinition(ConfigurationClassPostProcessor.class);
- def.setSource(source);
- beanDefs.add(registerPostProcessor(registry, def, CONFIGURATION_ANNOTATION_PROCESSOR_BEAN_NAME));
- }
- if (!registry.containsBeanDefinition(AUTOWIRED_ANNOTATION_PROCESSOR_BEAN_NAME)) {
- RootBeanDefinition def = new RootBeanDefinition(AutowiredAnnotationBeanPostProcessor.class);
- def.setSource(source);
- beanDefs.add(registerPostProcessor(registry, def, AUTOWIRED_ANNOTATION_PROCESSOR_BEAN_NAME));
- }
- // Check for JSR-250 support, and if present add the CommonAnnotationBeanPostProcessor.
- if (jsr250Present && !registry.containsBeanDefinition(COMMON_ANNOTATION_PROCESSOR_BEAN_NAME)) {
- RootBeanDefinition def = new RootBeanDefinition(CommonAnnotationBeanPostProcessor.class);
- def.setSource(source);
- beanDefs.add(registerPostProcessor(registry, def, COMMON_ANNOTATION_PROCESSOR_BEAN_NAME));
- }
- // Check for JPA support, and if present add the PersistenceAnnotationBeanPostProcessor.
- if (jpaPresent && !registry.containsBeanDefinition(PERSISTENCE_ANNOTATION_PROCESSOR_BEAN_NAME)) {
- RootBeanDefinition def = new RootBeanDefinition();
- try {
- def.setBeanClass(ClassUtils.forName(PERSISTENCE_ANNOTATION_PROCESSOR_CLASS_NAME,
- AnnotationConfigUtils.class.getClassLoader()));
- }
- catch (ClassNotFoundException ex) {
- throw new IllegalStateException(
- "Cannot load optional framework class: " + PERSISTENCE_ANNOTATION_PROCESSOR_CLASS_NAME, ex);
- }
- def.setSource(source);
- beanDefs.add(registerPostProcessor(registry, def, PERSISTENCE_ANNOTATION_PROCESSOR_BEAN_NAME));
- }
- if (!registry.containsBeanDefinition(EVENT_LISTENER_PROCESSOR_BEAN_NAME)) {
- RootBeanDefinition def = new RootBeanDefinition(EventListenerMethodProcessor.class);
- def.setSource(source);
- beanDefs.add(registerPostProcessor(registry, def, EVENT_LISTENER_PROCESSOR_BEAN_NAME));
- }
- if (!registry.containsBeanDefinition(EVENT_LISTENER_FACTORY_BEAN_NAME)) {
- RootBeanDefinition def = new RootBeanDefinition(DefaultEventListenerFactory.class);
- def.setSource(source);
- beanDefs.add(registerPostProcessor(registry, def, EVENT_LISTENER_FACTORY_BEAN_NAME));
- }
- return beanDefs;
- }
原文的注释为在给定的注册器中处理所有有意义的后置处理器,基本就是是否包含***,如果包含就set进去。这段代码是用来初始化内部的组件的。走到这里就已经初始化的Bean定义。也就是说我们的容器已经注入了定义信息,还未实例化。
this方法的上半部分就说完了,我们再来看下半部分的new ClassPathBeanDefinitionScanner,创建一个类路径扫描器,这个代码不多,就是判断我们是否使用默认的类路径扫描器。
- /**
- * Create a new {@code ClassPathBeanDefinitionScanner} for the given bean factory and
- * using the given {@link Environment} when evaluating bean definition profile metadata.
- * @param registry the {@code BeanFactory} to load bean definitions into, in the form
- * of a {@code BeanDefinitionRegistry}
- * @param useDefaultFilters whether to include the default filters for the
- * {@link org.springframework.stereotype.Component @Component},
- * {@link org.springframework.stereotype.Repository @Repository},
- * {@link org.springframework.stereotype.Service @Service}, and
- * {@link org.springframework.stereotype.Controller @Controller} stereotype annotations
- * @param environment the Spring {@link Environment} to use when evaluating bean
- * definition profile metadata
- * @param resourceLoader the {@link ResourceLoader} to use
- * @since 4.3.6
- */
- public ClassPathBeanDefinitionScanner(BeanDefinitionRegistry registry, boolean useDefaultFilters,
- Environment environment, @Nullable ResourceLoader resourceLoader) {
- Assert.notNull(registry, "BeanDefinitionRegistry must not be null");
- this.registry = registry;
- if (useDefaultFilters) {
- registerDefaultFilters();
- }
- setEnvironment(environment);
- setResourceLoader(resourceLoader);
- }
我们来直接看一下第23行代码,是否注册一个默认的过滤器(扫描策略)。25行设置环境,26行设置资源加载器。
到这里就已经制定好了我们的扫描策略了。
有点乱啊梳理一下。

register(annotatedClasses)
this部分就说你完了,再来看看register(annotatedClasses);字面意思来看是带着我们的配置文件注册,我们来看一下代码。
- /**
- * Register one or more annotated classes to be processed.
- * <p>Note that {@link #refresh()} must be called in order for the context
- * to fully process the new classes.
- * @param annotatedClasses one or more annotated classes,
- * e.g. {@link Configuration @Configuration} classes
- * @see #scan(String...)
- * @see #refresh()
- */
- public void register(Class<?>... annotatedClasses) {
- Assert.notEmpty(annotatedClasses, "At least one annotated class must be specified");
- this.reader.register(annotatedClasses);
- }
用我们上一步的reader解析器去注册,里面是一个循环方法。最终调用doRegisterBean来真正的注册。这一步我们先来简单的叫做注册吧。
直到这里其实我们容器还是没有创建的,这些都是一些前期的准备工作。最后也是最关键的一步才是我们的容器的实例化。refresh()方法。内容超多。
- @Override
- public void refresh() throws BeansException, IllegalStateException {
- synchronized (this.startupShutdownMonitor) {
- // Prepare this context for refreshing.
- prepareRefresh();
- // Tell the subclass to refresh the internal bean factory.
- ConfigurableListableBeanFactory beanFactory = obtainFreshBeanFactory();
- // Prepare the bean factory for use in this context.
- prepareBeanFactory(beanFactory);
- try {
- // Allows post-processing of the bean factory in context subclasses.
- postProcessBeanFactory(beanFactory);
- // Invoke factory processors registered as beans in the context.
- invokeBeanFactoryPostProcessors(beanFactory);
- // Register bean processors that intercept bean creation.
- registerBeanPostProcessors(beanFactory);
- // Initialize message source for this context.
- initMessageSource();
- // Initialize event multicaster for this context.
- initApplicationEventMulticaster();
- // Initialize other special beans in specific context subclasses.
- onRefresh();
- // Check for listener beans and register them.
- registerListeners();
- // Instantiate all remaining (non-lazy-init) singletons.
- finishBeanFactoryInitialization(beanFactory);
- // Last step: publish corresponding event.
- finishRefresh();
- }
- catch (BeansException ex) {
- if (logger.isWarnEnabled()) {
- logger.warn("Exception encountered during context initialization - " +
- "cancelling refresh attempt: " + ex);
- }
- // Destroy already created singletons to avoid dangling resources.
- destroyBeans();
- // Reset 'active' flag.
- cancelRefresh(ex);
- // Propagate exception to caller.
- throw ex;
- }
- finally {
- // Reset common introspection caches in Spring's core, since we
- // might not ever need metadata for singleton beans anymore...
- resetCommonCaches();
- }
- }
- }
我们来逐个方法看一下都是做什么的。
prepareRefresh()创建早期程序监听器。
ConfigurableListableBeanFactory beanFactory = obtainFreshBeanFactory()通知子类刷新Bean工厂
prepareBeanFactory(beanFactory)配置工厂上下文。
postProcessBeanFactory(beanFactory)处理Bean工厂的后置处理
invokeBeanFactoryPostProcessors实例化并调用所有注册的Bean工厂的后置处理器
registerBeanPostProcessors(beanFactory)注册Bean工厂的后置处理器
initMessageSource()初始化消息源
initApplicationEventMulticaster()初始化事件多播器
onRefresh()初始化特殊定义的Bean
registerListeners()注册事件监听器
finishBeanFactoryInitialization(beanFactory)实例化剩余非懒加载Bean
finishRefresh()事件发布
resetCommonCaches()刷新缓存
就这样我们的Bean工厂就创建完成了。看着如此简单吧。后面我们来详细看一下。内部还有超多的东西。Spring源码不建议太过于深入的学习,容易陷进去....


最近搞了一个个人公众号,会每天更新一篇原创博文,java,python,自然语言处理相关的知识有兴趣的小伙伴可以关注一下。

java架构之路-(spring源码篇)springIOC容器源码解析(上)的更多相关文章
- [转帖]java架构之路-(面试篇)JVM虚拟机面试大全
java架构之路-(面试篇)JVM虚拟机面试大全 https://www.cnblogs.com/cxiaocai/p/11634918.html 下文连接比较多啊,都是我过整理的博客,很多答案都 ...
- Java基础-SSM之Spring MVC入门篇
Java基础-SSM之Spring MVC入门篇 作者:尹正杰 版权声明:原创作品,谢绝转载!否则将追究法律责任. 一.Spring MVC简介 1>.什么是Spring MVC 答:Sprin ...
- Java基础-SSM之Spring快速入门篇
Java基础-SSM之Spring快速入门篇 作者:尹正杰 版权声明:原创作品,谢绝转载!否则将追究法律责任. Spring是一个开源框架,Spring是于2003 年兴起的一个轻量级的Java ...
- java架构之路-(SpringMVC篇)SpringMVC主要流程源码解析(上)源码执行流程
做过web项目的小伙伴,对于SpringMVC,Struts2都是在熟悉不过了,再就是我们比较古老的servlet,我们先来复习一下我们的servlet生命周期. servlet生命周期 1)初始化阶 ...
- java架构之路-(spring源码篇)由浅入深-spring实战详细使用
今天我更新了一篇jvm垃圾回收的算法和垃圾回收器的内部逻辑,但是看的人不多啊......貌似大家还是比较喜欢看源码吧,毕竟实战要比理论用的多. 这篇文章不会详细的深入底层源码,只是基于注解和配置来说说 ...
- java架构之路-(源码)mybatis基本使用
我们今天先来简单了解一下我们持久层框架,mybatis的使用.而且现在的注解成为趋势,我主要说一下注解方向的使用吧(配置文件也会说) 从使用角度只要是三个部分,mybatis-config.xml,m ...
- java架构之路-(源码)mybatis的一二级缓存问题
上次博客我们说了mybatis的基本使用,我们还捎带提到一下Mapper.xml中的select标签的useCache属性,这个就是设置是否存入二级缓存的. 回到我们正题,经常使用mybatis的小伙 ...
- java架构之路-(源码)mybatis执行流程源码解析
这次我们来说说Mybatis的源码,这里只说执行的流程,内部细节太多了,这里只能授之以渔了.还是最近的那段代码,我们来回顾一下. package mybatis; import mybatis.bea ...
- java架构之路(多线程)AQS之ReetrantLock显示锁的使用和底层源码解读
说完了我们的synchronized,这次我们来说说我们的显示锁ReetrantLock. 上期回顾: 上次博客我们主要说了锁的分类,synchronized的使用,和synchronized隐式锁的 ...
随机推荐
- NLP(一)语料库和WordNet
访问语料库 NLTK数据库的安装:http://www.nltk.org/data.html NLTK语料库列表:http://www.nltk.org/nltk_data/ 内部访问(以Reuter ...
- React 路由&脚手架
1.创建react项目 npm install -g create-react-app 全局环境 create-react-app my-app 创建项目 cd my-app 进入项目 npm sta ...
- ZOJ4027 Sequence Swapping DP
link:http://acm.zju.edu.cn/onlinejudge/showProblem.do?problemCode=4027 题意: 有一个括号序列,每个括号对应一个值,现在可以使得相 ...
- P1726 上白泽慧音 tarjan 模板
P1726 上白泽慧音 这是一道用tarjan做的模板,要求找到有向图中最大的联通块. #include <algorithm> #include <iterator> #in ...
- HDU - 2824 The Euler function 欧拉函数筛 模板
HDU - 2824 题意: 求[a,b]间的欧拉函数和.这道题卡内存,只能开一个数组. 思路: ϕ(n) = n * (p-1)/p * ... 可利用线性筛法求出所有ϕ(n) . #include ...
- HDU- 6437.Videos 最“大”费用流 -化区间为点
参考和完全学习:http://www.cnblogs.com/xcantaloupe/p/9519617.html HDU-6437 题意: 有m场电影,电影分为两种,看一场电影可以得到对应的快乐值. ...
- Educational Codeforces Round 44#985DSand Fortress+二分
传送门:送你去985D: 题意: 你有n袋沙包,在第一个沙包高度不超过H的条件下,满足相邻两个沙包高度差小于等于1的条件下(注意最小一定可以为0),求最少的沙包堆数: 思路: 画成图来说,有两种可能, ...
- atcoder C - Snuke and Spells(模拟+思维)
题目链接:http://agc017.contest.atcoder.jp/tasks/agc017_c 题解:就是简单的模拟一下就行.看一下代码就能理解 #include <iostream& ...
- Codeforces 416D Population Size
Population Size 题意: 一共n个数, 每个-1都可以变成一个正数, 现在要求最少数目的等差子序列,并且在这个子序列必须要连着截取一段,不能分开截取. 样例1: 8 6 4 2 1 4 ...
- 字符编码与gcc 编译器的编码问题
最近在 vscode 中借助 gcc 编译器来配置 c 语言开发环境时,发现中文编码存在乱码问题.再加上最近学习到多字节字符与宽字符,搅在一起,搞得很乱,就把自己的理解写下来,供有需者参考吧. 1. ...