机器学习之决策树二-C4.5原理与代码实现
决策树之系列二—C4.5原理与代码实现
本文系作者原创,转载请注明出处:https://www.cnblogs.com/further-further-further/p/9435712.html
ID3算法缺点
它一般会优先选择有较多属性值的Feature,因为属性值多的特征会有相对较大的信息增益,信息增益反映的是,在给定一个条件以后,不确定性减少的程度,
这必然是分得越细的数据集确定性更高,也就是条件熵越小,信息增益越大。为了解决这个问题,C4.5就应运而生,它采用信息增益率来作为选择分支的准则。
C4.5算法原理
信息增益率定义为:
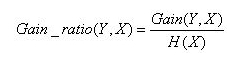
其中,分子为信息增益(信息增益计算可参考上一节ID3的算法原理),分母为属性X的熵。
需要注意的是,增益率准则对可取值数目较少的属性有所偏好。
所以一般这样选取划分属性:选择增益率最高的特征列作为划分属性的依据。
代码实现
与ID3代码实现不同的是:只改变计算香农熵的函数calcShannonEnt,以及选择最优特征索引函数chooseBestFeatureToSplit,具体代码如下:
 # -*- coding: utf-8 -*-

 """

 Created on Thu Aug  2 17:09:34 2018

 决策树ID3,C4.5的实现

 @author: weixw

 """

 from math import log

 import operator

 #原始数据

 def createDataSet():

     dataSet = [[1, 1, 'yes'],

                [1, 1, 'yes'],

                [1, 0, 'no'],

                [0, 1, 'no'],

                [0, 1, 'no']]

     labels = ['no surfacing','flippers']

     return dataSet, labels

 #多数表决器

 #列中相同值数量最多为结果

 def majorityCnt(classList):

     classCounts = {}

     for value in classList:

         if(value not in classCounts.keys()):

             classCounts[value] = 0

         classCounts[value] +=1

     sortedClassCount = sorted(classCounts.iteritems(),key = operator.itemgetter(1),reverse =True)

     return sortedClassCount[0][0]

 #划分数据集

 #dataSet:原始数据集

 #axis:进行分割的指定列索引

 #value:指定列中的值

 def splitDataSet(dataSet,axis,value):

     retDataSet= []

     for featDataVal in dataSet:

         if featDataVal[axis] == value:

             #下面两行去除某一项指定列的值,很巧妙有没有

             reducedFeatVal = featDataVal[:axis]

             reducedFeatVal.extend(featDataVal[axis+1:])

             retDataSet.append(reducedFeatVal)

     return retDataSet

 #计算香农熵

 #columnIndex = -1表示获取数据集每一项的最后一列的标签值

 #其他表示获取特征列

 def calcShannonEnt(columnIndex, dataSet):

     #数据集总项数

     numEntries = len(dataSet)

     #标签计数对象初始化

     labelCounts = {}

     for featDataVal in dataSet:

         #获取数据集每一项的最后一列的标签值

         currentLabel = featDataVal[columnIndex]

         #如果当前标签不在标签存储对象里,则初始化,然后计数

         if currentLabel not in labelCounts.keys():

             labelCounts[currentLabel] = 0

         labelCounts[currentLabel] += 1

     #熵初始化

     shannonEnt = 0.0

     #遍历标签对象,求概率,计算熵

     for key in labelCounts.keys():

         prop = labelCounts[key]/float(numEntries)

         shannonEnt -= prop*log(prop,2)

     return shannonEnt

 #通过信息增益,选出最优特征列索引(ID3)

 def chooseBestFeatureToSplit(dataSet):

     #计算特征个数,dataSet最后一列是标签属性,不是特征量

     numFeatures = len(dataSet[0])-1

     #计算初始数据香农熵

     baseEntropy = calcShannonEnt(-1, dataSet)

     #初始化信息增益,最优划分特征列索引

     bestInfoGain = 0.0

     bestFeatureIndex = -1

     for i in range(numFeatures):

         #获取每一列数据

         featList = [example[i] for example in dataSet]

         #将每一列数据去重

         uniqueVals = set(featList)

         newEntropy = 0.0

         for value in uniqueVals:

             subDataSet = splitDataSet(dataSet,i,value)

             #计算条件概率

             prob = len(subDataSet)/float(len(dataSet))

             #计算条件熵

             newEntropy +=prob*calcShannonEnt(-1, subDataSet)

         #计算信息增益

         infoGain = baseEntropy - newEntropy

         if(infoGain > bestInfoGain):

             bestInfoGain = infoGain

             bestFeatureIndex = i

     return bestFeatureIndex

 #通过信息增益率,选出最优特征列索引(C4.5)

 def chooseBestFeatureToSplitOfFurther(dataSet):

     #计算特征个数,dataSet最后一列是标签属性,不是特征量

     numFeatures = len(dataSet[0])-1

     #计算初始数据香农熵H(Y)

     baseEntropy = calcShannonEnt(-1, dataSet)

     #初始化信息增益,最优划分特征列索引

     bestInfoGainRatio = 0.0

     bestFeatureIndex = -1

     for i in range(numFeatures):

         #获取每一特征列香农熵H(X)

         featEntropy = calcShannonEnt(i, dataSet)

         #获取每一列数据

         featList = [example[i] for example in dataSet]

         #将每一列数据去重

         uniqueVals = set(featList)

         newEntropy = 0.0

         for value in uniqueVals:

             subDataSet = splitDataSet(dataSet,i,value)

             #计算条件概率

             prob = len(subDataSet)/float(len(dataSet))

             #计算条件熵

             newEntropy +=prob*calcShannonEnt(-1, subDataSet)

         #计算信息增益

         infoGain = baseEntropy - newEntropy

         #计算信息增益率

         infoGainRatio = infoGain/float(featEntropy)

         if(infoGainRatio > bestInfoGainRatio):

             bestInfoGainRatio = infoGainRatio

             bestFeatureIndex = i

     return bestFeatureIndex

 #决策树创建

 def createTree(dataSet,labels):

     #获取标签属性,dataSet最后一列,区别于labels标签名称

     classList = [example[-1] for example in dataSet]

     #树极端终止条件判断

     #标签属性值全部相同,返回标签属性第一项值

     if classList.count(classList[0]) == len(classList):

         return classList[0]

     #没有特征,只有标签列(1列)

     if len(dataSet[0]) == 1:

         #返回实例数最大的类

         return majorityCnt(classList)

 #    #获取最优特征列索引ID3

 #    bestFeatureIndex = chooseBestFeatureToSplit(dataSet)

     #获取最优特征列索引C4.5

     bestFeatureIndex = chooseBestFeatureToSplitOfFurther(dataSet)

     #获取最优索引对应的标签名称

     bestFeatureLabel = labels[bestFeatureIndex]

     #创建根节点

     myTree = {bestFeatureLabel:{}}

     #去除最优索引对应的标签名,使labels标签能正确遍历

     del(labels[bestFeatureIndex])

     #获取最优列

     bestFeature = [example[bestFeatureIndex] for example in dataSet]

     uniquesVals = set(bestFeature)

     for value in uniquesVals:

         #子标签名称集合

         subLabels = labels[:]

         #递归

         myTree[bestFeatureLabel][value] = createTree(splitDataSet(dataSet,bestFeatureIndex,value),subLabels)

     return myTree

 #获取分类结果

 #inputTree:决策树字典

 #featLabels:标签列表

 #testVec:测试向量  例如:简单实例下某一路径 [1,1]  => yes(树干值组合,从根结点到叶子节点)

 def classify(inputTree,featLabels,testVec):

     #获取根结点名称,将dict转化为list

     firstSide = list(inputTree.keys())

     #根结点名称String类型

     firstStr = firstSide[0]

     #获取根结点对应的子节点

     secondDict = inputTree[firstStr]

     #获取根结点名称在标签列表中对应的索引

     featIndex = featLabels.index(firstStr)

     #由索引获取向量表中的对应值

     key = testVec[featIndex]

     #获取树干向量后的对象

     valueOfFeat = secondDict[key]

     #判断是子结点还是叶子节点:子结点就回调分类函数,叶子结点就是分类结果

     #if type(valueOfFeat).__name__=='dict': 等价 if isinstance(valueOfFeat, dict):

     if isinstance(valueOfFeat, dict):

         classLabel = classify(valueOfFeat,featLabels,testVec)

     else:

         classLabel = valueOfFeat

     return classLabel

 #将决策树分类器存储在磁盘中,filename一般保存为txt格式

 def storeTree(inputTree,filename):

     import pickle

     fw = open(filename,'wb+')

     pickle.dump(inputTree,fw)

     fw.close()

 #将瓷盘中的对象加载出来,这里的filename就是上面函数中的txt文件

 def grabTree(filename):

     import pickle

     fr = open(filename,'rb')

     return pickle.load(fr)
决策树算法
 '''

 Created on Oct 14, 2010

 @author: Peter Harrington

 '''

 import matplotlib.pyplot as plt

 decisionNode = dict(boxstyle="sawtooth", fc="0.8")

 leafNode = dict(boxstyle="round4", fc="0.8")

 arrow_args = dict(arrowstyle="<-")

 #获取树的叶子节点

 def getNumLeafs(myTree):

     numLeafs = 0

     #dict转化为list

     firstSides = list(myTree.keys())

     firstStr = firstSides[0]

     secondDict = myTree[firstStr]

     for key in secondDict.keys():

         #判断是否是叶子节点(通过类型判断,子类不存在,则类型为str;子类存在,则为dict)

         if type(secondDict[key]).__name__=='dict':#test to see if the nodes are dictonaires, if not they are leaf nodes

             numLeafs += getNumLeafs(secondDict[key])

         else:   numLeafs +=1

     return numLeafs

 #获取树的层数

 def getTreeDepth(myTree):

     maxDepth = 0

     #dict转化为list

     firstSides = list(myTree.keys())

     firstStr = firstSides[0]

     secondDict = myTree[firstStr]

     for key in secondDict.keys():

         if type(secondDict[key]).__name__=='dict':#test to see if the nodes are dictonaires, if not they are leaf nodes

             thisDepth = 1 + getTreeDepth(secondDict[key])

         else:   thisDepth = 1

         if thisDepth > maxDepth: maxDepth = thisDepth

     return maxDepth

 def plotNode(nodeTxt, centerPt, parentPt, nodeType):

     createPlot.ax1.annotate(nodeTxt, xy=parentPt,  xycoords='axes fraction',

              xytext=centerPt, textcoords='axes fraction',

              va="center", ha="center", bbox=nodeType, arrowprops=arrow_args )

 def plotMidText(cntrPt, parentPt, txtString):

     xMid = (parentPt[0]-cntrPt[0])/2.0 + cntrPt[0]

     yMid = (parentPt[1]-cntrPt[1])/2.0 + cntrPt[1]

     createPlot.ax1.text(xMid, yMid, txtString, va="center", ha="center", rotation=30)

 def plotTree(myTree, parentPt, nodeTxt):#if the first key tells you what feat was split on

     numLeafs = getNumLeafs(myTree)  #this determines the x width of this tree

     depth = getTreeDepth(myTree)

     firstSides = list(myTree.keys())

     firstStr = firstSides[0] #the text label for this node should be this

     cntrPt = (plotTree.xOff + (1.0 + float(numLeafs))/2.0/plotTree.totalW, plotTree.yOff)

     plotMidText(cntrPt, parentPt, nodeTxt)

     plotNode(firstStr, cntrPt, parentPt, decisionNode)

     secondDict = myTree[firstStr]

     plotTree.yOff = plotTree.yOff - 1.0/plotTree.totalD

     for key in secondDict.keys():

         if type(secondDict[key]).__name__=='dict':#test to see if the nodes are dictonaires, if not they are leaf nodes

             plotTree(secondDict[key],cntrPt,str(key))        #recursion

         else:   #it's a leaf node print the leaf node

             plotTree.xOff = plotTree.xOff + 1.0/plotTree.totalW

             plotNode(secondDict[key], (plotTree.xOff, plotTree.yOff), cntrPt, leafNode)

             plotMidText((plotTree.xOff, plotTree.yOff), cntrPt, str(key))

     plotTree.yOff = plotTree.yOff + 1.0/plotTree.totalD

 #if you do get a dictonary you know it's a tree, and the first element will be another dict

 #绘制决策树

 def createPlot(inTree):

     fig = plt.figure(1, facecolor='white')

     fig.clf()

     axprops = dict(xticks=[], yticks=[])

     createPlot.ax1 = plt.subplot(111, frameon=False, **axprops)    #no ticks

     #createPlot.ax1 = plt.subplot(111, frameon=False) #ticks for demo puropses

     plotTree.totalW = float(getNumLeafs(inTree))

     plotTree.totalD = float(getTreeDepth(inTree))

     plotTree.xOff = -0.5/plotTree.totalW; plotTree.yOff = 1.0;

     plotTree(inTree, (0.5,1.0), '')

     plt.show()

 #绘制树的根节点和叶子节点(根节点形状:长方形,叶子节点:椭圆形)

 #def createPlot():

 #    fig = plt.figure(1, facecolor='white')

 #    fig.clf()

 #    createPlot.ax1 = plt.subplot(111, frameon=False) #ticks for demo puropses

 #    plotNode('a decision node', (0.5, 0.1), (0.1, 0.5), decisionNode)

 #    plotNode('a leaf node', (0.8, 0.1), (0.3, 0.8), leafNode)

 #    plt.show()

 def retrieveTree(i):

     listOfTrees =[{'no surfacing': {0: 'no', 1: {'flippers': {0: 'no', 1: 'yes'}}}},

                   {'no surfacing': {0: 'no', 1: {'flippers': {0: {'head': {0: 'no', 1: 'yes'}}, 1: 'no'}}}}

                   ]

     return listOfTrees[i]

 #thisTree = retrieveTree(0)

 #createPlot(thisTree)

 #createPlot()

 #myTree = retrieveTree(0)

 #numLeafs =getNumLeafs(myTree)

 #treeDepth =getTreeDepth(myTree)

 #print(u"叶子节点数目:%d"% numLeafs)

 #print(u"树深度:%d"%treeDepth)
绘制决策树
# -*- coding: utf-8 -*-
"""
Created on Fri Aug 3 19:52:10 2018 @author: weixw
"""
import myTrees as mt
import treePlotter as tp
#测试
dataSet, labels = mt.createDataSet()
#copy函数:新开辟一块内存,然后将list的所有值复制到新开辟的内存中
labels1 = labels.copy()
#createTree函数中将labels1的值改变了,所以在分类测试时不能用labels1
myTree = mt.createTree(dataSet,labels1)
#保存树到本地
mt.storeTree(myTree,'myTree.txt')
#在本地磁盘获取树
myTree = mt.grabTree('myTree.txt')
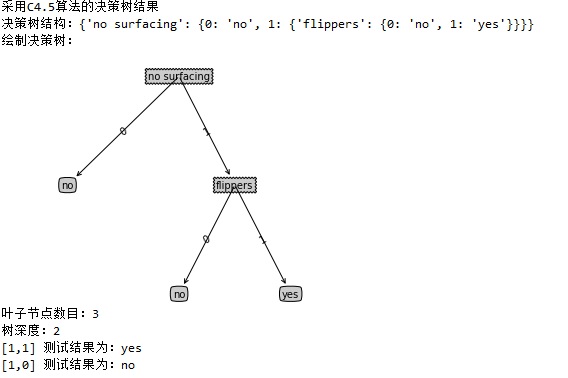
print(u"采用C4.5算法的决策树结果")
print (u"决策树结构:%s"%myTree)
#绘制决策树
print(u"绘制决策树:")
tp.createPlot(myTree)
numLeafs =tp.getNumLeafs(myTree)
treeDepth =tp.getTreeDepth(myTree)
print(u"叶子节点数目:%d"% numLeafs)
print(u"树深度:%d"%treeDepth)
#测试分类 简单样本数据3列
labelResult =mt.classify(myTree,labels,[1,1])
print(u"[1,1] 测试结果为:%s"%labelResult)
labelResult =mt.classify(myTree,labels,[1,0])
print(u"[1,0] 测试结果为:%s"%labelResult)
测试
运行结果
不要让懒惰占据你的大脑,不要让妥协拖垮你的人生。青春就是一张票,能不能赶上时代的快车,你的步伐掌握在你的脚下。
机器学习之决策树二-C4.5原理与代码实现的更多相关文章
- 机器学习之决策树三-CART原理与代码实现
决策树系列三—CART原理与代码实现 本文系作者原创,转载请注明出处:https://www.cnblogs.com/further-further-further/p/9482885.html ID ...
- 机器学习之决策树一-ID3原理与代码实现
决策树之系列一ID3原理与代码实现 本文系作者原创,转载请注明出处:https://www.cnblogs.com/further-further-further/p/9429257.html 应用实 ...
- 深入了解机器学习决策树模型——C4.5算法
本文始发于个人公众号:TechFlow,原创不易,求个关注 今天是机器学习专题的第22篇文章,我们继续决策树的话题. 上一篇文章当中介绍了一种最简单构造决策树的方法--ID3算法,也就是每次选择一个特 ...
- 图机器学习(GML)&图神经网络(GNN)原理和代码实现(前置学习系列二)
项目链接:https://aistudio.baidu.com/aistudio/projectdetail/4990947?contributionType=1 欢迎fork欢迎三连!文章篇幅有限, ...
- 《机器学习_09_01_决策树_ID3与C4.5》
简介 先看一个例子,某银行是否给用户放贷的判断规则集如下: if 年龄==青年: if 有工作==是: if 信贷情况==非常好: 放 else: 不放 else: if 有自己的房子==是: if ...
- 机器学习之决策树(ID3)算法与Python实现
机器学习之决策树(ID3)算法与Python实现 机器学习中,决策树是一个预测模型:他代表的是对象属性与对象值之间的一种映射关系.树中每个节点表示某个对象,而每个分叉路径则代表的某个可能的属性值,而每 ...
- python机器学习实战(二)
python机器学习实战(二) 版权声明:本文为博主原创文章,转载请指明转载地址 http://www.cnblogs.com/fydeblog/p/7159775.html 前言 这篇noteboo ...
- 决策树之C4.5算法
决策树之C4.5算法 一.C4.5算法概述 C4.5算法是最常用的决策树算法,因为它继承了ID3算法的所有优点并对ID3算法进行了改进和补充. 改进有如下几个要点: 用信息增益率来选择属性,克服了ID ...
- 机器学习之AdaBoost原理与代码实现
AdaBoost原理与代码实现 本文系作者原创,转载请注明出处: https://www.cnblogs.com/further-further-further/p/9642899.html 基本思路 ...
随机推荐
- maintenance.go
package, && req.Alarm == pb.AlarmType_NONE { ar, err := m.AlarmList(ctx) if ...
- xshell 快速复制打开之前用过的ssh
有时候需要对一个ip地址的服务器进行多个操作,不在一个会话中,需要新建多个同样的会话 然后左键单击+号 出现一个新的会话 然后再右键单击+号 选择之前保存过的ip地址即可快速创建!
- Django运算表达式与Q对象/F对象
Django运算表达式与Q对象/F对象 1 模型查询 概述: 1 查询集:表示从数据库中获取的对象的集合 2 查询集可以有多个过滤器,通过 逻辑运算符连接 3 过滤器就是一个函数,基于所给的参数限制查 ...
- linux系统日志查看
系统 日志文件( 可以通过cat 或tail 命令来查看) /var/log/message 系统启动后的信息和错误日志,是Red Hat Linux中最常用的日志之一/var/log/secure ...
- RPC基于http协议通过netty支持文件上传下载
本人在中间件研发组(主要开发RPC),近期遇到一个需求:RPC基于http协议通过netty支持文件上传下载 经过一系列的资料查找学习,终于实现了该功能 通过netty实现文件上传下载,主要在编解码时 ...
- 基于SpringBoot从零构建博客网站 - 整合lombok和mybatis-plus提高开发效率
在上一章节中<技术选型和整合开发环境>,确定了开发的技术,但是如果直接这样用的话,可能开发效率会不高,为了提高开发的效率,这里再整合lombok和mybatis-plus两个组件. 1.l ...
- 简单导出下载excel的方法
简单导出excel方法 /// <summary> /// Excel打包下载 /// </summary> /// <returns></returns&g ...
- Eclipse4JavaEE安装Gradle,并导入我们的Gradle项目
第一步:下载Gradle Gradle下载链接,如下图,下载最新版本即可.下载下来的zip包,解压到一个目录即可,如F盘 第二步:配置环境变量 首先添加GRADLE_HOME,如下图 然后在Path下 ...
- Bootstarp的安装以及简单的使用方法(pycharm中)
一.安装 首先打开Bootstarp的官网:https://v3.bootcss.com 下载完成后,解压压缩包,把解压后的文件导入pycham中 在HTML页面中的style中导入bootstrap ...
- win10环境下如何运行debug
在学习汇编的时候,会需要用到debug调试程序,但是现在win10默认已经移除了这个插件,我们需要手动安装,下面就告诉大家如何在win10环境下安装debug. 1:准备工具 1.1 DOSBox 1 ...