《JavaScript高级程序设计》笔记:面向对象的程序设计(六)
面向对象的语言有一个标志,那就是它们都有类的概念,而通过类可以创建任意多个具有相同属性和方法的对象。
理解对象
创建自定义对象的最简单的方法就是创建一个Object的实例,然后再为它添加属性和方法。例如:
var person = new Object();

    person.name="Nicholas";

    person.age=29;

    person.job="Software Engineer";

    person.SayName=function(){

        alert(this.name);

    }
同样上面的例子可以通过对象字面量语法写成如下:
var person ={

        name:"Nicholas",

        age:29,

        person.job:"Software Engineer",

        SayName:function(){

            alert(this.name);

        }

    }
属性类型
ECMAScript中有两种属性:数据属性和访问器属性。
1.数据属性
数据属性包含一个数据值的位置。在这个位置可以读取和写入值。数据属性有四个描述其行为的特性。
Configurable:表示能否通delete删除属性从而重新定义属性,能否修改属性的特性,或者能否把属性修改为访问器属性。像前面的例子中那样直接在对象上定义属性,它们的这个特性默认值为true。
Enumerable:表示能否通过for-in循环返回属性。像前面的例子中那样直接在对象上定义属性,它们的这个特性的默认值为true。
Writable:表示能否修改属性的值。前面例子直接在对象上定义的属性,它们的这个特性默认值为true。
Value:包含这个属性的数据值。读取属性值的时候,从这个位置读;写入属性值的时候,把新值保存到这个位置。这个特性默认值为undefined。
对于前面的例子,value特性被设置为特定的值。例如:
var person={

    name="Niceholas"

}
这里创建一个名为name的属性,为它指定的值是"Niceholas"。也就是说value特性将被设置为"Niceholas",而对这个值的任何修改都将反映在这个位置。
要修改属性默认的特性,必须使用ECMAScript5的Object.defineProperty()方法。这个方法接收三个参数:属性所在的对象、属性名字和一个描述符对象。其中,描述符对象的属性必须是Configurable、Enumerable、Writable、Value。设置其中的一或多个值。可以修改对应的特性值。例如:
var person={};

    Object.defineProperty(person,"name",{

        writable:false,

        value:'Nich'

    });

    alert(person.name);//Nich

    person.name="Greg";

    alert(person.name);//Nich
这个例子创建了一个名为name的属性,它的值为Nich是只读的。这个属性的值是不可以修改的,如果尝试为它指定新值,则在非严格模式下,赋值操作将被忽略;在严格模式下,赋值操作将会抛出错误。
类似的规则也适用与不可配置的属性。例如:
var person={};

    Object.defineProperty(person,"name",{

        configurable:false,

        value:'Nich'

    });

    alert(person.name);//Nich

    delete person.name;

    alert(person.name);//Nich
注意:一旦把属性定义为不可配置的,就不能再把它变回可配置了。此时,再调用Object.defineProperty()方法修改除了writable之外的特性,都会导致错误。
var person={};

    Object.defineProperty(person,"name",{

        configurable:false,

        value:'Nich'

    });

    //抛出错误

    Object.defineProperty(person,"name",{

        configurable:true,

        value:'Nich'

    });
也就是说,多次调用Object.defineProperty()方法修改同一个属性,但是把configurable特性设置为false之后就会有限制了。
在调用Object.defineProperty()方法时,如果不指定,configurable、Enumerable和writable特性的默认值为false。多数情况下,可能都没有必要利用Object.defineProperty()方法提供的这些高级功能。不过,理解这些概念对于理解javascript对象却非常有用。
注:IE8是第一个实现Object.defineProperty()方法的浏览器版本。然而,这个版本的实现存在诸多的限制:只能在DOM对象上使用这个方法,而且只能创建访问器属性。由于实现不彻底,建议不要在IE8中使用Object.defineProperty()方法。
2.访问器属性
访问器属性不包含数据值;它们包含一对儿getter和setter函数(不过,这两个函数都不是必需的)。
在读取访问器属性时,会调用getter函数,这个函数负责返回有效的值;在写入访问器属性时,会调用setter函数并传入新值,这个函数负责决定如何处理数据。访问器属性有如下4个特性。
- [Configurable]:表示能否通过delete删除属性从而重新定义属性,能否修改属性的特性,或者能否把属性修改为数据属性。对于直接在对象上定义的属性,这个特性的默认值为true。
- [Enumerable]:表示能否通过for-in循环返回属性。对于直接在对象上定义的属性,这个特性默认值为true。
- [Get]:在读取属性时调用的函数。默认值为undefined。
- [Set]:在写入属性时调用的函数。默认值为undefined。
访问器属性不能直接定义,必须使用Object.defineProperty()来定义。下面例子:
var book={

        _year:2004,

        edition:1

    }

    Object.defineProperty(book,"year",{

        get:function(){

            return this._year;

        },

        set:function(newValue){

            console.log(newValue);

            if(newValue>2004){

                this._year=newValue;

                this.edition+=newValue-2004;

            }

        }

    });

    book.year=2005;

    console.log(book.edition);//

//上面代码创建了一个book对象,并给它定义两个默认的属性:_year和edition。_year前面的下划线是一种常用的记号,用于表示只能通过对象方法访问的属性。

//支持ECMAScript5的这个方法的浏览器有IE9+、Firefox4+、SaFari5+、Opera12+和Chrome。在这个方法之前,要创建访问器属性,一般都使用两个非标准的方法:__defineGetter__()和__defineSetter__()。这2个方法最初是由Firefox引入的,后来SaFari3、Chrome1、opera9.5也给出了相同的实现。使用这2个遗留的方法,可以实现上面的例子如下:

var book={

    _year:2004,

    edition:1

}

//定义访问器的旧有方法

book.__defineGetter__('year',function(){

    return this._year;

});

book.__defineSetter__('year',function(newValue){

    if(newValue>2004){

        this._year=newValue;

        this.edition+=newValue-2004;

    }

});

book.year=2005;

alert(book.edition);//
在不支持Object.defineProperty()方法的浏览器中不能修改[Configurable] 和[Enumerable]。
定义多个属性
ECMAScript5又定义了一个Object.defineProperties()方法。这个方法接收两个对象参数:第一个对象是要添加和修改其属性的对象;第二个对象的属性与第一个对象中添加或修改的属性一一对应。例如:
var book={}

Object.defineProperties(book,{

    _year:{

        value:2004

    },

    edition:{

        value:1

    },

    year:{

        get:function(){

            return this._year;

        },

        set:function(newValue){

            if(newValue>2004){

                this._year=newValue;

                this.edition+=newValue-2004;

            }

        }

    }

})
读取属性的特性
使用Object.getOwnPropertyDescriptor()方法,这个方法接收两个参数:属性所在的对象和要读取的属性名称。
var book={};

Object.defineProperties(book,{

    _year:{

        value:2004

    },

    edition:{

        value:1

    },

    year:{

        get:function(){

            return this._year;

        },

        set:function(newValue){

            if(newValue>2004){

                this._year=newValue;

                this.edition+=newValue-2004;

            }

        }

    }

})

var descriptor=Object.getOwnPropertyDescriptor(book,'_year');

alert(descriptor.value);//

alert(descriptor.configurable);//false

alert(typeof descriptor.get);//undefined

var descriptor=Object.getOwnPropertyDescriptor(book,'year');

alert(descriptor.value);//undefined

alert(descriptor.configurable);//false

alert(typeof descriptor.get);//'function'
创建对象
虽然object构造函数或对象字面量都可以用来创建单个对象。但这些方式有个明显的缺点:使用同一个接口创建很多对象,会产生大量重复代码。
工厂模式
function createPerson(name, age,job){

    var o = new Object();

    o.name = name;

    o.age = age;

    o.job = job;

    o.sayName = function(){

        alert(this.name);

    }

    return o;

}

var person1 = createPerson("Nicholas", 29, "Software Engineer");

var person2 = createPerson("Greg", 27, "Doctor");
工厂模式虽然解决了创建多个相似对象的问题,但却没有解决对象识别的问题(即怎样知道一个对象的类型)。
构造函数模式
function Person(name, age,job){

    this.name = name;

    this.age = age;

    this.job = job;

    this.sayName = function(){

        alert(this.name);

    }

}

var person1 = new Person("Nicholas", 29, "Software Engineer");

var person2 = new Person("Greg", 27, "Doctor");
从上面的例子可以看出,要创建一个Person实例,需要使用new操作符。以这种方式调用构造函数要经历下面四个步骤:
- 创建一个新对象;
- 将构造函数的作用域赋给新对象(因此this就指向了这个新对象);
- 执行构造函数中的代码(为这个新对象添加属性);
- 返回新对象。
前面生成的两个person1和person1对象实例,这两个对象都一constructor属性,该属性指向Person,如下代码:
console.log(person1.constructor == Person); //true

console.log(person2.constructor == Person); //true
对象的constructor属性最初是用来标识对象类型的。但是,提到检测对象类型,使用instanceof操作符更可靠些。我们在上面创建的person1,person2对象既是Object的实例,同时也是Person的实例。
console.log(person1 instanceof Person); //true

console.log(person1 instanceof Object); //true

console.log(person2 instanceof Person); //true

console.log(person2 instanceof Object); //true
1.将构造函数当函数
例如前面例子中的Person函数可以用下面任何一种方式调用:
//当成构造函数使用

var person1 = new Person("Nicholas", 29, "Software Engineer");

person1.sayName();//Nicholas
//作为普通函数调用

Person("Greg", 27, "Doctor");

window.sayName();//Greg

//在另一个对象的作用域中调用

var o=new Object();

Person.call(o,"Kristen",25,"Nurse");

o.sayName();
2.构造函数的问题
function Person(name,age,job){

    this.name = name;

    this.age = age;

    this.job = job;

    this.sayName = new Function("console.log(this.name)"); // 与声明函数在逻辑上是等价的

}
以这种方法创建函数,会导致不同的作用域链和标示符解析。不同实例上的同名函数是不相等的。
var person1 = new Person("Nicholas", 29, "Software Engineer");

var person2 = new Person("Greg", 27, "Doctor");

console.log(person1.sayName == person2.sayName); // false
然后,创建两个完成同样任务的Function实例的确没有必要;况且有this对象在,根本不用在执行代码前就把函数绑定到特定对象上面。因此,大可像下面这样,通过把函数定义转移到构造函数外部来解决这个问题。
function Person(name, age,job){

    this.name = name;

    this.age = age;

    this.job = job;

    this.sayName = sayName;

}

function sayName(){

    alert(this.name);

}

var person1 = new Person("Nicholas", 29, "Software Engineer");

var person2 = new Person("Greg", 27, "Doctor");
可是新问题又来了:在全局作用域中定义的函数实际上只能被某个对象调用,这让全局作用域有点名不副实。而更让人无法接受的是:如果对象需要定义很多方法,那么就要定义很多多个全局函数,于是我们这个自定义的引用类型就丝毫没有封装性可言了。好在,这些问题可以通过使用原型模式来解决。
原型模式
我们创建的每个函数都有一个prototype(原型)属性,这个属性是一个指针,指向一个对象,而这个对象的用途是包含可以由特定类型的所有实例共享的属性和方法。也就是说prototype就是通过调用构造函数而创建的那个实例对象的原型对象。
function Person(){}

Person.prototype.name = "Nicholas";

Person.prototype.age = 29;

Person.prototype.job = "Software  Engineer";

Person.prototype.sayName = function(){

    alert(this.name);

}

var person1 = new Person();

person1.sayName(); // Nicholas

var person2 = new Person();

person2.sayName(); // Nicholas

alert(person1.sayName == person2.sayName);
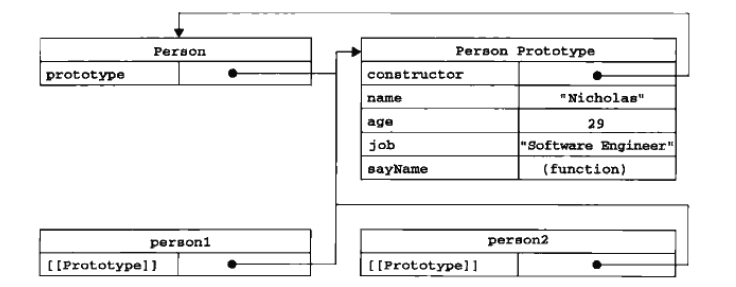
从图上可以看到构造函数Person的属性prototype指向了函数的原型对象,这个原型对象刚开始只有一个constructor属性,后面给它添加了原型对象的属性和方法。person1和person2的实例对象没有标准的方式访问[[prototype]],但firefox,safari,chrome在每个对象上有一个内部属性__proto__;这个内部属性__proto__指向了Person.prototype。这儿说明下,Person.prototype.constructor == Person为true,说明Person.prototype.constructor指回了Person。
isPrototypeOf()
console.log(Person.prototype.isPrototypeOf(person1)); // true

console.log(Person.prototype.isPrototypeOf(person2)); // true
hasOwnProperty()
function Person(){}

Person.prototype.name = "Nicholas";

Person.prototype.age = 29;

Person.prototype.job = "Software  Engineer";

Person.prototype.sayName = function(){

    console.log(this.name);

}

var person1 = new Person();

var person2 = new Person();

console.log(person1.hasOwnProperty("name")); // false

person1.name = "Greg";

console.log(person1.name); // Greg

console.log(person1.hasOwnProperty("name")); // true

console.log(person2.name); // Nicholas

console.log(person2.hasOwnProperty("name")); // false

delete person1.name;

console.log(person1.name); // Nicholas

console.log(person1.hasOwnProperty("name")); // false
原型与in操作符
function Person(){}

Person.prototype.name = "Nicholas";

Person.prototype.age = 29;

Person.prototype.job = "Software  Engineer";

Person.prototype.sayName = function(){

    console.log(this.name);

}

var person1 = new Person();

var person2 = new Person();

console.log(person1.hasOwnProperty("name")); // false

console.log("name" in person1); // true

person1.name = "Greg";

console.log(person1.name); // Greg

console.log(person1.hasOwnProperty('name')); // true

console.log("name" in person1); // true

console.log(person2.name); // Nicholas

console.log(person2.hasOwnProperty('name')); // false

console.log("name" in person2); // true

delete person1.name;

console.log(person1.name); // Nicholas

console.log(person1.hasOwnProperty('name')); // false

console.log("name" in person1); // true
同时使用hasOwnProperty()方法和in操作符,就可以确定该属性到底是存在于对象中,还是存在于原型中,如下:
function hasPrototypeProperty(object,name){

    return !object.hasOwnProperty(name)&&(name in object);

}
只要in操作符返回true而hasOwnProperty()返回false,就可以确定属性是原型中的属性。
更简单的原型语法
function Person(){}

Person.prototype = {

    name: "Nicholas",

    age:29,

    job: "Software Engineer",

    sayName: function(){

        console.log(this.name);

    }

}

var friend = new Person();

console.log(friend instanceof Object); // true

console.log(friend instanceof Person); // true

console.log(friend.constructor == Person); // false

console.log(friend.constructor == Object); // true
如果constructor的值真的很重要,可以像下面这样特意将它设置回适当的值。
function Person(){}

Person.prototype = {

    constructor: Person,

    name: "Nicholas",

    age:29,

    job: "Software Engineer",

    sayName: function(){

        console.log(this.name);

    }

}
原型对象的问题
function Person(){}

Person.prototype = {

    constructor: Person,

    name: "Nicholas",

    age:29,

    job: "Software Engineer",

    friends: ['Shelby', "Court"],

    sayName: function(){

        console.log(this.name);

    }

}

var person1 = new Person();

var person2 = new Person();

person1.friends.push("Van");

console.log(person1.friends); //Shelby,Court,Van

console.log(person2.friends); //Shelby,Court,Van

console.log(person1.friends===person2.friends); // true
假如我们的初衷就是像这样在所有实例中共享一个数组,那么对这个结果无话可说。可是,实例一般都是要有属于自己的全部属性的。而这个问题正是我们很少看到有人单独使用原型模式的原因所在。
组合使用构造函数模式和原型模式
function Person(name,age,job){

    this.name = name;

    this.age = age;

    this.job = job;

    this.friends = ["Shelby", "Court"];

}

Person.prototype = {

    constructor: Person,

    sayName: function(){ console.log(this.name);}

}

var person1 = new Person("Nicholas", 29, "Software Engineer");

var person2 = new Person("Greg", 27, "Doctor");

person1.friends.push("Van");

console.log(person1.friends); // Shelby, Count, Van

console.log(person2.friends); // Shelby, Count

console.log(person1.friends === person2.friends); // false

console.log(person1.sayName === person2.sayName); // true
在这个例子中,实例属性都是在构造函数中定义的,而由所有实例共享的属性constructor和方法sayName()则是在原型中定义的。这种构造函数与原型混成的模式,是目前认同度最高的一种创建自定义类型的方法。
动态原型模式
function Person(name, age,job){

    this.name = name;

    this.age = age;

    this.job = job;

    if (typeof this.sayName!='function'){

            Person.prototype.sayName = function(){

                    console.log(this.name);

         }

    }

}

var friend = new Person("Nicholas",29,"Software Engineer");

friend.sayName(); //Nicholas
寄生构造函数模式
这种模式的基本思想是创建一个函数,这个函数的作用仅仅是封装创建对象的代码,然后返回新创建的对象。
function Person(name,age,job){

    var o = new Object();

    o.name = name;

    o.age = age;

    o.job = job;

    o.sayName = function(){

        console.log(this.name);

    };

    return o;

}

var friend = new Person("Nicholas", 29, "Software Engineer");

friend.sayName(); // Nicholas
关于寄生构造函数模式,返回的对象与构造函数或者构造函数的原型属性之间没有关系;也就是说,构造函数返回的对象与在构造函数外部创建的对象没有什么不同。
 function SpecialArray(){

        var values=new Array();

        values.push.apply(values,arguments);

        values.toPipedString=function(){

            return this.join("|");

        }

        return values;

    }

    var colors=new SpecialArray("red","blue","green");

    console.log(colors.toPipedString()); //red|blue|green
稳妥构造函数模式
所谓稳妥对象,指的是没有公共属性,而且其方法也不引用this的对象。
其特点是:一是新创建的对象实例方法不引用this;二是不使用new操作符调用构造函数。
把前面的Person构造函数重新如下:
function Person(name,age,job){

    var o = new Object();

   //可以在这儿创建私有变量和函数

   //方法

    o.sayName = function(){

        console.log(name);

    };

    //返回对象

    return o;

}

var friend = Person("Nicholas", 29, "Software Engineer");

friend.sayName(); // Nicholas
继承
原型链
function SuperType(){

     this.property= true;

}

SuperType.prototype.getSuperValue = function(){

    return this.property;

};

function Subtype(){

    this.subproperty = false;

}

// 继承了SuperType

Subtype.prototype = new SuperType();

Subtype.prototype.getSubValue = function(){

    return this.subproperty;

}

var instance = new Subtype();

console.log(instance.getSuperValue()); // true
谨慎地定义方法
function SuperType(){

     this.property= true;

}

SuperType.prototype.getSuperValue = function(){

    return this.property;

};

function Subtype(){

    this.subproperty = false;

}

// 继承了SuperType

Subtype.prototype = new SuperType();

Subtype.prototype = {

    getSubValue: function(){

        return this.subproperty;

    },

    someOtherMethod: function(){

        return false;

    }

};

var instance = new Subtype();

console.log(instance.getSuperValue()); // error
原型链的问题
包含引用类型值的原型属性会被所有实例共享;而这也正是为什么要在构造函数中,而不是在原型对象中定义属性的原因。
在创建子类型的实例时,不能向超类型的构造函数中传递参数。实际上,应该说是没有办法在不影响所有对象实例的情况下,给超类型的构造函数传递参数。
function SuperType(){

    this.colors = ["red", "blue", "green"];

}

function Subtype(){

}

Subtype.prototype= new SuperType();

var instance1 = new Subtype();

instance1.colors.push("black");

console.log(instance1.colors); // red, blue, green, black

var instance2 = new Subtype();

console.log(instance2.colors); // red, blue, green, black
借用构造函数
1.传递参数
function SuperType(name){

    this.name = name;

}

function Subtype(){

    SuperType.call(this,"Nicholas");

    this.age = 29;

}

var instance = new Subtype();

console.log(instance.name); //Nicholas

console.log(instance.age); //
2.借用构造函数的问题
方法都在构造函数中定义,因此函数复用就无从谈起。而且在超类型的原型中定义的方法,在子类型中就无法调用了。
组合继承
function SuperType(name){

    this.name = name;

    this.colors = ["red", "blue", "green"];

}

SuperType.prototype.sayName = function(){

    console.log(this.name);

};

function Subtype(name,age){

    SuperType.call(this,name);

    this.age = age;

}

Subtype.prototype = new SuperType();

Subtype.prototype.sayAge = function(){

   console.log(this.age);

};

var instance1 = new Subtype("Nicholas", 29);

instance1.colors.push("black");

console.log(instance1.colors); // red, blue, green, black

instance1.sayName(); // Nicholas

instance1.sayAge(); //

var instance2 = new Subtype("Greg", 2);

console.log(instance2.colors); // red, blue, green

instance2.sayName(); // Greg

instance2.sayAge(); //
组合继承避免了原型链和借用函数的缺陷,融合了它们的优点,成为Javascript中最常用的继承模式。
原型式继承
function object(o){

    function F(){}

    F.prototype = o;

    return new F();

}

var person = {

    name:"Nicholas",

    friends:["Shelby", "Court", "Van"]

};

var anotherPerson = object(person);

anotherPerson.name = "Greg";

anotherPerson.friends.push("Rob");

var yetAnotherPerson = object(person);

yetAnotherPerson.name = "Linda";

yetAnotherPerson.friends.push("Barbie");

console.log(person.friends); // Shelby, Court, Van, Rob, Barbie
Object.create()
Object.create()方法规范了原型式继承。
var person = {

    name:"Nicholas",

    friends:["Shelby", "Court", "Van"]

};

var anotherPerson = Object.create(person);

anotherPerson.name = "Greg";

anotherPerson.friends.push("Rob");

var yetAnotherPerson = Object.create(person);

yetAnotherPerson.name = "Linda";

yetAnotherPerson.friends.push("Barbie");

console.log(person.friends); // Shelby, Court, Van, Rob, Barbie
寄生式继承
就是一个封装继承过程的函数,该函数内部以某种方式来增强对象,最后返回这个增强的对象。
function object(o){

    function F(){}

    F.prototype = o;

    return new F();

}

function createAnother(original){

    var clone = object(original);

    clone.sayHi = function(){

        alert('hi')

    };

    return clone;

}

var person = {

    name:"Nicholas",

    friends:["Shelby", "Court", "Van"]

}

var anotherPerson = createAnother(person);

anotherPerson.sayHi();
寄生组合式继承
function object(o){

    function F(){}

    F.prototype = o;

    return new F();

}

function inheritPrototype(subType,superType){

    var prototype = object(superType.prototype);

    prototype.constructor = subType;

    subType.prototype = prototype;

}

function SuperType(name){

    this.name = name;

    this.colors = ["red", "blue", "green"];

}

SuperType.prototype.sayName = function(){

    console.log(this.name);

}

function Subtype(name,age){

    SuperType.call(this,name);

    this.age = age;

}

inheritPrototype(Subtype, SuperType);

Subtype.prototype.sayAge = function(){

    console.log(this.age);

}
《JavaScript高级程序设计》笔记:面向对象的程序设计(六)的更多相关文章
- js高级程序设计 笔记 --- 面向对象的程序设计
1,理解对象 通过对象字面量的方式,创建一个对象,为它添加属性和方法: var obj = { a: 1, b:2, sayA(){ console.log(this.a)}} 1,属性类型: 数据属 ...
- JavaScript高级程序设计学习笔记--面向对象的程序设计(二)-- 继承
相关文章: 面向对象的程序设计(一) — 创建对象 http://www.cnblogs.com/blackwood/archive/2013/04/24/3039523.html 继承 继承是OO语 ...
- javascript高级编程笔记01(基本概念)
1.在html中使用JavaScript 1. <script> 元素 <script>定义了下列6个属性: async:可选,异步下载外部脚本文件. charset:可选, ...
- javascript高级程序设计读书笔记----面向对象的程序设计
创建对象 工厂模式 function createPerson(name, age, job){ var o = new Object(); o.name = name; o.age = ...
- javascript高级编程笔记05(面向对象)
面向对象设计 es中有两种属性:数据属性和访问器属性 数据属性: 数据属性包含一个数据值的位置,在这个位置可以读取和写入值,数据属性有4个描述其行为的特性 [[Configurable]]:表示能否通 ...
- JavaScript高级特征之面向对象笔记
Javascript面向对象 函数 * Arguments对象: * Arguments对象是数组对象 * Arguments对象的length属性可以获取参数的个数 * 利用Arguments对象模 ...
- javascript第四章--面向对象的程序设计
① 理解对象 ② 创建对象 ③ 继承
- JavaScript高级特征之面向对象笔记二
Prototype 1. 当声明一个函数的时候,浏览器会自动为该函数添加一个属性prototype, 2. 该属性的默认值为{} 3. 可以动态的给prototype增加key和value值 4 ...
- javascript高级编程笔记02(基本概念)
ParseInt()函数: 由于Number函数在转换字符串时比较复杂而且不合理,我们常常转换字符串都用parseInt函数, Parseint函数规则: 忽略字符串前面的空格,直到找到第一个非空格字 ...
- 前端JavaScript高级面试笔记
一.ES6 1.模块化 ES6通过export和import实现模块化 ES6的模块化的基本规则或特点, 欢迎补充: 1:每一个模块只加载一次, 每一个JS只执行一次, 如果下次再去加载同目录下同文件 ...
随机推荐
- 使用 Premiere 制作视频简介
Premiere 简介 经常上B站或其他视频网站,有很多个人制作的有趣视频.也会想要自己制作视频.目前网上常见的视频剪辑软件有很多种,神剪辑.爱剪辑.会声会影.EDIUS等.但在专业视频剪辑师中,使用 ...
- 第15章 时间常数字符串比较 - IdentityModel 中文文档(v1.0.0)
在比较安全上下文中的字符串(例如比较键)时,应尽量避免泄漏时序信息. 该TimeConstantComparer类可以帮助: var isEqual = TimeConstantComparer.Is ...
- python:前端(HTML)+后端(Django)+数据库(MySQL)
1.创建一个html文件用于简单的网页注册demo <!DOCTYPE html> <html lang="en"> <head> <me ...
- h5实现实时时钟
<!DOCTYPE html> <html> <head> <meta charset="UTF-8"/> <meta nam ...
- 驰骋工作流引擎 -CCBPM如何自动升级
关键词:工作流引擎自动升级 工作流自动升级升级步骤设置1,CCBPM把更新分成三类, 应用程序代码更新.数据表结构更新.数据更新.2,CCBPM在您登录流程设计器时自动判断当前的版本与数据库版本是 ...
- openlayers4 入门开发系列之迁徙图篇(附源码下载)
前言 openlayers4 官网的 api 文档介绍地址 openlayers4 api,里面详细的介绍 openlayers4 各个类的介绍,还有就是在线例子:openlayers4 官网在线例子 ...
- ArcGIS API for JavaScript 入门教程[4] 代码的骨架
[回顾与本篇预览] 上篇简单介绍了JsAPI中的数据与视图,并告诉大家这两部分有什么用.如何有机连接在一起. 这一篇快速介绍一下前端代码的骨架.当然,假定你已经熟悉HTML5.CSS3和JavaScr ...
- 2018-08-20 中文代码之Spring Boot集成H2内存数据库
续前文: 中文代码之Spring Boot添加基本日志, 源码库地址相同. 鉴于此项目中的数据总量不大(即使万条词条也在1MB之内), 当前选择轻量级而且配置简单易于部署的H2内存数据库比较合理. 此 ...
- 配置Java文件
下载jdk https://www.oracle.com ----------------------------------------------------------------------- ...
- 从壹开始前后端分离 [ Vue2.0+.NET Core2.1] 二十║Vue基础终篇:传值+组件+项目说明
缘起 新的一天又开始啦,大家也应该看到我的标题了,是滴,Vue基础基本就到这里了,咱们回头看看这一路,如果你都看了,并且都会写了,那么现在你就可以自己写一个Demo了,如果再了解一点路由,ajax请求 ...