用VSCode开发一个asp.net core2.0+angular5项目(5): Angular5+asp.net core 2.0 web api文件上传
第一部分: http://www.cnblogs.com/cgzl/p/8478993.html
第二部分: http://www.cnblogs.com/cgzl/p/8481825.html
第三部分: https://www.cnblogs.com/cgzl/p/8525541.html
第四部分: https://www.cnblogs.com/cgzl/p/8536350.html
这部分就讲从angular5的客户端上传图片到asp.net core 2.0的 web api.
这是需要的源码: https://pan.baidu.com/s/1Eqc4MRiQDwOHmu0OHyttqA
当前的效果如下:

点击这个超链接后:

好的, 下面开始编写上传相关的代码.
Asp.net core 2.0 文件上传
按照顺序, 先建立Photo的domain model:
建立Models/Photo.cs:
using System.ComponentModel.DataAnnotations;

namespace Tv.Models

{

    public class Photo

    {

        public int Id { get; set; }

        [Required]

        [StringLength()]

        public string FileName { get; set; }

    }

}
然后编辑TvShow.cs:
using System.Collections.Generic;

using System.ComponentModel.DataAnnotations;

namespace Tv.Models

{

    public class TvShow

    {

        public TvShow()

        {

            Photoes = new List<Photo>();

        }

        public int Id { get; set; }

        [Required]

        [StringLength()]

        public string Name { get; set; }

        public int TvNetworkId { get; set; }

        public TvNetwork TvNetwork { get; set; }

        public ICollection<Photo> Photoes { get; set; }

    }

}
TvContext.cs:
using Microsoft.EntityFrameworkCore;

using Tv.Models;

namespace Tv.Database

{

    public class TvContext : DbContext

    {

        public TvContext(DbContextOptions<TvContext> options)

            : base(options)

        {

        }

        public DbSet<TvNetwork> TvNetworks { get; set; }

        public DbSet<TvShow> TvShows { get; set; }

        public DbSet<Photo> Photoes { get; set; }

    }

}
然后添加迁移和更新数据库, 您应该知道怎么做了, 这部分就略了.
添加PhotoViewModel.cs:
namespace Tv.ViewModels

{

    public class PhotoViewModel

    {

        public int Id { get; set; }

        public string FileName { get; set; }

    }

}
不要忘了做一下Mapping映射, 这里我就不写了.
然后建立PhotoesController.cs:
using System;

using System.IO;

using System.Threading.Tasks;

using AutoMapper;

using Microsoft.AspNetCore.Hosting;

using Microsoft.AspNetCore.Http;

using Microsoft.AspNetCore.Mvc;

using Tv.Database;

using Tv.Models;

using Tv.ViewModels;

namespace Tv.Controllers

{

    [Route("api/tvshows/{tvShowId}/photoes")]

    public class PhotoesController : Controller

    {

        private readonly IHostingEnvironment host;

        private readonly ITvRepository tvRepository;

        private readonly IUnitOfWork unitOfWork;

        private readonly IMapper mapper;

        public PhotoesController(IHostingEnvironment host, ITvRepository tvRepository, IUnitOfWork unitOfWork, IMapper mapper)

        {

            this.host = host;

            this.tvRepository = tvRepository;

            this.unitOfWork = unitOfWork;

            this.mapper = mapper;

        }

        [HttpPost]

        public async Task<IActionResult> Upload(int tvShowId, IFormFile file)

        {

            var tvShow = await tvRepository.GetTvShowByIdAsync(tvShowId, includeRelated: false);

            if (tvShow == null)

            {

                return NotFound();

            }

            var uploadsFolderPath = Path.Combine(host.WebRootPath, "Uploads");

            if (!Directory.Exists(uploadsFolderPath))

            {

                Directory.CreateDirectory(uploadsFolderPath);

            }

            var fileName = Guid.NewGuid().ToString() + Path.GetExtension(file.FileName);

            var filePath = Path.Combine(uploadsFolderPath, fileName);

            using (var stream = new FileStream(filePath, FileMode.Create))

            {

                await file.CopyToAsync(stream);

            }

            var photo = new Photo

            {

                FileName = fileName

            };

            tvShow.Photoes.Add(photo);

            await unitOfWork.SaveAsync();

            var result = mapper.Map<Photo, PhotoViewModel>(photo);

            return Ok(result);

        }

    }

}
这里要简单讲一下. asp.net core 上传文件的文档在这: https://docs.microsoft.com/en-us/aspnet/core/mvc/models/file-uploads
首先该controller的路由应该遵循web api的规范, 注意controller 的路由地址.
上传单个文件需要使用IFormFile作为Action的参数. 如果上传的是多个文件, 那么应该使用IFormCollection.
这里我做的是单文件上传, 所以使用IFormFile.
随后使用注入的IHostingEnvironment获得wwwroot目录, 我想要把文件上传到wwwroot/uploads下, 判断该目录是否存在, 如果不存在则创建该目录.
为了防黑, 把文件名改成Guid, 后缀名不变.
然后使用FileStream创建该文件.
后边的内容就是把文件名保存到数据库了.
接下来, 使用Postman来测试这个api.
打开postman, 按照图示输入:

注意这里的参数的key为file, 这个名字要与action的参数名一致:

send:
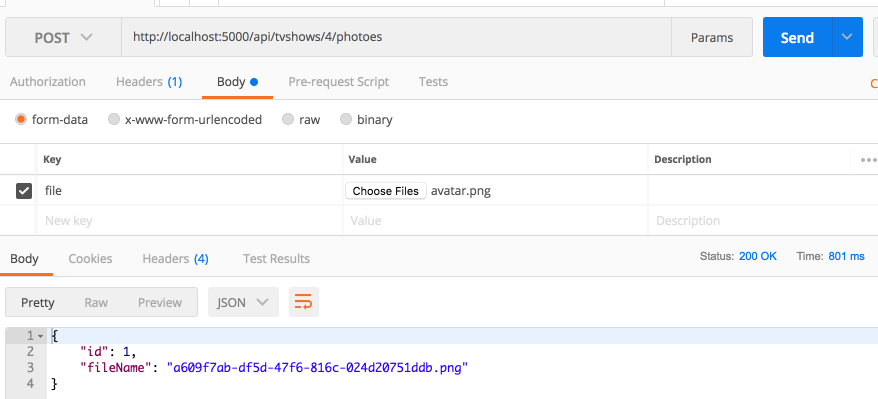
很好, 测试通过.
下面为Action添加一些验证:
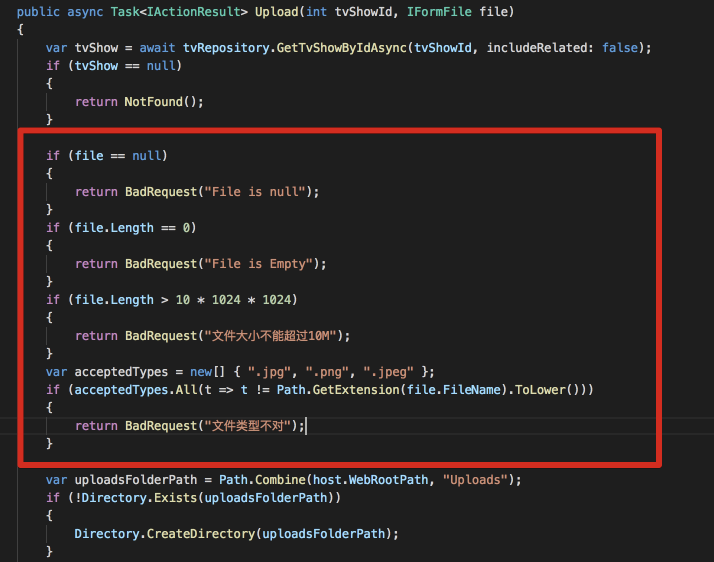
这就是一些常规的验证, 没有什么特别的, 就不累述了.
针对这些东西, 您可以使用配置类, 并把相关的值放在appSettings.json里面. 这部分您自己学一下吧 https://docs.microsoft.com/en-us/aspnet/core/fundamentals/configuration/?tabs=basicconfiguration.
下面是客户端
Angular 5 文件上传
先做ui, tv-show-detail.component.html:
<form>

  <h2>基本信息</h2>

  <div class="form-group row">

    <label for="name" class="col-sm-2 col-form-label">名称</label>

    <div class="col-sm-10">

      <input type="text" readonly class="form-control-plaintext" id="name" value="{{model.name}}">

    </div>

  </div>

  <h2>电视剧照片</h2>

  <div class="form-group row">

    <label for="file" class="col-sm-2 col-form-label">照片</label>

    <input type="file" name="file" id="file" class="form-control" #fileInput (change)="upload()">

  </div>

</form>
注意这里使用了template reference.
然后创建一个photo.service:
import { Injectable } from '@angular/core';

import { HttpHeaders, HttpClient } from '@angular/common/http';

@Injectable()

export class PhotoService {

  constructor(

    private http: HttpClient

  ) { }

  upload(tvShowId: number, photo) {

    const formData = new FormData();

    formData.append('file', photo);

    return this.http.post(`/api/tvshows/${tvShowId}/photoes`, formData);

  }

}
其中post的参数类型是FormData, 它是js原生对象. formData里面文件的key要和后台Action方法的参数名一样.
最后改一下tv-show-detail.component.ts:
import { Component, OnInit, ElementRef, ViewChild } from '@angular/core';

import { TvShowService } from '../../services/tv-show.service';

import { Router, ActivatedRoute, ParamMap } from '@angular/router';

import { TvShow } from '../../models/tv-show';

import { Subscription } from 'rxjs/Subscription';

import { ToastrService } from 'ngx-toastr';

import { PhotoService } from '../../services/photo.service';

@Component({

  selector: 'app-tv-show-detail',

  templateUrl: './tv-show-detail.component.html',

  styleUrls: ['./tv-show-detail.component.css']

})

export class TvShowDetailComponent implements OnInit {

  tvShowId: number;

  @ViewChild('fileInput') fileInput: ElementRef;

  model: TvShow = new TvShow();

  busy: Subscription;

  constructor(

    private tvShowService: TvShowService,

    private router: Router,

    private route: ActivatedRoute,

    private toastr: ToastrService,

    private photoService: PhotoService

  ) { }

  ngOnInit() {

    this.route.paramMap.switchMap((params: ParamMap) => {

      this.tvShowId = +params.get('id');

      return this.tvShowService.getById(this.tvShowId);

    }).subscribe(item => {

      this.model = item;

    });

  }

  upload() {

    const ele = this.fileInput.nativeElement;

    this.photoService.upload(this.tvShowId, ele.files[0]).subscribe(x => {

      console.log(x);

    });

  }

}
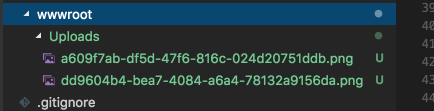
如果上传成功, 那么回来先只做打印到log. 试一下:

上传成功. 文件即出现在wwwroot下, 文件名也保存到了数据库.
回显照片:
首先修改Photo.cs:
using System.ComponentModel.DataAnnotations;

namespace Tv.Models

{

    public class Photo

    {

        public int Id { get; set; }

        [Required]

        [StringLength()]

        public string FileName { get; set; }

        public int TvShowId { get; set; }

        public TvShow TvShow { get; set; }

    }

}
不要忘记迁移数据库.
然后创建Repository, 并注册:
using System.Collections.Generic;

using System.Threading.Tasks;

using Tv.Models;

namespace Tv.Database

{

    public interface IPhotoRepository

    {

        Task<List<Photo>> GetPhotoesByTvShowIdAsync(int tvShowId);

    }

}
using System.Collections.Generic;

using System.Linq;

using System.Threading.Tasks;

using Microsoft.EntityFrameworkCore;

using Tv.Models;

namespace Tv.Database

{

    public class PhotoRepository : IPhotoRepository

    {

        private readonly TvContext context;

        public PhotoRepository(TvContext context)

        {

            this.context = context;

        }

        public async Task<List<Photo>> GetPhotoesByTvShowIdAsync(int tvShowId)

        {

            var photoes = await context.Photoes.Where(x => x.TvShowId == tvShowId).ToListAsync();

            return photoes;

        }

    }

}
最后修改PhotoesController:
using System;

using System.IO;

using System.Linq;

using System.Threading.Tasks;

using AutoMapper;

using Microsoft.AspNetCore.Hosting;

using Microsoft.AspNetCore.Http;

using Microsoft.AspNetCore.Mvc;

using Tv.Database;

using Tv.Models;

using Tv.ViewModels;

namespace Tv.Controllers

{

    [Route("api/tvshows/{tvShowId}/photoes")]

    public class PhotoesController : Controller

    {

        private readonly IHostingEnvironment host;

        private readonly ITvRepository tvRepository;

        private readonly IUnitOfWork unitOfWork;

        private readonly IMapper mapper;

        private readonly IPhotoRepository photoRepository;

        public PhotoesController(IHostingEnvironment host, ITvRepository tvRepository, IUnitOfWork unitOfWork, IMapper mapper, IPhotoRepository photoRepository)

        {

            this.host = host;

            this.tvRepository = tvRepository;

            this.unitOfWork = unitOfWork;

            this.mapper = mapper;

            this.photoRepository = photoRepository;

        }

        [HttpPost]

        public async Task<IActionResult> Upload(int tvShowId, IFormFile file)

        {

            var tvShow = await tvRepository.GetTvShowByIdAsync(tvShowId, includeRelated: false);

            if (tvShow == null)

            {

                return NotFound();

            }

            if (file == null)

            {

                return BadRequest("File is null");

            }

            if (file.Length == )

            {

                return BadRequest("File is Empty");

            }

            if (file.Length >  *  * )

            {

                return BadRequest("文件大小不能超过10M");

            }

            var acceptedTypes = new[] { ".jpg", ".png", ".jpeg" };

            if (acceptedTypes.All(t => t != Path.GetExtension(file.FileName).ToLower()))

            {

                return BadRequest("文件类型不对");

            }

            var uploadsFolderPath = Path.Combine(host.WebRootPath, "Uploads");

            if (!Directory.Exists(uploadsFolderPath))

            {

                Directory.CreateDirectory(uploadsFolderPath);

            }

            var fileName = Guid.NewGuid().ToString() + Path.GetExtension(file.FileName);

            var filePath = Path.Combine(uploadsFolderPath, fileName);

            using (var stream = new FileStream(filePath, FileMode.Create))

            {

                await file.CopyToAsync(stream);

            }

            var photo = new Photo

            {

                FileName = fileName

            };

            tvShow.Photoes.Add(photo);

            await unitOfWork.SaveAsync();

            var result = mapper.Map<Photo, PhotoViewModel>(photo);

            return Ok(result);

        }

        [HttpGet]

        public async Task<IActionResult> GetPhotoesByTvShowId(int tvShowId)

        {

            var photoes = await photoRepository.GetPhotoesByTvShowIdAsync(tvShowId);

            return Ok(photoes);

        }

    }

}
然后修改angular部分:
添加Photo到model:
export class Photo {

    id: number;

    tvShowId: number;

    fileName: string;

}
修改photo service:
import { Injectable } from '@angular/core';

import { HttpHeaders, HttpClient } from '@angular/common/http';

import { Observable } from 'rxjs/Observable';

import { Photo } from '../models/photo';

@Injectable()

export class PhotoService {

  constructor(

    private http: HttpClient

  ) { }

  upload(tvShowId: number, photo): Observable<Photo> {

    const formData = new FormData();

    formData.append('file', photo);

    return this.http.post<Photo>(`/api/tvshows/${tvShowId}/photoes`, formData);

  }

  getPhotoes(tvShowId: number): Observable<Photo[]> {

    return this.http.get<Photo[]>(`/api/tvshows/${tvShowId}/photoes`);

  }

}
tv-show-detail.component.html:
<form>

  <h2>基本信息</h2>

  <div class="form-group row">

    <label for="name" class="col-sm-2 col-form-label">名称</label>

    <div class="col-sm-10">

      <input type="text" readonly class="form-control-plaintext" id="name" value="{{model.name}}">

    </div>

  </div>

  <h2>电视剧照片</h2>

  <div class="form-group row">

    <label for="file" class="col-sm-2 col-form-label">照片</label>

    <input type="file" name="file" id="file" class="form-control" #fileInput (change)="upload()">

  </div>

  <div>

    <img [src]="'http://localhost:5000/Uploads/' + p.fileName" [alt]="p.fileName" *ngFor="let p of photoes" class="m-1" width="200"

      height="200" />

  </div>

</form>
tv-show-detail.component.ts:
import { Component, OnInit, ElementRef, ViewChild } from '@angular/core';

import { TvShowService } from '../../services/tv-show.service';

import { Router, ActivatedRoute, ParamMap } from '@angular/router';

import { TvShow } from '../../models/tv-show';

import { Subscription } from 'rxjs/Subscription';

import { ToastrService } from 'ngx-toastr';

import { PhotoService } from '../../services/photo.service';

import { Photo } from '../../models/photo';

import { Observable } from 'rxjs/Observable';

import 'rxjs/add/observable/forkJoin';

@Component({

  selector: 'app-tv-show-detail',

  templateUrl: './tv-show-detail.component.html',

  styleUrls: ['./tv-show-detail.component.css']

})

export class TvShowDetailComponent implements OnInit {

  tvShowId: number;

  @ViewChild('fileInput') fileInput: ElementRef;

  model: TvShow = new TvShow();

  busy: Subscription;

  photoes: Photo[] = [];

  constructor(

    private tvShowService: TvShowService,

    private router: Router,

    private route: ActivatedRoute,

    private toastr: ToastrService,

    private photoService: PhotoService

  ) { }

  ngOnInit() {

    this.route.paramMap.switchMap((params: ParamMap) => {

      this.tvShowId = +params.get('id');

      return Observable.forkJoin<TvShow, Photo[]>(

        this.tvShowService.getById(this.tvShowId),

        this.photoService.getPhotoes(this.tvShowId)

      );

    }).subscribe(([tvShow, photoes]) => {

      this.model = tvShow;

      this.photoes = photoes;

    });

  }

  upload() {

    const ele = this.fileInput.nativeElement;

    this.photoService.upload(this.tvShowId, ele.files[0]).subscribe(photo => {

      this.photoes.push(photo);

    });

  }

}
这部分比较简单, 注意同时发送多个请求可以使用forkJoin.
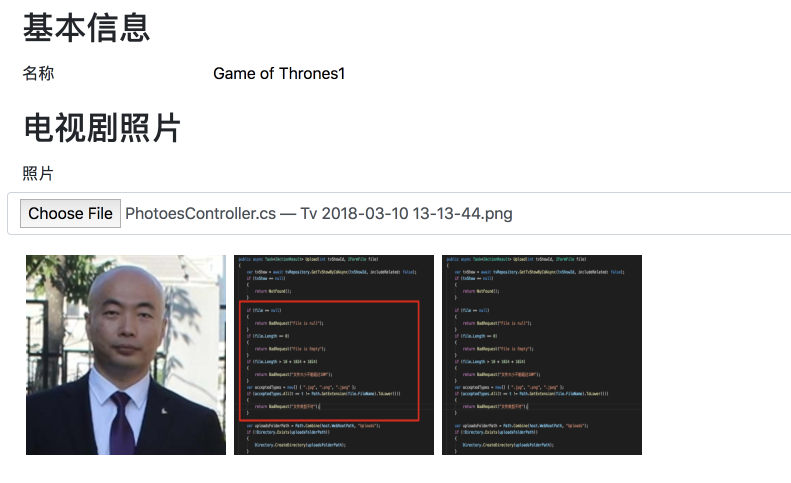
看看效果:
如果照片没有显示出来, 可能是asp.net core没有启用静态文件到支持, 在Startup.cs添加这句话即可:
using System;

using System.Collections.Generic;

using System.Linq;

using System.Threading.Tasks;

using AutoMapper;

using Microsoft.AspNetCore.Builder;

using Microsoft.AspNetCore.Hosting;

using Microsoft.EntityFrameworkCore;

using Microsoft.Extensions.Configuration;

using Microsoft.Extensions.DependencyInjection;

using Microsoft.Extensions.Logging;

using Tv.Database;

namespace Tv

{

    public class Startup

    {

        public Startup(IConfiguration configuration)

        {

            Configuration = configuration;

        }

        public IConfiguration Configuration { get; }

        // This method gets called by the runtime. Use this method to add services to the container.

        public void ConfigureServices(IServiceCollection services)

        {

            services.AddAutoMapper();

            // services.AddDbContext<TvContext>(opt => opt.UseSqlServer(Configuration["ConnectionStrings:Default"]));

            services.AddDbContext<TvContext>(opt => opt.UseSqlServer(Configuration.GetConnectionString("Default")));

            services.AddScoped<ITvRepository, TvRepository>();

            services.AddScoped<IPhotoRepository, PhotoRepository>();

            services.AddScoped<IUnitOfWork, UnitOfWork>();

            services.AddMvc();

        }

        // This method gets called by the runtime. Use this method to configure the HTTP request pipeline.

        public void Configure(IApplicationBuilder app, IHostingEnvironment env)

        {

            if (env.IsDevelopment())

            {

                app.UseDeveloperExceptionPage();

            }

            app.UseStaticFiles();

            app.UseMvc();

        }

    }

}
很好. 即使是刚添加完到照片也会即时显示出来.
上传进度显示.
首先创建一个修改photo service:
根据官方文档, 如果想要上传文件时显示进度, 那么应该使用HttpRequest, 并设置属性reportProgress为true:
import { Injectable } from '@angular/core';

import { HttpHeaders, HttpClient, HttpRequest, HttpEvent, HttpEventType, HttpErrorResponse } from '@angular/common/http';

import { Observable } from 'rxjs/Observable';

import { Photo } from '../models/photo';

@Injectable()

export class PhotoService {

  constructor(

    private http: HttpClient

  ) { }

  upload(tvShowId: number, photo: File) {

    const formData = new FormData();

    formData.append('file', photo);

    // return this.http.post<Photo>(`/api/tvshows/${tvShowId}/photoes`, formData);

    const req = new HttpRequest('POST', `/api/tvshows/${tvShowId}/photoes`, formData, {

      reportProgress: true

    });

    return this.http.request<Photo>(req);

  }

  getPhotoes(tvShowId: number): Observable<Photo[]> {

    return this.http.get<Photo[]>(`/api/tvshows/${tvShowId}/photoes`);

  }

}
回到 tv-show-detail.component.ts:
import { Component, OnInit, ElementRef, ViewChild } from '@angular/core';

import { TvShowService } from '../../services/tv-show.service';

import { Router, ActivatedRoute, ParamMap } from '@angular/router';

import { TvShow } from '../../models/tv-show';

import { Subscription } from 'rxjs/Subscription';

import { ToastrService } from 'ngx-toastr';

import { PhotoService } from '../../services/photo.service';

import { Photo } from '../../models/photo';

import { Observable } from 'rxjs/Observable';

import 'rxjs/add/observable/forkJoin';

import { HttpEvent, HttpEventType } from '@angular/common/http';

import { HttpResponse } from 'selenium-webdriver/http';

@Component({

  selector: 'app-tv-show-detail',

  templateUrl: './tv-show-detail.component.html',

  styleUrls: ['./tv-show-detail.component.css']

})

export class TvShowDetailComponent implements OnInit {

  tvShowId: number;

  @ViewChild('fileInput') fileInput: ElementRef;

  model: TvShow = new TvShow();

  busy: Subscription;

  photoes: Photo[] = [];

  constructor(

    private tvShowService: TvShowService,

    private router: Router,

    private route: ActivatedRoute,

    private toastr: ToastrService,

    private photoService: PhotoService

  ) { }

  ngOnInit() {

    this.route.paramMap.switchMap((params: ParamMap) => {

      this.tvShowId = +params.get('id');

      return Observable.forkJoin<TvShow, Photo[]>(

        this.tvShowService.getById(this.tvShowId),

        this.photoService.getPhotoes(this.tvShowId)

      );

    }).subscribe(([tvShow, photoes]) => {

      this.model = tvShow;

      this.photoes = photoes;

    });

  }

  upload() {

    const ele = this.fileInput.nativeElement;

    const file = ele.files[0];

    this.photoService.upload(this.tvShowId, file).subscribe((event: HttpEvent<any>) => {

      switch (event.type) {

        case HttpEventType.Sent:

          console.log(`开始上传 "${file.name}", 大小是: ${file.size}.`);

          break;

        case HttpEventType.UploadProgress:

          const percentDone = Math.round(100 * event.loaded / event.total);

          console.log(`文件 "${file.name}" 的上传进度是 ${percentDone}%.`);

          break;

        case HttpEventType.Response:

          console.log(`文件 "${file.name}" 上传成功!`);

          this.toastr.success(`文件 "${file.name}" 上传成功!`);

          this.photoes.push(<Photo>(event.body));

          break;

        default:

          console.log(`文件 "${file.name}" 的事件类型: ${event.type}.`);

          break;

      }

    });

  }

}
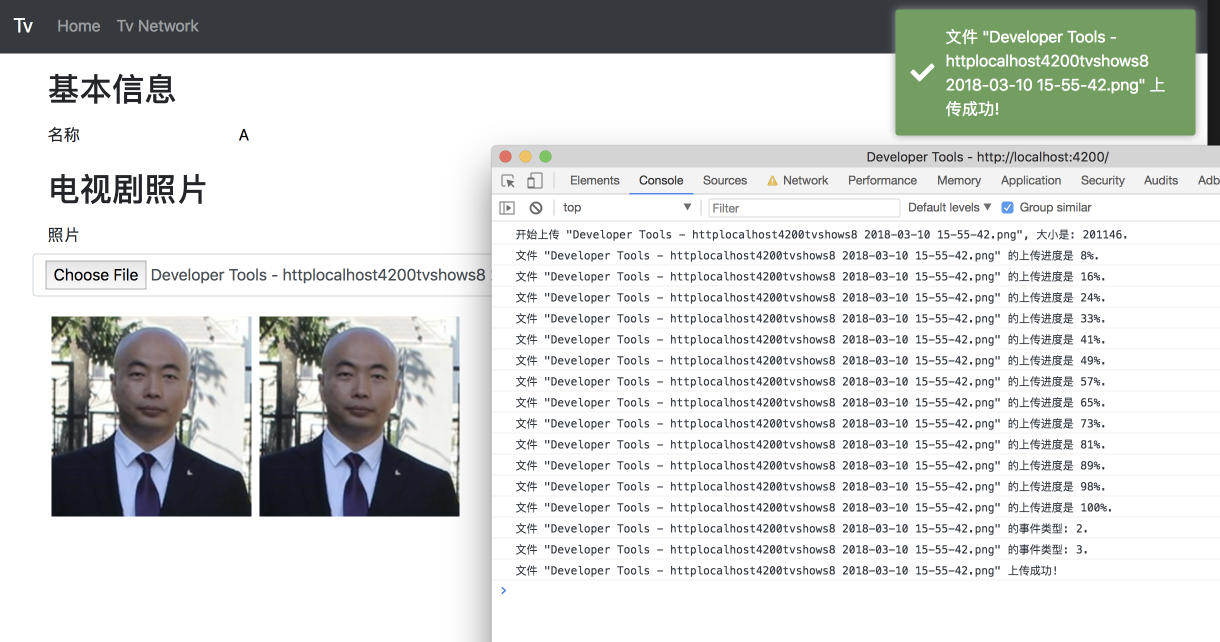
这样, 上传文件时, 每个进度都会返回一个event, 我暂时就先把它打印到控制台.
看一下效果:
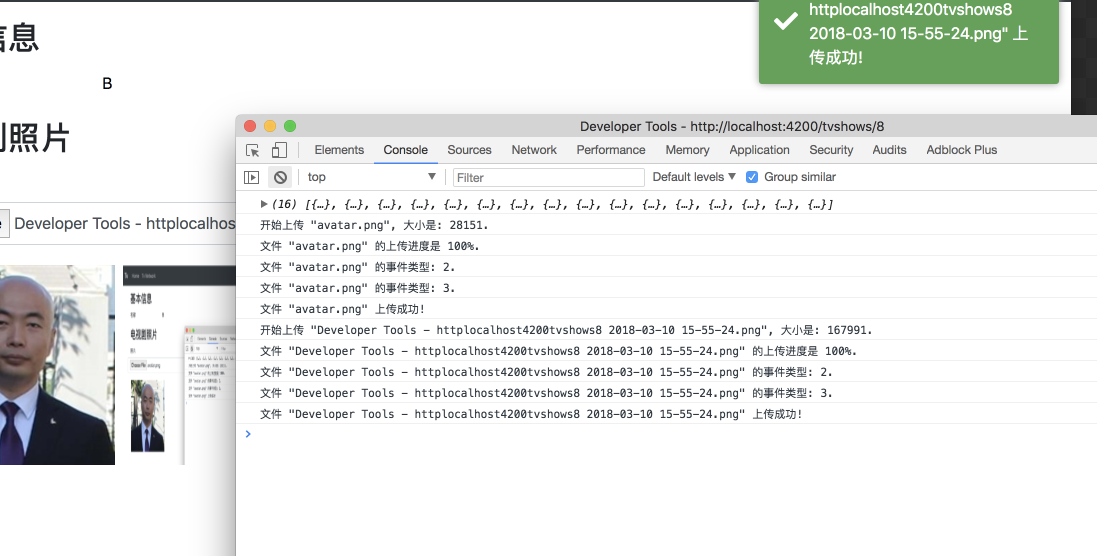
好的, 文件太小, 本地到速度又太快, 进度直接100%了.
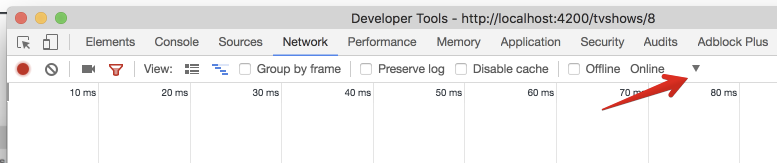
那我改一下Chrome的设置, 打开Developer Tools的Network 选项, 然后点击这里:
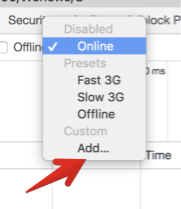
然后添加:
添加一个非常慢的网速限制:
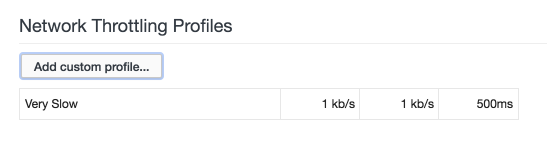
最后选取这个限制:
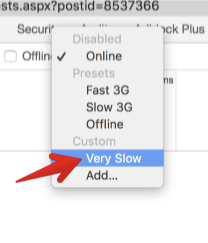
实际上, 选择Slow 3G就很慢了.
这时, 再上传一次试试效果:
很好, 没问题.
接下来就是UI显示进度条的问题了, 很简单:
打开html:
<form>

  <h2>基本信息</h2>

  <div class="form-group row">

    <label for="name" class="col-sm-2 col-form-label">名称</label>

    <div class="col-sm-10">

      <input type="text" readonly class="form-control-plaintext" id="name" value="{{model.name}}">

    </div>

  </div>

  <h2>电视剧照片</h2>

  <div class="form-group row">

    <label for="file" class="col-sm-2 col-form-label">照片</label>

    <input type="file" name="file" id="file" class="form-control" #fileInput (change)="upload()">

  </div>

  <div class="progress" *ngIf="progress">

    <div class="progress-bar progress-bar-striped progress-bar-animated" role="progressbar" aria-valuenow="0" aria-valuemin="0"

      aria-valuemax="100" [style.width]="progress"></div>

  </div>

  <div>

    <img [src]="'http://localhost:5000/Uploads/' + p.fileName" [alt]="p.fileName" *ngFor="let p of photoes" class="m-1" width="200"

      height="200" />

  </div>

</form>
打开tv-show-detail.component.ts:
import { Component, OnInit, ElementRef, ViewChild } from '@angular/core';

import { TvShowService } from '../../services/tv-show.service';

import { Router, ActivatedRoute, ParamMap } from '@angular/router';

import { TvShow } from '../../models/tv-show';

import { Subscription } from 'rxjs/Subscription';

import { ToastrService } from 'ngx-toastr';

import { PhotoService } from '../../services/photo.service';

import { Photo } from '../../models/photo';

import { Observable } from 'rxjs/Observable';

import 'rxjs/add/observable/forkJoin';

import { HttpEvent, HttpEventType } from '@angular/common/http';

import { HttpResponse } from 'selenium-webdriver/http';

@Component({

  selector: 'app-tv-show-detail',

  templateUrl: './tv-show-detail.component.html',

  styleUrls: ['./tv-show-detail.component.css']

})

export class TvShowDetailComponent implements OnInit {

  tvShowId: number;

  @ViewChild('fileInput') fileInput: ElementRef;

  model: TvShow = new TvShow();

  busy: Subscription;

  photoes: Photo[] = [];

  progress: string;

  constructor(

    private tvShowService: TvShowService,

    private router: Router,

    private route: ActivatedRoute,

    private toastr: ToastrService,

    private photoService: PhotoService

  ) { }

  ngOnInit() {

    this.route.paramMap.switchMap((params: ParamMap) => {

      this.tvShowId = +params.get('id');

      return Observable.forkJoin<TvShow, Photo[]>(

        this.tvShowService.getById(this.tvShowId),

        this.photoService.getPhotoes(this.tvShowId)

      );

    }).subscribe(([tvShow, photoes]) => {

      this.model = tvShow;

      this.photoes = photoes;

    });

  }

  upload() {

    const ele = this.fileInput.nativeElement;

    const file = ele.files[0];
    ele.value = ''; // 上传图片后,把input的值清空.

    this.photoService.upload(this.tvShowId, file).subscribe((event: HttpEvent<any>) => {

      switch (event.type) {

        case HttpEventType.Sent:

          console.log(`开始上传 "${file.name}", 大小是: ${file.size}.`);

          break;

        case HttpEventType.UploadProgress:

          const percentDone = Math.round(100 * event.loaded / event.total);

          this.progress = `${percentDone}%`;

          console.log(`文件 "${file.name}" 的上传进度是 ${percentDone}%.`);

          break;

        case HttpEventType.Response:

          console.log(`文件 "${file.name}" 上传成功!`);

          this.toastr.success(`文件 "${file.name}" 上传成功!`);

          this.photoes.push(<Photo>(event.body));

          this.progress = null;

          break;

        default:

          console.log(`文件 "${file.name}" 的事件类型: ${event.type}.`);

          break;

      }

    });

  }

}
试试效果:
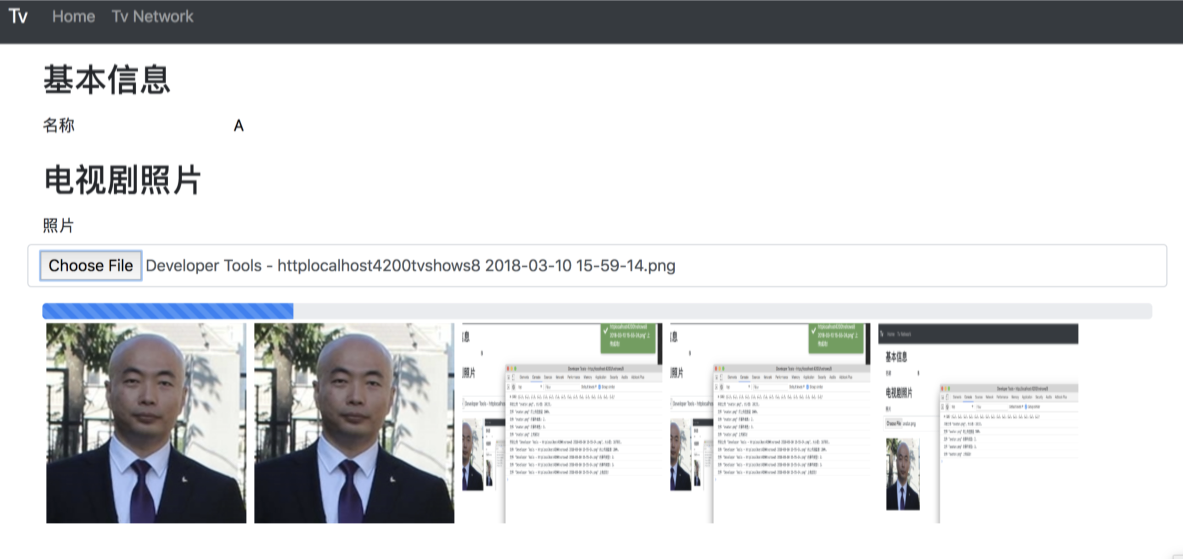
OK, 没问题!
今天就写到这吧.
用VSCode开发一个asp.net core2.0+angular5项目(5): Angular5+asp.net core 2.0 web api文件上传的更多相关文章
- Asp.Net Core 3.0 学习3、Web Api 文件上传 Ajax请求以及跨域问题
1.创建Api项目 我用的是VS2019 Core3.1 .打开Vs2019 创建Asp.Net Core Web应用程序命名CoreWebApi 创建选择API 在Controller文件夹下面添加 ...
- asp.net web api 文件上传
1正确的做法 public class AvaterController : BaseApiController { [HttpPost] public async Task<IHttpActi ...
- Asp.Net Core Web Api图片上传(一)集成MongoDB存储实例教程
Asp.Net Core Web Api图片上传及MongoDB存储实例教程(一) 图片或者文件上传相信大家在开发中应该都会用到吧,有的时候还要对图片生成缩略图.那么如何在Asp.Net Core W ...
- Web大文件上传控件-asp.net-bug修复-Xproer.HttpUploader6.2
版权所有 2009-2016荆门泽优软件有限公司 保留所有权利 官方网站:http://www.ncmem.com/ 产品首页:http://www.ncmem.com/webapp/up6.2/in ...
- Asp.Net Web Api 图片上传
public string UploadFile() { if (Request.Content.IsMimeMultipartContent()) ...
- 19、文件上传与下载/JavaMail邮件开发
回顾: 一. 监听器 生命周期监听器 ServletRequestListener HttpSessionListener ServletContextListener 属性监听器 ServletRe ...
- iOS多线程与网络开发之小文件上传
郝萌主倾心贡献,尊重作者的劳动成果,请勿转载. /** 取得本地文件的MIMEType */ 2 - (void) getMIMEType { 3 // Socket 实现断点上传 4 5 //apa ...
- Java开发系列-文件上传
概述 Java开发中文件上传的方式有很多,常见的有servlet3.0.common-fileUpload.框架.不管哪种方式,对于文件上传的本质是不变的. 文件上传的准备 文件上传需要客户端跟服务都 ...
- 用VSCode开发一个基于asp.net core 2.0/sql server linux(docker)/ng5/bs4的项目(1)
最近使用vscode比较多. 学习了一下如何在mac上使用vscode开发asp.netcore项目. 这里是我写的关于vscode的一篇文章: https://www.cnblogs.com/cgz ...
随机推荐
- 用js脚本一键下载网页所有图片
年前这两天稍微闲一点了,琢磨了一点js脚本,功能是把当前网页页面上的所有图片一次性保存到本地,免得每次都要对图片右键保存. 测试环境:Chrome开发者模式下(启动Chrome,按F12即可) 测试网 ...
- xBIM WeXplorer xViewer 基本应用
目录 基础 xBIM WeXplorer 简要介绍 xBIM WeXplorer xViewer 基本应用 xBIM WeXplorer xViewer 浏览器检查 xBIM WeXplorer xV ...
- Mysql查询某字段值重复的数据
查询user表中,user_name字段值重复的数据及重复次数 select user_name,count(*) as count from user group by user_name havi ...
- centos 6.* 配置端口
vi /etc/sysconfig/iptables 将 -A INPUT -m state --state NEW -m tcp -p tcp --dport 80 -j ACCEPT (允 ...
- 2.数码相框-编码(ASCII/GB2312/Unicode)介绍,并使LCD显示汉字字符(2)
在上章-学习了数码相框的框架分析(1)了 本章主要内容如下: 1)熟悉ASCII/GB2312/Unicode编码 2)写应用程序,使LCD显示汉字和字符 大家都知道,数据传输的是二进制,而字符和汉字 ...
- makefile讲解
仅供自己学习使用 一.Makefile介绍 Makefile 或 makefile: 告诉make维护一个大型程序, 该做什么.Makefile说明了组成程序的各模块间的相互 关系及更新模块时必须进行 ...
- .net 分割字符串
string a = "1-2-3-4-5-6-7-8-9"; string[] b = a.Split(new Char[] { '-' }); for (int i = 0; ...
- js创建数组的三个方式
<!DOCTYPE html> <html lang="en"> <head> <meta charset="UTF-8&quo ...
- java11 - GUI图形用户界面编程
一.JavaSwing界面设计参考教程 二.布局管理器 三.绝对布局 import java.awt.Color; import java.awt.event.ActionEvent; import ...
- Centos6增加新用户并赋予权限
第一步:创建用户并设置密码 useradd testuser // 增加用户名为'testuser'的用户 passwd testpasswd //设定密码为'testpasswd' 第二步:用户授权 ...