keras03 Aotuencoder 非监督学习 第一个自编码程序
# keras
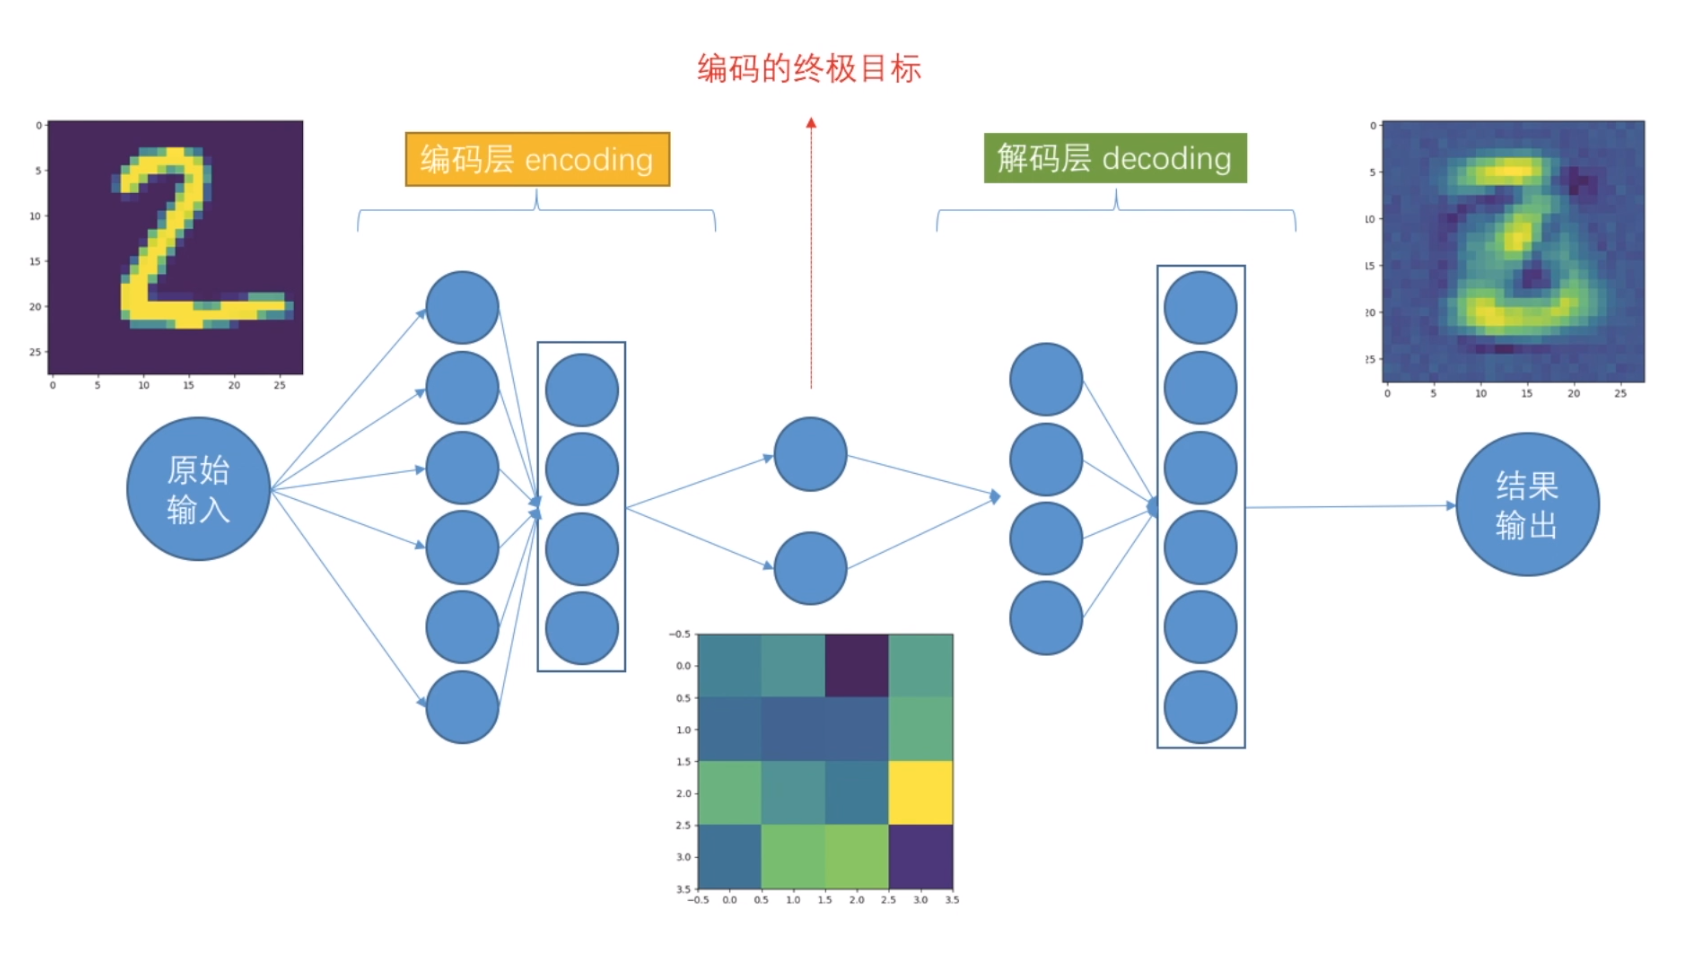
# Autoencoder 自编码非监督学习
# keras的函数Model结构 (非序列化Sequential)
# 训练模型
# mnist数据集
# 聚类 https://www.bilibili.com/video/av31910829?t=115 准备工作,array ——》 numpy ; plt.show()
import matplotlib.pyplot as plt

import numpy as np

a = [[1, 2]]

a = np.array(a)

c = a[:, 0]

b = a[:, 1]

print(c, b)

print(a.shape)

plt.scatter(c, b)

plt.show()
# coding:utf-8 import numpy as np
from keras.datasets import mnist
from keras.models import Model
from keras.layers import Dense, Input
import matplotlib.pyplot as plt '''
1st 加载数据集 x (60000, 28, 28) y (10000, 1)
'''
(x_train, y_train), (x_test, y_test) = mnist.load_data() # 数据处理-归一化 转 浮点 , 不需要标签
x_train = x_train.astype('float32')/255.0
x_test = x_test.astype('float32')/255.0
# reshape 数据形状 适用于dense层,是input需要的
x_train = x_train.reshape(-1, 784)
x_test = x_test.reshape(-1, 784) '''
2nd encoded & decoded
'''
# 定义encoding终极维度
encoding_dim = 4 # 因为我们输出的时候, 需要一个二维坐标,二维坐标只有两个值. 高维无法可视化 # 定义输入层input可以接受的数据shape,类似TensorFlow 的placeholder
input_img = Input(shape=(784,)) # 定义编码层 这里是把数据从大维度降低到小维度 如28*28或784 降低到2个维度
# 特别注意 keras 这次用API函数模式构建网络层 # ***第一层编码***
encoded = Dense(units=128, activation='relu')(input_img)
# ***第二层编码***
encoded = Dense(units=64, activation='relu')(encoded) # 后面的encoded是第一层的
# ***第三层编码***
encoded = Dense(units=32, activation='relu')(encoded) # 后面的encoded是第2层的
# ***第四层编码***(终极输出)和前面终极维度相对应 encoding_dim = 2,并给出解码层
encoded_output = Dense(units=encoding_dim)(encoded) # 这里up主少了(encoded) # ***可以输出结果 如果我想的话 2个维度结果*** 改为4个维度 2*2 # 定义解码层
# ***第一层解码***
decoded = Dense(units=32, activation='relu')(encoded_output)
# ***第二层解码***
decoded = Dense(units=64, activation='relu')(decoded)
# ***第三层解码***
decoded = Dense(units=128, activation='relu')(decoded)
# ***第四层解码***
decoded = Dense(units=784, activation='tanh')(decoded) '''
3rd autoencoder
''' # 构建自动编码模型结构
autoencoder = Model(inputs=input_img, outputs=decoded) # 构建编码模型结构
encoder = Model(inputs=input_img, outputs=encoded_output) # 编译模型 autoencoder.compile(optimizer='adam', loss='mse') # mean square err
# adam可以实例化,自行改参数 # 训练
autoencoder.fit(
x=x_train,
y=x_train, # 非监督学习,比的不是label,而是自己
epochs=20,
batch_size=512,
shuffle=True, # 每个训练的epoch完成后,数据打乱每次结构 1 2 3 4 5 6 7 8 9这样的顺序会被打乱
) # 打印结果
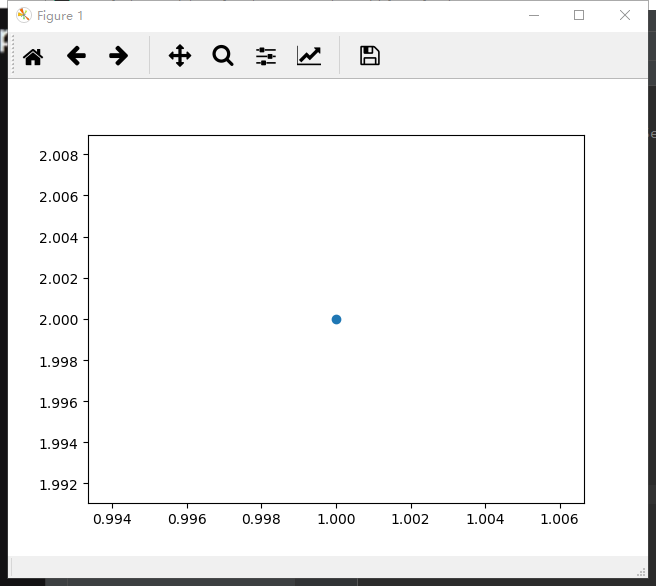
encoded_img = encoder.predict(x_test) plt.scatter(x=encoded_img[:, 0], y=encoded_img[:, 1], c=y_test, s=3) # y_test唯一用的地方
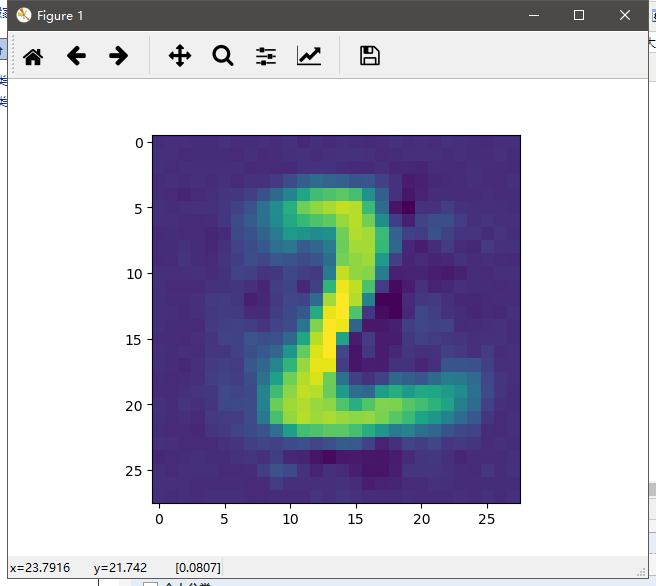
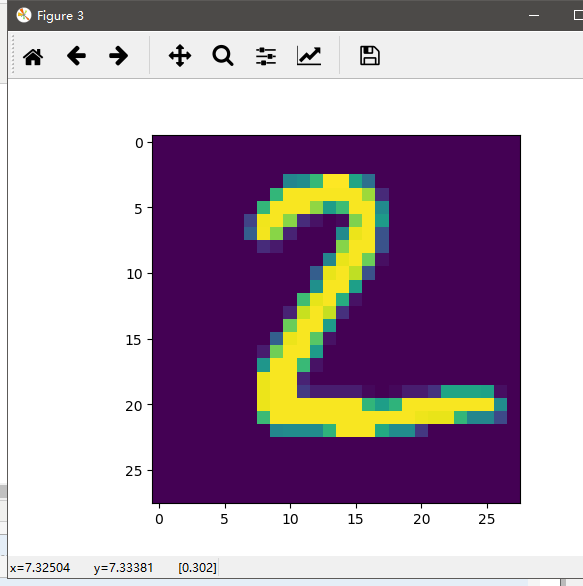
plt.show() # 打印三个图对比 decoded_img = autoencoder.predict(x_test[1].reshape(1, 784))
encoded_img = encoder.predict(x_test[1].reshape(1, 784)) plt.figure(1)
plt.imshow(decoded_img[0].reshape(28, 28))
plt.figure(2)
plt.imshow(encoded_img[0].reshape(2, 2))
plt.figure(3)
plt.imshow(x_test[1].reshape(28, 28))
plt.show()
运行结果,省略前面的epoch。
D:\Anaconda3\envs\tf\python.exe D:/adevelop/keras/autoencoder/ancoder.py

Using TensorFlow backend.

Epoch 1/20

2018-12-20 21:10:36.415134: I tensorflow/core/platform/cpu_feature_guard.cc:141] Your CPU supports instructions that this TensorFlow binary was not compiled to use: AVX AVX2

2018-12-20 21:10:36.589254: I tensorflow/core/common_runtime/gpu/gpu_device.cc:1432] Found device 0 with properties:

name: GeForce GTX 1060 6GB major: 6 minor: 1 memoryClockRate(GHz): 1.7845

pciBusID: 0000:01:00.0

totalMemory: 6.00GiB freeMemory: 4.97GiB

2018-12-20 21:10:36.589537: I tensorflow/core/common_runtime/gpu/gpu_device.cc:1511] Adding visible gpu devices: 0

2018-12-20 21:10:36.928535: I tensorflow/core/common_runtime/gpu/gpu_device.cc:982] Device interconnect StreamExecutor with strength 1 edge matrix:

2018-12-20 21:10:36.928694: I tensorflow/core/common_runtime/gpu/gpu_device.cc:988]      0

2018-12-20 21:10:36.928783: I tensorflow/core/common_runtime/gpu/gpu_device.cc:1001] 0:   N

2018-12-20 21:10:36.928967: I tensorflow/core/common_runtime/gpu/gpu_device.cc:1115] Created TensorFlow device (/job:localhost/replica:0/task:0/device:GPU:0 with 4720 MB memory) -> physical GPU (device: 0, name: GeForce GTX 1060 6GB, pci bus id: 0000:01:00.0, compute capability: 6.1)

.......

  512/60000 [..............................] - ETA: 0s - loss: 0.0291

 5120/60000 [=>............................] - ETA: 0s - loss: 0.0296

 9728/60000 [===>..........................] - ETA: 0s - loss: 0.0298

14336/60000 [======>.......................] - ETA: 0s - loss: 0.0298

19456/60000 [========>.....................] - ETA: 0s - loss: 0.0297

24064/60000 [===========>..................] - ETA: 0s - loss: 0.0296

28672/60000 [=============>................] - ETA: 0s - loss: 0.0297

33280/60000 [===============>..............] - ETA: 0s - loss: 0.0297

38400/60000 [==================>...........] - ETA: 0s - loss: 0.0297

43008/60000 [====================>.........] - ETA: 0s - loss: 0.0297

47616/60000 [======================>.......] - ETA: 0s - loss: 0.0297

52224/60000 [=========================>....] - ETA: 0s - loss: 0.0298

56832/60000 [===========================>..] - ETA: 0s - loss: 0.0297

60000/60000 [==============================] - 1s 11us/step - loss: 0.0297

Process finished with exit code 0


保存以及测试:终极编码
autoencoder.save('autoencoder.h5')

ex_img1 = Image.open('../mnist/4.png')

ex_img2 = Image.open('../mnist/7.jpg')

ex_img1 = np.array(ex_img1)

ex_img2 = np.array(ex_img2)

encoded_img1 = encoder.predict(ex_img1.reshape(1, 784))

encoded_img2 = encoder.predict(ex_img2.reshape(1, 784))

print(encoded_img1)

print(encoded_img2)
运行结果:
  512/60000 [..............................] - ETA: 0s - loss: 0.0293

 5632/60000 [=>............................] - ETA: 0s - loss: 0.0299

10752/60000 [====>.........................] - ETA: 0s - loss: 0.0299

15360/60000 [======>.......................] - ETA: 0s - loss: 0.0298

19968/60000 [========>.....................] - ETA: 0s - loss: 0.0298

25088/60000 [===========>..................] - ETA: 0s - loss: 0.0298

30208/60000 [==============>...............] - ETA: 0s - loss: 0.0299

34816/60000 [================>.............] - ETA: 0s - loss: 0.0299

39424/60000 [==================>...........] - ETA: 0s - loss: 0.0299

44544/60000 [=====================>........] - ETA: 0s - loss: 0.0299

49664/60000 [=======================>......] - ETA: 0s - loss: 0.0299

54784/60000 [==========================>...] - ETA: 0s - loss: 0.0299

59904/60000 [============================>.] - ETA: 0s - loss: 0.0299

60000/60000 [==============================] - 1s 11us/step - loss: 0.0299

[[  851.9073 -2038.2947  1888.9907 -3720.866 ]]

[[  462.43057 -2609.475    2269.1575  -5579.742  ]]
keras03 Aotuencoder 非监督学习 第一个自编码程序的更多相关文章
- Standford机器学习 聚类算法(clustering)和非监督学习(unsupervised Learning)
聚类算法是一类非监督学习算法,在有监督学习中,学习的目标是要在两类样本中找出他们的分界,训练数据是给定标签的,要么属于正类要么属于负类.而非监督学习,它的目的是在一个没有标签的数据集中找出这个数据集的 ...
- Deep Learning论文笔记之(三)单层非监督学习网络分析
Deep Learning论文笔记之(三)单层非监督学习网络分析 zouxy09@qq.com http://blog.csdn.net/zouxy09 自己平时看了一些论文,但老感 ...
- 如何区分监督学习(supervised learning)和非监督学习(unsupervised learning)
监督学习:简单来说就是给定一定的训练样本(这里一定要注意,样本是既有数据,也有数据对应的结果),利用这个样本进行训练得到一个模型(可以说是一个函数),然后利用这个模型,将所有的输入映射为相应的输出,之 ...
- 5.1_非监督学习之sckit-learn
非监督学习之k-means K-means通常被称为劳埃德算法,这在数据聚类中是最经典的,也是相对容易理解的模型.算法执行的过程分为4个阶段. 1.首先,随机设K个特征空间内的点作为初始的聚类中心. ...
- Machine Learning——Unsupervised Learning(机器学习之非监督学习)
前面,我们提到了监督学习,在机器学习中,与之对应的是非监督学习.无监督学习的问题是,在未加标签的数据中,试图找到隐藏的结构.因为提供给学习者的实例是未标记的,因此没有错误或报酬信号来评估潜在的解决方案 ...
- k-means 非监督学习聚类算法
非监督学习 非监督学习没有历史样本数据和标签,直接对数据分析或得结果. k-means 使用 >>> from sklearn.cluster import KMeans >& ...
- 监督学习&非监督学习
监督学习 1 - 3 - Supervised Learning 在监督学习中,数据集中的每个例子,算法将预测得到例子的""正确答案"",像房子的价格,或者溜 ...
- 【学习笔记】非监督学习-k-means
目录 k-means k-means API k-means对Instacart Market用户聚类 Kmeans性能评估指标 Kmeans性能评估指标API Kmeans总结 无监督学习,顾名思义 ...
- 数学模型:3.非监督学习--聚类分析 和K-means聚类
1. 聚类分析 聚类分析(cluster analysis)是一组将研究对象分为相对同质的群组(clusters)的统计分析技术 ---->> 将观测对象的群体按照相似性和相异性进行不同群 ...
随机推荐
- 【Caffe篇】--Caffe从入门到初始及各层介绍
一.前述 Caffe,全称Convolutional Architecture for Fast Feature Embedding.是一种常用的深度学习框架,主要应用在视频.图像处理方面的应用上.c ...
- WelcomeActivity【欢迎界面】
版权声明:本文为HaiyuKing原创文章,转载请注明出处! 前言 简单记录下欢迎界面的布局以及倒计时和跳过功能. 效果图 代码分析 1.修改APP整个主题为无标题栏样式:styles.xml文件 & ...
- Tesseract 在 windows 下的安装及简单应用
Tesseract 是一个开源的 OCR 引擎,可以识别多种格式的图像文件并将其转换成文本,最初由 HP 公司开发,后来由 Google 维护.下载地址:https://digi.bib.uni-ma ...
- msql分区
确认mysql服务器是否支持分区表: show plugins; 如果能看到partition则表示能分区. HASH分区的特点: 根据MOD(分区键,分区数)的值把数据行存储到表的不同分区中 数据可 ...
- shared_ptr和动态数组
std::shared_ptr智能指针是c++11一个相当重要的特性,可以极大地将开发者从资源申请/释放的繁重劳动中解放出来. 然而直到c++17前std::shared_ptr都有一个严重的限制,那 ...
- java开发注解总结笔记
目录 1.最基础注解(spring-context包下的org.springframework.stereotype) 1.1.@Controller @Service @Repository @Co ...
- vue学习记录①(vue-cli脚手架构建项目结构)
我们直接从vue的工程化开始入手. 在这里用git命令行搭建项目环境.(当然直接cmd命令行下也是一样的) git下载安装地址:https://www.git-scm.com/download/win ...
- Docker-compose command 有多个命令例子
cat docker-compose.yml version: '3.4' services: klvchen: image: python_django:19.03.0 ports: - 8000: ...
- mpvue学习笔记-之微信小程序数据请求封装
简介 美团出品的mpvue已经开源出来很久了,一直说要进行一次实践,这不最近一次个人小程序开发就用上了它. 看了微信官方的数据请求模块--request,对比了下get和post请求的代码,发现如果在 ...
- [20190416]完善shared latch测试脚本2.txt
[20190416]完善shared latch测试脚本2.txt --//昨天测试shared latch,链接:http://blog.itpub.net/267265/viewspace-264 ...