SpringBoot的 HelloWorld
SpringBoot HelloWorld
功能需求
浏览器发送hello请求,服务器接收请求并处理,相应HelloWorld字符串
1.创建一个maven工程;(jar)
2.导入SpringBoot相关依赖
<parent>

    <groupId>org.springframework.boot</groupId>

    <artifactId>spring-boot-starter-parent</artifactId>

    <version>1.5.9.RELEASE</version>

</parent>

<dependencies>

    <dependency>

        <groupId>org.springframework.boot</groupId>

        <artifactId>spring-boot-starter-parent</artifactId>

    </dependency>

</dependencies>
3.编写一个主程序,启动SpringBoot应用
/**

 * @SpringBootApplication 标注一个主程序类,说明这是一个SpringBoot 应用

 **/

@SpringBootApplication

public class HelloWorldMainApplication {

    public static void main(String[] args) {

        //启动Spring应用

        SpringApplication.run(HelloWorldMainApplication.class,args);

    }

}
4.编写相关的Controller、Service
@Controller

public class HelloController {

    @ResponseBody

    @RequestMapping("/hello")

    public String hello(){

        return "HelloWorld!";

    }

}
5.运行主程序测试
6. 简化部署
<!--    这个插件可以将应用打包成一个可执行的jar包-->

    <build>

        <plugins>

            <plugin>

                <groupId>org.springframework.boot</groupId>

                <artifactId>spring-boot-maven-plugin</artifactId>

            </plugin>

        </plugins>

    </build>
将这个应用打成jar包(自带tomcat),直接使用java -jar的命令进行执行
7.探究HalloWorld
1.POM文件
1.父项目
<parent>

    <groupId>org.springframework.boot</groupId>

    <artifactId>spring-boot-starter-parent</artifactId>

    <version>1.5.9.RELEASE</version>

</parent>

它的父项目是

	<parent>

		<groupId>org.springframework.boot</groupId>

		<artifactId>spring-boot-dependencies</artifactId>

		<version>1.5.9.RELEASE</version>

		<relativePath>../../spring-boot-dependencies</relativePath>

	</parent>

	真正管理Spring Boot应用里面的所有依赖版本;
Spring Boot版本仲裁中心(spring-boot-dependencies);
以后我们导入依赖默认是不需要些版本的;(没有在dependencies里面管理的依赖自然需要声明)
2.启动器starter
<dependency>

    <groupId>org.springframework.boot</groupId>

    <artifactId>spring-boot-starter-web</artifactId>

</dependency>
spring-boot-starter-web:
spring-boot-starter:spring-boot场景启动器;
spring-boot-starter-web帮我们导入了web模块正常运行所依赖的组件;
Spring Boot将所有功能场景都抽取出来,做成一个个的starters(启动器),只需要在项目里面引入这些starter相关场景的所有依赖都会导入进来
2.主程序类,主入口类
/**

 * @SpringBootApplication 标注一个主程序类,说明这是一个SpringBoot 应用

 **/

@SpringBootApplication

public class HelloWorldMainApplication {

    public static void main(String[] args) {

        //启动Spring应用

        SpringApplication.run(HelloWorldMainApplication.class,args);

    }

}
@SpringBootApplication:Spring Boot 应用标注在某个类上说明这个类是SpringBoot的主配置类,SpringBoot就应该运行这个类的方法来启动SpringBoot应用;
@Target({ElementType.TYPE})

@Retention(RetentionPolicy.RUNTIME)

@Documented

@Inherited

@SpringBootConfiguration

@EnableAutoConfiguration

@ComponentScan(

    excludeFilters = {@Filter(

    type = FilterType.CUSTOM,

    classes = {TypeExcludeFilter.class}

), @Filter(

    type = FilterType.CUSTOM,

    classes = {AutoConfigurationExcludeFilter.class}

)}

)

public @interface SpringBootApplication {
1.@SpringBootConfiguration:Spring Boot的配置类;
标注在某个类上,表示这是一个SpringBoot的配置类
包含@Configuration:配置类上来标注这个注解;
配置类就是以往的配置文件;将配置文件替换成配置类,使用该注解才能让springboot知道这是个配置类,配置类也是容器中的一个组件:@Component
2.@EnableAutoConfiguration:开启自动配置功能
以前我们需要配置的东西,Springboot帮我们自动配置;
@AutoConfigurationPackage

@Import({EnableAutoConfigurationImportSelector.class})

public @interface EnableAutoConfiguration {
@AutoConfigurationPackage:自动配置包
@Import({Registrar.class}):Spring的底层注解@Import,给容器中导入一个组件;导入的组件由{Registrar.class}来决定
将主配置类(@SpringBootApplication标注的类)的所在包以及所有子包里面的所有组件扫描到Spring容器中
@Import({EnableAutoConfigurationImportSelector.class})
给容器中导入组件
EnableAutoConfigurationImportSelector:导入哪些组件的选择器,将所有需要导入的组件以全类名返回,这些组件就会被添加到容器中
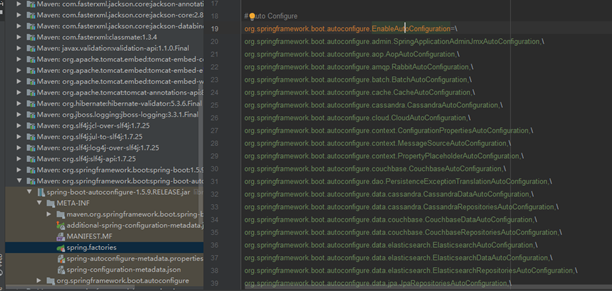
会给容器中导入96个自动配置类(xxxAutoConfigration):就是容器中导入这个场景需要的所有组件,并配置好这些组件;有了自动配置类,免去了我们手动编写配置注入功能组件等的工作;
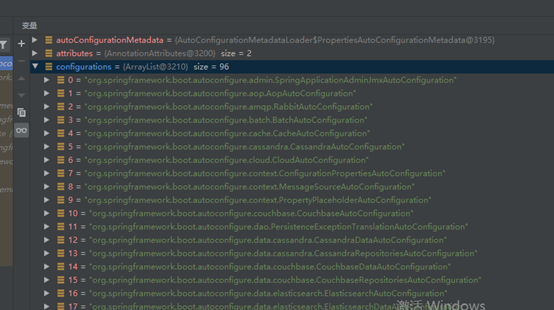
获取Configurations主要使用了
SpringFactoriesLoader.loadFactoryNames(EnableAutoConfigurationr.class, classLoader);
从类路径下获取 META-INF/spring.factories 资源文件(spring-boot-autoconfigure-1.5.9.RELEASE中),获取EnableAutoConfigurationr指定的值(如上图),将这些值作为自动配置类导入到容器中,自动配置类就生效了,即自动配置。
以前我们需要自己配置的东西,自动配置类都帮我们完成了。(eg.WebMvcAutoConfiguration)
@bean添加组件
//WebMvcAutoConfiguration

@Bean   //RequestMapping

@Primary

public RequestMappingHandlerMapping requestMappingHandlerMapping() {

 @Bean   //视图解析器

 @ConditionalOnMissingBean

 public InternalResourceViewResolver defaultViewResolver() {

 .....
J2EE的整体整合解决方案和自动配置都在spring-boot-autoconfigure-x.x.x.RELEASE.jar下的org.springframework.boot.autoconfigure中
SpringBoot的 HelloWorld的更多相关文章
- springboot之HelloWorld
简介 为了简化开发Spring的复杂度,Spring提供了SpringBoot可以快速开发一个应用,这里就简单介绍下SpringBoot如何快速开发一个J2EE应用 HelloWorld 首先在gra ...
- SpringBoot学习helloworld
这几天开始学习springBoot记录一下(Hello World) pom.xml <project xmlns="http://maven.apache.org/POM/4.0.0 ...
- SpringBoot的HelloWorld 应用及解释
参考链接: Spring Data JPA - Reference Documentation Spring Data JPA--参考文档 中文版 纯洁的微笑:http://www.ityouknow ...
- [一]SpringBoot 之 HelloWorld
(1)新建一个Maven Java工程 (2)在pom.xml文件中添加Spring BootMaven依赖 2.1在pom.xml中引入spring-boot-start-parent spring ...
- SpringBoot入门学习(一): Idea 创建 SpringBoot 的 HelloWorld
创建项目: 项目结构: 程序启动入口: 正式开始: package com.example.demo; import org.springframework.boot.SpringApplicatio ...
- redis整合springboot的helloworld
引入依赖 compile 'org.springframework.boot:spring-boot-starter-data-redis' 使用redis有两种方法 1.Jedis Jedis je ...
- SpringBoot——探究HelloWorld【三】
前言 前面我们写了helloworld的一个,这里我们对他进行分析 探究 那么下面就开始我们的探究之旅吧,首先从POM文件来,在POM文件中我们导入了项目所需要的依赖 POM文件 父项目 <pa ...
- spring-boot的helloWorld详解
1.运行环境 开发工具:intellij idea JDK版本:1.8 项目管理工具:Maven 3.2.5 2.Maven Plugin管理 pom.xml配置代码: <project xml ...
- eclipse springboot运行helloworld错误: 找不到或无法加载主类 xxx.xxx.xxx
这个错误,在网上搜找了好久,说是什么jar包冲突,什么环境配置,我经过验证均是正确的,javac java java -version 都没问题,环境变量也OK,各种解释均没有能够解决我的问题,最后好 ...
随机推荐
- ipc$链接批量爆破
写了一个bat bat code: @echo off cls echo Useage: % ip.txt pass.txt ) do ( FOR /F ) do ( echo net use \\% ...
- CF#637 D. Nastya and Scoreboard DP
D. Nastya and Scoreboard 题意 一块电子屏幕上有n个数字. 每个数字是通过这样7个线段显示的,现在你不小心打坏了k个线段,给出打坏之后的n个数字的显示方式,问之前的屏幕表示的最 ...
- [hdu4627 The Unsolvable Problem]数论
题意:给一个数n,找一个正整数x<n,使得x和n-x的最小公倍数最大. 思路:显然x和n-x越接近越好,gcd必须为1(贪心).从大到小考虑x,如果n为奇数,则答案就是x=n/2,如果n为偶数, ...
- What?废柴, 模拟登陆,代码控制滑动验证真的很难吗?Are you kidding???
1.简介 在前边的python接口自动化的时候,我们由于博客园的登录机制的改变,没有用博客园的登录测试接口.那么博客园现在变成了滑动验证登录,而且现在绝大多数的登录都变成这种滑动验证和验证码的登录验证 ...
- C# 数据操作系列 - 5. EF Core 入门
0.前言 上一章简单介绍了一下ORM框架,并手写了一个类似ORM的工具类.这一章将介绍一个在C#世界里大名鼎鼎的ORM框架--Entity Framework的Core版. Entity Framew ...
- PHP根据抖音的分享链接来抓包抖音视频
现在抖音是个很火的短视频平台,上面有许多不错的小视频.今天教大家怎么用PHP技术来获取到抖音上的的内容. 1:打开抖音选中你认为好的视频点击分享,复制链接,然后你会获取到如下的内容: #科比 愿你去的 ...
- Java面试札记
Java面试札记 在最深的夜里,即使是你的影子也会离你而去. 背景:愿某人在中秋节之前吃上大厂月饼!!!@CDZ 1.Java的八种基本数据类型? 整型:byte.int.short.long: 浮 ...
- c++离散化处理大范围和重复数据
关于离散化 有些新手可能会问:离散化是什么?离散化就是将无限空间中有限的个体映射到有限的空间里去. 上面的定义肯定会有人看不懂(其实我刚开始学的时候也看不懂) 用我自己的话来说,就是在不改变数据的相对 ...
- Vue中import用法
1. 引入第三方插件 第三方常用插件参考https://blog.csdn.net/vbirdbest/article/details/86527886 2. 导入 css 文件 import 'iv ...
- Echarts图标宽度变成100px,让图表宽度随着父元素自动适应,Vue实时监听宽度的变化,这可能是史上最好的解决方案!
最近工作中element后台管理使用Echarts图表,本后台项目分图表模式和列表模式,使用display控制显示隐藏,这样就引出了本文的问题. 问题1:Echarts图标宽度变成100px? 问题2 ...