vue-toy: 200行代码模拟Vue实现
vue-toy
200行左右代码模拟vue实现,视图渲染部分使用React来代替Snabbdom,欢迎Star。
项目地址:https://github.com/bplok20010/vue-toy
已实现的参数:
interface Options {

    el: HTMLElement | string;

	propsData?: Record<string, any>;

	props?: string[];

	name?: string;

	data?: () => Record<string, any>;

	methods?: Record<string, (e: Event) => void>;

	computed?: Record<string, () => any>;

	watch?: Record<string, (newValue: any, oldValue: any) => any>;

	render: (h: typeof React.createElement) => React.ReactNode;

	renderError?: (h: typeof React.createElement, error: Error) => React.ReactNode;

	mounted?: () => void;

	updated?: () => void;

	destroyed?: () => void;

	errorCaptured?: (e: Error, vm: React.ReactInstance) => void;

}
示例:
import Vue from "vue-toy";

const Hello = Vue.component({

	render(h){

		return h('span', null, 'vue-toy') ;

	}

})

new Vue({

  el: document.getElementById("root"),

  data() {

    return {

      msg: "hello vue toy"

    };

  },

  render(h) {

    return h("h1", null, this.msg, h(Hello));

  }

});
基本原理
官方原理图:
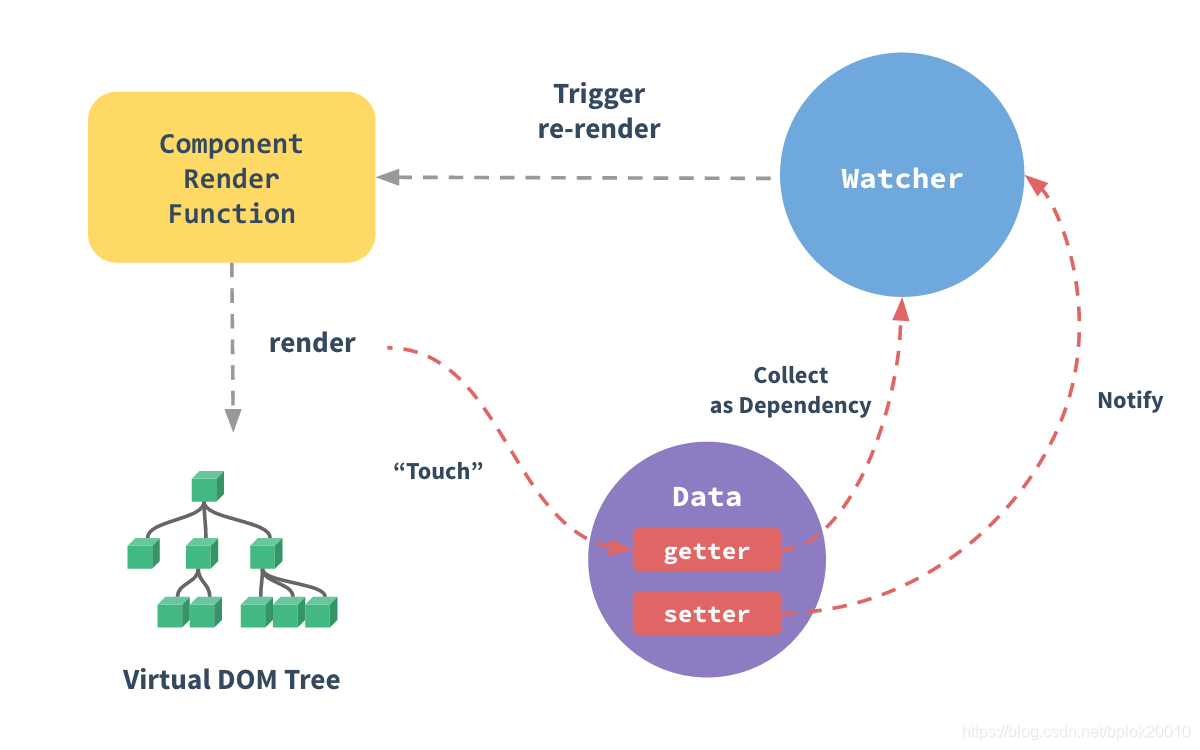
实现基本步骤:
- 使用Observable创建观察对象
- 定义好视图既render函数
- 收集视图依赖,并监听依赖属性
- 渲染视图
- 重复3-4
// 创建观察对象

// 观察对象主要使用的是Object.defineProperty或Proxy来实现,

const data = observable({

    name: 'vue-toy',

});

// 渲染模版

const render = function(){

    return <h1>{data.name}</h1>

}

// 计算render的依赖属性,

// 依赖属性改变时,会重新计算computedFn,并执行监控函数watchFn,

// 属性依赖计算使用栈及可以了。

// watch(computedFn, watchFn);

watch(render, function(newVNode, oldVNode){

    update(newVNode, mountNode);

});

//初始渲染

mount(render(), mountNode);

// 改变观察对象属性,如果render依赖了该属性,则会重新渲染

data.name = 'hello vue toy';
视图渲染部分(既render)使用的是vdom技术,vue使用
Snabbdom库,vue-toy使用的是react来进行渲染,所以在render函数里你可以直接使用React的JSX语法,不过别忘记import React from 'react',当然也可以使用preactinferno等 vdom库。
由于vue的template的最终也是解析并生成render函数,模版的解析可用
htmleParser库来生成AST,剩下就是解析指令并生产代码,由于工作量大,这里就不具体实现,直接使用jsx。
响应式实现
一个响应式示例代码:
const data = Observable({

	name: "none",

});

const watcher =new Watch(

	data,

	function computed() {

		return "hello " + this.name;

	},

	function listener(newValue, oldValue) {

		console.log("changed:", newValue, oldValue);

	}

);

// changed vue-toy none

data.name = "vue-toy";
Observable实现
源码
观察对象创建这里使用Proxy实现,示例:
function Observable(data) {

	return new Proxy(data, {

		get(target, key) {

			return target[key];

		},

		set(target, key, value) {

			target[key] = value;

			return true;

		},

	});

}
这就完成了一个对象的观察,但以上示例代码虽然能观察对象,但无法实现对象属性改动后通知观察者,这时还缺少Watch对象来计算观察函数的属性依赖及Notify来实现属性变更时的通知。
Watch实现
定义如下:
Watch(data, computedFn, watchFn);
- data 为 computedFn 的 上下文 既
this非必须 - computedFn 为观察函数并返回观察的数据,Watch会计算出里面的依赖属性。
- watchFn 当computedFn 返回内容发生改变时,watchFn会被调用,同时接收到新、旧值
大概实现如下:
// Watch.js

// 当前正在收集依赖的Watch

const CurrentWatchDep = {

    current: null,

};

class Watch {

    constructor(data, exp, fn) {

        this.deps = [];

        this.watchFn = fn;

        this.exp =  () => {

                    return exp.call(data);

                };

        // 保存上一个依赖收集对象

        const lastWatchDep = CurrentWatchDep.current;

        // 设置当前依赖收集对象

        CurrentWatchDep.current = this;

        // 开始收集依赖,并获取观察函数返回的值

        this.last = this.exp();

        // 还原

        CurrentWatchDep.current = lastWatchDep;

    }

    clearDeps() {

        this.deps.forEach((cb) => cb());

        this.deps = [];

    }

    // 监听依赖属性的改动,并保存取消回调

    addDep(notify) {

        // 当依赖属性改变时,重新触发依赖计算

        this.deps.push(notify.sub(() => {

            this.check();

        }));

    }

    // 重新执行依赖计算

    check() {

        // 清空所有依赖,重新计算

        this.clearDeps();

        // 作用同构造函数

        const lastWatchDep = CurrentWatchDep.current;

        CurrentWatchDep.current = this;

        const newValue = this.exp();

        CurrentWatchDep.current = lastWatchDep;

        const oldValue = this.last;

        // 对比新旧值是否改变

        if (!shallowequal(oldValue, newValue)) {

            this.last = newValue;

            // 调用监听函数

            this.watchFn(newValue, oldValue);

        }

    }

}
Notify实现
观察对象发生改变后需要通知监听者,所以还需要实现通知者Notify:
class Notify {

    constructor() {

        this.listeners = [];

    }

    sub(fn) {

        this.listeners.push(fn);

        return () => {

            const idx = this.listeners.indexOf(fn);

            if (idx === -1)

                return;

            this.listeners.splice(idx, 1);

        };

    }

    pub() {

        this.listeners.forEach((fn) => fn());

    }

}
调整Observable
前面的Observable太简单了,无法完成属性计算的需求,结合上面Watch Notify的来调整下Observable。
function Observable(data) {

	const protoListeners = Object.create(null);

	// 给观察数据的所有属性创建一个Notify

	each(data, (_, key) => {

		protoListeners[key] = new Notify();

	});

	return new Proxy(data, {

		get(target, key) {

			// 属性依赖计算

			if (CurrentWatchDep.current) {

				const watcher = CurrentWatchDep.current;

				watcher.addDep(protoListener[key]);

			}

			return target[key];

		},

		set(target, key, value) {

			target[key] = value;

			if (protoListeners[key]) {

				// 通知所有监听者

				protoListeners[key].pub();

			}

			return true;

		},

	});

}
好了,观察者的创建和订阅都完成了,开始模拟Vue。
模拟Vue
vue-toy 使用React来实现视图的渲染,所以render函数里如果使用JSX则需要引入React
准备
既然已经实现了Observable和Watch,那我们就来实现基本原理的示例:
import Observable from "vue-toy/cjs/Observable";

import Watch from "vue-toy/cjs/Watch";

function mount(vnode) {

  console.log(vnode);

}

function update(vnode) {

  console.log(vnode);

}

const data = Observable({

  msg: "hello vue toy!",

  counter: 1

});

function render() {

  return `render: ${this.counter} | ${this.msg}`;

}

new Watch(data, render, update);

mount(render.call(data));

setInterval(() => data.counter++, 1000);

// 在控制台可看到每秒的输出信息
这时将mount update的实现换成vdom就可以完成一个基本的渲染。
但这还不够,我们需要抽象并封装成组件来用。
Component
这里的Component像是React的高阶函数HOC,使用示例:
const Hello = Component({

	props: ["msg"],

	data() {

		return {

			counter: 1,

		};

	},

	render(h) {

		return h("h1", null, this.msg, this.counter);

	},

});
大概实现如下,options 参考文章开头
function Component(options) {

	return class extends React.Component {

	    // 省略若干...

		constructor(props) {

			super(props);

			// 省略若干...

			// 创建观察对象

			this.$data = Observable({ ...propsData, ...methods, ...data }, computed);

			// 省略若干...

			// 计算render依赖并监听

			this.$watcher = new Watch(

				this.$data,

				() => {

					return options.render.call(this, React.createElement);

				},

				debounce((children) => {

					this.$children = children;

					this.forceUpdate();

				})

			);

			this.$children = options.render.call(this, React.createElement);

		}

		shouldComponentUpdate(nextProps) {

			if (

				!shallowequal(

					pick(this.props, options.props || []),

					pick(nextProps, options.props || [])

				)

			) {

				this.updateProps(nextProps);

				this.$children = options.render.call(this, React.createElement);

				return true;

			}

			return false;

		}

        // 生命周期关联

		componentDidMount() {

			options.mounted?.call(this);

		}

		componentWillUnmount() {

			this.$watcher.clearDeps();

			options.destroyed?.call(this);

		}

		componentDidUpdate() {

			options.updated?.call(this);

		}

		render() {

			return this.$children;

		}

	};

}
创建主函数 Vue
最后创建入口函数Vue,实现代码如下:
export default function Vue(options) {

	const RootComponent = Component(options);

	let el;

	if (typeof el === "string") {

		el = document.querySelector(el);

	}

	const props = {

		...options.propsData,

		$el: el,

	};

	return ReactDOM.render(React.createElement(RootComponent, props), el);

}

Vue.component = Component;
好了,Vue的基本实现完成了。
感谢阅读。
最后,欢迎Star:https://github.com/bplok20010/vue-toy
vue-toy: 200行代码模拟Vue实现的更多相关文章
- 200行代码,7个对象——让你了解ASP.NET Core框架的本质
原文:200行代码,7个对象--让你了解ASP.NET Core框架的本质 2019年1月19日,微软技术(苏州)俱乐部成立,我受邀在成立大会上作了一个名为<ASP.NET Core框架揭秘&g ...
- 200行代码实现Mini ASP.NET Core
前言 在学习ASP.NET Core源码过程中,偶然看见蒋金楠老师的ASP.NET Core框架揭秘,不到200行代码实现了ASP.NET Core Mini框架,针对框架本质进行了讲解,受益匪浅,本 ...
- 200 行代码实现基于 Paxos 的 KV 存储
前言 写完[paxos 的直观解释]之后,网友都说疗效甚好,但是也会对这篇教程中一些环节提出疑问(有疑问说明真的看懂了 ),例如怎么把只能确定一个值的 paxos 应用到实际场景中. 既然 Talk ...
- 200行代码实现简版react🔥
200行代码实现简版react
- 不到 200 行代码,教你如何用 Keras 搭建生成对抗网络(GAN)【转】
本文转载自:https://www.leiphone.com/news/201703/Y5vnDSV9uIJIQzQm.html 生成对抗网络(Generative Adversarial Netwo ...
- SpringBoot,用200行代码完成一个一二级分布式缓存
缓存系统的用来代替直接访问数据库,用来提升系统性能,减小数据库复杂.早期缓存跟系统在一个虚拟机里,这样内存访问,速度最快. 后来应用系统水平扩展,缓存作为一个独立系统存在,如redis,但是每次从缓存 ...
- 200行代码,7个对象——让你了解ASP.NET Core框架的本质
2019年1月19日,微软技术(苏州)俱乐部成立,我受邀在成立大会上作了一个名为<ASP.NET Core框架揭秘>的分享.在此次分享中,我按照ASP.NET Core自身的运行原理和设计 ...
- 200行代码,7个对象——让你了解ASP.NET Core框架的本质[3.x版]
2019年1月19日,微软技术(苏州)俱乐部成立,我受邀在成立大会上作了一个名为<ASP.NET Core框架揭秘>的分享.在此次分享中,我按照ASP.NET Core自身的运行原理和设计 ...
- JavaScript开发区块链只需200行代码
用JavaScript开发实现一个简单区块链.通过这一开发过程,你将理解区块链技术是什么:区块链就是一个分布式数据库,存储结构是一个不断增长的链表,链表中包含着许多有序的记录. 然而,在通常情况下,当 ...
随机推荐
- poj3687拓扑排序
Labeling Balls Time Limit: 1000MS Memory Limit: 65536K Total Submissions: 14749 Accepted: 4325 D ...
- HDU2819
题目链接:http://acm.hdu.edu.cn/showproblem.php?pid=2819 题目大意: 给出一个N*N的0/1矩阵,只能交换整行或者整列,问最少交换多少次可以变成一个主对角 ...
- 【Java_SSM】(二)使用eclipse创建一个Maven web工程
这篇博文我们介绍一下如何利用eclipse创件一个maven web工程. (1)File--New--Other--Maven--Maven project 此处我们快速创建一个maven工程 点击 ...
- python运用 - log信息提取(知识: 遍历 | os )
运用到的python知识点: excel相关:https://www.cnblogs.com/yaner2018/p/11269873.html 字典: python字典的几种方式: 1)key值遍历 ...
- ForkJoinPool分支合并框架-工作窃取
Fork/Join 框架 Fork/Join 框架:就是在必要的情况下,将一个大任务,进行拆分(fork)成 若干个小任务(拆到不可再拆时), 再将一个个的小任务运算的结果进行 join 汇总 For ...
- NodeJS——模块全局安装路径配置以及关于supervisor的问题解释
下载安装NodeJS后,在自己选择的路径下会有如下的文件: 默认情况下NodeJS安装会同时安装npm(模块管理器:用于管理用户require的模块,有全局和本地两种). 注:全局:执行npm in ...
- hackone ssrf
alyssa_herrera submitted a report to U.S. Dept Of Defense. Jan 29th (2 years ago) Summary:A server s ...
- Spring boot Sample 001之spring-boot-begin-hello
一.环境 1.1.Idea 2020.1 1.2.JDK 1.8 二.目的 初识Spring Boot 三.步骤 3.1.点击File -> New Project -> Spring I ...
- 集合遍历元素的3种方法:for、foreach、迭代器iterator
1.for循环方式(Set集合不能使用,因为Set是无序的没有索引) for (int i = 0; i < list.size(); i++) { Object o = list.get(i) ...
- HTML静态页面项目:英雄联盟官网网站 的实现
效果: 源码与素材:链接: https://pan.baidu.com/s/1OuJd1lfEV7mrnf0I6FXm4A 提取码: 5c6j 复制这段内容后打开百度网盘手机App,操作更方便哦