关于Python 获取windows信息收集
收集一些Python操作windows的代码 (不管是自带的or第三方库)均来自网上
1.shutdown 操作
定时关机、重启、注销
#!/usr/bin/python

#-*-coding:utf-8-*-

#shutdown.py

import sys#导入

import os

from PyQt4.QtCore import *

from PyQt4.QtGui import *

class ShutDown(QWidget):

    def __init__(self):

        super(ShutDown, self).__init__()

        self.setWindowTitle('PyQt')

        self.hourLabel = QLabel(u'小时')#标签

        self.minuteLabel = QLabel(u'分钟')

        self.secondLabel = QLabel(u'秒')

        self.shutDownButton = QPushButton()#按钮

        self.shutDownButton.setText(u'关机')

        self.shutDownButton.clicked.connect(self.confirm_shutdown)

        self.rebootButton = QPushButton()

        self.rebootButton.setText(u'重启')

        self.rebootButton.clicked.connect(self.confirm_reboot)

        self.logoffButton = QPushButton()

        self.logoffButton.setText(u'注销')

        self.logoffButton.clicked.connect(self.confirm_logoff)

        self.hourSpinBox = QSpinBox()

        self.hourSpinBox.setRange(0,1000)

        self.hourSpinBox.setSingleStep(1)

        self.hourSpinBox.setValue(0)

        self.minuteSpinBox = QSpinBox()

        self.minuteSpinBox.setRange(0,1000)

        self.minuteSpinBox.setSingleStep(1)

        self.minuteSpinBox.setValue(0)

        self.secondSpinBox = QSpinBox()

        self.secondSpinBox.setRange(0,1000)

        self.secondSpinBox.setSingleStep(1)

        self.secondSpinBox.setValue(0)

        self.layout = QGridLayout()#网格布局

        self.layout.addWidget(self.hourLabel,1,0)

        self.layout.addWidget(self.hourSpinBox,1,1)

        self.layout.addWidget(self.minuteLabel,1,2)

        self.layout.addWidget(self.minuteSpinBox,1,3)

        self.layout.addWidget(self.secondLabel,1,4)

        self.layout.addWidget(self.secondSpinBox,1,5)

        self.layout.addWidget(self.shutDownButton,2,0,2,2)

        self.layout.addWidget(self.rebootButton,2,2,2,2)

        self.layout.addWidget(self.logoffButton,2,4,2,2)

        self.setLayout(self.layout)

    def confirm_shutdown(self):

        self.time = (self.hourSpinBox.value() * 3600 + self.minuteSpinBox.value() * 60

                     + self.secondSpinBox.value())

        shutdown = 'C:\Windows\System32\shutdown.exe -s -t ' + str(self.time)

        os.system(shutdown)

        sys.exit(0)

    def confirm_reboot(self):

        reboot = 'C:\Windows\System32\shutdown.exe -r'

        os.system(reboot)

        sys.exit(0)

    def confirm_logoff(self):

        logoff = 'C:\Windows\System32\shutdown.exe -l'

        os.system(logoff)

        sys.exit(0)

if __name__ == '__main__':

    app = QApplication(sys.argv)

    shutdown = ShutDown()

    shutdown.show()

    sys.exit(app.exec_())

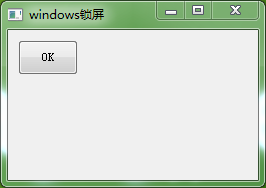
2.windows锁屏
相当与WIN+L 操作
 # -*- coding: utf-8 -*-

 # python在windows锁屏的代码

 import sys

 from ctypes import *

 from PyQt4 import QtGui, QtCore

 try:

     _fromUtf8 = QtCore.QString.fromUtf8

 except AttributeError:

     def _fromUtf8(s):

         return s

 class QuitButton(QtGui.QWidget):

     def __init__(self, parent=None):

         QtGui.QWidget.__init__(self, parent)

         self.setGeometry(300, 300, 250, 150)

         self.setWindowTitle(_fromUtf8('windows锁屏'))    #utf8 输出中文

         lockscreen = QtGui.QPushButton('OK', self)

         lockscreen.setGeometry(10, 10, 60, 35)

         QtCore.QObject.connect(lockscreen, QtCore.SIGNAL('clicked()'), self.win_L)  #self.win_L  点击执行

     def win_L(self):

         user32 = windll.LoadLibrary('user32.dll')

         user32.LockWorkStation()

 class lockScr(QtGui.QWidget):

     def __init__(self):

         QtGui.QWidget.__init__(self)

     def win_L(self):

         user32 = windll.LoadLibrary('user32.dll')

         user32.LockWorkStation()

 app = QtGui.QApplication(sys.argv)

 qb = QuitButton()

 qb.show()

 sys.exit(app.exec_())

3.获取电脑的基本信息
引用第三方库WMI 可以查看到 windows当前的版本、位数X86(64)、进程数目、CPU类型和使用率、硬盘的分区和使用率、Ip地址和Mac地址、 详细进程数据等
 #!/usr/bin/env python

 # -*- coding: utf-8 -*-

 import wmi

 import os

 import sys

 import platform

 import time

 import sys

 reload(sys)

 sys.setdefaultencoding( "utf-8" )

 def sys_version():

     c = wmi.WMI ()

     #获取操作系统版本

     for sys in c.Win32_OperatingSystem():

         print u"Version:%s" % sys.Caption,"Vernum:%s" % sys.BuildNumber

         print  sys.OSArchitecture#系统是32位还是64位的

         print sys.NumberOfProcesses #当前系统运行的进程总数

 def cpu_mem():

     c = wmi.WMI ()

     #CPU类型和内存

     for processor in c.Win32_Processor():

         #print "Processor ID: %s" % processor.DeviceID

         print "Process Name: %s" % processor.Name.strip()

     for Memory in c.Win32_PhysicalMemory():

         print "Memory Capacity: %.fMB" %(int(Memory.Capacity)/1048576)

 def cpu_use():

     #5s取一次CPU的使用率

     c = wmi.WMI()

     while True:

         for cpu in c.Win32_Processor():

             timestamp = time.strftime('%a, %d %b %Y %H:%M:%S', time.localtime())

             print '%s | Utilization: %s: %d %%' % (timestamp, cpu.DeviceID, cpu.LoadPercentage)

             time.sleep(5)

             break

 def disk():

     c = wmi.WMI ()

     #获取硬盘分区

     for physical_disk in c.Win32_DiskDrive ():

         for partition in physical_disk.associators ("Win32_DiskDriveToDiskPartition"):

             for logical_disk in partition.associators ("Win32_LogicalDiskToPartition"):

                 print physical_disk.Caption, partition.Caption, logical_disk.Caption

     #获取硬盘使用百分情况

     for disk in c.Win32_LogicalDisk (DriveType=3):

         print disk.Caption, "%0.2f%% free" % (100.0 * long (disk.FreeSpace) / long (disk.Size))

 def network():

     c = wmi.WMI ()

     #获取MAC和IP地址

     for interface in c.Win32_NetworkAdapterConfiguration (IPEnabled=1):

         print "MAC: %s" % interface.MACAddress

     for ip_address in interface.IPAddress:

         print "ip_add: %s" % ip_address

     print

     #获取自启动程序的位置

     for s in c.Win32_StartupCommand ():

         print "[%s] %s <%s>" % (s.Location, s.Caption, s.Command)

     #获取当前运行的进程

     for process in c.Win32_Process ():

         print process.ProcessId, process.Name

 def main():

     sys_version()

     cpu_mem()

     disk()

     network()

     #cpu_use()

 if __name__ == '__main__':

     main()

     print platform.system()

     print platform.release()

     print platform.version()

     print platform.platform()

     print platform.machine()
关于Python 获取windows信息收集的更多相关文章
- python获取windows信息
转载自http://www.blog.pythonlibrary.org/2010/02/06/more-windows-system-information-with-python/ How to ...
- 用python获取服务器硬件信息[转]
#!/usr/bin/env python # -*- coding: utf-8 -*- import rlcompleter, readline readline.parse_and_bind(' ...
- 用python获取ip信息
1.138网站 http://user.ip138.com/ip/首次注册后赠送1000次请求,API接口请求格式如下,必须要有token值 import httplib2 from urllib.p ...
- 内网渗透----windows信息收集整理
一.基础信息收集 1.信息收集类型 操作系统版本.内核.架构 是否在虚拟化环境中,已安装的程序.补丁 网络配置及连接 防火墙设置 用户信息.历史纪录(浏览器.登陆密码) 共享信息.敏感文件.缓存信息. ...
- 利用python 获取 windows 组策略
工作中有时候会有这种需求: 1. 自动配置组策略的安全基线,这个东西不用你自己写了,微软有这个工具,Microsoft Security Compliance Manager,你可以在下面的地址去下载 ...
- python 获取对象信息
当我们拿到一个对象的引用时,如何知道这个对象是什么类型.有哪些方法呢? 使用type() 首先,我们来判断对象类型,使用type()函数: 基本类型都可以用type()判断: >>> ...
- python写一个信息收集四大件的脚本
0x0前言: 带来一首小歌: 之前看了小迪老师讲的课,仔细做了些笔记 然后打算将其写成一个脚本. 0x01准备: requests模块 socket模块 optparser模块 time模块 0x02 ...
- Python 获取车票信息
提示:该代码仅供学习使用,切勿滥用!!! 先来一个git地址:https://gitee.com/wang_li/li_wang 效果图: 逻辑: 1.获取Json文件的内容 2.根据信息生成URL ...
- python获取对象信息
获取对象信息 拿到一个变量,除了用 isinstance() 判断它是否是某种类型的实例外,还有没有别的方法获取到更多的信息呢? 例如,已有定义: class Person(object): def ...
随机推荐
- Opencv人头跟踪检测
//-------------------------------------人头检测------------------------------------- int main(){ //V ...
- Kali Linux渗透基础知识整理(四):维持访问
Kali Linux渗透基础知识整理系列文章回顾 维持访问 在获得了目标系统的访问权之后,攻击者需要进一步维持这一访问权限.使用木马程序.后门程序和rootkit来达到这一目的.维持访问是一种艺术形式 ...
- 2-python学习——hello world
"hello world"是编程界一个经久不衰的例子,几乎所有语言的学习教程都把它当做第一个程序的范例.学习的过程就是再造轮子的过程,千万不要以为有人做过的,就不去学习了. hel ...
- mysql远程登录权限修改ubuntu
mysql默认只允许在localhost主机登录,如果想要通过远程登录管理,需要修改相应的权限. 方法一 首先:开启mysql所在主机的3306端口,或者关闭防火墙. service iptables ...
- JVM(java 虚拟机)内存设置
一.设置JVM内存设置 1. 设置JVM内存的参数有四个: -Xmx Java Heap最大值,默认值为物理内存的1/4,最佳设值应该视物理内存大小及计算机内其他内存开销而定: -Xms Ja ...
- ZendStudio 解决svn导出项目乱码问题
从svn导出项目往往会出现乱码,可以右击项目,点击properties(或者选中项目alt+enter键进入)直接修改项目编码为utf-8,但是html文件还是乱码. 下面的方法可以解决: windo ...
- Hibernate 多对多关联查询条件使用
from Brand as b inner join fetch b.styles as s where s.styleId=?
- 转:js中this关键字详解
this指向哪里? 一般而言,在Javascript中,this指向函数执行时的当前对象. In JavaScript, as in most object-oriented programming ...
- JAVA8 十大新特性详解
前言: Java8 已经发布很久了,很多报道表明Java 8 是一次重大的版本升级.在Java Code Geeks上已经有很多介绍Java 8新特性的文章, 例如Playing with Java ...
- Thread.Sleep vs. Task.Delay
We use both Thread.Sleep() and Task.Delay() to suspend the execution of a program for some given tim ...
