使用IDEA详解Spring中依赖注入的类型(上)
使用IDEA详解Spring中依赖注入的类型(上)
在Spring中实现IoC容器的方法是依赖注入,依赖注入的作用是在使用Spring框架创建对象时动态地将其所依赖的对象(例如属性值)注入Bean组件中。
Spring框架的依赖注入通常有两种实现方式,一种是使用构造方法注入,另一种是使用属性的setter方法注入。
使用构造方法注入
Spring框架可以采用Java反射机制,通过构造方法完成依赖注入。
创建项目及导入Maven模块过程请看《使用IDEA开发Spring入门程序》,在这就不赘述了。在这继续前面的项目,按照下面的步骤补充:
创建entity包,创建Person类
package entity;

public class Person {

    private String name;

    private String sex;

    public Person() {

        System.out.println("无参构造调用了...");

    }

    public Person(String name, String sex) {

        this.name = name;

        this.sex = sex;

    }

    public String getName() {

        return name;

    }

    public void setName(String name) {

        this.name = name;

    }

    public String getSex() {

        return sex;

    }

    public void setSex(String sex) {

        this.sex = sex;

    }

}

复制代码
构造方法注入方式一
编写配置文件
配置文件的具体代码如下:
<?xml version="1.0" encoding="UTF-8"?>

<beans xmlns="http://www.springframework.org/schema/beans"

       xmlns:xsi="http://www.w3.org/2001/XMLSchema-instance"

       xsi:schemaLocation="http://www.springframework.org/schema/beans

       http://www.springframework.org/schema/beans/spring-beans.xsd">

    <!--将指定类TestDaoImpl配置给Spring,即注册一个TestDaoImpl对象,让Spring创建其实例-->

    <!--

    一个Bean标签可以注册一个组件(对象、类)

    class:写要注册的组件的全类名

    id:这个对象的唯一标识

    -->

    <bean id="test" class="dao.TestDaoImpl"/>

    <bean id="person1" class="entity.Person"/>

    <!--使用构造方法注入-->

    <bean id="person2" class="entity.Person">

        <!--使用有参构造器进行创建对象并赋值-->

        <!-- public Person(String name, String sex) {

        this.name = name;

        this.sex = sex;

    }-->

        <constructor-arg name="name" value="泰斗贤若如"></constructor-arg>

        <constructor-arg name="sex" value="男"></constructor-arg>

    </bean>

</beans>

复制代码
在测试类TestDemo中测试
package test;

import dao.TestDao;

import entity.Person;

import org.junit.jupiter.api.Test;

import org.springframework.beans.factory.BeanFactory;

import org.springframework.beans.factory.xml.XmlBeanFactory;

import org.springframework.context.ApplicationContext;

import org.springframework.context.support.ClassPathXmlApplicationContext;

import org.springframework.context.support.FileSystemXmlApplicationContext;

import org.springframework.core.io.FileSystemResource;

public class TestDemo {

    @Test

    public void test4(){

        //初始化spring容器ApplicationContext,加载配置文件

        ApplicationContext applicationContext = new ClassPathXmlApplicationContext("applicationContext.xml");

        //通过容器获取test实例

        Person person2 =(Person) applicationContext.getBean("person2");

        System.out.println("姓名:"+person2.getName()+";"+"性别:"+person2.getSex());

    }

}

复制代码
测试结果
构造方法注入方式二
编写配置文件
<?xml version="1.0" encoding="UTF-8"?>

<beans xmlns="http://www.springframework.org/schema/beans"

       xmlns:xsi="http://www.w3.org/2001/XMLSchema-instance"

       xsi:schemaLocation="http://www.springframework.org/schema/beans

       http://www.springframework.org/schema/beans/spring-beans.xsd">

    <!--将指定类TestDaoImpl配置给Spring,即注册一个TestDaoImpl对象,让Spring创建其实例-->

    <!--

    一个Bean标签可以注册一个组件(对象、类)

    class:写要注册的组件的全类名

    id:这个对象的唯一标识

    -->

    <bean id="test" class="dao.TestDaoImpl"/>

    <bean id="person1" class="entity.Person"/>

    <!--使用构造方法注入-->

    <bean id="person2" class="entity.Person">

        <!--使用有参构造器进行创建对象并赋值-->

        <!-- public Person(String name, String sex) {

        this.name = name;

        this.sex = sex;

    }-->

        <constructor-arg name="name" value="泰斗贤若如"></constructor-arg>

        <constructor-arg name="sex" value="男"></constructor-arg>

    </bean>

    <!--可以省略name属性,严格按照构造器参数的位置赋值-->

    <bean id="person3" class="entity.Person">

        <!--使用有参构造器进行创建对象并赋值-->

        <!-- public Person(String name, String sex) {

        this.name = name;

        this.sex = sex;

    }-->

        <constructor-arg value="泰斗贤若如"></constructor-arg>

        <constructor-arg value="男"></constructor-arg>

    </bean>

</beans>

复制代码
在测试类TestDemo中测试
package test;
import dao.TestDao;
import entity.Person;
import org.junit.jupiter.api.Test;
import org.springframework.beans.factory.BeanFactory;
import org.springframework.beans.factory.xml.XmlBeanFactory;
import org.springframework.context.ApplicationContext;
import org.springframework.context.support.ClassPathXmlApplicationContext;
import org.springframework.context.support.FileSystemXmlApplicationContext;
import org.springframework.core.io.FileSystemResource;
public class TestDemo {
@Test
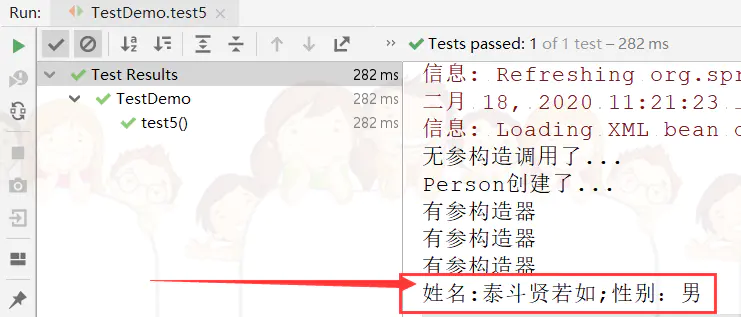
public void test5(){
//初始化spring容器ApplicationContext,加载配置文件
ApplicationContext applicationContext = new ClassPathXmlApplicationContext("applicationContext.xml");
//通过容器获取test实例
Person person3 =(Person) applicationContext.getBean("person3");
System.out.println("姓名:"+person3.getName()+";"+"性别:"+person3.getSex());
}
}
复制代码测试结果
需要注意的是,如果使用这种方法,要严格按照构造器参数的位置赋值,如果不这样赋值,当然也不会报错,但会造成赋值错乱,比如会把姓名赋值成性别,这当然是我们不愿意看到的,如果你非不按要求赋值(有点极端,皮一下),有种方法可以避免你赋值错乱,请看下面代码:
编写配置文件
<?xml version="1.0" encoding="UTF-8"?>

<beans xmlns="http://www.springframework.org/schema/beans"

       xmlns:xsi="http://www.w3.org/2001/XMLSchema-instance"

       xsi:schemaLocation="http://www.springframework.org/schema/beans

       http://www.springframework.org/schema/beans/spring-beans.xsd">

    <!--将指定类TestDaoImpl配置给Spring,即注册一个TestDaoImpl对象,让Spring创建其实例-->

    <!--

    一个Bean标签可以注册一个组件(对象、类)

    class:写要注册的组件的全类名

    id:这个对象的唯一标识

    -->

    <bean id="test" class="dao.TestDaoImpl"/>

    <bean id="person1" class="entity.Person"/>

    <!--使用构造方法注入-->

    <bean id="person2" class="entity.Person">

        <!--使用有参构造器进行创建对象并赋值-->

        <!-- public Person(String name, String sex) {

        this.name = name;

        this.sex = sex;

    }-->

        <constructor-arg name="name" value="泰斗贤若如"></constructor-arg>

        <constructor-arg name="sex" value="男"></constructor-arg>

    </bean>

    <!--可以省略name属性,严格按照构造器参数的位置赋值-->

    <bean id="person3" class="entity.Person">

        <!--使用有参构造器进行创建对象并赋值-->

        <!-- public Person(String name, String sex) {

        this.name = name;

        this.sex = sex;

    }-->

        <constructor-arg value="泰斗贤若如"></constructor-arg>

        <constructor-arg value="男"></constructor-arg>

    </bean>

    <bean id="person4" class="entity.Person">

        <!--使用有参构造器进行创建对象并赋值-->

        <!-- public Person(String name, String sex) {

        this.name = name;

        this.sex = sex;

    }-->

        <!--index="1",为参数指定索引,从0开始-->

        <constructor-arg value="男" index="1"></constructor-arg>

        <constructor-arg value="泰斗贤若如" ></constructor-arg>

    </bean>

</beans>

复制代码
在测试类TestDemo中测试
package test;

import dao.TestDao;

import entity.Person;

import org.junit.jupiter.api.Test;

import org.springframework.beans.factory.BeanFactory;

import org.springframework.beans.factory.xml.XmlBeanFactory;

import org.springframework.context.ApplicationContext;

import org.springframework.context.support.ClassPathXmlApplicationContext;

import org.springframework.context.support.FileSystemXmlApplicationContext;

import org.springframework.core.io.FileSystemResource;

public class TestDemo {

    @Test

    public void test5(){

        //初始化spring容器ApplicationContext,加载配置文件

        ApplicationContext applicationContext = new ClassPathXmlApplicationContext("applicationContext.xml");

        //通过容器获取test实例

        Person person4 =(Person) applicationContext.getBean("person4");

        System.out.println("姓名:"+person4.getName()+";"+"性别:"+person4.getSex());

    }

}

复制代码
测试结果
不要以为这样就完了,我在想,如果出现重载的情况,该如何办?且看我向下分解:
将entity包下的Person类修改如下
package entity;

public class Person {

    private String name;

    private String sex;

    private Integer age;

    private String email;

    public Person() {

        System.out.println("无参构造调用了...");

        System.out.println("Person创建了...");

    }

    public Person(String name, String sex) {

        this.name = name;

        this.sex = sex;

        System.out.println("有参构造器");

    }

    public Person(String name, String sex, Integer age) {

        this.name = name;

        this.sex = sex;

        this.age = age;

    }

    public Person(String name, String sex, String email) {

        this.name = name;

        this.sex = sex;

        this.email = email;

    }

    public String getName() {

        return name;

    }

    public void setName(String name) {

        this.name = name;

    }

    public String getSex() {

        return sex;

    }

    public void setSex(String sex) {

        this.sex = sex;

    }

    public Integer getAge() {

        return age;

    }

    public void setAge(Integer age) {

        this.age = age;

    }

    public String getEmail() {

        return email;

    }

    public void setEmail(String email) {

        this.email = email;

    }

}

复制代码
编写配置文件
<?xml version="1.0" encoding="UTF-8"?>

<beans xmlns="http://www.springframework.org/schema/beans"

       xmlns:xsi="http://www.w3.org/2001/XMLSchema-instance"

       xsi:schemaLocation="http://www.springframework.org/schema/beans

       http://www.springframework.org/schema/beans/spring-beans.xsd">

    <!--将指定类TestDaoImpl配置给Spring,即注册一个TestDaoImpl对象,让Spring创建其实例-->

    <!--

    一个Bean标签可以注册一个组件(对象、类)

    class:写要注册的组件的全类名

    id:这个对象的唯一标识

    -->

    <bean id="test" class="dao.TestDaoImpl"/>

    <bean id="person1" class="entity.Person"/>

    <!--使用构造方法注入-->

    <bean id="person2" class="entity.Person">

        <!--使用有参构造器进行创建对象并赋值-->

        <!-- public Person(String name, String sex) {

        this.name = name;

        this.sex = sex;

    }-->

        <constructor-arg name="name" value="泰斗贤若如"></constructor-arg>

        <constructor-arg name="sex" value="男"></constructor-arg>

    </bean>

    <!--可以省略name属性,严格按照构造器参数的位置赋值-->

    <bean id="person3" class="entity.Person">

        <!--使用有参构造器进行创建对象并赋值-->

        <!-- public Person(String name, String sex) {

        this.name = name;

        this.sex = sex;

    }-->

        <constructor-arg value="泰斗贤若如"></constructor-arg>

        <constructor-arg value="男"></constructor-arg>

    </bean>

    <bean id="person4" class="entity.Person">

        <!--使用有参构造器进行创建对象并赋值-->

        <!-- public Person(String name, String sex) {

        this.name = name;

        this.sex = sex;

    }-->

        <!--index="1",为参数指定索引,从0开始-->

        <constructor-arg value="男" index="1"></constructor-arg>

        <constructor-arg value="泰斗贤若如" ></constructor-arg>

    </bean>

    <bean id="person5" class="entity.Person">

        <!--使用有参构造器进行创建对象并赋值-->

        <!--public Person(String name, String sex, Integer age) {

        this.name = name;

        this.sex = sex;

        this.age = age;

    }

            public Person(String name, String sex, String email) {

        this.name = name;

        this.sex = sex;

        this.email = email;

    } -->

        <!--重载的情况下type可以指定参数的类型-->

        <constructor-arg value="男" index="1"></constructor-arg>

        <constructor-arg value="泰斗贤若如" index="0"></constructor-arg>

        <constructor-arg value="22" index="2" type="java.lang.Integer"></constructor-arg>

    </bean>

</beans>

复制代码
在测试类TestDemo中测试
package test;

import dao.TestDao;

import entity.Person;

import org.junit.jupiter.api.Test;

import org.springframework.beans.factory.BeanFactory;

import org.springframework.beans.factory.xml.XmlBeanFactory;

import org.springframework.context.ApplicationContext;

import org.springframework.context.support.ClassPathXmlApplicationContext;

import org.springframework.context.support.FileSystemXmlApplicationContext;

import org.springframework.core.io.FileSystemResource;

public class TestDemo {

    @Test

    public void test6(){

        //初始化spring容器ApplicationContext,加载配置文件

        ApplicationContext applicationContext = new ClassPathXmlApplicationContext("applicationContext.xml");

        //通过容器获取test实例

        Person person5 =(Person) applicationContext.getBean("person5");

        System.out.println("姓名:"+person5.getName()+";"+"性别:"+person5.getSex()+";"+"年龄:"+person5.getAge());

    }

}

复制代码
测试结果
不过话又说过来了,明明name能搞定的事情弄这么复杂干嘛,所以常用的还是方式一
使用属性的setter方法注入
这部分放到下一篇讲解吧,篇幅有点多了,请持续关注!
使用IDEA详解Spring中依赖注入的类型(上)的更多相关文章
- 用IDEA详解Spring中的IoC和DI(挺透彻的,点进来看看吧)
用IDEA详解Spring中的IoC和DI 一.Spring IoC的基本概念 控制反转(IoC)是一个比较抽象的概念,它主要用来消减计算机程序的耦合问题,是Spring框架的核心.依赖注入(DI)是 ...
- 详解Spring中Bean的作用域与生命周期
摘要:在利用Spring进行IOC配置时,关于bean的配置和使用一直都是比较重要的一部分,同时如何合理的使用和创建bean对象,也是小伙伴们在学习和使用Spring时需要注意的部分,所以这一篇文章我 ...
- Spring中依赖注入的四种方式
在Spring容器中为一个bean配置依赖注入有三种方式: · 使用属性的setter方法注入 这是最常用的方式: · 使用构造器注入: · 使用Filed注入(用于注解方式). 使用属性的sett ...
- spring中依赖注入
理解依赖注入:参考https://blog.csdn.net/taijianyu/article/details/2338311 一.依赖注入让bean与bean之间以配置文件组织在一起,而不是以硬编 ...
- spring中依赖注入与aop讲解
一.依赖注入 这个属于IOC依赖注入,也叫控制反转,IOC是说类的实例由容器产生,而不是我们用new的方式创建实例,控制端发生了改变所以叫控制反转. 1 2 3 4 5 6 7 8 9 10 11 1 ...
- 【Spring】详解Spring中Bean的加载
之前写过bean的解析,这篇来讲讲bean的加载,加载要比bean的解析复杂些,该文之前在小编原文中有发表过,要看原文的可以直接点击原文查看,从之前的例子开始,Spring中加载一个bean的方式: ...
- Spring点滴七:Spring中依赖注入(Dependency Injection:DI)
Spring机制中主要有两种依赖注入:Constructor-based Dependency Injection(基于构造方法依赖注入) 和 Setter-based Dependency Inje ...
- 详解Spring中的Profile
前言 由于在项目中使用Maven打包部署的时候,经常由于配置参数过多(比如Nginx服务器的信息.ZooKeeper的信息.数据库连接.Redis服务器地址等),导致实际现网的配置参数与测试服务器参数 ...
- Spring中依赖注入的使用和配置
使用方法1: //在执行此实例化的时候就会完成所有注入 ClassPathXmlApplicationContext ctx = new ClassPathXmlApplicationContext( ...
随机推荐
- 利用Python进行数据分析学习记录(一)
1.Python的科学计算邮件列表 pydata:这是一个Google Group邮件列表,其中的问题都是Python数据分析和pandas方面的. pystatsmodels:针对Numpy相关的问 ...
- VS从标准输入读入文件
1.点击[生成],在对应目标平台[64 or 32]文件夹下的[release]或[debug]下找到可执行文件 2.读取销售记录文件 1)打开cmd,将销售记录文件和可执行文件放在同一文件夹下 2) ...
- Spring Boot2 系列教程 (十三) | 整合 MyBatis (XML 版)
前言 如题,今天介绍 SpringBoot 与 Mybatis 的整合以及 Mybatis 的使用,之前介绍过了 SpringBoot 整合MyBatis 注解版的使用,上一篇介绍过 MyBatis ...
- Ubuntu18.04 一次性升级Python所有库
pip是什么 pip 是 Python 包管理工具,该工具提供了对Python 包的查找.下载.安装.卸载的功能. 升级pip版本 默认Ubuntu自带的pip (pip 9.0.1)是基于Pytho ...
- mysql索引创建和使用细节(二)
上篇粗略记录当mysql字段类型是string,传入int类型参数后失效当问题. 现在测试下mysql字段是int类型,传参string类型会发生什么. 题外话,最近膝盖手术后还在家养伤中,只怪自己以 ...
- cf 450b 矩阵快速幂(数论取模 一大坑点啊)
Jzzhu has invented a kind of sequences, they meet the following property: You are given x and y, ple ...
- Nginx在Centos 7中配置开机启动
1.创建脚本 # vi /etc/init.d/nginx #!/bin/bash # nginx Startup script for the Nginx HTTP Server # it is v ...
- ORM基础3 在python脚本里调用Django环境
1.查询 1.# all获取所有的object,结果QuerySet,列表 print('all'.center(80, '=')) ret = models.Person.objects.all() ...
- linux DHCP 服务器
配置 1:/etc/dhcp.conf 配置文件 2:dhcp.leases 启动 dhcp 服务器 linux dhcp客户端 windows dhcp 客户端
- HCNA 2017年01月26日
[Huawei]ping 127.0.0.1 PING 127.0.0.1: 56 data bytes, press CTRL_C to break Reply from 127.0.0.1: by ...