Blazor client-side + webapi (.net core 3.1) 添加jwt验证流程(非host)第二步 添加Identity
添加Identity数据上下文
安装nuget包:Microsoft.AspNetCore.Identity.EntityFrameworkCore
创建ApplicationDbContext类
创建一个Data文件夹,并创建一个新类,添加以下内容
    public class ApplicationDbContext : IdentityDbContext

    {

        public ApplicationDbContext(DbContextOptions options) : base(options)

        {

        }

    }
这个是一个默认Identity上下文,继承于DbContext,包含了一些默认的表(Dbset)包括用户,权限身份等等。
注册数据库和数据上下文
添加以下代码到ConfigureServices中
            services.AddDbContext<ApplicationDbContext>(options =>

                options.UseSqlServer(Configuration.GetConnectionString("DefaultConnection")));

            services.AddIdentity<IdentityUser,IdentityRole>()
          .AddEntityFrameworkStores<ApplicationDbContext>();
在.net core 3.1中,AddDefaultIdentity() 被删除了,所以这里用了AddIdentity()。
如果你需要使用SqlServer或者localdb的话,就安装nuget:Microsoft.EntityFrameworkCore.SqlServer ,我自己是使用的Mysql,使用的nuget包是:Pomelo.EntityFrameworkCore.MySql。
这两个包都会自动安装EFCore包。
添加链接字符串到appsettings.json
localdb
  "ConnectionStrings": {

    "DefaultConnection": "Server=(localdb)\\MSSQLLocalDB;Database=AuthApiAndBlazor;Trusted_Connection=True;MultipleActiveResultSets=true"

  },
Mysql
  "ConnectionStrings": {

    "DefaultConnection": "Server=localhost;database=AuthApiAndBlazor;uid=root;pwd=password;charset=utf8;sslMode=None",

  },
打开包管理器(或.Net CLI),添加迁移。
使用包管理员
PM> Add-Migration Init
使用命令行
C:\Users\Administrator\source\repos\AuthApiAndBlazor\server> dotnet ef migrations add init
当然,在3.1.2中,你可能会遇到错误,需要安装 Microsoft.EntityFrameworkCore.Design包
Your startup project 'server' doesn't reference Microsoft.EntityFrameworkCore.Design. This package is required for the Entity Framework Core Tools to work. Ensure your startup project is correct, install the package, and try again.
检查迁移文件,无误后更新到服务器
包管理器
PM> Update-Database
命令行
C:\Users\Administrator\source\repos\AuthApiAndBlazor\server> dotnet ef database update
添加用户验证到管道(Configure method)中
            app.UseAuthorization(); //验证用户可以做什么

            app.UseAuthentication(); //用户身份的验证
为你的api 控制器添加授权验证(用户验证)来测试我们的用户成功了
    [Authorize] //添加特性

    public class WeatherForecastController : ControllerBase
生成后运行,这时候再访问WeatherForecast的api就会跳转到https://localhost:5002/Account/Login?ReturnUrl=%2FWeatherForecast Login操作的页面上,这是Identity的预设链接,也是MVC标识(Identity)基架的默认页面,在MVC下这会被自动创建,但是由于我们是手动添加到WebApi中的,所以需要更改,我们也只需要它返回401状态码即可,实际登陆应该由前端进行操作。
设置JWT
首先需要安装Nuget包:Microsoft.AspNetCore.Authentication.JwtBearer
添加代码到ConfigureServices method中
            services.AddAuthentication((opts =>

            {

                opts.DefaultAuthenticateScheme = JwtBearerDefaults.AuthenticationScheme;

                opts.DefaultChallengeScheme = JwtBearerDefaults.AuthenticationScheme;  //如果不加这行,将会跳转到/Account/Login,也就是说你可以用视图来处理未登录

            })) //设置验证方式为常量Bearer,即JWTBearer

                .AddJwtBearer(options =>

                {

                    options.TokenValidationParameters = new TokenValidationParameters

                    {

                        ValidateIssuer = true, //验证发行方

                        ValidateAudience = true, //验证听众api

                        ValidateLifetime = true, //验证生存时间

                        ValidateIssuerSigningKey = true, //验证发行方密钥

                        ValidIssuer = Configuration["JwtIssuer"], //发行方

                        ValidAudience = Configuration["JwtAudience"], //听众

                        IssuerSigningKey = new SymmetricSecurityKey(Encoding.UTF8.GetBytes(Configuration["JwtSecurityKey"])) //对称密钥

                    };

                });
这里的写法是将JwtIssuer 、 JwtAudience 和 JwtSecurityKey 都放到appsettings.json文件中,你可以自己选择,我没有试过AddJwtBearer是单例还是怎样,即它可能不是实时可修改的。
它在appsettings.json的样子:
  "JwtSecurityKey": "RANDOM_KEY_MUST_NOT_BE_SHARED", //密钥

  "JwtIssuer": "https://localhost:5002", //server的域名

  "JwtAudience": "http://localhost:5001", //client (Blazor的域名)

  "JwtExpiryInDays":  //过期时间
添加Register和Login控制器
在server中生成两个api控制器,一个用于注册,一个用来做登陆。
RegisterController:
    [Route("api/[controller]")]

    [ApiController]

    public class AccountsController : ControllerBase

    {

        private readonly UserManager<IdentityUser> _userManager;

        public AccountsController(UserManager<IdentityUser> userManager)

        {

            _userManager = userManager;

        }

        [HttpPost]

        public async Task<IActionResult> Post([FromBody]RegisterModel model)

        {

            //创建用户,实际运用中我们一般会将IdentityUser更换为我们自定义的用户

            var newUser = new IdentityUser { UserName = model.Email, Email = model.Email };

            var result = await _userManager.CreateAsync(newUser, model.Password);

            if (!result.Succeeded)

            {

                var errors = result.Errors.Select(x => x.Description);

                //提示失败

                return Ok(new RegisterResult { Successful = false, Errors = errors });

            }

            //提示成功,让前端做跳转

            return Ok(new RegisterResult { Successful = true });

        }

    }
所需模型: (tips:这里因为我们前后端都是使用.net core 去实现,所以实际上我们可以将这些前后端都需要的模型,做成一个共享类库,即保证了同步性,又节省了代码量,如果你不这么做的话,你接下来还需要再添加一次这些模型到client项目)
RegisterModel(用于接收注册前端参数)
    public class RegisterModel

    {

        [Required]

        [EmailAddress]

        [Display(Name = "Email")]

        public string Email { get; set; }

        [Required]

        [StringLength(, ErrorMessage = "The {0} must be at least {2} and at max {1} characters long.", MinimumLength = )]

        [DataType(DataType.Password)]

        [Display(Name = "Password")]

        public string Password { get; set; }

        [DataType(DataType.Password)]

        [Display(Name = "Confirm password")]

        [Compare("Password", ErrorMessage = "The password and confirmation password do not match.")]

        public string ConfirmPassword { get; set; }

    }
RegisterResult (用于回传注册状态)
    public class RegisterResult

    {

        public bool Successful { get; set; }

        public IEnumerable<string> Errors { get; set; }

    }
为了方便,我们这里一次性也把登陆的模型都添加进去
LoginModel
    public class LoginModel

    {

        [Required]

        public string Email { get; set; }

        [Required]

        public string Password { get; set; }

        public bool RememberMe { get; set; }

    }
LoginResult
    public class LoginResult

    {

        public bool Successful { get; set; }

        public string Error { get; set; }

        public string Token { get; set; } //最终token

    }
UserModel
    public class UserModel

    {

        public string Email { get; set; }

        public bool IsAuthenticated { get; set; }

    }
LoginController的代码:
    [Route("api/[controller]")]

    [ApiController]

    public class LoginController : ControllerBase

    {

        private readonly IConfiguration _configuration;

        private readonly SignInManager<IdentityUser> _signInManager;

        public LoginController(IConfiguration configuration,

                               SignInManager<IdentityUser> signInManager)

        {

            _configuration = configuration;

            _signInManager = signInManager;

        }

        //api/login (GET)

        [HttpPost]

        public async Task<IActionResult> Login([FromBody] LoginModel login)

        {

            //尝试登陆

            var result = await _signInManager.PasswordSignInAsync(login.Email, login.Password, false, false);

            if (!result.Succeeded) return BadRequest(new LoginResult { Successful = false, Error = "Username and password are invalid." }); //如果登陆失败

            //payload

            var claims = new[]

            {

                new Claim(ClaimTypes.Name, login.Email)

            };

            //对称密钥

            var key = new SymmetricSecurityKey(Encoding.UTF8.GetBytes(_configuration["JwtSecurityKey"]));

            //密钥做签名

            var creds = new SigningCredentials(key, SecurityAlgorithms.HmacSha256);

            //过期时间

            var expiry = DateTime.Now.AddDays(Convert.ToInt32(_configuration["JwtExpiryInDays"]));

            //生成token

            var token = new JwtSecurityToken(

                _configuration["JwtIssuer"],

                _configuration["JwtAudience"],

                claims,

                expires: expiry,

                signingCredentials: creds

            );

            return Ok(new LoginResult { Successful = true, Token = new JwtSecurityTokenHandler().WriteToken(token) });

        }

    }
下面我们可以自己找个方法验证下,这里就省略。 如果正确的话,你的WeatherForecast控制器应该是401未授权的。
当然我在实际运行中试过并不返回401而是302跳转到了/Account/Login这个默认的登陆页面,由于我们将全部内容都交由前端处理,并不打算用mvc方式处理登陆注册,所以我们必须返回401以供前端识别。
使用postman做测试,首先WeatherForecast控制器是401返回(GET)
其次来试验/api/register 注册控制器
首先设置Content-Type为application/json
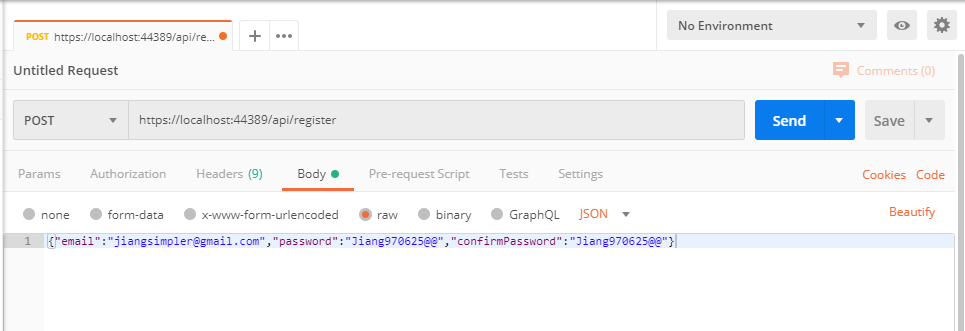
接着把json字符串放入body,经过实验,提交的json中对象名称可以首字母小写也可以首字母大写,跟实际类名相同都可,但是Blazor提交的json是会自动将首字母变小写,但是后面的其他的大写字母都不会变。当在使用blazor对接其他后端的时候要小心,因为如果要更改这个已经做好的过程,稍微有点麻烦
接下来可以获得Response
{

    "successful": false,

    "errors": [

        "User name 'jiangsimpler@gmail.com' is already taken."

    ]

}
到此本章就结束了,下一章将开始处理client前端的注册登陆和登出以及查询授权api数据
Blazor client-side + webapi (.net core 3.1) 添加jwt验证流程(非host)第二步 添加Identity的更多相关文章
- Blazor client-side + webapi (.net core 3.1) 添加jwt验证流程(非host)第一步
第一步,设置并检查CROS跨域请求 因为我们并不打算将Blazor 由webapi来进行host,所以Blazor和api将是两个域名,这样操作即方便以后单独使用Blazor来写前端,但后端采用已有或 ...
- Blazor client-side + webapi (.net core 3.1) 添加jwt验证流程(非host)第三章 客户端存储及验证
准备工作: 安装Nuget包:Blazored.LocalStorge. 这是一个client-side 浏览器存储库,找了非常久. 官方文档中也有一款Microsoft.AspNetCore.Pro ...
- jwt-在asp.net core中的使用jwt
JWT学习文章: 第一篇:JWT原理 第二篇:JWT原理实现代码 第三篇:在asp.net core中的使用JWT 前两篇文章中我写了jwt的原理,并且也用原理实现了jwt的验证.如果要看前两篇文章, ...
- .net core webapi+EF Core
.net core webapi+EF Core 一.描述: EF Core必须下载.net core2.0版本 Micorsoft.EntityFrameworkCore:EF框架的核心包Micor ...
- 【Blazor】在ASP.NET Core中使用Blazor组件 - 创建一个音乐播放器
前言 Blazor正式版的发布已经有一段时间了,.NET社区的各路高手也创建了一个又一个的Blazor组件库,其中就包括了我和其他小伙伴一起参与的AntDesign组件库,于上周终于发布了第一个版本0 ...
- ASP.NET Core 实战:基于 Jwt Token 的权限控制全揭露
一.前言 在涉及到后端项目的开发中,如何实现对于用户权限的管控是需要我们首先考虑的,在实际开发过程中,我们可能会运用一些已经成熟的解决方案帮助我们实现这一功能,而在 Grapefruit.VuCore ...
- 【.NET Core项目实战-统一认证平台】第十二章 授权篇-深入理解JWT生成及验证流程
[.NET Core项目实战-统一认证平台]开篇及目录索引 上篇文章介绍了基于Ids4密码授权模式,从使用场景.原理分析.自定义帐户体系集成完整的介绍了密码授权模式的内容,并最后给出了三个思考问题,本 ...
- ASP.NET Core Web Api之JWT刷新Token(三)
前言 如题,本节我们进入JWT最后一节内容,JWT本质上就是从身份认证服务器获取访问令牌,继而对于用户后续可访问受保护资源,但是关键问题是:访问令牌的生命周期到底设置成多久呢?见过一些使用JWT的童鞋 ...
- 为 ASP.NET Core (6.0)服务应用添加ApiKey验证支持
这个代码段演示了如何为一个ASP.NET Core项目中添加Apikey验证支持. 首先,通过下面的代码创建项目 dotnet new webapi -minimal -o yourwebapi 然后 ...
随机推荐
- python(从放弃到从头开始)
本节内容 Python介绍 发展史 Python 2 or 3? Hello World程序 变量 用户输入 .pyc是个什么鬼? 数据类型初识 数据运算 表达式if ...else语句 表达式for ...
- Kubernetes学习(一)
一 安装 三台机器搭建K8S集群,一台master两台woker Docker 18.09.0---kubeadm-1.14.0-0 kubelet-1.14.0-0 kubectl-1.14.0-0 ...
- MVC的概念
MVC模式的概念: 1.Model(业务模型):应用程序中用于处理应用程序数据逻辑的部分,通常模型对象负责在数据库中存取数据. 说白了就是确定要打的地基等一系列信息的. 2.view(视图):应用程序 ...
- 引入Activiti配置文件activiti.cfg.xml
前面我们用代码实现了生成25张activiti表,今天我们用Activiti提供的activiti.cfg.xml配置文件来简化实现前面的功能: 官方文档参考地址:http://activiti.or ...
- Spanner的TrueTime与事务
Spanner的TrueTime与事务 Spanner是谷歌的分布式数据库,发表于著名论文Spanner: Google's Globally-Distributed Database,它创造性的采用 ...
- Codeforces_714_A
http://codeforces.com/problemset/problem/714/A 水,注意K的值. #include <iostream> using namespace st ...
- Head First设计模式分析学习
永不放弃的毅力,和对欲望的控制. 注意:要能够理解相类似的设计模式之间的区别和不同.可以把类比列举出来,加深记忆. 是否加入Spring容器中的标准是是否要用到Spring框架的方法或者功能特性,如事 ...
- 2 深入分析 Java IO的工作机制(一)
大部分Web应用系统的瓶颈都是I/O瓶颈 2.1 Java的I/O类库的基本架构 Java的I/O操作类在包java.io下,大概有将近80个类,这些类大概可以分成如下4组. 基于字节操作的I/O接口 ...
- Html / XHtml 解析 - Parsing Html and XHtml
Html / XHtml 解析 - Parsing Html and XHtml HTMLParser 模块 通过 HTMLParser 模块来解析 html 文件通常的做法是, 建立一个 HTMLP ...
- [redis读书笔记] 第二部分 单机数据库 RDB持久化
内存中的rdb是会存为文件以做到RDB持久化的.RDB文件时一个二进制文件. 一 载入与存储 文件的载入是在server启动时进行的(rdbload()),因为AOF的更新频率比RDB高,所以如果AO ...