SpringBoot学习笔记(6) SpringBoot数据缓存Cache [Guava和Redis实现]
https://blog.csdn.net/a67474506/article/details/52608855
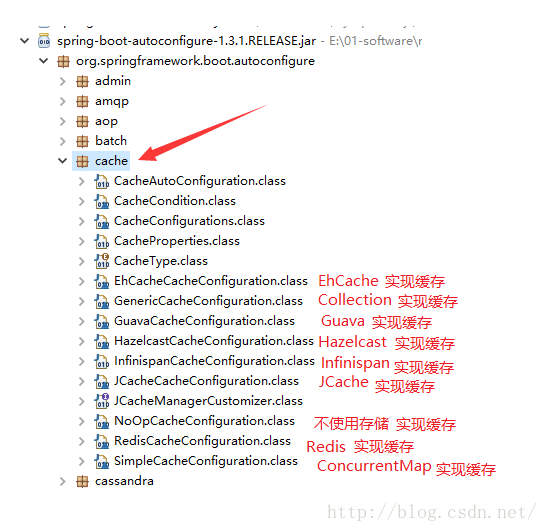
在不适用任何额外配置的情况下,默认使用SimpleCacheConfiguration
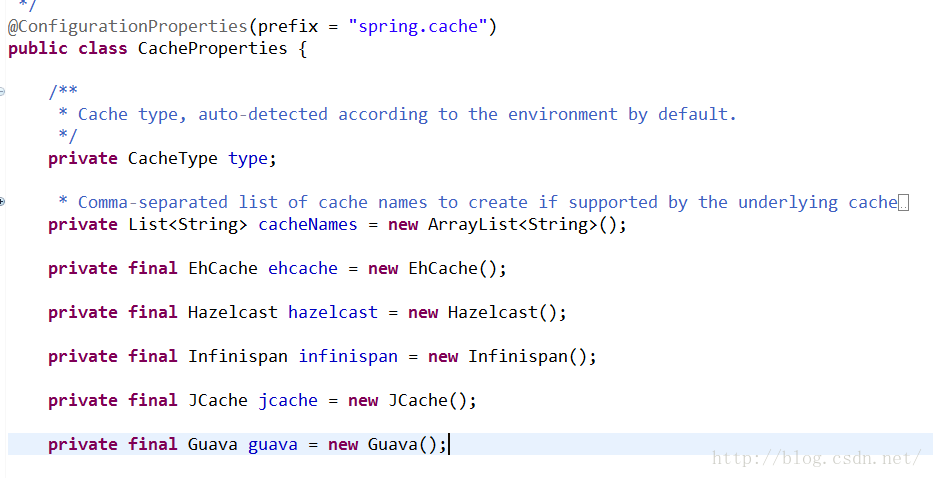
SpringBoot通过spring.cache为前缀来配置缓存

使用这些缓存实现的话,只需导入相关缓存的依赖,并在配置类中使用@EnableCaching开启缓存即可
Guava实现
这里简单介绍下使用Guava实现
引入的依赖
pom.xml
- <project xmlns="http://maven.apache.org/POM/4.0.0" xmlns:xsi="http://www.w3.org/2001/XMLSchema-instance"
- xsi:schemaLocation="http://maven.apache.org/POM/4.0.0 http://maven.apache.org/xsd/maven-4.0.0.xsd">
- <modelVersion>4.0.0</modelVersion>
- <groupId>com.ibigsea</groupId>
- <artifactId>spirngboot-cache-demo</artifactId>
- <version>0.0.1-SNAPSHOT</version>
- <properties>
- <project.build.sourceEncoding>UTF-8</project.build.sourceEncoding>
- <boot.version>1.3.5.RELEASE</boot.version>
- </properties>
- <dependencies>
- <dependency>
- <groupId>org.springframework.boot</groupId>
- <artifactId>spring-boot-starter-web</artifactId>
- <version>${boot.version}</version>
- </dependency>
- <dependency>
- <groupId>org.springframework.boot</groupId>
- <artifactId>spring-boot-starter-test</artifactId>
- <version>${boot.version}</version>
- <scope>test</scope>
- </dependency>
- <dependency>
- <groupId>org.springframework.boot</groupId>
- <artifactId>spring-boot-starter-cache</artifactId>
- <version>${boot.version}</version>
- </dependency>
- <dependency>
- <groupId>com.google.guava</groupId>
- <artifactId>guava</artifactId>
- <version>19.0</version>
- </dependency>
- </dependencies>
- </project>

dataCache.java
- package com.ibigsea.springboot_cache_demo.cache;
- import java.text.SimpleDateFormat;
- import java.util.Date;
- import java.util.HashMap;
- import java.util.Map;
- import javax.annotation.PostConstruct;
- import org.springframework.cache.annotation.CacheConfig;
- import org.springframework.cache.annotation.CacheEvict;
- import org.springframework.cache.annotation.CachePut;
- import org.springframework.cache.annotation.Cacheable;
- import org.springframework.stereotype.Component;
- @Component
- public class DataCache {
- private Map<Long, String> dataMap = new HashMap<>();
- /**
- * 初始化
- */
- @PostConstruct
- public void init() {
- dataMap.put(1L, "张三");
- dataMap.put(2L, "李四");
- dataMap.put(3L, "王五");
- }
- /**
- * 查询
- * 如果数据没有缓存,那么从dataMap里面获取,如果缓存了,
- * 那么从guavaDemo里面获取
- * 并且将缓存的数据存入到 guavaDemo里面
- * 其中key 为 #id+dataMap
- */
- @Cacheable(value="guavaDemo" ,key="#id + 'dataMap'")
- public String query(Long id) {
- SimpleDateFormat sdf = new SimpleDateFormat("yyyy-MM-dd HH:mm:ss");
- System.out.println(sdf.format(new Date()) + " : query id is " + id);
- return dataMap.get(id);
- }
- /**
- * 插入 或者更新
- * 插入或更新数据到dataMap中
- * 并且缓存到 guavaDemo中
- * 如果存在了那么更新缓存中的值
- * 其中key 为 #id+dataMap
- */
- @CachePut(value="guavaDemo" ,key="#id + 'dataMap'")
- public String put(Long id, String value) {
- SimpleDateFormat sdf = new SimpleDateFormat("yyyy-MM-dd HH:mm:ss");
- System.out.println(sdf.format(new Date()) + " : add data ,id is "+ id);
- dataMap.put(id, value);
- // data persistence
- return value;
- }
- /**
- * 删除
- * 删除dataMap里面的数据
- * 并且删除缓存guavaDemo中的数据
- * 其中key 为 #id+dataMap
- */
- @CacheEvict(value="guavaDemo" , key="#id + 'dataMap'")
- public void remove(Long id) {
- SimpleDateFormat sdf = new SimpleDateFormat("yyyy-MM-dd HH:mm:ss");
- System.out.println(sdf.format(new Date()) + " : remove id is "+ id + " data");
- dataMap.remove(id);
- // data remove
- }
- }
关于缓存注解中的value,就是配置文件中的cache-names
关于注解中的key这个值,如果不指定的话 ,那么会取方法参数当做Key
application.yml
- spring:
- cache:
- #缓存名称
- cache-names: guavaDemo
- #缓存最大数量500条, 缓存失效时间 6个小时
- guava.spec: maximumSize=500,expireAfterWrite=360m
App.java
- package com.ibigsea.springboot_cache_demo;
- import java.text.SimpleDateFormat;
- import java.util.Date;
- import org.springframework.beans.factory.annotation.Autowired;
- import org.springframework.boot.SpringApplication;
- import org.springframework.boot.autoconfigure.SpringBootApplication;
- import org.springframework.cache.annotation.EnableCaching;
- import org.springframework.web.bind.annotation.RequestMapping;
- import org.springframework.web.bind.annotation.RestController;
- import com.ibigsea.springboot_cache_demo.cache.DataCache;
- /**
- * 是Spring Boot项目的核心注解,主要是开启自动配置
- */
- @SpringBootApplication // same as @Configuration @EnableAutoConfiguration @ComponentScan
- @RestController
- // 开启缓存
- @EnableCaching
- public class App {
- @Autowired
- private DataCache dataCache;
- public static void main(String[] args) {
- SpringApplication.run(App.class, args);
- }
- @RequestMapping("/put")
- public String put(Long id, String value) {
- SimpleDateFormat sdf = new SimpleDateFormat("yyyy-MM-dd HH:mm:ss");
- return sdf.format(new Date()) + " : value is " + dataCache.put(id, value) ;
- }
- @RequestMapping("/get")
- public String query(Long id){
- SimpleDateFormat sdf = new SimpleDateFormat("yyyy-MM-dd HH:mm:ss");
- return sdf.format(new Date()) + " : value is " +dataCache.query(id) ;
- }
- @RequestMapping("/remove")
- public String remove(Long id) {
- SimpleDateFormat sdf = new SimpleDateFormat("yyyy-MM-dd HH:mm:ss");
- dataCache.remove(id) ;
- return sdf.format(new Date()) + " : success " ;
- }
- }
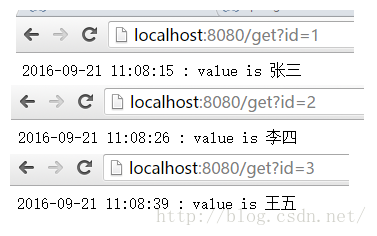
运行结果
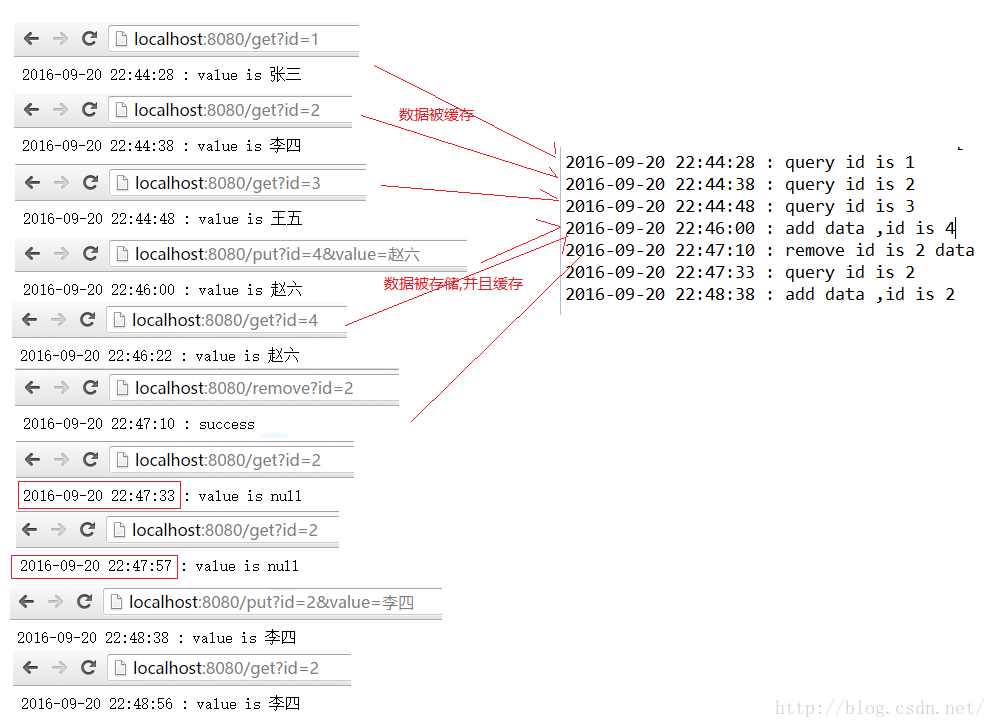
关于注解配置:
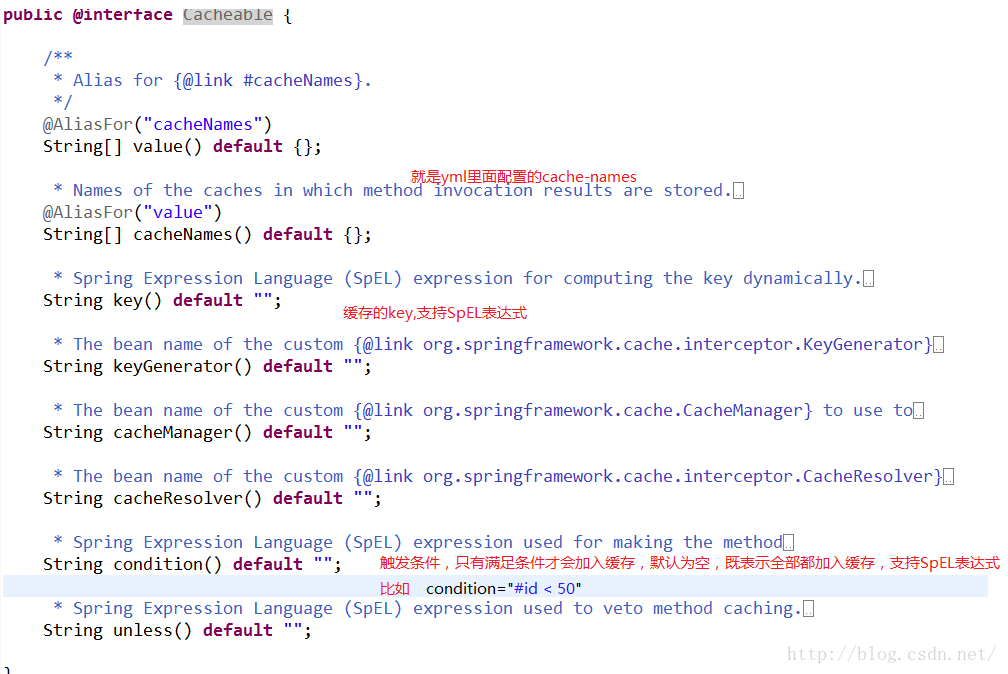
@Cacheable
@CacheEvict
@CachePut
和上面的一样,只是这个注解是用来更新或者插入数据到缓存中的,
其中key自己定义,返回值会缓存
还有就是SpringBoot会根据你的类路径里面的依赖jar,来确定使用什么类型进行缓存,所以基本是我们是不用配置spring.cache.type这个属性的
Redis实现
Redis缓存:
如果是用redis作为缓存的话
我们只需要引入redis相关依赖,修改yml配置属性
- <project xmlns="http://maven.apache.org/POM/4.0.0" xmlns:xsi="http://www.w3.org/2001/XMLSchema-instance"
- xsi:schemaLocation="http://maven.apache.org/POM/4.0.0 http://maven.apache.org/xsd/maven-4.0.0.xsd">
- <modelVersion>4.0.0</modelVersion>
- <groupId>com.ibigsea</groupId>
- <artifactId>spirngboot-cache-demo</artifactId>
- <version>0.0.1-SNAPSHOT</version>
- <properties>
- <project.build.sourceEncoding>UTF-8</project.build.sourceEncoding>
- <boot.version>1.3.5.RELEASE</boot.version>
- </properties>
- <dependencies>
- <dependency>
- <groupId>org.springframework.boot</groupId>
- <artifactId>spring-boot-starter-web</artifactId>
- <version>${boot.version}</version>
- </dependency>
- <dependency>
- <groupId>org.springframework.boot</groupId>
- <artifactId>spring-boot-starter-test</artifactId>
- <version>${boot.version}</version>
- <scope>test</scope>
- </dependency>
- <dependency>
- <groupId>org.springframework.boot</groupId>
- <artifactId>spring-boot-starter-cache</artifactId>
- <version>${boot.version}</version>
- </dependency>
- <dependency>
- <groupId>org.springframework.boot</groupId>
- <artifactId>spring-boot-starter-redis</artifactId>
- <version>${boot.version}</version>
- </dependency>
- <!-- <dependency> -->
- <!-- <groupId>com.google.guava</groupId> -->
- <!-- <artifactId>guava</artifactId> -->
- <!-- <version>19.0</version> -->
- <!-- </dependency> -->
- </dependencies>
- </project>
application.yml
- spring:
- cache:
- #缓存名称
- cache-names: guavaDemo
- #缓存最大数量500条, 缓存失效时间 6个小时
- #guava.spec: maximumSize=500,expireAfterWrite=360m
- # REDIS (RedisProperties)
- redis :
- host : localhost # server host
- port : 6379 # connection port
- pool.max-idle : 8 # pool settings ...
- pool.min-idle : 1
- pool.max-active : 8
- pool.max-wait : -1
就这样就OK了,代码什么的都是不用改变的,是不是很方便
测试结果
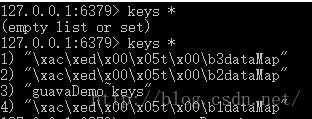
数据都会缓存到redis里面
其他的地方就不测试了 都是差不多的
使用其他实现导入对应的依赖,然后添加配置即可
注意:
如果使用guava缓存的时候 ,同时添加了redis的jar依赖,或者其他的依赖,可能会出现异常
这个时候加上 type: GUAVA 就可以

guava cache
缓存是提高性能的一把利器。
常用到的缓存技术有分布式缓存,像Redis、MC;也有本地缓存,像ehcache、guava cache等。这里说的是本地缓存guava cache。
guava cache刚开始接触,这就记录下来。。

    public static void main(String[] args) throws ExecutionException, InterruptedException{

        //缓存接口这里是LoadingCache,LoadingCache在缓存项不存在时可以自动加载缓存

        LoadingCache<Integer,Student> studentCache

                //CacheBuilder的构造函数是私有的,只能通过其静态方法newBuilder()来获得CacheBuilder的实例

                = CacheBuilder.newBuilder()

                //设置并发级别为8,并发级别是指可以同时写缓存的线程数

                .concurrencyLevel(8)

                //设置写缓存后8秒钟过期

                .expireAfterWrite(8, TimeUnit.SECONDS)
          //设置写缓存后1秒钟刷新
         .refreshAfterWrite(1, TimeUnit. SECONDS)

                //设置缓存容器的初始容量为10

                .initialCapacity(10)

                //设置缓存最大容量为100,超过100之后就会按照LRU最近虽少使用算法来移除缓存项

                .maximumSize(100)

                //设置要统计缓存的命中率

                .recordStats()

                //设置缓存的移除通知

                .removalListener(new RemovalListener<Object, Object>() {

                    @Override

                    public void onRemoval(RemovalNotification<Object, Object> notification) {

                        System.out.println(notification.getKey() + " was removed, cause is " + notification.getCause());

                    }

                })

                //build方法中可以指定CacheLoader,在缓存不存在时通过CacheLoader的实现自动加载缓存

                .build(

                        new CacheLoader<Integer, Student>() {

                            @Override

                            public Student load(Integer key) throws Exception {

                                System.out.println("load student " + key);

                                Student student = new Student();

                                student.setId(key);

                                student.setName("name " + key);

                                return student;

                            }

                        }

                );

        for (int i=0;i<20;i++) {

            //从缓存中得到数据,由于我们没有设置过缓存,所以需要通过CacheLoader加载缓存数据

            Student student = studentCache.get(1);

            System.out.println(student);

            //休眠1秒

            TimeUnit.SECONDS.sleep(1);

        }

        System.out.println("cache stats:");

        //最后打印缓存的命中率等 情况

        System.out.println(studentCache.stats().toString());

    }
还有另一种方法
package com;

import java.util.concurrent.Callable;

import java.util.concurrent.ExecutionException;

import java.util.concurrent.TimeUnit;

import com.google.common.cache.*;

/**

 * @author  作者 PZhang  E-mail:pzhang@rxhui.com

 * @date 创建时间:2017-2-15 上午9:58:00

 * @version 1.0

 * @parameter

 * @return

 */

public class CacheModel {

    public Student getStudent(Integer key){

        System.out.println("load student " + key);

        Student student = new Student();

        student.setId(key);

        student.setName("name " + key);

        return student;

    }

    //load Method

    public void loadCacheA() throws Exception{

         LoadingCache<Integer,Student> studentCache= CacheBuilder.newBuilder().concurrencyLevel(8).

                 expireAfterWrite(8, TimeUnit.SECONDS).refreshAfterWrite(1, TimeUnit. SECONDS).initialCapacity(10).maximumSize(100)

                 .recordStats().removalListener(new RemovalListener<Object, Object>() {

                     public void onRemoval(RemovalNotification<Object, Object> notification) {

                                 System.out.println(notification.getKey() + " was removed, cause is " + notification);}

                     }).build(

                    new CacheLoader<Integer, Student>() {

                        @Override

                        public Student load(Integer key) throws Exception {

                            return getStudent(key);

                           }

                        }

          );

         for (int i=0;i<20;i++) {

           Student student = studentCache.get(1);

           System.out.println(student);

           TimeUnit.SECONDS.sleep(1);

         }

         System.out.println("cache stats:");

         System.out.println(studentCache.stats().toString());

    }

    //call back Method

    public void loadCacheB(final Integer key) throws Exception{

         Cache<Integer, Student> cache = CacheBuilder.newBuilder().maximumSize(1000).recordStats().expireAfterWrite(8, TimeUnit.SECONDS).build();

         for (int i=0;i<20;i++) {

                System.out.println(cache.get(key, new Callable<Student>() {

                     public Student call() {

                        return getStudent(key);

                    }

                }));

                TimeUnit.SECONDS.sleep(1);

              }

              System.out.println("cache stats:");

              System.out.println(cache.stats().toString());

    }

    public static void main(String[] args) throws Exception {

        CacheModel cache = new CacheModel();

        cache.loadCacheB(2);

    }

}
guava Cache数据移除:
guava做cache时候数据的移除方式,在guava中数据的移除分为被动移除和主动移除两种。
被动移除数据的方式,guava默认提供了三种方式:
1.基于大小的移除:看字面意思就知道就是按照缓存的大小来移除,如果即将到达指定的大小,那就会把不常用的键值对从cache中移除。
定义的方式一般为 CacheBuilder.maximumSize(long),还有一种一种可以算权重的方法,个人认为实际使用中不太用到。就这个常用的来看有几个注意点,
其一,这个size指的是cache中的条目数,不是内存大小或是其他;
其二,并不是完全到了指定的size系统才开始移除不常用的数据的,而是接近这个size的时候系统就会开始做移除的动作;
其三,如果一个键值对已经从缓存中被移除了,你再次请求访问的时候,如果cachebuild是使用cacheloader方式的,那依然还是会从cacheloader中再取一次值,如果这样还没有,就会抛出异常
2.基于时间的移除:guava提供了两个基于时间移除的方法
expireAfterAccess(long, TimeUnit) 这个方法是根据某个键值对最后一次访问之后多少时间后移除
expireAfterWrite(long, TimeUnit) 这个方法是根据某个键值对被创建或值被替换后多少时间移除
3.基于引用的移除:
这种移除方式主要是基于java的垃圾回收机制,根据键或者值的引用关系决定移除
主动移除数据方式,主动移除有三种方法:
1.单独移除用 Cache.invalidate(key)
2.批量移除用 Cache.invalidateAll(keys)
3.移除所有用 Cache.invalidateAll()
如果需要在移除数据的时候有所动作还可以定义Removal Listener,但是有点需要注意的是默认Removal Listener中的行为是和移除动作同步执行的,如果需要改成异步形式,可以考虑使用RemovalListeners.asynchronous(RemovalListener, Executor)
SpringBoot学习笔记(6) SpringBoot数据缓存Cache [Guava和Redis实现]的更多相关文章
- 微信小程序开发:学习笔记[9]——本地数据缓存
微信小程序开发:学习笔记[9]——本地数据缓存 快速开始 说明 本地数据缓存是小程序存储在当前设备上硬盘上的数据,本地数据缓存有非常多的用途,我们可以利用本地数据缓存来存储用户在小程序上产生的操作,在 ...
- SpringBoot学习笔记(10)-----SpringBoot中使用Redis/Mongodb和缓存Ehcache缓存和redis缓存
1. 使用Redis 在使用redis之前,首先要保证安装或有redis的服务器,接下就是引入redis依赖. pom.xml文件如下 <dependency> <groupId&g ...
- springboot学习笔记-5 springboot整合shiro
shiro是一个权限框架,具体的使用可以查看其官网 http://shiro.apache.org/ 它提供了很方便的权限认证和登录的功能. 而springboot作为一个开源框架,必然提供了和sh ...
- springboot学习笔记-6 springboot整合RabbitMQ
一 RabbitMQ的介绍 RabbitMQ是消息中间件的一种,消息中间件即分布式系统中完成消息的发送和接收的基础软件.这些软件有很多,包括ActiveMQ(apache公司的),RocketMQ(阿 ...
- SpringBoot学习笔记(11)-----SpringBoot中使用rabbitmq,activemq消息队列和rest服务的调用
1. activemq 首先引入依赖 pom.xml文件 <dependency> <groupId>org.springframework.boot</groupId& ...
- SpringBoot学习笔记(9)----SpringBoot中使用关系型数据库以及事务处理
在实际的运用开发中,跟数据库之间的交互是必不可少的,SpringBoot也提供了两种跟数据库交互的方式. 1. 使用JdbcTemplate 在SpringBoot中提供了JdbcTemplate模板 ...
- SpringBoot学习笔记(4)----SpringBoot中freemarker、thymeleaf的使用
1. freemarker引擎的使用 如果你使用的是idea或者eclipse中安装了sts插件,那么在新建项目时就可以直接指定试图模板 如图: 勾选freeMarker,此时springboot项目 ...
- 【转】SpringBoot学习笔记(7) SpringBoot整合Dubbo(使用yml配置)
http://blog.csdn.net/a67474506/article/details/61640548 Dubbo是什么东西我这里就不详细介绍了,自己可以去谷歌 SpringBoot整合Dub ...
- SpringBoot学习笔记(16)----SpringBoot整合Swagger2
Swagger 是一个规范和完整的框架,用于生成,描述,调用和可视化RESTful风格的web服务 http://swagger.io Springfox的前身是swagger-springmvc,是 ...
随机推荐
- Oracle 不小心删除undo数据文件以及磁盘空间不足导致不能登录的解决办法
在一次测试中,由于导入的数据量过大导致事务一直提交失败因为磁盘空间不够用了,一检查发现是undo表空间不够用,于是重新创建了一个表空间,准备把之前的undo表空间删除,删除时却发现一直删不掉,因为它一 ...
- python(Django之组合搜索、JSONP、XSS过滤 )
一.组合搜索 二.jsonp 三.xss过滤 一.组合搜索 首先,我们在做一个门户网站的时候,前端肯定是要进行搜索的,但是如果搜索的类型比较多的话,怎么做才能一目了然的,这样就引出了组合搜索的这个案例 ...
- Quartz 定时任务时间设置
转自https://blog.csdn.net/zdx1515888659/article/details/79158169 quartz定时任务时间设置: 这些星号由左到右按顺序代表 : * * * ...
- Mapper动态代理方式
开发规范 Mapper接口开发方法只需要程序员编写Mapper接口(相当于Dao接口),由Mybatis框架根据接口定义创建接口的动态代理对象,代理对象的方法体同Dao接口实现类方法. Mapper接 ...
- 接触Struts2的ModelDriven<>接口
最近在学SSH框架,实战项目,用到了Struts2的ModelDriven<>接口,在这做一点记录 ModelDriven,意为模型驱动,意思是直接把实体类当成页面数据的收集对象 参考他人 ...
- centOS 开机自启动自己的脚本
centOS 开机自启动自己的脚本 1. 自己脚本 myservice 如下: #!/bin/bash # chkconfig: # description: myservice .... echo ...
- JS判断语句 注意多句时加大括号 回调函数LODOP兼顾写法
由于C-LODOP获取一些动作函数的返回值,需要用回调函数,由于常见的使用方法是混合部署,也就是同一个页面,根据浏览器的不同,可能会走LODOP ,也可能会走C-LODOP,因此写法要坚固两种,而有些 ...
- 常用css样式处理
1:如何设置html的input框的高度和宽度! 用style来设置,<input style="width:111px;height:111px">
- 牛客网-2018年湘潭大学程序设计竞赛-F
题目链接:https://www.nowcoder.com/acm/contest/105/F 解题思路:这道题第一眼直接思路就是搜索,但想了半天没想到有什么好办法搜,然后就转成最短路写了, 因为多入 ...
- 基于MMSE的预测
本文的目的是预测随机变量的输出值. 既然有预测值,那么我们就需要一个判断基准(criterion)用于判断该预测值与该随机变量的实际输出之间的差值,这里采用的判断基准就是MSE(mean-square ...