卷积:神经网络不再是对每个像素做处理,而是对一小块区域的处理,这种做法加强了图像信息的连续性,使得神经网络看到的是一个图像,而非一个点,同时也加深了神经网络对图像的理解,卷积神经网络有一个批量过滤器,通过重复的收集图像的信息,每次收集的信息都是小块像素区域的信息,将信息整理,先得到边缘信息,再用边缘信息总结从更高层的信息结构,得到部分轮廓信息,最后得到完整的图像信息特征,最后将特征输入全连接层进行分类,得到分类结果。

卷积:

经过卷积以后,变为高度更高,长和宽更小的图像,进行多次卷积,就会获得深层特征。

1)256*256的输入(RGB为图像深度)

2)不断的利用卷积提取特征,压缩长和宽,增大深度,也就是深层信息越多。

3)分类

池化:

提高鲁棒性。

搭建简单的卷积神经网络进行mnist手写数字识别

网络模型:

两个卷积层,两个全连接层
输入[sample*28*28*1](灰度图)
[ 28 * 28 *1 ]  --> (32个卷积核,每个大小5*5*1,sample方式卷积) --> [ 28 * 28 * 32] --> (池化 2*2 ,步长2)--> [14 *14 *32]
 
[ 14 * 14 *32]  --> (64个卷积核,每个大小  5 * 5 * 32,sample方式卷积) -->  [14 * 14 *64] --> (池化 2*2 ,步长2)--> [7 * 7 *64]
 
[ 7 * 7 * 64] --> reshape 成列向量 --> (7 * 7 * 64)
 
[sample * (7*7*64)]  全连接层1 weights:[7*7*64 , 1024]  --> [sample * 1024]
 
[sample * 1024]      全连接层2 weights:[1024,10]        -->  [sample *10]
输出:10个分类

1、定义变量weight_variable、bias_variable

def weight_variable(shape):
    initial = tf.truncated_normal(shape, stddev=0.1)
    return tf.Variable(initial)
 
def bias_variable(shape):
    initial = tf.constant(0.1, shape=shape)
    return tf.Variable(initial)
2、定义卷积层函数和池化层函数
def conv2d(x, W):
    # stride [1, x_movement, y_movement, 1]
    # Must have strides[0] = strides[3] = 1
    return tf.nn.conv2d(x, W, strides=[1, 1, 1, 1], padding='SAME')
 
def max_pool_2x2(x):
    # stride [1, x_movement, y_movement, 1]
    return tf.nn.max_pool(x, ksize=[1,2,2,1], strides=[1,2,2,1], padding='SAME')
3、网络输入
xs = tf.placeholder(tf.float32, [None, 784])/255.   # 28x28
ys = tf.placeholder(tf.float32, [None, 10])
keep_prob = tf.placeholder(tf.float32)
#把xs的形状变成[-1,28,28,1],-1代表先不考虑输入的图片例子多少这个维度,后面的1是channel的数量
#因为我们输入的图片是黑白的,因此channel是1,例如如果是RGB图像,那么channel就是3。
x_image = tf.reshape(xs, [-1, 28, 28, 1])
# print(x_image.shape)  # [n_samples, 28,28,1]
4、建立两个卷积层和池化层:提高鲁棒性
## 本层我们的卷积核patch的大小是5x5,因为黑白图片channel是1所以输入是1,输出是32个featuremap ??? 32 是什么意思?####
###conv1 layer
W_conv1 = weight_variable([5,5, 1,32])  # patch 5x5, in size 1, out size 32
b_conv1 = bias_variable([32])
#卷积运算
h_conv1 = tf.nn.relu(conv2d(x_image, W_conv1) + b_conv1) # output size 28x28x32
h_pool1 = max_pool_2x2(h_conv1)                                         # output size 14x14x32
 
 ###conv2 layer
W_conv2 = weight_variable([5,5, 32, 64]) # patch 5x5, in size 32, out size 64   ??? 64 是什么意思?
b_conv2 = bias_variable([64])
h_conv2 = tf.nn.relu(conv2d(h_pool1, W_conv2) + b_conv2) # output size 14x14x64
h_pool2 = max_pool_2x2(h_conv2)  
5、建立全连接层
W_fc1 = weight_variable([7*7*64, 1024])
b_fc1 = bias_variable([1024])
# [n_samples, 7, 7, 64] ->> [n_samples, 7*7*64]
h_pool2_flat = tf.reshape(h_pool2, [-1, 7*7*64])
h_fc1 = tf.nn.relu(tf.matmul(h_pool2_flat, W_fc1) + b_fc1)
h_fc1_drop = tf.nn.dropout(h_fc1, keep_prob)
 
## fc2 layer ##
W_fc2 = weight_variable([1024, 10])
b_fc2 = bias_variable([10])
prediction = tf.nn.softmax(tf.matmul(h_fc1_drop, W_fc2) + b_fc2)
6、损失函数
# the error between prediction and real data
cross_entropy = tf.reduce_mean(-tf.reduce_sum(ys * tf.log(prediction),reduction_indices=[1]))       # loss
train_step = tf.train.AdamOptimizer(1e-4).minimize(cross_entropy)
 
sess = tf.Session()
init = tf.global_variables_initializer()
sess.run(init)
7、预测
for i in range(500):
    batch_xs, batch_ys = mnist.train.next_batch(100)
    sess.run(train_step, feed_dict={xs: batch_xs, ys: batch_ys, keep_prob: 0.5})
    if i % 50 == 0:
        print(compute_accuracy(mnist.test.images[:1000], mnist.test.labels[:1000]))
 
#从测试集里面拿一些数据 试一试结果
start = np.random.randint(1, 100)
end = start + 10
test_res=sess.run(prediction,feed_dict={xs : mnist.test.images[start:end],keep_prob: 0.5} )
#print (res)
#print (res.shape)  # shape : examples_to_show * 10
 
# 输出图片识别的结果
print ("number is : ", sess.run(tf.argmax(test_res,1)))
 
# show 一下图片
# 这段代码 是从别的地方copy 过来的,作用是将图片show出来
f, a = plt.subplots(2, 10, figsize=(10, 2))
for i in range(10):
    a[0][i].imshow(np.reshape(mnist.test.images[i+start], (28, 28)))
    #a[1][i].imshow(np.reshape(encode_decode[i], (28, 28)))
plt.show()
sess.close()

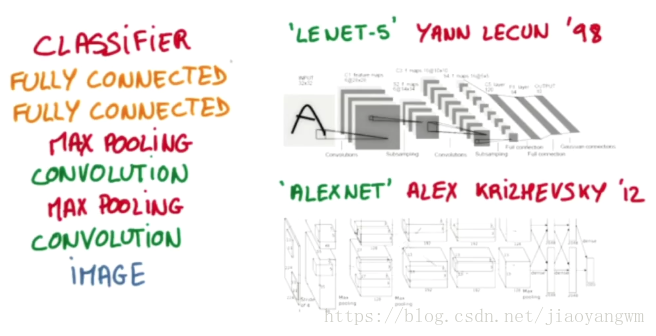
第三节,CNN案例-mnist手写数字识别的更多相关文章

  1. [Python]基于CNN的MNIST手写数字识别

    目录 一.背景介绍 1.1 卷积神经网络 1.2 深度学习框架 1.3 MNIST 数据集 二.方法和原理 2.1 部署网络模型 (1)权重初始化 (2)卷积和池化 (3)搭建卷积层1 (4)搭建卷积 ...

  2. Android+TensorFlow+CNN+MNIST 手写数字识别实现

    Android+TensorFlow+CNN+MNIST 手写数字识别实现 SkySeraph 2018 Email:skyseraph00#163.com 更多精彩请直接访问SkySeraph个人站 ...

  3. Tensorflow实现MNIST手写数字识别

    之前我们讲了神经网络的起源.单层神经网络.多层神经网络的搭建过程.搭建时要注意到的具体问题.以及解决这些问题的具体方法.本文将通过一个经典的案例:MNIST手写数字识别,以代码的形式来为大家梳理一遍神 ...

  4. mnist手写数字识别——深度学习入门项目(tensorflow+keras+Sequential模型)

    前言 今天记录一下深度学习的另外一个入门项目——<mnist数据集手写数字识别>,这是一个入门必备的学习案例,主要使用了tensorflow下的keras网络结构的Sequential模型 ...

  5. 深度学习之 mnist 手写数字识别

    深度学习之 mnist 手写数字识别 开始学习深度学习,先来一个手写数字的程序 import numpy as np import os import codecs import torch from ...

  6. 基于tensorflow的MNIST手写数字识别(二)--入门篇

    http://www.jianshu.com/p/4195577585e6 基于tensorflow的MNIST手写字识别(一)--白话卷积神经网络模型 基于tensorflow的MNIST手写数字识 ...

  7. mnist 手写数字识别

    mnist 手写数字识别三大步骤 1.定义分类模型2.训练模型3.评价模型 import tensorflow as tfimport input_datamnist = input_data.rea ...

  8. 持久化的基于L2正则化和平均滑动模型的MNIST手写数字识别模型

    持久化的基于L2正则化和平均滑动模型的MNIST手写数字识别模型 觉得有用的话,欢迎一起讨论相互学习~Follow Me 参考文献Tensorflow实战Google深度学习框架 实验平台: Tens ...

  9. 用MXnet实战深度学习之一:安装GPU版mxnet并跑一个MNIST手写数字识别

    用MXnet实战深度学习之一:安装GPU版mxnet并跑一个MNIST手写数字识别 http://phunter.farbox.com/post/mxnet-tutorial1 用MXnet实战深度学 ...

随机推荐

  1. tar压缩解压文件

    查看visualization1.5.tar.gz 压缩包里面的内容: $ tar -tf visualization1.5.tar.gz 解压指定文件JavascriptVisualRelease/ ...

  2. (count 或直接枚举) 统计字符 hdu1860

    统计字符(很水) 链接:http://acm.hdu.edu.cn/showproblem.php?pid=1860 Time Limit: 1000/1000 MS (Java/Others)    ...

  3. 分析JVM GC Dump 工具

    GC 日志分析工具: http://gceasy.io/ JVM Dump 文件分析工具: IBM HeapAnalyzer

  4. java io系列07之 FileInputStream和FileOutputStream

    本章介绍FileInputStream 和 FileOutputStream 转载请注明出处:http://www.cnblogs.com/skywang12345/p/io_07.html File ...

  5. Sidetiq 定时任务

    class SidekiqCreateMonthPlanWorker #定时自动生成下月计划 include Sidekiq::Worker include Sidetiq::Schedulable ...

  6. Ubuntu 开启SSH服务以及有关设置:安装,指定端口号、免密登录、远程拷贝

    本文所用系统为 Ubuntu 18.04   什么是SSH?     简单说,SSH是一种网络协议,用于计算机之间的加密登录.全名为:安全外壳协议.为Secure Shell的缩写.SSH为建立在应用 ...

  7. Part-Four

    1. 2. 3. 4. 5. 6. 7. 8. 9. 10. 11. 12.

  8. LeetCode(192. Word Frequency)

    192. Word Frequency Write a bash script to calculate the frequency of each word in a text file words ...

  9. 067、如何部署Calico网络 (2019-04-10 周三)

    参考https://www.cnblogs.com/CloudMan6/p/7509975.html   Calico 是一个纯三层的虚拟网络方案,Calico为每个容器分配一个IP,每个host都是 ...

  10. [Android] Android Studio 修改Gradle使用国内源

    Gradle 仓库中心的项目,下载速度又比较慢, 网上查询了下, 使用阿里云的Maven镜像仓库 在 project 的 build.gradle中修改如下: allprojects { reposi ...