前端框架之Vue(10)-全家桶简单使用实例
安装
npm install vue-router --save
使用实例
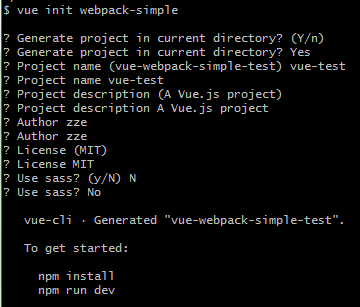
vue-router初使用(webpack-simple模板)
1、切换到指定目录,执行命令(使用 vue 命令的需要安装 vue-cli ,点击查看如何安装):
vue init webpack-simple
2、安装 vue-router :
npm install vue-router
3、运行:
npm install

npm run dev
4、在 src 下创建名为 components 的文件夹,并在其下新建如下三个简单组件:
<template>

    <div>

        <h1>首页</h1>

    </div>

</template>

<script>

    export default{}

</script>
VMain.vue
<template>

    <div>

        <h1>列表页</h1>

    </div>

</template>

<script>

    export default{}

</script>
VList.vue
<template>

    <div>

        <h1>详细页</h1>

    </div>

</template>

<script>

    export default{}

</script>
VDetail.vue
5、修改 App.vue 文件,使用 router-link 标签:
<template>

  <div id="app">

   <ul>

      <li>

        <router-link to='/'>主页</router-link>

      </li>

      <li>

        <router-link to='/list'>列表页</router-link>

      </li>

      <li>

        <router-link to='/detail'>详细页</router-link>

      </li>

    </ul>

    <router-view/>

  </div>

</template>

<script>

export default {

  data () {

    return {

    }

  }

}

</script>

<style>

</style>
App.vue
6、配置路由:
import Vue from 'vue'

import App from './App.vue'

import VueRouter from 'vue-router'

import VMain from './components/VMain'

import VList from './components/VList'

import VDetail from './components/VDetail'

Vue.use(VueRouter);

const router = new VueRouter({

  mode: 'history',

  routes: [

    { path: '/', component: VMain },

    { path: '/list', component: VList },

    { path: '/detail', component: VDetail }

  ]

});

new Vue({

  el: '#app',

  router,

  render: h => h(App)

})
main.js
7、效果:

支持markdown语法笔记小网站实例(webpack模板)
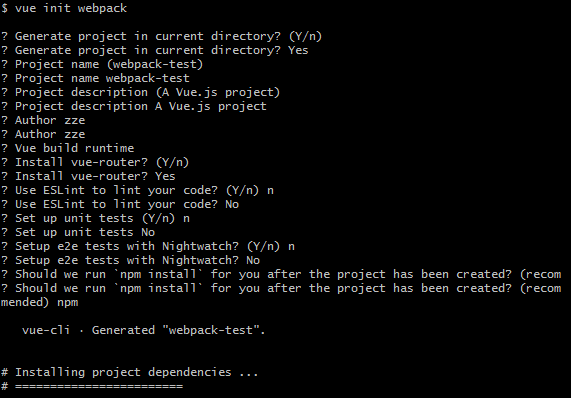
1、初始化目录。
vue init webpack
2、安装依赖包 。
"axios": "^0.18.0",

"bootstrap": "^3.3.7",

"marked": "^0.5.2",

"vue": "^2.5.2",

"vue-router": "^3.0.1",

"vuex": "^3.0.1"
3、模块编写。
<template>

  <nav class="navbar navbar-inverse">

    <div class="container-fluid">

      <div class="collapse navbar-collapse" id="bs-example-navbar-collapse-1">

        <ul class="nav navbar-nav">

          <li @click='select(index)' :class="{active:index==currentIndex}" v-for='(item,index) in routes'>

            <router-link :to='item.path'>{{item.title}}</router-link>

          </li>

        </ul>

      </div><!-- /.navbar-collapse -->

    </div><!-- /.container-fluid -->

  </nav>

</template>

<script>

export default {

  data() {

    return {

      currentIndex: 0,

      routes: [

        { path: '/', title: '首页' },

        { path: '/note', title: '我的笔记' },

      ]

    }

  },

  methods: {

    select(index) {

      this.currentIndex = index;

    }

  },

  created() {

    // 刷新保持超链接激活的状态

    for (var i = 0; i < this.routes.length; i++) {

      // this.$route.path 可以获取当前地址信息

      if (this.routes[i].path == this.$route.path) {

        this.currentIndex = i;

        break;

      }

    }

  }

}

</script>

<style></style>
/components/Vheader.vue
<template>

  <div class="main">

    <h1>{{msg}}</h1>

   </div>

</template>

<script>

export default {

  name: 'Vmain',

  data () {

    return {

        msg:"这是首页"

    }

  }

}

</script>

<style scoped>

</style>
/components/Vmain.vue
<template>

  <div class='note'>

    <div class="row">

      <div class="col-md-2">

        <VnoteList></VnoteList>

      </div>

      <div class="col-md-9">

        <div class="row">

          <VnoteTitle></VnoteTitle>

        </div>

        <div class="row">

            <VnoteBody></VnoteBody>

        </div>

      </div>

    </div>

  </div>

</template>

<script>

import VnoteList from '@/components/VnoteList'

import VnoteTitle from '@/components/VnoteTitle'

import VnoteBody from '@/components/VnoteBody'

export default {

  data() {

    return {}

  },

  components: {

    VnoteList,

    VnoteTitle,

    VnoteBody

  }

}

</script>

<style>

</style>
/components/Vnote.vue
<template>

  <div class="panel panel-primary">

    <div class="panel-body">

      <div class="row">

        <div class="col-md-4">

          <VnoteEditContent></VnoteEditContent>

        </div>

        <div class="col-md-8">

          <VnoteMarkedContent></VnoteMarkedContent>

        </div>

      </div>

    </div>

  </div>

</template>

<script>

import VnoteEditContent from '@/components/VnoteEditContent'

import VnoteMarkedContent from '@/components/VnoteMarkedContent'

export default {

  data() {

    return {}

  },

  components: {

    VnoteEditContent,

    VnoteMarkedContent

  }

}

</script>
/components/Vbody.vue
<template>

  <div class="panel panel-primary">

    <div class="panel-heading">

      编辑内容

    </div>

    <div class="panel-body" style='height: 855px;'>

      <textarea v-model='markedContentHandler' class="form-control" rows="38">

      </textarea>

    </div>

  </div>

</template>

<script>

export default {

  data() {

    return {}

  },

  computed: {

    markedContentHandler: {

      get() {

        return this.$store.state.note.markedContent;

      },

      set(newVal) {

        this.$store.state.note.markedContent = newVal;

      }

    }

  }

}

</script>
/components/VnoteEditContent.vue
<template>

  <div class="panel panel-info">

    <div class="panel-heading">

      {{title}}

    </div>

    <div class="panel-body" style="height: 1050px;">

      <div class="list-group">

        <a href="javascript:" :class='{active:item.id==activeItem}' @click='selectNote(item.id)' v-for='(item,index) in changedList' class="list-group-item">

        <h4 class="list-group-item-heading">{{item.title}}</h4>

        <p class="list-group-item-text">{{item.content.length>20?item.content.substr(0,20)+'...':item.content}}</p>

      </a>

        <a href="javascript:"class="list-group-item" :class='{active:isNewNote}' @click='newNoteFunc'>

        <h4 class="list-group-item-heading">新笔记</h4>

        <p class="list-group-item-text">创建你的新笔记</p>

      </a>

      </div>

      <button v-if="isShowDeleteBtn" @click='deleteNote' class="btn btn-danger pull-right">删除选中</button>

    </div>

  </div>

</template>

<script>

export default {

  data() {

    return {

      title: "笔记列表",

      newNote: false

    }

  },

  methods: {

    selectNote(id) {

      this.newNote = false;

      this.$store.state.note.id = id;

      let _this = this;

      this.axios.request({

        url: `http://localhost:8000/notes/${id}/`,

        method: 'get',

      }).then(function(resp) {

        _this.$store.state.note = resp.data;

      })

    },

    newNoteFunc() {

      this.newNote = true;

      this.$store.commit('clearData');

    },

    deleteNote(){

      let _this = this;

      let id = this.$store.state.note.id;

      this.axios.request({

        url: `http://localhost:8000/notes/${id}/`,

        method: 'delete',

      }).then(function(resp) {

        alert('删除成功');

        _this.$store.commit('showList');

      })

    }

  },

  computed: {

    changedList() {

      return this.$store.state.list;

    },

    activeItem() {

      return this.$store.state.note.id;

    },

    isNewNote() {

      return this.newNote;

    },

    isShowDeleteBtn(){

      return this.$store.state.note.id != 0;

    }

  }

}

</script>
/components/VnoteList.vue
<template>

  <div class="panel panel-info">

    <div class="panel-heading">

      显示区

    </div>

    <div class="panel-body" v-html='markedContent' id='showContent' style='height: 855px;word-wrap:break-word;

word-break:break-all;

overflow: hidden;

overflow-y: auto;'>

    </div>

  </div>

</template>

<script>

import marked from 'marked'

export default {

  data() {

    return {}

  },

  computed: {

    markedContent() {

      return marked(this.$store.state.note.markedContent);

    }

  }

}

</script>
/components/VnoteMarkedContent.vue
<template>

  <div class="panel panel-danger">

    <div class="panel-heading">

      {{titleMsg}}

    </div>

    <div class="panel-body">

      <div class="row">

        <div class="col-md-10">

          <div class="form-group">

            <input type="text" class="form-control" v-model='titleHander' placeholder="标题">

          </div>

        </div>

        <div class="col-md-2"><button class="btn btn-primary" @click='submitNote'>{{optionStr}}</button></div>

      </div>

    </div>

  </div>

</template>

<script>

export default {

  data() {

    return {

      titleMsg: "笔记标题",

    }

  },

  methods:{

    submitNote(){

      this.$store.state.note.content = document.getElementById('showContent').innerText;

      this.$store.commit('submitNote');

    }

  },

  computed:{

    titleHander:{

      get(){

        return this.$store.state.note.title;

      },

      set(newVal){

        this.$store.state.note.title = newVal;

      }

    },

    optionStr(){

      return this.$store.state.note.id == 0?'保存':'更新';

    }

  }

}

</script>
/components/VnoteTitle.vue
4、路由配置。
import Vue from 'vue'

import Router from 'vue-router'

import Vmain from '@/components/Vmain'

import Vnote from '@/components/Vnote'

Vue.use(Router)

export default new Router({

  mode: 'history',

  routes: [{

    path: '/',

    component: Vmain

  }, {

    path: '/note',

    component: Vnote

  }]

})
/router/index.js
<template>

  <div id="app">

    <Vheader></Vheader>

    <router-view />

  </div>

</template>

<script>

import 'bootstrap/dist/css/bootstrap.min.css'

import Vheader from '@/components/Vheader'

export default {

  name: 'App',

  components: {

    Vheader

  }

}

</script>

<style>

</style>
/App.vue
5、依赖引入。
// The Vue build version to load with the `import` command

// (runtime-only or standalone) has been set in webpack.base.conf with an alias.

import Vue from 'vue'

import App from './App'

import router from './router'

import Vuex from 'vuex'

import axios from 'axios'

import Qs from 'qs'

Vue.config.productionTip = false;

Vue.prototype.axios = axios;

Vue.prototype.qs = Qs

Vue.use(Vuex);

const store = new Vuex.Store({

  state: {

    note: {

        id: 0,

        title: '',

        content: '',

        markedContent: ''

      },

    list:null

  },

  mutations: {

    submitNote(state) {

      let _this = this;

      let _url = 'http://127.0.0.1:8000/notes/';

      axios.request({

          url: state.note.id == 0 ? _url : `${_url}${state.note.id}/`,

          data: Qs.stringify(state.note),

          method: state.note.id == 0 ? 'post' : 'put'

        })

        .then(function(res) {

          _this.commit('showList');

        })

        .catch(function(err) {

          if (err.response) {

            console.log(err.response);

          }

        })

      console.info(state.note)

    },

    showList(state) {

      axios.get('http://127.0.0.1:8000/notes/').then(function(res) {

          store.state.list = res.data;

        })

        .catch(function(err) {

          if (err.response) {

            console.log(err.response)

          }

        })

    },

    clearData(state) {

      state.note = {

        id: 0,

        title: '',

        content: '',

        markedContent: ''

      };

    }

  }

});

/* eslint-disable no-new */

new Vue({

  el: '#app',

  router,

  store,

  components: { App },

  template: '<App/>',

  mounted() {

    store.commit('showList')

  }

})
/main.js
6、效果图:
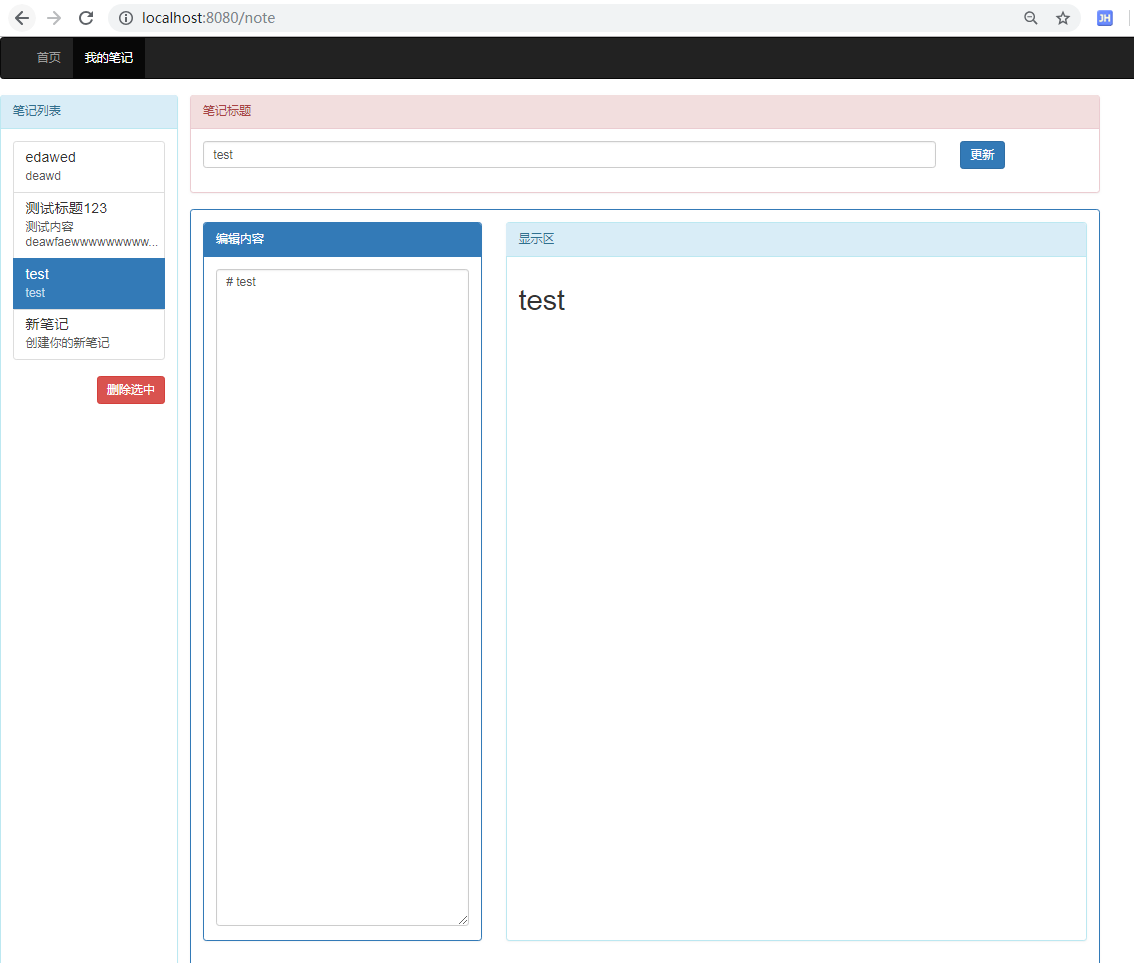
7、完整示例点击下载(提取码: 7vvk ),包含前后端程序,此处后端使用 django rest framework 框架。
相关链接:vue-cookies使用
前端框架之Vue(10)-全家桶简单使用实例的更多相关文章
- 一款简单而不失强大的前端框架——【Vue.js的详细入门教程①】
↓— Vue.js框架魅力 —↓ 前言 Vue.js 是一个构建数据驱动的 web 界面的渐进式框架.Vue.js 的目标是通过尽可能简单的 API 实现响应的数据绑定和组合的视图组件.V ...
- 前端框架之Vue.js
前言: 前端主流框架有Vue.react.angular,目前比较火因为Vue比较容易学习,运营起来比较快速: Vue是什么呢? 是一个基于MVVM架构的,前端框架: 如果你之前已经习惯了用jQuer ...
- 前端框架之vue初步学习
Vue.js介绍: Vue.js是一个构建数据驱动的web界面的渐进式框架.Vue.js的目标是通过尽可能简单的API实现响应的数据绑定和组合的视图组件.它不仅易于上手,还便于与第三方库或既有项目整合 ...
- 前端框架Bootstrap(10.7国庆补写)
框架的官网地址:https://v3.bootcss.com/ 主要学习Bootstrap框架提供的样式.组件.插件的使用. 首先下载到本地,在项目中导入使用: 下载的文件中包含:min.css的是压 ...
- 后端视角下的前端框架之Vue.js初探
背景 作为常年搞后端的自己来说,除了多年前学习的一点关于HTML的皮毛,对现在的前端技术栈可谓是一窍不通.但是因为最近在做的内部业务全链路监控系统,负责前端的同事做到一半去搞别的项目了,为了把项目落地 ...
- 前端框架之VUE
vue学习[第1篇]:vue之指令 vue学习[第2篇]:es6简单介绍 vue学习[第3篇]:vue之node.js的简单介绍 vue学习[第4篇]:vue 之webpack打包工具的使用 vue学 ...
- 什么是vue的全家桶
vue.js有著名的全家桶系列,包含了vue-router,vuex, vue-resource,再加上构建工具vue-cli,就是一个完整的vue项目的核心构成.
- vue服务端渲染简单入门实例
想到要学习vue-ssr的同学,自不必多说,一定是熟悉了vue,并且多多少少做过几个项目.然后学习vue服务端渲染无非解决首屏渲染的白屏问题以及SEO友好. 话不多说,笔者也是研究多日才搞明白这个服务 ...
- Python-S9——Day100-Web前端框架之Vue
01 课程简介: 02 let和const: 03 箭头函数: 04 对象的单体模式: 05 nodejs介绍和npm操作: 06 webpack.babel介绍和vue的第一个案例: 07 昨日内容 ...
随机推荐
- /usr/bin/ld: cannot find -lncurses是咋回事?
你的系統是32位的還是64位的? 如果是32位的就用:sudo apt-get install libncurses5-dev 如果是64位的,就用:sudo apt-get install lib3 ...
- 解决pycharm在ubuntu下搜狗输入法一直固定在左下角的问题
1.缩放VMware,当ubuntu中出现下拉导航条时,点击左上角查看>立即适应客户机,然后在pycharm中打中文的时候不用全屏,就可以看到输入法显示的文字了. 2.目前没有发现搜狗输入法版本 ...
- 使用 JdbcTemplate 查询数据时报错:列名无效(已解决)
又犯了一个错误. 争取没有下次了. 就算再犯,也要知道去哪找答案. 所以,记录一下,以示警戒. 报错 使用 JdbcTemplate 查询数据时,出现异常: PreparedStatementCall ...
- Elasticsearch数据迁移工具elasticdump工具
1. 工具安装 wget https://nodejs.org/dist/v8.11.2/node-v8.11.2-linux-x64.tar.xz tar xf node-v8.11.2-linux ...
- Go学习笔记(二)搭建Visual Studio Code调试环境
上一篇 Go学习笔记(一)安装Go语言环境 安装Visual Studio Code 这是目前我觉得最好用的文本编辑器了, https://code.visualstudio.com/ 中间有几部确认 ...
- NHibernate.3.0.Cookbook第一章第五节Setting up a base entity class
Setting up a base entity class设置一个实体类的基类 在这节中,我将给你展示怎么样去为我们的实体类设置一个通用的基类. 准备工作 完成前面三节的任务 如何去做 1.在Ent ...
- 学习markdown语法
12.内部跳转 [这是一个按钮](#测试标题) - 1 - 1 - 1 # 测试标题 这是一个按钮 1 1 1 测试标题 注:使用-代替空格
- python中的细节
# 1 # li = ['a', 'b', 'c', 'd','e'] # print(li[10:]) #[] 不报错 # 2 # 这不是True或False,而是值 # 另外,优先级 not &g ...
- select cast(round(12.5,2) as numeric(5,2))
http://www.jb51.net/article/74284.htm 解释: round()函数,是四舍五入用,第一个参数是我们要被操作的数据,第二个参数是设置小数四舍五入的精度. )--32. ...
- shell脚本之tr命令使用
tr命令用来进行对标准输入的内容做替换.例如 # echo 'HELLO WORLD!!!' | tr "A-Z" "a-z" hello world!!! 这 ...