【PyQt5-Qt Designer】对话框系列
标准输入对话框(QInputDialog)系列:
主要模块
from PyQt5.QtWidgets import QInputDialog
效果如下:

完整代码:
from PyQt5.QtWidgets import (QApplication, QWidget, QPushButton, QLabel, QInputDialog, QTextBrowser,QGridLayout)

import sys

from PyQt5.QtGui import QIcon

class Example(QWidget):

    def __init__(self):

        super().__init__()

        self.initUI()

    def initUI(self):

        self.setGeometry(500,500,500,500)

        self.setWindowTitle("标准输入对话框")

        self.setWindowIcon(QIcon("11.ico"))

        gridLayout = QGridLayout()

        self.lb11 = QLabel("姓名:")

        self.lb12 = QLabel("xiong")

        self.btn1 = QPushButton("修改姓名")

        gridLayout.addWidget(self.lb11,0,0,1,1)

        gridLayout.addWidget(self.lb12,0,1,1,1)

        gridLayout.addWidget(self.btn1,0,2,1,1)

        self.lb21 = QLabel("年龄:")

        self.lb22 = QLabel("")

        self.btn2 = QPushButton("修改年龄")

        gridLayout.addWidget(self.lb21, 1, 0, 1, 1)

        gridLayout.addWidget(self.lb22, 1, 1, 1, 1)

        gridLayout.addWidget(self.btn2, 1, 2, 1, 1)

        self.lb31 = QLabel("性别:")

        self.lb32 = QLabel("男")

        self.btn3 = QPushButton("修改性别")

        gridLayout.addWidget(self.lb31, 2, 0, 1, 1)

        gridLayout.addWidget(self.lb32, 2, 1, 1, 1)

        gridLayout.addWidget(self.btn3, 2, 2, 1, 1)

        self.lb41 = QLabel("身高(cm):")

        self.lb42 = QLabel("177.0")

        self.btn4 = QPushButton("修改身高")

        gridLayout.addWidget(self.lb41, 3, 0, 1, 1)

        gridLayout.addWidget(self.lb42, 3, 1, 1, 1)

        gridLayout.addWidget(self.btn4, 3, 2, 1, 1)

        self.lb51 = QLabel("基本信息:")

        self.textBrowser = QTextBrowser()

        self.btn5 = QPushButton("修改信息")

        gridLayout.addWidget(self.lb51, 4, 0, 1, 1)

        gridLayout.addWidget(self.textBrowser, 5, 0, 1, 3)

        gridLayout.addWidget(self.btn5, 4, 2, 1, 1)

        self.setLayout(gridLayout)

        self.btn1.clicked.connect(self.showDialog)

        self.btn2.clicked.connect(self.showDialog)

        self.btn3.clicked.connect(self.showDialog)

        self.btn4.clicked.connect(self.showDialog)

        self.btn5.clicked.connect(self.showDialog)

    def showDialog(self):

        sender = self.sender()

        if sender == self.btn1:

            text , ok = QInputDialog.getText(self,"修改姓名!","请输入姓名:")

            if ok:

                self.lb12.setText(text)

        elif sender == self.btn2:

            text, ok = QInputDialog.getInt(self, "修改年龄!", "请输入年龄:",min=1)

            if ok:

                self.lb22.setText(str(text))

        elif sender == self.btn3:

            text, ok = QInputDialog.getItem(self, "修改性别!", "请输入性别:",["男","女","人妖"])

            if ok:

                self.lb32.setText(text)

        elif sender == self.btn4:

            text, ok = QInputDialog.getDouble(self, "修改身高!", "请输入身高:",min=10.0)

            if ok:

                self.lb42.setText(str(text))

        elif sender == self.btn5:

            text, ok = QInputDialog.getMultiLineText(self, "修改信息!", "请输入基本信息:")

            if ok:

                self.textBrowser.setText(text)

if __name__ == '__main__':

    app = QApplication(sys.argv)

    ex = Example()

    ex.show()

    sys.exit(app.exec_())
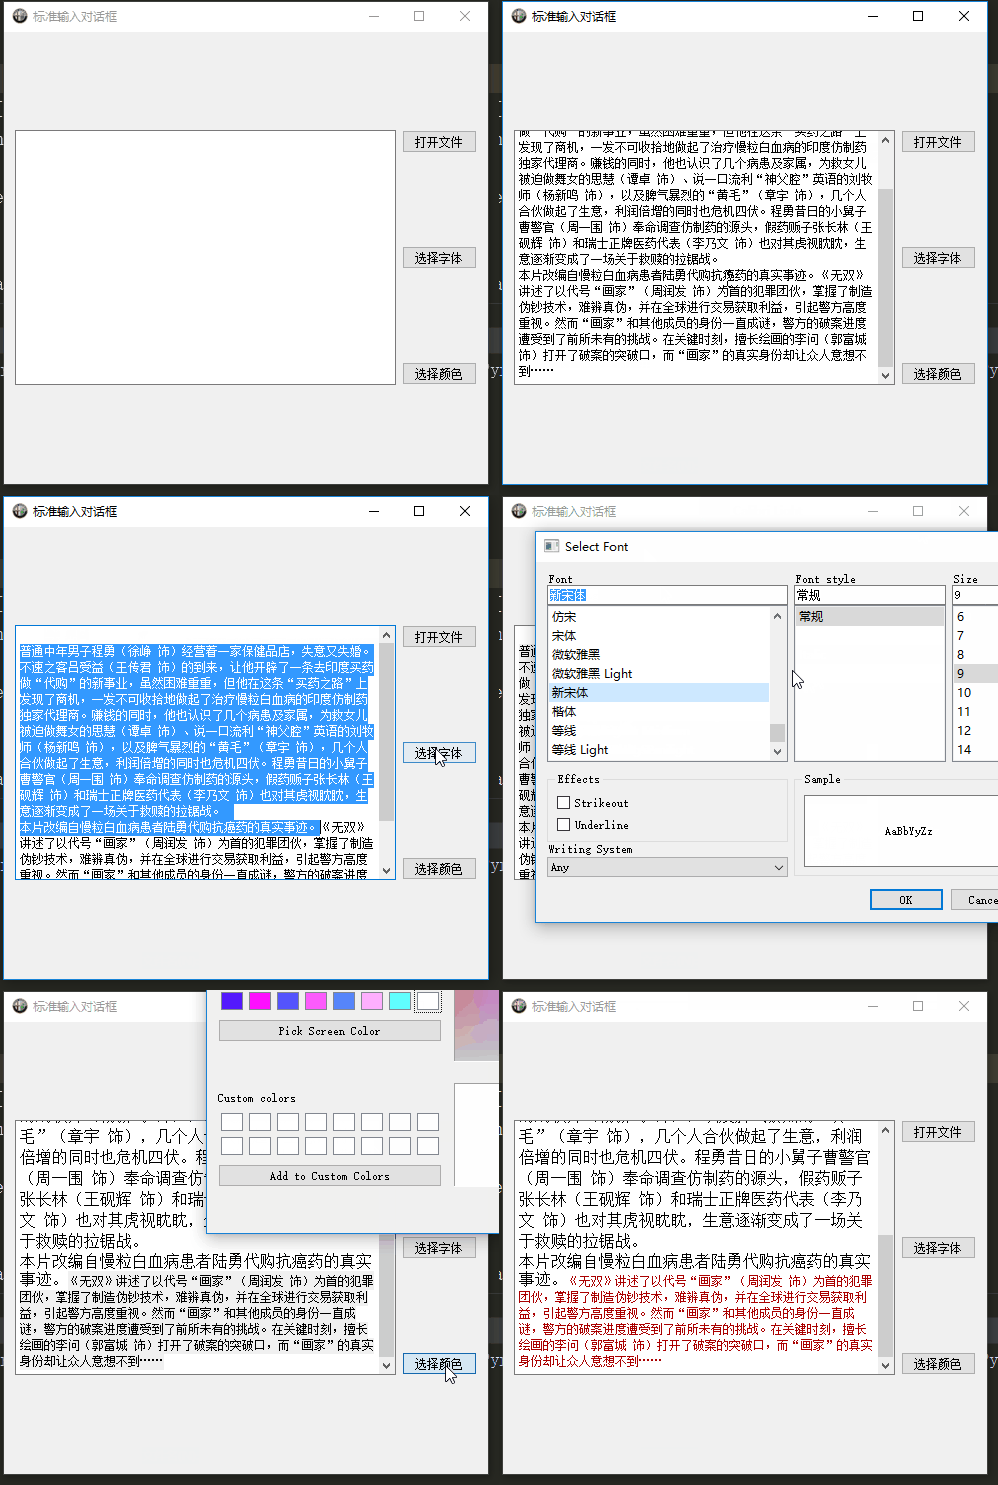
打开文件(QFileDialog)、颜色(QColorDialog)、字体(QFontDialog)对话框
效果如下:

参考:
https://zhuanlan.zhihu.com/p/29321561
完整代码:
from PyQt5.QtWidgets import (QApplication, QWidget, QPushButton, QColorDialog,QFontDialog,QFileDialog,QGridLayout,QTextEdit)

import sys

from PyQt5.QtGui import QIcon

class Example(QWidget):

    def __init__(self):

        super().__init__()

        self.initUI()

    def initUI(self):

        self.setGeometry(500,500,400,300)

        self.setWindowTitle("标准输入对话框")

        self.setWindowIcon(QIcon("11.ico"))

        gridLayout = QGridLayout()

        self.txtFile = QTextEdit()

        self.fileContent = []

        gridLayout.addWidget(self.txtFile,0,0,3,1)

        self.btn1 = QPushButton("打开文件")

        self.btn2 = QPushButton("选择字体")

        self.btn3 = QPushButton("选择颜色")

        gridLayout.addWidget(self.btn1, 0, 1, 1, 1)

        gridLayout.addWidget(self.btn2, 1, 1, 1, 1)

        gridLayout.addWidget(self.btn3, 2, 1, 1, 1)

        self.setLayout(gridLayout)

        self.btn1.clicked.connect(self.openFile)

        self.btn2.clicked.connect(self.choseFont)

        self.btn3.clicked.connect(self.choseColor)

    def openFile(self):

        fname = QFileDialog.getOpenFileName(self,"打开文件",'./')

        if fname[0]:

            with open(fname[0],'r+',encoding='utf8',errors="ignore") as f:

                self.fileContent.append(f.read())

                txtCon = "".join(self.fileContent)

                self.txtFile.setText("\n"+txtCon)

    def choseFont(self):

        font , ok = QFontDialog.getFont()

        if ok:

            self.txtFile.setCurrentFont(font)

    def choseColor(self):

        color = QColorDialog.getColor()

        if color.isValid():

            self.txtFile.setTextColor(color)

if __name__ == '__main__':

    app = QApplication(sys.argv)

    ex = Example()

    ex.show()

    sys.exit(app.exec_())
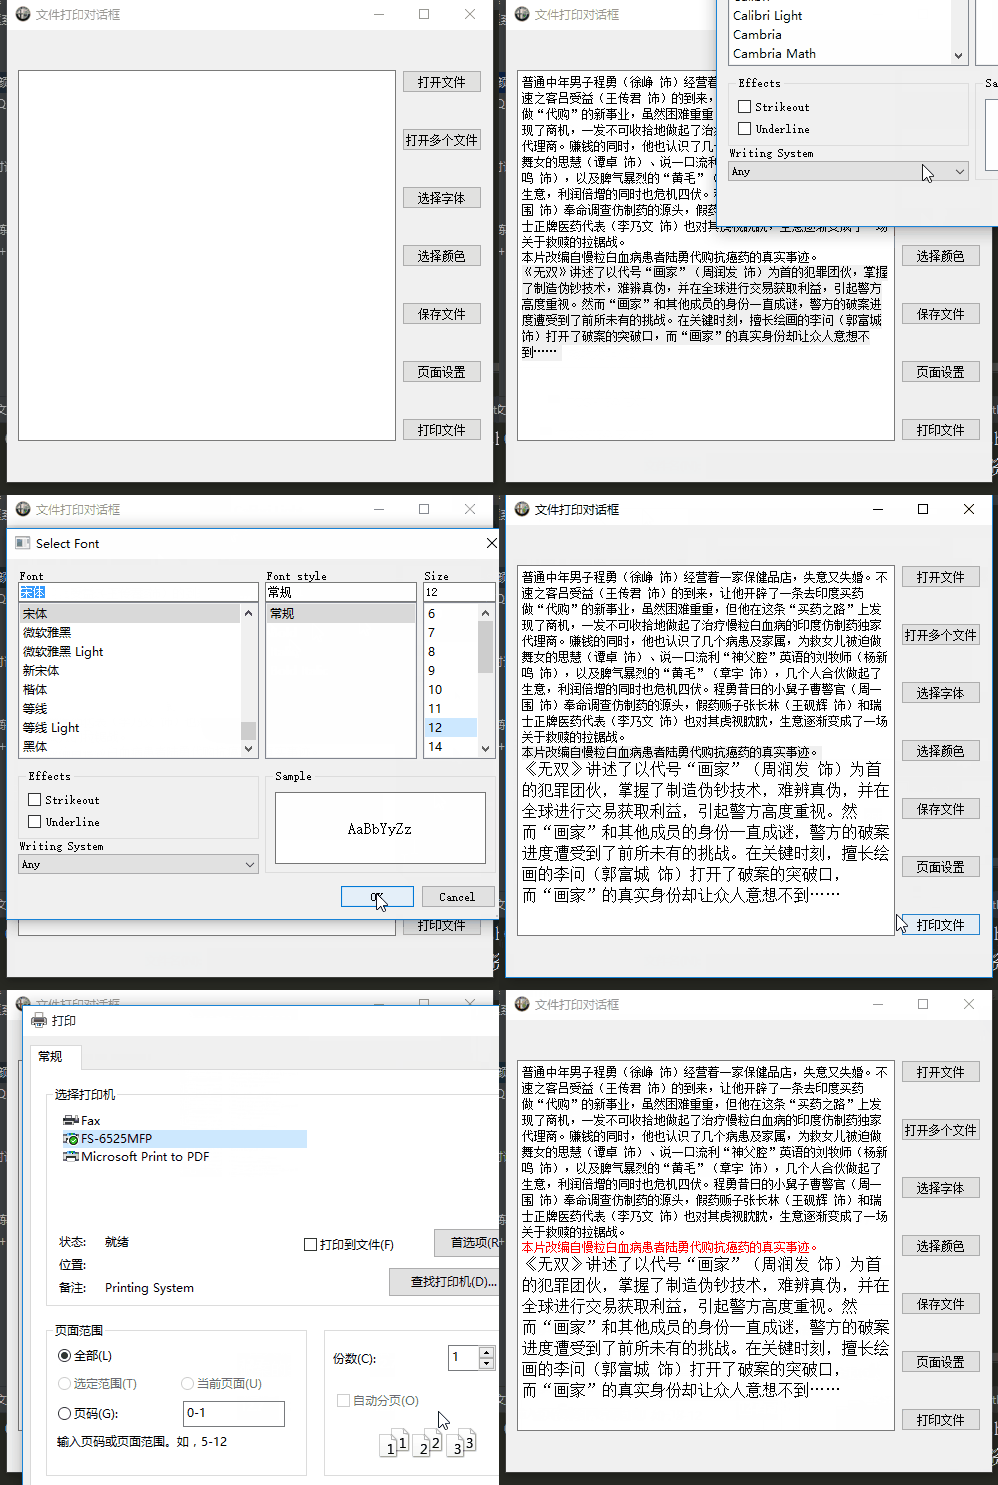
文件打印(QPageSetupDialog、QPrintDialog)
效果如下:

参考:
https://zhuanlan.zhihu.com/p/29556459
完整代码:
from PyQt5.QtWidgets import (QApplication, QWidget, QPushButton, QColorDialog,QFontDialog,QFileDialog,QGridLayout,QTextEdit,QDialog)

import sys

from PyQt5.QtGui import QIcon

from PyQt5.QtPrintSupport import QPageSetupDialog,QPrintDialog,QPrinter,QPrintPreviewDialog

class Example(QWidget):

    def __init__(self):

        super().__init__()

        self.initUI()

        self.printer = QPrinter()

    def initUI(self):

        self.setGeometry(500,500,400,300)

        self.setWindowTitle("文件打印对话框")

        self.setWindowIcon(QIcon("11.ico"))

        gridLayout = QGridLayout()

        self.txtFile = QTextEdit()

        self.fileContent = []

        gridLayout.addWidget(self.txtFile,0,0,7,1)

        self.btn1 = QPushButton("打开文件")

        self.btn2 = QPushButton("打开多个文件")

        self.btn3 = QPushButton("选择字体")

        self.btn4 = QPushButton("选择颜色")

        self.btn5 = QPushButton("保存文件")

        self.btn6 = QPushButton("页面设置")

        self.btn7 = QPushButton("打印文件")

        gridLayout.addWidget(self.btn1, 0, 1, 1, 1)

        gridLayout.addWidget(self.btn2, 1, 1, 1, 1)

        gridLayout.addWidget(self.btn3, 2, 1, 1, 1)

        gridLayout.addWidget(self.btn4, 3, 1, 1, 1)

        gridLayout.addWidget(self.btn5, 4, 1, 1, 1)

        gridLayout.addWidget(self.btn6, 5, 1, 1, 1)

        gridLayout.addWidget(self.btn7, 6, 1, 1, 1)

        self.setLayout(gridLayout)

        self.btn1.clicked.connect(self.openFile)

        self.btn2.clicked.connect(self.openFiles)

        self.btn3.clicked.connect(self.choseFont)

        self.btn4.clicked.connect(self.choseColor)

        self.btn5.clicked.connect(self.saveFile)

        self.btn6.clicked.connect(self.pageSet)

        self.btn7.clicked.connect(self.printFile)

    def openFile(self):

        fname = QFileDialog.getOpenFileName(self,"打开文件",'./')

        if fname[0]:

            with open(fname[0],'r+',encoding='utf8',errors="ignore") as f:

                self.fileContent.append(f.read())

                txtCon = "".join(self.fileContent)

                self.txtFile.setText("\n"+txtCon)

    def openFiles(self):

        fnames = QFileDialog.getOpenFileNames(self,"打开多个文件",'./')

        print(fnames)

        if fnames[0]:

            for fname in fnames[0]:

                with open(fname,'r+',encoding='utf8',errors="ignore") as f:

                    self.fileContent.append(f.read()+"\n")

            txtsCon = "".join(self.fileContent)

            self.txtFile.setText(txtsCon)

    def choseFont(self):

        font , ok = QFontDialog.getFont()

        if ok:

            self.txtFile.setCurrentFont(font)

    def choseColor(self):

        color = QColorDialog.getColor()

        if color.isValid():

            self.txtFile.setTextColor(color)

    def saveFile(self):

        fileName = QFileDialog.getSaveFileName(self,"保存文件","./","Text files (*.txt)")

        if fileName[0]:

            with open(fileName[0],'w+',encoding='utf8') as f:

                f.write(self.txtFile.toPlainText())

    def pageSet(self):

        printSetDialog = QPageSetupDialog(self.printer,self)

        printSetDialog.exec_()

    def printFile(self):

        printDialog = QPrintDialog(self.printer,self)

        if QDialog.Accepted == printDialog.exec_():

            self.txtFile.print(self.printer)

if __name__ == '__main__':

    app = QApplication(sys.argv)

    ex = Example()

    ex.show()

    sys.exit(app.exec_())
消息对话框(QMessageBox)
效果如下:

参考:
https://zhuanlan.zhihu.com/p/29795495
完整代码:
from PyQt5.QtWidgets import (QApplication, QWidget, QLabel,QPushButton, QMessageBox,QGridLayout,QTextEdit,QCheckBox)

import sys

from PyQt5.QtGui import QIcon,QPixmap

class Example(QWidget):

    def __init__(self):

        super().__init__()

        self.initUI()

    def initUI(self):

        self.setGeometry(500,500,400,200)

        self.setWindowTitle("标准输入对话框")

        self.setWindowIcon(QIcon("11.ico"))

        gridLayout = QGridLayout()

        self.lb = QLabel("你选择了abort!")

        self.btn1 = QPushButton("提示")

        self.btn2 = QPushButton("询问")

        self.btn3 = QPushButton("警告")

        self.btn4 = QPushButton("错误")

        self.btn5 = QPushButton("关于")

        self.btn6 = QPushButton("关于QT")

        gridLayout.addWidget(self.lb,0,0,1,1)

        gridLayout.addWidget(self.btn1,1,0,1,1)

        gridLayout.addWidget(self.btn2,1,1,1,1)

        gridLayout.addWidget(self.btn3,1,2,1,1)

        gridLayout.addWidget(self.btn4,3,0,1,1)

        gridLayout.addWidget(self.btn5,3,1,1,1)

        gridLayout.addWidget(self.btn6,3,2,1,1)

        self.setLayout(gridLayout)

        self.btn1.clicked.connect(self.information_dialog)

        self.btn2.clicked.connect(self.question_dialog)

        self.btn3.clicked.connect(self.warning_dialog)

        self.btn4.clicked.connect(self.critical_dialog)

        self.btn5.clicked.connect(self.about_dialog)

        self.btn6.clicked.connect(self.about_QT_dialog)

    def information_dialog(self):

        reply = QMessageBox.information(self,"提示对话框","这是一个提示对话框", QMessageBox.Ok | QMessageBox.Close, QMessageBox.Close)

        if reply == QMessageBox.Ok:

            self.lb.setText("你选择了information_dialog的ok!")

        else:

            self.lb.setText("你选择了information_dialog的close!")

    def question_dialog(self):

        reply = QMessageBox.question(self,"询问对话框窗口标题!","这是一个询问对话框。。。",QMessageBox.Yes|QMessageBox.No|QMessageBox.Cancel,QMessageBox.No)

        if reply == QMessageBox.Yes:

            self.lb.setText("你选择了question_dialog的Yes")

        elif reply == QMessageBox.No:

            self.lb.setText("你选择了question_dialog的No")

        else:

            self.lb.setText("你选择了question_dialog的Cancel")

    def warning_dialog(self):

        # reply = QMessageBox.warning(self,'警告','这是一个警告消息对话框', QMessageBox.Save | QMessageBox.Discard | QMessageBox.Cancel, QMessageBox.Save)

        cb = QCheckBox('所有文档都按此操作')

        msgBox = QMessageBox()

        msgBox.setWindowTitle('警告')

        msgBox.setIcon(QMessageBox.Warning)

        msgBox.setText('这是一个警告消息对话框')

        msgBox.setInformativeText('出现更改愿意保存吗?')

        Save = msgBox.addButton('保存', QMessageBox.AcceptRole)

        NoSave = msgBox.addButton('取消', QMessageBox.RejectRole)

        Cancel = msgBox.addButton('不保存', QMessageBox.DestructiveRole)

        msgBox.setDefaultButton(Save)

        msgBox.setCheckBox(cb)

        cb.stateChanged.connect(self.check)

        reply = msgBox.exec()

        if reply == QMessageBox.AcceptRole:

            self.lb.setText('你选择了保存!')

        elif reply == QMessageBox.RejectRole:

            self.lb.setText('你选择了取消!')

        else:

            self.lb.setText('你选择了不保存!')

    def check(self):

        print(self.sender().isChecked())

        if self.sender().isChecked():

            self.lb.setText('你打勾了哦')

        else:

            self.lb.setText('怎么又不打了啊')

    def critical_dialog(self):

        # reply = QMessageBox.critical(self,'错误','这是一个错误消息对话框', QMessageBox.Retry | QMessageBox.Abort | QMessageBox.Ignore , QMessageBox.Retry)

        msgBox = QMessageBox()

        msgBox.setWindowTitle('错误')

        msgBox.setIcon(QMessageBox.Critical)

        msgBox.setText("这是一个错误消息对话框")

        msgBox.setStandardButtons(QMessageBox.Retry | QMessageBox.Abort | QMessageBox.Ignore)

        msgBox.setDefaultButton(QMessageBox.Retry)

        msgBox.setDetailedText('这是详细的信息:学点编程吧,我爱你!')

        reply = msgBox.exec()

        if reply == QMessageBox.Retry:

            self.lb.setText('你选择了Retry!')

        elif reply == QMessageBox.Abort:

            self.lb.setText('你选择了Abort!')

        else:

            self.lb.setText('你选择了Ignore!')

    def about_dialog(self):

        # msgBox = QMessageBox.about(self,"关于对话框标题","这是一个关于对话框,是个加拿大小红旗")

        msgBox = QMessageBox(QMessageBox.NoIcon ,"关于对话框标题","这是一个关于对话框内容...")

        msgBox.setIconPixmap(QPixmap("22.ico"))

        msgBox.exec()

    def about_QT_dialog(self):

        msgBox = QMessageBox.aboutQt(self,"关于QT的对话框标题")

if __name__ == '__main__':

    app = QApplication(sys.argv)

    ex = Example()

    ex.show()

    sys.exit(app.exec_())
3种密码输入框的输入方式
- 输入的密码不可见;
- 输入的密码可见,但是鼠标点击其他控件后,密码不可见;
- 输入的密码不可见,同时为了更加的安全,屏蔽了鼠标右键、禁用复制、粘贴快捷键、鼠标在密码框中不可移动,不可全选。就类似我们在输入QQ密码的时候一样。
效果如下:
参考:
https://zhuanlan.zhihu.com/p/30152208
完整代码:
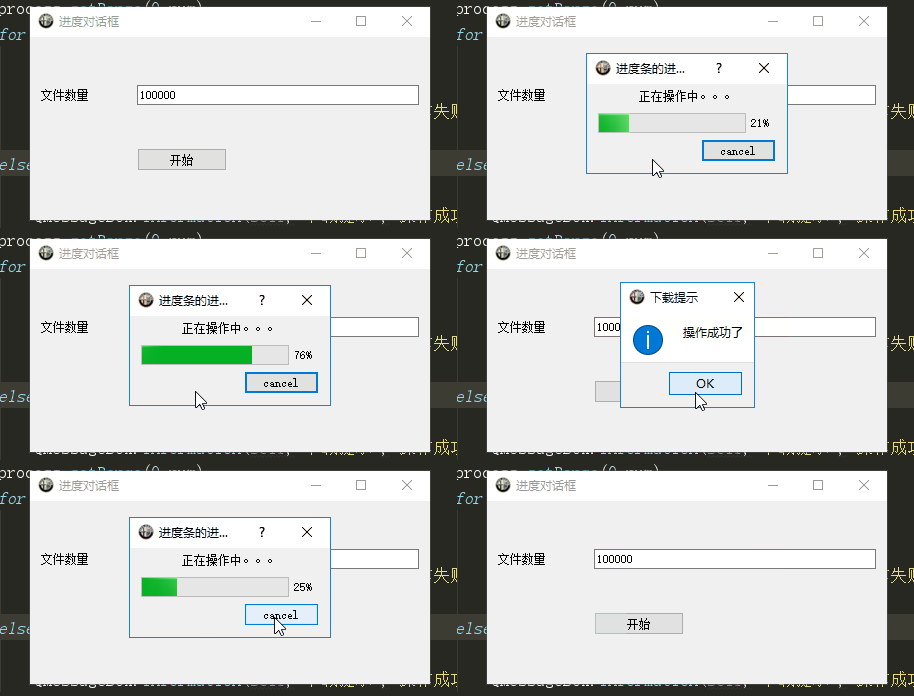
进度对话框(QProgressDialog)
效果如下:

参考:
https://zhuanlan.zhihu.com/p/30283367
完整代码:
from PyQt5.QtWidgets import (QApplication, QWidget, QLabel,QPushButton, QMessageBox,QGridLayout,QLineEdit,QProgressDialog)

import sys

from PyQt5.QtGui import QIcon

from PyQt5.QtCore import Qt

class Example(QWidget):

    def __init__(self):

        super().__init__()

        self.initUI()

    def initUI(self):

        self.setGeometry(500,500,400,200)

        self.setWindowTitle("进度对话框")

        self.setWindowIcon(QIcon("11.ico"))

        gridLayout = QGridLayout()

        self.lb = QLabel("文件数量")

        self.lineEdit = QLineEdit("")

        self.btn = QPushButton("开始")

        gridLayout.addWidget(self.lb,0,0,1,1)

        gridLayout.addWidget(self.lineEdit,0,1,1,3)

        gridLayout.addWidget(self.btn,1,1,1,1)

        self.setLayout(gridLayout)

        self.btn.clicked.connect(self.startProcess)

    def startProcess(self):

        num = int(self.lineEdit.text())

        process = QProgressDialog(self)

        process.setWindowTitle("进度条的进程对话框")

        process.setWindowIcon(QIcon("11.ico"))

        process.setLabelText("正在操作中。。。")

        process.setCancelButtonText("cancel")

        process.setMinimumDuration(3)   #设置进度条的最小持续时间,若进度时间少于3000ms 则不会出现

        process.setWindowModality(Qt.WindowModal)

        process.setRange(0,num)

        for i in range(num):

            process.setValue(i)

            if process.wasCanceled():

                QMessageBox.warning(self,"下载提示","操作失败")

                break

        else:

            process.setValue(num)

            QMessageBox.information(self,"下载提示","操作成功了")

if __name__ == '__main__':

    app = QApplication(sys.argv)

    ex = Example()

    ex.show()

    sys.exit(app.exec_())
【PyQt5-Qt Designer】对话框系列的更多相关文章
- PyQt5 & Qt Designer使用小结
开始在知乎写文章的原因,主要还是想整理平时的经验,方便自己以后查看,有机会的话大家也可以交流吧. 11月中旬由于项目需要,和另一名实习生负责使用Python开发一个数据分析的小软件. 虽然才开始接触Q ...
- PyCharm+PyQt5+Qt Designer配置
配置前提 因为本机已经配置完毕了,本次使用的是虚拟机中的Win7系统,Win10系统操作步骤完全一样,无任何区别 PyCharm (这个不多说,官网下载安装,我是用的是2019.3版本) Python ...
- 痞子衡嵌入式:超级好用的可视化PyQt GUI构建工具(Qt Designer)
大家好,我是痞子衡,是正经搞技术的痞子.今天痞子衡给大家介绍的是PyQt GUI构建工具Qt Designer. 痞子衡开博客至今已有好几年,一直以嵌入式开发相关主题的文章为主线,偶尔穿插一些其他技术 ...
- PyCharm+Qt Designer+PyUIC安装配置教程
Qt Designer用于像VC++的MFC一样拖放.设计控件 PyUIC用于将Qt Designer生成的.ui文件转换成.py文件 Qt Designer和PyUIC都包含在PyQt5中,所以我们 ...
- PyCharm安装PyQt5及其工具(Qt Designer、PyUIC、PyRcc)详细教程
摘要:Qt是常用的用户界面设计工具,而在Python中则使用PyQt这一工具包,它是Python编程语言和Qt库的成功融合.这篇博文通过图文详细介绍在PyCharm中如何完整优雅地安装配置PyQt5的 ...
- pyqt5 在qt designer后以弹窗的方式连接多个UI图形界面
当我们通过pyqt开发时,eric6为我们提供了一个方便的工具:图形化的绘制UI工具--qt designer. 我们可以通过它开发多个UI,然后利用信号-槽工具,将功能代码附着在上面.也可以将多个界 ...
- 使用 PySide2 开发 Maya 插件系列一:QT Designer 设计GUI, pyside-uic 把 .ui 文件转为 .py 文件
使用 PySide2 开发 Maya 插件系列一:QT Designer 设计GUI, pyside-uic 把 .ui 文件转为 .py 文件 前期准备: 安装 python:https://www ...
- PyQt5(1)——Qt Designer初探
相关环境配置我们就不介绍了(网上有很多教程) Qt Designer 是一款十分强大的GUI工具,生成的文件为 .UI文件 可以通过命令转化为Py文件,简单来说我们可以通过拖拽方式生成界面,在通过简 ...
- Win10安装PyQt5与Qt Designer【转】
https://blog.csdn.net/u011342224/article/details/78879633 1.直接在cmd中通过pip安装PyQt5 1 pip install pyqt5 ...
随机推荐
- .net core读取json格式的配置文件
在.Net Framework中,配置文件一般采用的是XML格式的,.NET Framework提供了专门的ConfigurationManager来读取配置文件的内容,.net core中推荐使用j ...
- opencv之内存存储器——CvMemStorage与CvSeq
1.CvMemStorage *storage=cvCreateMemStorage(block_size); 用来创建一个内存存储器,来统一管理各种动态对象的内存. 函数返回一个新创建的内存存储器指 ...
- ubuntu GCC 版本切换
(1) 查看gcc以及g++的版本 gcc -v g++ -v star@ai:~ $ gcc -v Using built-in specs. COLLECT_GCC=gcc COLLECT_L ...
- Springboot学习笔记(三)-常用注入组件方式
包扫描@ComponentScan+组件标注注解(@Controller.@Service.@Repository.@Component) 包扫描不是必须的,指定包名后以指定的包名为准,比如指定包名为 ...
- Android短信监听实现,及Android4.4之后短信机制变更
前阵子公司有一个项目,简单的监听短信应用,功能只有如下两个: 1.监听短信并获取短信内容上传服务器: 2.从服务器获取短信内容,发送出去 按照传统的思路,监听短信我们有两种方式:第一种是使用广播 ...
- [OpenCV] Install OpenCV 3.4 with DNN
目标定位 一.开始全面支持 Tensorflow OpenCV3.4 新功能 当前最新进展OpenCV 3.4 dev:https://github.com/opencv/opencv/tree/ma ...
- chrome设置捕获异常时自动暂停js
1. [F12 | 右键审查元素] 打开chrome调试工具 2. 进行如下设置 a. 点击Pause on exceptions b. 选中Pasue On Caught Exceptions 设置 ...
- a or an
在英语句子中用a还是用an,一直是个容易出错的问题. 原则为:如果下一个词的发音为元音则用an,否则用a. 例: a man an elephant a house an hour 对于大写字母要注意 ...
- linux下的文件解压命令
说一下tar命令的参数含义:z,使用gzip解压,x:extract解压,v:显示详细信息,f:使用归档在当前文件夹. 在解压时出现了解压失败,原因是没有sudo,无法创建文件夹.
- org.apache.jasper.JasperException:Unable to read TLD "META-INF/c-1_0-rt.tld" from JAR file jstl-1.2.jar
前两天把项目从eclipse EE版搬到MyEclipse中了.配置好jdk,确定build path中没有报错后,在tomcat中运行.结果,报错: org.apache.jasper.Jasper ...
