pip安装报错处理+PyPi源切换教程
一、pip安装出错类型
1.1 pip版本过旧导致不能安装
报错提示:
You are using pip version 9.0.3, however version 10.0.1 is available.

You should consider upgrading via the 'python -m pip install --upgrade pip' comm

and.
可通过以下命令升级pip
python -m pip install --upgrade pip
1.2 官方的PyPi连接超时
如果是timeout类形错误,那重点怀疑网络问题,可能是官方的PyPi太慢导致。
这类错误可通过在pip.ini中index-url指定为使用本地源进行处理。我这里以清华源为例,具体操作步骤看下边第二大点。
1.3 HTTPS证书问题
现在很多网站都换成了HTTPS,python验证证书没通过时就会拒绝使用PyPi源,通常报错如下:
Could not fetch URL https://pypi.tuna.tsinghua.edu.cn/simple/gg/: There was a

problem confirming the ssl certificate: HTTPSConnectionPool(host='pypi.tuna.tsin

ghua.edu.cn', port=443): Max retries exceeded with url: /simple/numpy/ (Caused by S

SLError(SSLError(, u'[SSL: CERTIFICATE_VERIFY_FAILED] certificate verify failed

 (_ssl.c:)'),)) - skipping
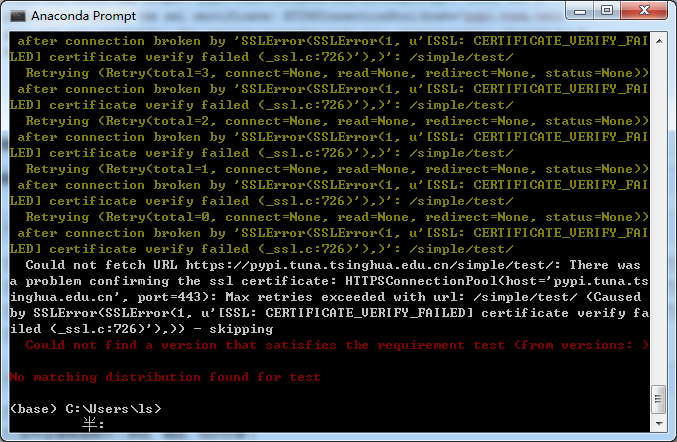
这类错误可通过在pip.ini中添加trusted-host进行处理。我这里以信任清华源为例,具体操作步骤看下边第二大点。
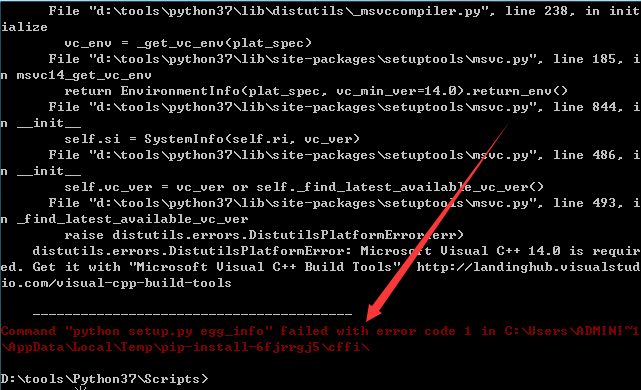
1.4 缺少VC环境依赖
这类错误处理,一是安装vc环境不过到现在我还不是很明白要装哪个文件,更推荐的做法是使用conda安装第三方库,具体操作参见“PyCharm+Miniconda3安装配置教程” 第二大点查看如何安装conda及参看3.2.2节看如何用conda安装第三方库
通常报错如下:
“distutils.errors.DistutilsPlatformError: Microsoft Visual C++ 14.0 is required”

“Command "python setup.py egg_info" failed with error code 1 in C:\Users\ADMINI~1\AppData\Local\Temp\pip-install-6fjrrgj5\cffi\”
20191212更新:
既然说缺少Microsoft Visual C++ 14.0 Build Tools那我们直接给他装上。(需要生成工具的原因,猜测是有些python库并不是单纯的python文件,还有c语言写的需要编译成exe等可执行文件)
visual studio installer下载地址:https://visualstudio.microsoft.com/zh-hans/thank-you-downloading-visual-studio/?sku=Community&rel=16#
两个本质上是一样的,而我们要装的都是一个,即”Microsoft Visual C++ 14.0 Build Tools“(VS中文名翻译成生成工具)。
不管是vs 2015还是vs 2017还vs 2019,用的都是14.x版本只是小版本不一样,我们装最新的即可,比如我这里直接装VS2019的。
由于VS无敌的大,为了避免C盘耗费过多建议修改安装地址。可以只勾选安装生成工具,但我这为了方便装了VS能用于编写C++就不取消色选其他组件了。但不管怎么样VS核心编缉器都是必须安装的,大概是微软为了避免有些小白想装VS最终装了一堆组件编缉器却没见到。

二、将PyPi切换为本地源并处理证书错误
注意:这个创建的pip.ini文件配置对conda等发行版中的pip也生效,因为conda等中的pip本质也是pip。
2.1 查看%APPDATA%路径【可选】
echo %APPDATA%

2.2 创建 %APPDATA%\pip\目录
我这里直接在cmd使用命令创建。图形界面创的话,上一步我们已查到%APPDATA%的指向了一层层根着创即可
mkdir %APPDATA%\pip
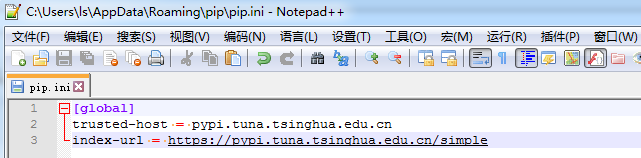
2.3 创建pip.ini文件
使用文件编辑器创建一个文本,然后输入以下内容,并将其保存到上边的%APPDATA%\pip\目录下,命名为pip.ini即可(注意不要保存成pip,ini.txt)
Linux等是$HOME/.config/pip/pip.conf,index-url行可不需要
[global]

trusted-host = pypi.tuna.tsinghua.edu.cn

index-url = https://pypi.tuna.tsinghua.edu.cn/simple
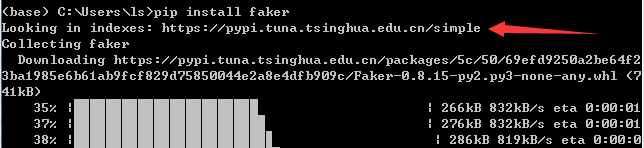
2.4 验证源成功切换且无报错
我这里以pip安装faker库进行验证,自己随便装什么都行
pip install faker
三、配置代理【可选】
应该来讲在把源设置成国内源后应该来讲,网络网速什么的就应该都没问题了,也就没有配置代理的需求。
但在一些公司访问中不允许pip直接访问外部网站,一定要通过公司代理才能访问,这时就只能配置代理。
配置代理也简单,一样在%APPDATA%\pip\pip.ini的[global]节区中设置proxy值即可。假设代理为“http://proxy.company.com:8080”:
[global]

trusted-host = pypi.tuna.tsinghua.edu.cn

index-url = https://pypi.tuna.tsinghua.edu.cn/simple

proxy = http://proxy.company.com:8080
参考:
https://mirrors.tuna.tsinghua.edu.cn/help/pypi/
http://mirrors.ustc.edu.cn/help/pypi.html
https://superuser.com/questions/727924/pip-and-ssl-certificate-errors
https://stackoverflow.com/questions/9698557/how-to-use-pip-on-windows-behind-an-authenticating-proxy
pip安装报错处理+PyPi源切换教程的更多相关文章
- 安装Tensorflow过程pip安装报错:is not a supported wheel on this platform
安装Tensorflow过程pip安装报错:is not a supported wheel on this platform 通过pip安装wheel镜像时,安装指令为: pip install - ...
- pip安装报错: Retrying (Retry(total=4, connect=None, read=None, redirect=None, status=None)) after connection broken by 'ProxyError('Cannot connect to proxy
pip安装报错 解决办法: pip install selenium -i http://pypi.douban.com/simple --trusted-host pypi.douban.com
- Python——pip安装报错:is not a supported wheel on this platform
pip安装报错:is not a supported wheel on this platform 可能的原因1:安装的不是对应python版本的库,下载的库名中cp35代表python3.5,其它同 ...
- 使用pip安装报错的处理方法
在新的机子上使用pip安装程序一直报错: Retrying (Retry(total=4, connect=None, read=None, redirect=None)) after connect ...
- 使用pip安装报错的处理方法_2
终端更新pip出错 sudo pip install --upgrade pip : 1.ReadTimeoutError: HTTPSConnectionPool(host='pypi.Python ...
- pip安装报错:is not a supported wheel on this platform
可能的原因1:安装的不是对应python版本的库,下载的库名中cp27代表python2.7,其它同理. 可能的原因2:这个是我遇到的情况(下载的是对应版本的库,然后仍然提示不支持当前平台) 我下载到 ...
- 【python】pip安装报错UnicodeDecodeError: 'ascii' codec can't decode byte 0xc4 in position 7: ordinal not in range(128)
刚安装完python,准备pip安装第三方库的时候出现了一个错误: UnicodeDecodeError: ‘ascii’ code can’t decode byte 0xef in positio ...
- python中使用pip安装报错:Fatal error in launcher... 解决方法
python安装了2和3版本在 cmd 中用pip报的错误为:Fatal error in launcher:Unable to create process using 这是因为你安装了python ...
- pip安装报错:Fatal error in launcher: Unable to create process using '"'
pip安装包报错 解决方案: pip需要升级,可使用以下脚本: python -m pip install -U pip
随机推荐
- CentOS7 使用firewalld打开关闭防火墙以及端口
1.firewalld的基本使用 启动 systemctl start firewalld 关闭 systemctl stop firewalld 查看状态 systemctl status fire ...
- python,函数的基本用法
一.函数 函数的概念:对功能或者动作的封装可以帮我们把一段公共的代码提取出来 语法如下 def 函数名(形参): 函数体 函数名(实参) # 函数名() def yue(): print(" ...
- Integer的最大值
来自:https://blog.csdn.net/qq_33611068/article/details/77369050 有这样一道题: 编程测试,遍历 0 到 int所能表示最大的正数,将消耗的时 ...
- [osg][原]自定义osgGA漫游器
相机矩阵变化基础:http://blog.csdn.net/popy007/article/details/5120158 osg漫游器原理:http://blog.csdn.net/csxiaosh ...
- [osg]osg绘制动态改变顶点的几何体
最简单的顶点数据更新方法是预先获取setVertexArray()所用的数组数据,并对其进行更新.但是对于开启显示列表支持的几何体(这是默认的情况)来说,有一个问题需要特别需要引起注意,即显示列表中的 ...
- Math.abs(~2020) 按位取反后的绝对值是多少 2021, 按位取反后,比正数多1
Math.abs(~2020) 按位取反后的绝对值是多少 2021, 按位取反后,比正数多1 int 值的取值 范围: -128 --- 127 之间, 0000 0000 按位取 ...
- leecode第七十题(爬楼梯)
class Solution { public: int climbStairs(int n) { vector<unsigned long long> num;//斐波那契数列 num. ...
- Go语言学习之1 基本概念、环境搭建、第一个Go程序
一.环境搭建 见我的这篇博客 https://www.cnblogs.com/xuejiale/p/10258244.html 二.golang语言特性1. 垃圾回收 1) 内存自动回收,再也不 ...
- maven的安装以及问题
https://blog.csdn.net/machao0903/article/details/73368909https://www.cnblogs.com/jiejiecool/p/421885 ...
- 测试环境的好工具bginfo
省的自己来回找这台机器的IP,剩余空间了. 直接都显示在桌面了. https://www.howtogeek.com/school/sysinternals-pro/lesson7/