Re:从零开始的Spring Security Oauth2(一)
前言
今天来聊聊一个接口对接的场景,A厂家有一套HTTP接口需要提供给B厂家使用,由于是外网环境,所以需要有一套安全机制保障,这个时候oauth2就可以作为一个方案。
关于oauth2,其实是一个规范,本文重点讲解spring对他进行的实现,如果你还不清楚授权服务器,资源服务器,认证授权等基础概念,可以移步理解OAuth 2.0 - 阮一峰,这是一篇对于oauth2很好的科普文章。
需要对spring security有一定的配置使用经验,用户认证这一块,spring security oauth2建立在spring security的基础之上。第一篇文章主要是讲解使用springboot搭建一个简易的授权,资源服务器,在文末会给出具体代码的github地址。后续文章会进行spring security oauth2的相关源码分析。java中的安全框架如shrio,已经有跟我学shiro - 开涛,非常成体系地,深入浅出地讲解了apache的这个开源安全框架,但是spring security包括oauth2一直没有成体系的文章,学习它们大多依赖于较少的官方文档,理解一下基本的使用配置;通过零散的博客,了解一下他人的使用经验;打断点,分析内部的工作流程;看源码中的接口设计,以及注释,了解设计者的用意。spring的各个框架都运用了很多的设计模式,在学习源码的过程中,也大概了解了一些套路。spring也在必要的地方添加了适当的注释,避免了源码阅读者对于一些细节设计的理解产生偏差,让我更加感叹,spring不仅仅是一个工具框架,更像是一个艺术品。
概述
使用oauth2保护你的应用,可以分为简易的分为三个步骤
- 配置资源服务器
- 配置认证服务器
- 配置spring security
前两点是oauth2的主体内容,但前面我已经描述过了,spring security oauth2是建立在spring security基础之上的,所以有一些体系是公用的。
oauth2根据使用场景不同,分成了4种模式
- 授权码模式(authorization code)
- 简化模式(implicit)
- 密码模式(resource owner password credentials)
- 客户端模式(client credentials)
本文重点讲解接口对接中常使用的密码模式(以下简称password模式)和客户端模式(以下简称client模式)。授权码模式使用到了回调地址,是最为复杂的方式,通常网站中经常出现的微博,qq第三方登录,都会采用这个形式。简化模式不常用。
项目准备
主要的maven依赖如下
<!-- 注意是starter,自动配置 -->

<dependency>

    <groupId>org.springframework.boot</groupId>

    <artifactId>spring-boot-starter-security</artifactId>

</dependency>

<!-- 不是starter,手动配置 -->

<dependency>

    <groupId>org.springframework.security.oauth</groupId>

    <artifactId>spring-security-oauth2</artifactId>

</dependency>

<dependency>

    <groupId>org.springframework.boot</groupId>

    <artifactId>spring-boot-starter-web</artifactId>

</dependency>

<!-- 将token存储在redis中 -->

<dependency>

    <groupId>org.springframework.boot</groupId>

    <artifactId>spring-boot-starter-data-redis</artifactId>

</dependency>
我们给自己先定个目标,要干什么事?既然说到保护应用,那必须得先有一些资源,我们创建一个endpoint作为提供给外部的接口:
@RestController

public class TestEndpoints {

    @GetMapping("/product/{id}")

    public String getProduct(@PathVariable String id) {

        //for debug

        Authentication authentication = SecurityContextHolder.getContext().getAuthentication();

        return "product id : " + id;

    }

    @GetMapping("/order/{id}")

    public String getOrder(@PathVariable String id) {

        //for debug

        Authentication authentication = SecurityContextHolder.getContext().getAuthentication();

        return "order id : " + id;

    }

}
暴露一个商品查询接口,后续不做安全限制,一个订单查询接口,后续添加访问控制。
配置资源服务器和授权服务器
由于是两个oauth2的核心配置,我们放到一个配置类中。
为了方便下载代码直接运行,我这里将客户端信息放到了内存中,生产中可以配置到数据库中。token的存储一般选择使用redis,一是性能比较好,二是自动过期的机制,符合token的特性。
@Configuration

public class OAuth2ServerConfig {

    private static final String DEMO_RESOURCE_ID = "order";

    @Configuration

    @EnableResourceServer

    protected static class ResourceServerConfiguration extends ResourceServerConfigurerAdapter {

        @Override

        public void configure(ResourceServerSecurityConfigurer resources) {

            resources.resourceId(DEMO_RESOURCE_ID).stateless(true);

        }

        @Override

        public void configure(HttpSecurity http) throws Exception {

            // @formatter:off

            http

                    // Since we want the protected resources to be accessible in the UI as well we need

                    // session creation to be allowed (it's disabled by default in 2.0.6)

                    .sessionManagement().sessionCreationPolicy(SessionCreationPolicy.IF_REQUIRED)

                    .and()

                    .requestMatchers().anyRequest()

                    .and()

                    .anonymous()

                    .and()

                    .authorizeRequests()

//                    .antMatchers("/product/**").access("#oauth2.hasScope('select') and hasRole('ROLE_USER')")

                    .antMatchers("/order/**").authenticated();//配置order访问控制,必须认证过后才可以访问

            // @formatter:on

        }

    }

    @Configuration

    @EnableAuthorizationServer

    protected static class AuthorizationServerConfiguration extends AuthorizationServerConfigurerAdapter {

        @Autowired

        AuthenticationManager authenticationManager;

        @Autowired

        RedisConnectionFactory redisConnectionFactory;

        @Override

        public void configure(ClientDetailsServiceConfigurer clients) throws Exception {

            //配置两个客户端,一个用于password认证一个用于client认证

            clients.inMemory().withClient("client_1")

                    .resourceIds(DEMO_RESOURCE_ID)

                    .authorizedGrantTypes("client_credentials", "refresh_token")

                    .scopes("select")

                    .authorities("client")

                    .secret("123456")

                    .and().withClient("client_2")

                    .resourceIds(DEMO_RESOURCE_ID)

                    .authorizedGrantTypes("password", "refresh_token")

                    .scopes("select")

                    .authorities("client")

                    .secret("123456");

        }

        @Override

        public void configure(AuthorizationServerEndpointsConfigurer endpoints) throws Exception {

            endpoints

                    .tokenStore(new RedisTokenStore(redisConnectionFactory))

                    .authenticationManager(authenticationManager);

        }

        @Override

        public void configure(AuthorizationServerSecurityConfigurer oauthServer) throws Exception {

            //允许表单认证

            oauthServer.allowFormAuthenticationForClients();

        }

    }

}
简单说下spring security oauth2的认证思路。
client模式,没有用户的概念,直接与认证服务器交互,用配置中的客户端信息去申请accessToken,客户端有自己的client_id,client_secret对应于用户的username,password,而客户端也拥有自己的authorities,当采取client模式认证时,对应的权限也就是客户端自己的authorities。
password模式,自己本身有一套用户体系,在认证时需要带上自己的用户名和密码,以及客户端的client_id,client_secret。此时,accessToken所包含的权限是用户本身的权限,而不是客户端的权限。
我对于两种模式的理解便是,如果你的系统已经有了一套用户体系,每个用户也有了一定的权限,可以采用password模式;如果仅仅是接口的对接,不考虑用户,则可以使用client模式。
配置spring security
在spring security的版本迭代中,产生了多种配置方式,建造者模式,适配器模式等等设计模式的使用,spring security内部的认证flow也是错综复杂,在我一开始学习ss也产生了不少困惑,总结了一下配置经验:使用了springboot之后,spring security其实是有不少自动配置的,我们可以仅仅修改自己需要的那一部分,并且遵循一个原则,直接覆盖最需要的那一部分。这一说法比较抽象,举个例子。比如配置内存中的用户认证器。有两种配置方式
planA:
@Bean

protected UserDetailsService userDetailsService(){

    InMemoryUserDetailsManager manager = new InMemoryUserDetailsManager();

    manager.createUser(User.withUsername("user_1").password("123456").authorities("USER").build());

    manager.createUser(User.withUsername("user_2").password("123456").authorities("USER").build());

    return manager;

}
planB:
@Configuration

@EnableWebSecurity

public class SecurityConfiguration extends WebSecurityConfigurerAdapter {

    @Override

    protected void configure(AuthenticationManagerBuilder auth) throws Exception {

        auth.inMemoryAuthentication()

                .withUser("user_1").password("123456").authorities("USER")

                .and()

                .withUser("user_2").password("123456").authorities("USER");

   }

   @Bean

   @Override

   public AuthenticationManager authenticationManagerBean() throws Exception {

       AuthenticationManager manager = super.authenticationManagerBean();

        return manager;

    }

}
你最终都能得到配置在内存中的两个用户,前者是直接替换掉了容器中的UserDetailsService,这么做比较直观;后者是替换了AuthenticationManager,当然你还会在SecurityConfiguration 复写其他配置,这么配置最终会由一个委托者去认证。如果你熟悉spring security,会知道AuthenticationManager和AuthenticationProvider以及UserDetailsService的关系,他们都是顶级的接口,实现类之间错综复杂的聚合关系…配置方式千差万别,但理解清楚认证流程,知道各个实现类对应的职责才是掌握spring security的关键。
下面给出我最终的配置:
@Configuration

@EnableWebSecurity

public class SecurityConfiguration extends WebSecurityConfigurerAdapter {

    @Bean

    @Override

    protected UserDetailsService userDetailsService(){

        InMemoryUserDetailsManager manager = new InMemoryUserDetailsManager();

        manager.createUser(User.withUsername("user_1").password("123456").authorities("USER").build());

        manager.createUser(User.withUsername("user_2").password("123456").authorities("USER").build());

        return manager;

    }

    @Override

    protected void configure(HttpSecurity http) throws Exception {

        // @formatter:off

        http

            .requestMatchers().anyRequest()

            .and()

                .authorizeRequests()

                .antMatchers("/oauth/*").permitAll();

        // @formatter:on

    }

}
重点就是配置了一个UserDetailsService,和ClientDetailsService一样,为了方便运行,使用内存中的用户,实际项目中,一般使用的是数据库保存用户,具体的实现类可以使用JdbcDaoImpl或者JdbcUserDetailsManager。
获取token
进行如上配置之后,启动springboot应用就可以发现多了一些自动创建的endpoints:
{[/oauth/authorize]}

{[/oauth/authorize],methods=[POST]

{[/oauth/token],methods=[GET]}

{[/oauth/token],methods=[POST]}

{[/oauth/check_token]}

{[/oauth/error]}
重点关注一下/oauth/token,它是获取的token的endpoint。启动springboot应用之后,使用http工具访问
password模式:
http://localhost:8080/oauth/token?username=user_1&password=123456&grant_type=password&scope=select&client_id=client_2&client_secret=123456
响应如下: {"access_token":"950a7cc9-5a8a-42c9-a693-40e817b1a4b0","token_type":"bearer","refresh_token":"773a0fcd-6023-45f8-8848-e141296cb3cb","expires_in":27036,"scope":"select"}
client模式:
http://localhost:8080/oauth/token?grant_type=client_credentials&scope=select&client_id=client_1&client_secret=123456
响应如下: {"access_token":"56465b41-429d-436c-ad8d-613d476ff322","token_type":"bearer","expires_in":25074,"scope":"select"}
在配置中,我们已经配置了对order资源的保护,如果直接访问: http://localhost:8080/order/1
会得到这样的响应: {"error":"unauthorized","error_description":"Full authentication is required to access this resource"}
(这样的错误响应可以通过重写配置来修改)
而对于未受保护的product资源 http://localhost:8080/product/1
则可以直接访问,得到响应 product id : 1
携带accessToken参数访问受保护的资源:
使用password模式获得的token: http://localhost:8080/order/1?access_token=950a7cc9-5a8a-42c9-a693-40e817b1a4b0
得到了之前匿名访问无法获取的资源: order id : 1
使用client模式获得的token: http://localhost:8080/order/1?access_token=56465b41-429d-436c-ad8d-613d476ff322
同上的响应 order id : 1
我们重点关注一下debug后,对资源访问时系统记录的用户认证信息,可以看到如下的debug信息
password模式:
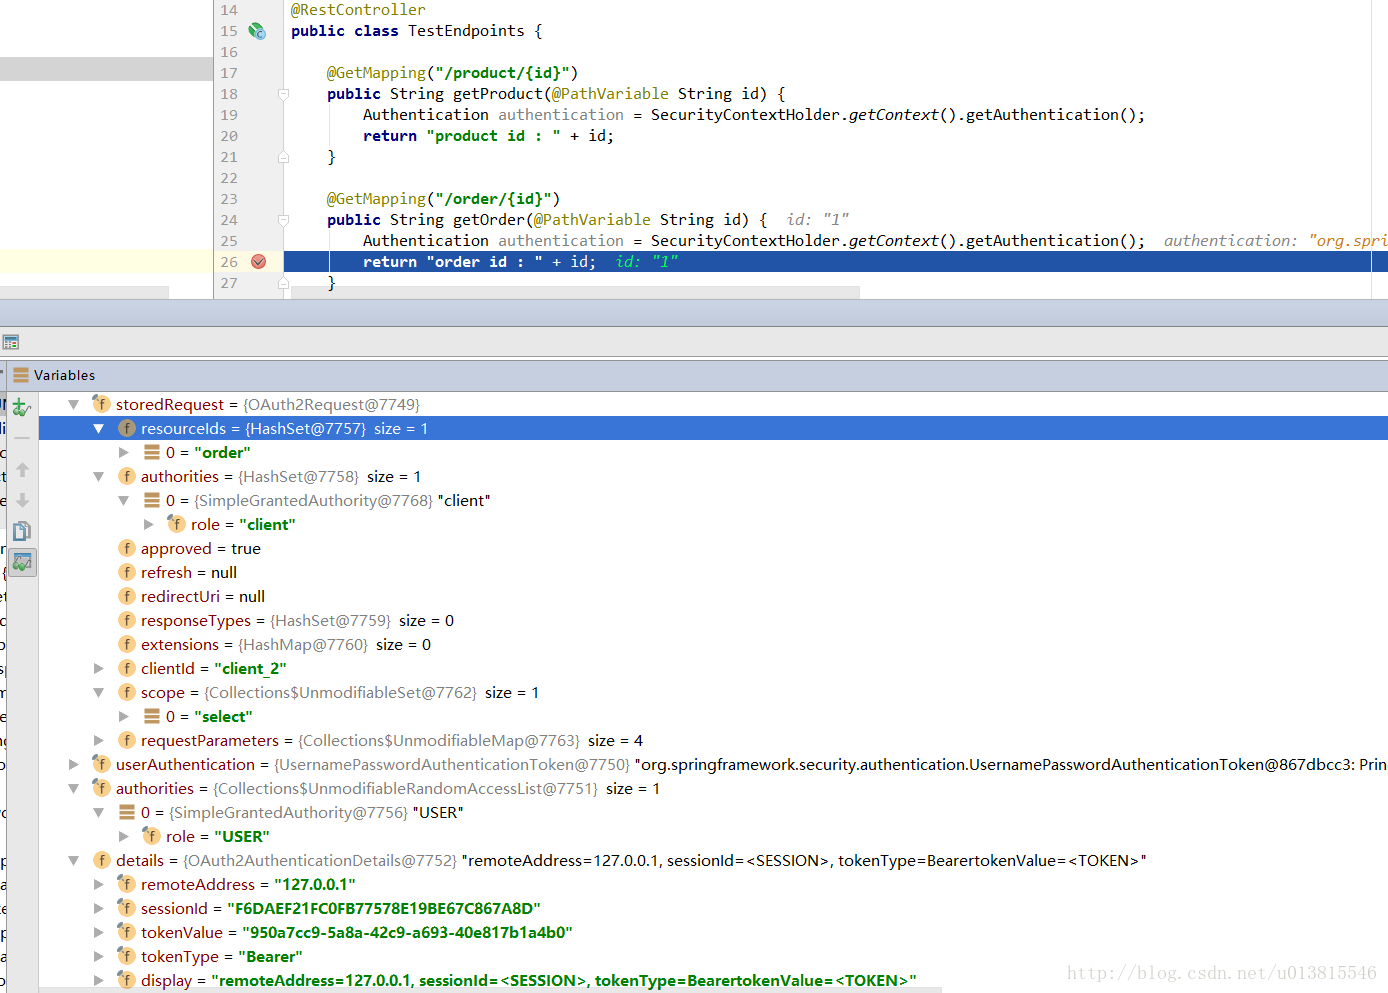
client模式:
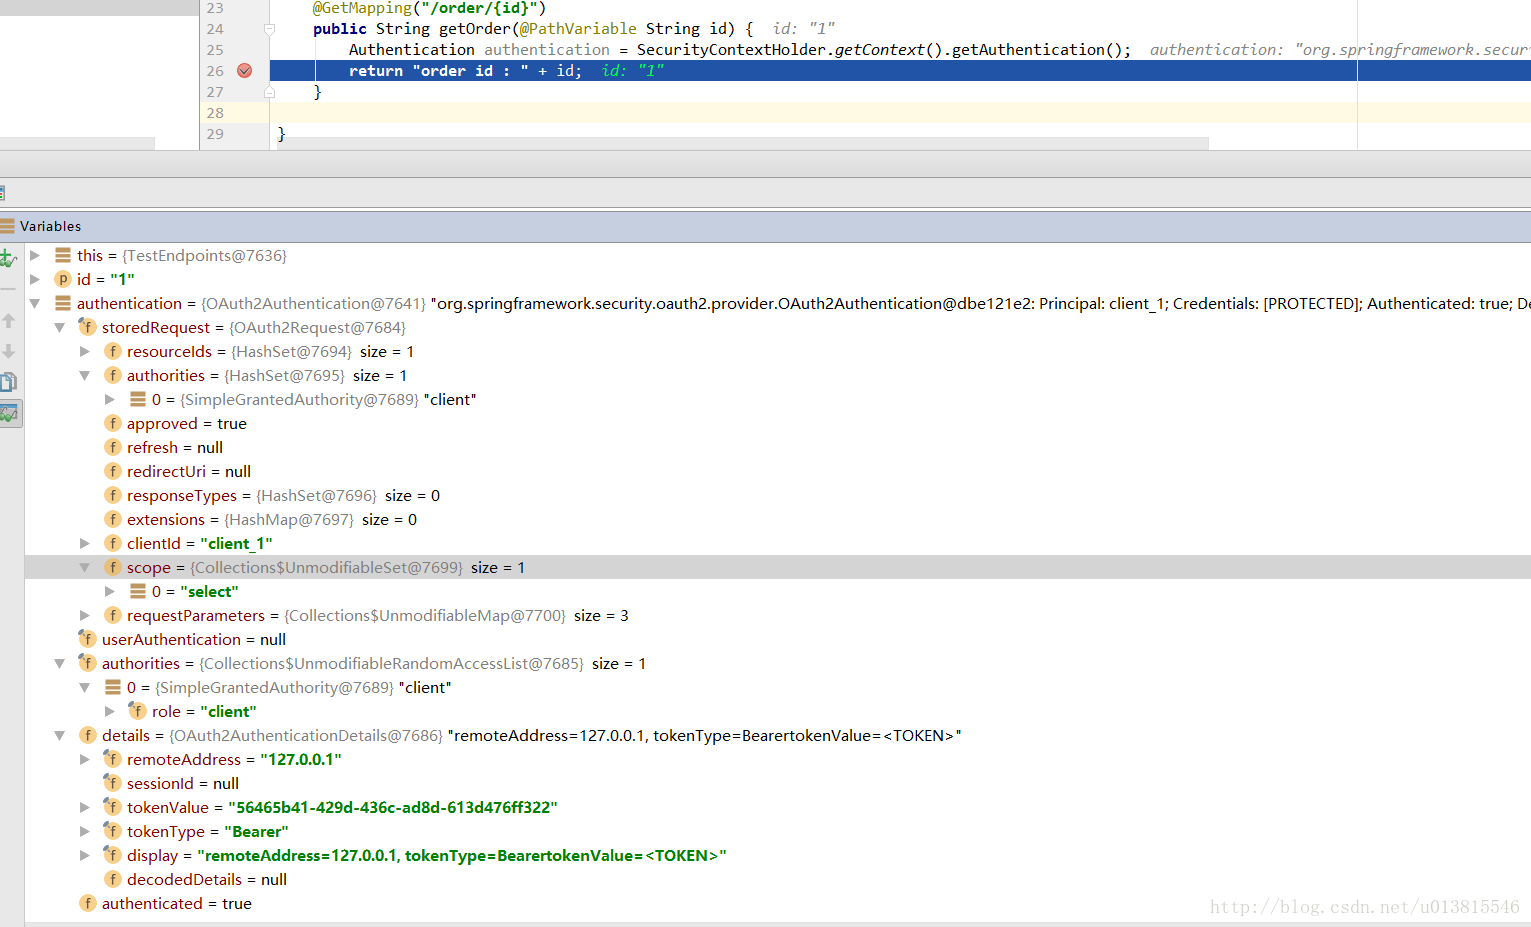
和我们的配置是一致的,仔细看可以发现两者的身份有些许的不同。想要查看更多的debug信息,可以选择下载demo代码自己查看,为了方便读者调试和验证,我去除了很多复杂的特性,基本实现了一个最简配置,涉及到数据库的地方也尽量配置到了内存中,这点记住在实际使用时一定要修改。
到这儿,一个简单的oauth2入门示例就完成了,一个简单的配置教程。token的工作原理是什么,它包含了哪些信息?spring内部如何对身份信息进行验证?以及上述的配置到底影响了什么?这些内容会放到后面的文章中去分析。
示例代码下载
全部的代码可以在我的github上进行下载,项目使用springboot+maven构建:
https://github.com/lexburner/oauth2-demo
原文:https://blog.csdn.net/u013815546/article/details/76898524
Re:从零开始的Spring Security Oauth2(一)的更多相关文章
- Re:从零开始的Spring Security Oauth2(三)
上一篇文章中我们介绍了获取token的流程,这一篇重点分析一下,携带token访问受限资源时,内部的工作流程. @EnableResourceServer与@EnableAuthorizationSe ...
- Re:从零开始的Spring Security Oauth2(二)
本文开始从源码的层面,讲解一些Spring Security Oauth2的认证流程.本文较长,适合在空余时间段观看.且涉及了较多的源码,非关键性代码以…代替. 准备工作 首先开启debug信息: l ...
- Spring Security Oauth2系列(一)
前言: 关于oauth2,其实是一个规范,本文重点讲解spring对他进行的实现,如果你还不清楚授权服务器,资源服务器,认证授权等基础概念,可以移步理解OAuth 2.0 - 阮一峰,这是一篇对于oa ...
- Spring Security Oauth2 的配置
使用oauth2保护你的应用,可以分为简易的分为三个步骤 配置资源服务器 配置认证服务器 配置spring security 前两点是oauth2的主体内容,但前面我已经描述过了,spring sec ...
- 【OAuth2.0】Spring Security OAuth2.0篇之初识
不吐不快 因为项目需求开始接触OAuth2.0授权协议.断断续续接触了有两周左右的时间.不得不吐槽的,依然是自己的学习习惯问题,总是着急想了解一切,习惯性地钻牛角尖去理解小的细节,而不是从宏观上去掌握 ...
- 使用Spring Security Oauth2完成RESTful服务password认证的过程
摘要:Spring Security与Oauth2整合步骤中详细描述了使用过程,但它对于入门者有些重量级,比如将用户信息.ClientDetails.token存入数据库而非内存.配置 ...
- Spring security oauth2最简单入门环境搭建
关于OAuth2的一些简介,见我的上篇blog:http://wwwcomy.iteye.com/blog/2229889 PS:貌似内容太水直接被鹳狸猿干沉.. 友情提示 学习曲线:spring+s ...
- spring security oauth2 jwt 认证和资源分离的配置文件(java类配置版)
最近再学习spring security oauth2.下载了官方的例子sparklr2和tonr2进行学习.但是例子里包含的东西太多,不知道最简单最主要的配置有哪些.所以决定自己尝试搭建简单版本的例 ...
- Spring Security OAuth2 Demo -- good
1. 添加依赖授权服务是基于Spring Security的,因此需要在项目中引入两个依赖: <dependency> <groupId>org.springframework ...
随机推荐
- 「小程序JAVA实战」java-sesion的状态会话与无状态会话(38)
转自:https://idig8.com/2018/09/02/xiaochengxujavashizhanjava-sesiondezhuangtaihuihuayuwuzhuangtaihuihu ...
- node / npm 配置问题
安装nodejs 后运行 npm 命令无响应处理方法 安装和卸载过nodejs, 也编辑过 C:\Users\{账户}\下的.npmrc文件. 再全新安装nodejs ,运行npm 命令,无响应. 处 ...
- js中格式化时间
//时间格式化 Date.prototype.Format = function (fmt) { var o = { "M+": this.getMonth() + 1, &quo ...
- iOS学习之第二个View使用UITabBarViewController
前面有一篇博文iOS学习之Tab Bar的使用和视图切换 这是在AppDelegate里使用Tabbar,这样的程序打开就是TabbarView了,有时候我们需要给程序做一些帮助页面,或者登录页面,之 ...
- [iOS]UIScrollView嵌套UITableView,超出屏幕的cell点击不了问题
最初我是用UIScrollView嵌套了一个UIView,然后UIView里面嵌套UITableView,这样cell 就会超出屏幕那一部分点击不了. 解决方法如下,UITableView拖出来,作为 ...
- java算法 第七届 蓝桥杯B组(题+答案) 7.剪邮票
7.剪邮票 (结果填空) 如[图1.jpg], 有12张连在一起的12生肖的邮票.现在你要从中剪下5张来,要求必须是连着的.(仅仅连接一个角不算相连)比如,[图2.jpg],[图3.jpg]中,粉红 ...
- windows编程之内核对象
学好windows编程,理解内核对象还是至关重要的(●'◡'●).闲话不多说,下面先来了解一下关于内核对象的知识: 内核对象(kernel object):内核对象是用于管理进 ...
- linux fuser的使用
当进行共享存储的时候,umount可能无法用于卸载某个设备,说是被某个进程所占用,但是又无法找到该进程.这个时候使用fuser -km /data命令杀死所有在使用这个存储设备的进程然后再umount ...
- loadrunner-27077报错解决办法
警告 -27077: “每次迭代模拟一个新用户”运行时设置为“开”时,“vuser_init”节将包含 Web 函数.这可能会产生具有多次迭代的不可预测结果 [MsgId: MWAR-27077] ...
- java基础知识汇总(持续更新中....)
1.java四大特性:抽象.继承.封装,多态 构造函数: http://blog.csdn.net/qq_33642117/article/details/51909346 2.java数据基本类型: ...