【 Linux 网络虚拟化 】Netns
netns 可以创建一个完全隔离的新网络环境,这个环境包括一个独立的网卡空间,路由表,ARP表,ip地址表,iptables等。总之,与网络有关的组件都是独立的。
创建网络空间:
# ip netns add ns1
查看网络空间:
# ip netns list
删除网络空间:
# ip netns del ns1
进入网络空间执行命令:
# ip netns exec ns1 `command`
实例一:
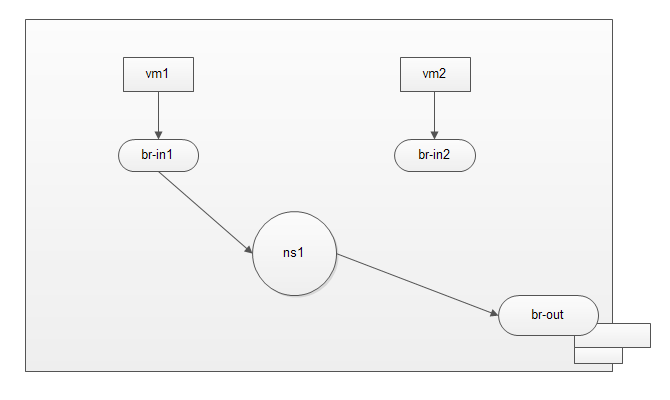
用netns连接两个隔离环境中的虚拟机,如图:
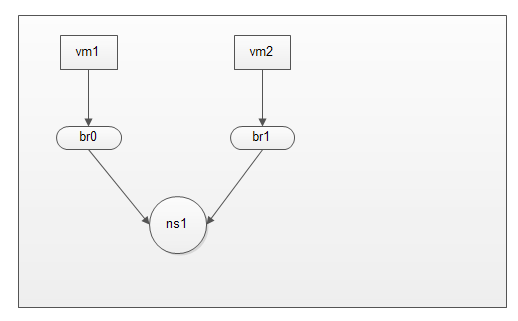
在虚拟化中有两个虚拟机网络隔离环境需要通信。
系统: centos7.2 x64
安装程序包

# yum install bridge-utils libvirt libvirt-client virt-install virt-viewer net-tools -y

# brctl addbr br0

# brctl addbr br1

# ifconfig br0 up

# ifconfig br1 up
取消默认nat网络模式

# mv /etc/libvirt/qemu/networks/default.xml /etc/libvirt/qemu/networks/default.xml_bak

# systemctl start libvirtd
创建虚拟机并连接至br0

# virt-install --name vm1 --ram  --vcpus= --disk /images/linux/cirros-0.3.-i386-disk-.img --network bridge=br0,model=virtio --force --import --nographics --serial=pty --console=pty

打开第二个终端创建第二个虚拟机并连接至br1

# virt-install --name vm2 --ram  --vcpus= --disk /images/linux/cirros-0.3.-i386-disk-.img --network bridge=br1,model=virtio --force --import --nographics --serial=pty --console=pty

# brctl show

bridge name    bridge id        STP enabled    interfaces

br0        .fe54007e1861    no        vnet0

br1        .fe5400be1885    no        vnet1
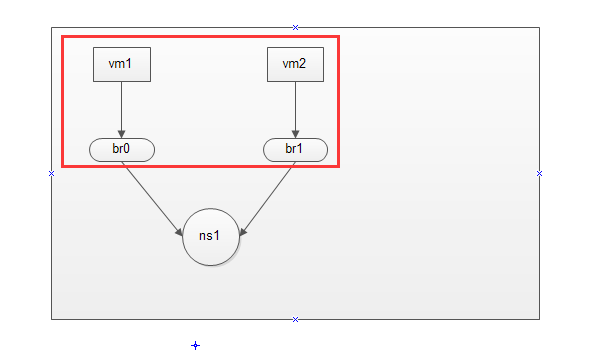
到此,虚拟机已经连接上各自的桥设备了。完成如图:
创建虚拟网络空间:

# ip netns add ns1

# ip netns list

ns1
接下来创建一张虚拟网卡,虚拟网卡分为前半段和后半段,我们将前半段添加到br0中,并将后半段添加到虚拟网络空间中,这样br0桥设备中主机就能够连接到虚拟网络空间中。
# ip link add net-in type veth peer name net-out

# ifconfig net-in up

# ifconfig net-out up
将net-in虚拟网卡添加到br0中,将net-out虚拟网卡添加到ns1中
# brctl addif br0 net-in

查看是否添加成功

# brctl show br0

bridge name    bridge id        STP enabled    interfaces

br0        .46c7e9d2c0fa    no            net-in

                                        vnet0
将net-out添加到ns1中,并重命名为eth0

# ip link set dev net-out name eth0 netns ns1
查看是否添加成功

# ip netns exec ns1 ifconfig -a

eth0: flags=<BROADCAST,MULTICAST>  mtu

        ether a2::dc:ba::a2  txqueuelen   (Ethernet)

        RX packets   bytes  (0.0 B)

        RX errors   dropped   overruns   frame

        TX packets   bytes  (0.0 B)

        TX errors   dropped  overruns   carrier   collisions

lo: flags=<LOOPBACK>  mtu

        loop  txqueuelen   (Local Loopback)

        RX packets   bytes  (0.0 B)

        RX errors   dropped   overruns   frame

        TX packets   bytes  (0.0 B)

        TX errors   dropped  overruns   carrier   collisions

# ip netns exec ns1 ifconfig lo up
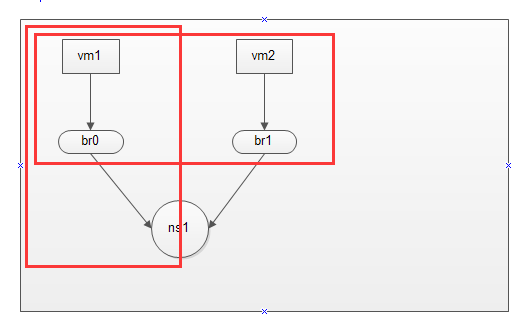
现在vm1 --> br0 --> ns1 网络做通了,完成如下图:
同理,和上面操作一样。
# ip link add net1-in type veth peer name net1-out

# ifconfig net1-in up

# ifconfig net1-out up

# brctl addif br1 net1-in

# brctl show br1

bridge name    bridge id        STP enabled    interfaces

br1        .1291a963b290    no        net1-in

                            vnet1

# ip link set dev net1-out name eth1 netns ns1

# ip netns exec ns1 ifconfig -a

eth0: flags=<BROADCAST,MULTICAST>  mtu

        ether a2::dc:ba::a2  txqueuelen   (Ethernet)

        RX packets   bytes  (0.0 B)

        RX errors   dropped   overruns   frame

        TX packets   bytes  (0.0 B)

        TX errors   dropped  overruns   carrier   collisions

eth1: flags=<BROADCAST,MULTICAST>  mtu

        ether :d4:3c:7d:3b:2e  txqueuelen   (Ethernet)

        RX packets   bytes  (0.0 B)

        RX errors   dropped   overruns   frame

        TX packets   bytes  (0.0 B)

        TX errors   dropped  overruns   carrier   collisions

lo: flags=<UP,LOOPBACK,RUNNING>  mtu

        inet 127.0.0.1  netmask 255.0.0.0

        inet6 ::  prefixlen   scopeid 0x10<host>

        loop  txqueuelen   (Local Loopback)

        RX packets   bytes  (0.0 B)

        RX errors   dropped   overruns   frame

        TX packets   bytes  (0.0 B)

        TX errors   dropped  overruns   carrier   collisions
ip地址配置如下:
vm1 - eth0 : 192.168.1.2
ns1 - eth0 : 192.168.1.1
vm2 - eth0 : 172.168.10.2
ns1 - eth0 : 172.168.10.1
记住:当宿主机开启了网络转发功能,虚拟网络空间才会开启,在以上场景中,必须开启网络转发功能。
# sysctl -w net.ipv4.ip_forward=

net.ipv4.ip_forward =
vm1 - eth0 网络配置如下:
# ifconfig lo up

# ifconfig eth0 192.168.1.2/ up

# ifconfig

eth0      Link encap:Ethernet  HWaddr :::7E::

          inet addr:192.168.1.2  Bcast:192.168.1.255  Mask:255.255.255.0

          inet6 addr: fe80:::ff:fe7e:/ Scope:Link

          UP BROADCAST RUNNING MULTICAST  MTU:  Metric:

          RX packets: errors: dropped: overruns: frame:

          TX packets: errors: dropped: overruns: carrier:

          collisions: txqueuelen:

          RX bytes: (648.0 B)  TX bytes: (168.0 B)

lo        Link encap:Local Loopback

          inet addr:127.0.0.1  Mask:255.0.0.0

          inet6 addr: ::/ Scope:Host

          UP LOOPBACK RUNNING  MTU:  Metric:

          RX packets: errors: dropped: overruns: frame:

          TX packets: errors: dropped: overruns: carrier:

          collisions: txqueuelen:

          RX bytes: (0.0 B)  TX bytes: (0.0 B)
ns1 - eth0 网络配置如下:
# ip netns exec ns1 ifconfig lo up

# ip netns exec ns1 ifconfig eth0 192.168.1.1/ up

# ip netns exec ns1 ifconfig eth0

eth0: flags=<UP,BROADCAST,MULTICAST>  mtu

        inet 192.168.1.1  netmask 255.255.255.0  broadcast 192.168.1.255

        ether a2::dc:ba::a2  txqueuelen   (Ethernet)

        RX packets   bytes  (0.0 B)

        RX errors   dropped   overruns   frame

        TX packets   bytes  (0.0 B)

        TX errors   dropped  overruns   carrier   collisions
vm2 - eth0 网络配置如下:
# ifconfig lo up

# ifconfig eth0 172.168.10.2/ up

# ifconfig eth0

eth0      Link encap:Ethernet  HWaddr :::BE::

          inet addr:172.168.10.2  Bcast:172.168.255.255  Mask:255.255.0.0

          inet6 addr: fe80:::ff:febe:/ Scope:Link

          UP BROADCAST RUNNING MULTICAST  MTU:  Metric:

          RX packets: errors: dropped: overruns: frame:

          TX packets: errors: dropped: overruns: carrier:

          collisions: txqueuelen:

          RX bytes: (648.0 B)  TX bytes: (168.0 B)
ns1 - eth1 网络配置如下:
# ip netns exec ns1 ifconfig eth1 172.168.10.1/ up

# ip netns exec ns1 ifconfig eth1

eth1: flags=<UP,BROADCAST,MULTICAST>  mtu

        inet 172.168.10.1  netmask 255.255.255.0  broadcast 172.168.10.255

        ether :d4:3c:7d:3b:2e  txqueuelen   (Ethernet)

        RX packets   bytes  (0.0 B)

        RX errors   dropped   overruns   frame

        TX packets   bytes  (0.0 B)

        TX errors   dropped  overruns   carrier   collisions
为虚拟机指定路由:
vm1 :

# ping 192.168.1.1 -c1

PING 192.168.1.1 (192.168.1.1):  data bytes

 bytes from 192.168.1.1: seq= ttl= time=0.811 ms

--- 192.168.1.1 ping statistics ---

 packets transmitted,  packets received, % packet loss

round-trip min/avg/max = 0.811/0.811/0.811 ms

# ip route add default via 192.168.1.1
注意:如果ping不通,请检查链路上的网卡状态是否是up状态。
vm2 :

# ping  172.168.10.1 -c1

PING 172.168.10.1 (172.168.10.1):  data bytes

 bytes from 172.168.10.1: seq= ttl= time=2.385 ms

--- 172.168.10.1 ping statistics ---

 packets transmitted,  packets received, % packet loss

round-trip min/avg/max = 2.385/2.385/2.385 ms

添加默认路由

# ip route add default via 172.168.10.1
接下来,使用ping测试。
vm1 - eth0 : 192.168.1.2 --> ns1 - eth1 : 172.168.10.1 # ping 172.168.10.1 -c1
PING 172.168.10.1 (172.168.10.1): data bytes
bytes from 172.168.10.1: seq= ttl= time=0.426 ms --- 172.168.10.1 ping statistics ---
packets transmitted, packets received, % packet loss
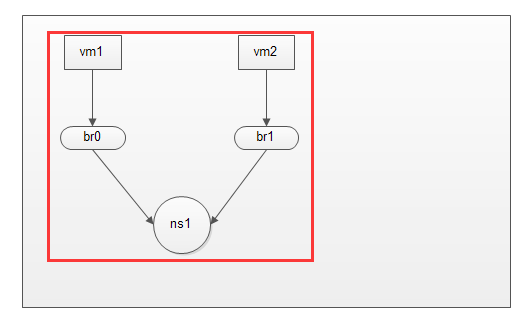
round-trip min/avg/max = 0.426/0.426/0.426 ms 能够达到ns1 eth1网卡,说明ns1从eth0 - 192.168.10.1 转发到了 172.168.10.1 vm1 - eth0 : 192.168.1.2 --> vm2 - eth0 : 172.168.10.2

这样,就完成了在宿主机中,两个虚拟主机隔离模式的通信。
实例二:
说明:宿主机中两组隔离模型,其中只有一组可以访问公网
接下来,在模式一的基础上进行修改:
# ip netns del ns1
删除虚拟网络空间模式,所有和虚拟网络空间有关的虚拟网卡都会被删除。
现在的模式如下:

vm1: 192.168.1.2/24
vm2: 192.168.1.2/24
ns1: 192.168.1.1/24
这里故意把vm1和vm2的ip设置为一样,方便我们进行测试。
添加虚拟网络空间

# ip netns add ns1

# ip link add net-in type veth peer name net-out

# ifconfig net-in up

# ifconfig net-out up
添加net-in到br0,添加net-out到虚拟网络空间ns1

# brctl addif br0 net-in

# ip link set dev net-out name eth0 netns ns1

为ns1启动网卡并配置ip地址

# ip netns exec ns1 ifconfig lo up

# ip netns exec ns1 ifconfig eth0 192.168.1.1 netmask 255.255.255.0 up
为vm1配置网关为192.168.1.1
创建桥设备,并将物理网卡添加到桥设备中,这里建议直接修改物理网卡配置文件
cp -a ifcfg-eno16777736 ifcfg-br-out

# vim ifcfg-eno16777736

TYPE=Ethernet

BOOTPROTO=none

DEFROUTE=yes

PEERDNS=yes

PEERROUTES=yes

IPV4_FAILURE_FATAL=no

IPV6INIT=no

NAME=eno16777736

UUID=100e462e-c0d0--9b5a-1c8e47ff0d03

DEVICE=eno16777736

ONBOOT=yes

BRIDGE=br-out

# vim ifcfg-br-out

TYPE=Bridge

BOOTPROTO=none

DEFROUTE=yes

PEERDNS=yes

PEERROUTES=yes

IPV4_FAILURE_FATAL=no

IPV6INIT=no

NAME=br-out

DEVICE=br-out

ONBOOT=yes

IPADDR=10.0.0.11

NETMASK=255.255.255.0

GATEWAY=10.0.0.1

DNS1=10.0.0.1

DNS2=114.114.114.114

重启下网络

# systemctl restart network

物理网卡添加成功

# brctl show br-out

bridge name    bridge id        STP enabled    interfaces

br-out        .000c2923e15d    no        eno16777736
现在创建一对网卡,连接ns1和br-out
# ip link add net1-in type veth peer name net1-out

# ifconfig net1-in up

# ifconfig net1-out up

# ip link set dev net1-in name eth1 netns ns1

# brctl addif br-out net1-out

# brctl show br-out

bridge name    bridge id        STP enabled    interfaces

br-out        .000c2923e15d    no        eno16777736

                                        net1-out
我真实局域网的ip为10.0.0.0/24
因此添加到ns1中的eth1要配置到同网段
# ip netns exec ns1 ifconfig eth1 10.0.0.12 netmask 255.255.255.0 up
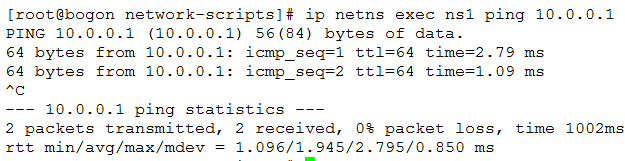
能够到达网关了。
已实现如下:
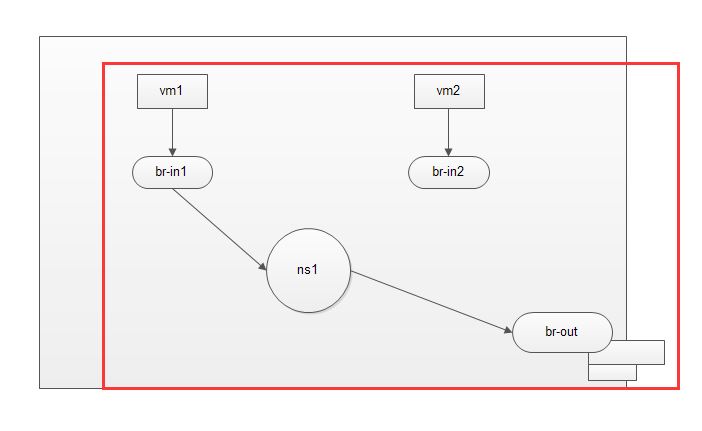
在ns1中添加源地址转换
# ip netns exec ns1 iptables -t nat -A POSTROUTING -s 192.168.1.0/ ! -d 192.168.1.0/ -j SNAT --to-source 10.0.0.12

# ip netns exec ns1 ip route default via 10.0.0.1
再次通过vm1 ping 公网ip
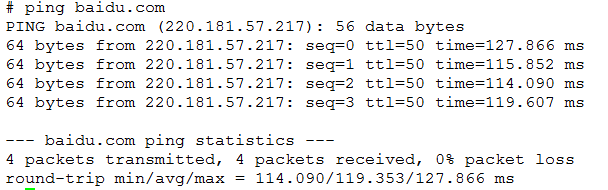
这样就实现了宿主机内部分网络中的主机可以访问公网,部分主机没有访问公网权限。
总之,网络逻辑很重要。
【 Linux 网络虚拟化 】Netns的更多相关文章
- Docker核心实现技术(命名空间&控制组&联合文件系统&Linux网络虚拟化支持)
作为一种容器虚拟化技术,Docker深度应用了操作系统的多项底层支持技术. 早期版本的Docker是基于已经成熟的Linux Container(LXC)技术实现的.自Docker 0.9版本起,Do ...
- linux 网络虚拟化: network namespace 简介
linux 网络虚拟化: network namespace 简介 network namespace 是实现网络虚拟化的重要功能,它能创建多个隔离的网络空间,它们有独自的网络栈信息.不管是虚拟机还是 ...
- linux网络虚拟化
图解几个与Linux网络虚拟化相关的虚拟网卡-VETH/MACVLAN/MACVTAP/IPVLAN http://smilejay.com/2012/08/qemu-kvm-networking-m ...
- 【 Linux 网络虚拟化 】Openvswitch
openvswitch: openvswitch: 开放的虚拟交换机,虚拟交换就是利用虚拟平台,通过软件的方式形成交换机部件.跟传统的物理交换机相比,虚拟交换机同样具备众多优点: ...
- 网络虚拟化技术(一): Linux网络虚拟化
创建虚拟网络环境 使用命令 $ ip netns add net0 可以创建一个完全隔离的新网络环境,这个环境包括一个独立的网卡空间,路由表,ARP表,ip地址表,iptables,ebtables, ...
- 理解 Linux 网络栈(2):非虚拟化Linux 环境中的 Segmentation Offloading 技术
本系列文章总结 Linux 网络栈,包括: (1)Linux 网络协议栈总结 (2)非虚拟化Linux环境中的网络分段卸载技术 GSO/TSO/UFO/LRO/GRO (3)QEMU/KVM + Vx ...
- 网络虚拟化基础一:linux名称空间Namespaces
一 介绍 如果把linux操作系统比作一个大房子,那命名空间指的就是这个房子中的一个个房间,住在每个房间里的人都自以为独享了整个房子的资源,但其实大家仅仅只是在共享的基础之上互相隔离,共享指的是共享全 ...
- 网络虚拟化技术 -- LXC TUN/TAP MACVLAN MACVTAP
Linux的网络虚拟化是LXC项目中的一个子项目,LXC包括文件系统虚拟化,进程空间虚拟化,用户虚拟化,网络虚拟化,等等 [ LXC内核命名空间 ],这里使用LXC的网络虚拟化来模拟多个网络环境. 创 ...
- Linux网络属性配置命令和管理详解
一.Linux网络属性配置 1.Linux主机接入到网络方式 IP/NETMASK:实现本地网络通信 路由(网关):可以进行跨网络通信 DNS服务器地址:基于主机名的通信,Linux可以有三个DNS地 ...
随机推荐
- 总结const
int b; const int *a=&b; int const * a=&b; int * const a =&b; const int *const a=&b; ...
- lintcode-57-三数之和
57-三数之和 给出一个有n个整数的数组S,在S中找到三个整数a, b, c,找到所有使得a + b + c = 0的三元组. 注意事项 在三元组(a, b, c),要求a <= b <= ...
- Java集合整体框架
Java中的集合类有List.Set.Map Collection的实现类:List.Set List的实现类:ArrayList.LinkedList.Vector Set的实现类:HashSet. ...
- could not read column value from result set:
错误描述: INFO [http-apr-8080-exec-26] (NullableType.java:203) - could not read column value from result ...
- 【bzoj3997】[TJOI2015]组合数学 Dilworth定理结论题+dp
题目描述 给出一个网格图,其中某些格子有财宝,每次从左上角出发,只能向下或右走.问至少走多少次才能将财宝捡完.此对此问题变形,假设每个格子中有好多财宝,而每一次经过一个格子至多只能捡走一块财宝,至少走 ...
- P4109 [HEOI2015]定价
题目描述 在市场上有很多商品的定价类似于 999 元.4999 元.8999 元这样.它们和 1000 元.5000 元和 9000 元并没有什么本质区别,但是在心理学上会让人感觉便宜很多,因此也是商 ...
- (转载)Hadoop示例程序WordCount详解
最近在学习云计算,研究Haddop框架,费了一整天时间将Hadoop在Linux下完全运行起来,看到官方的map-reduce的demo程序WordCount,仔细研究了一下,算做入门了. 其实Wor ...
- 【题解】【CF Round #278】Tourists
圆方树第二题…… 图中询问的是指定两点之间简单路径上点的最小权值.若我们建出圆方树,圆点的权值为自身权值,方点的权值为所连接的圆点的权值最小值(即点双连通分量中的最小权值).我们可以发现其实就是这两点 ...
- 安徽师大附中%你赛day4T2 演讲解题报告
演讲 题目背景: 众所周知,\(\mathrm{Zdrcl}\)是一名天天\(\mathrm{AK}\)的高水平选手. 作为一民长者,为了向大家讲述自己\(\mathrm{AK}\)的经验,他决定在一 ...
- 【HDU 4300 Clairewd’s message】
Clairewd is a member of FBI. After several years concealing in BUPT, she intercepted some important ...