Spring 14: Spring + MyBatis初步整合开发
SM整合步骤
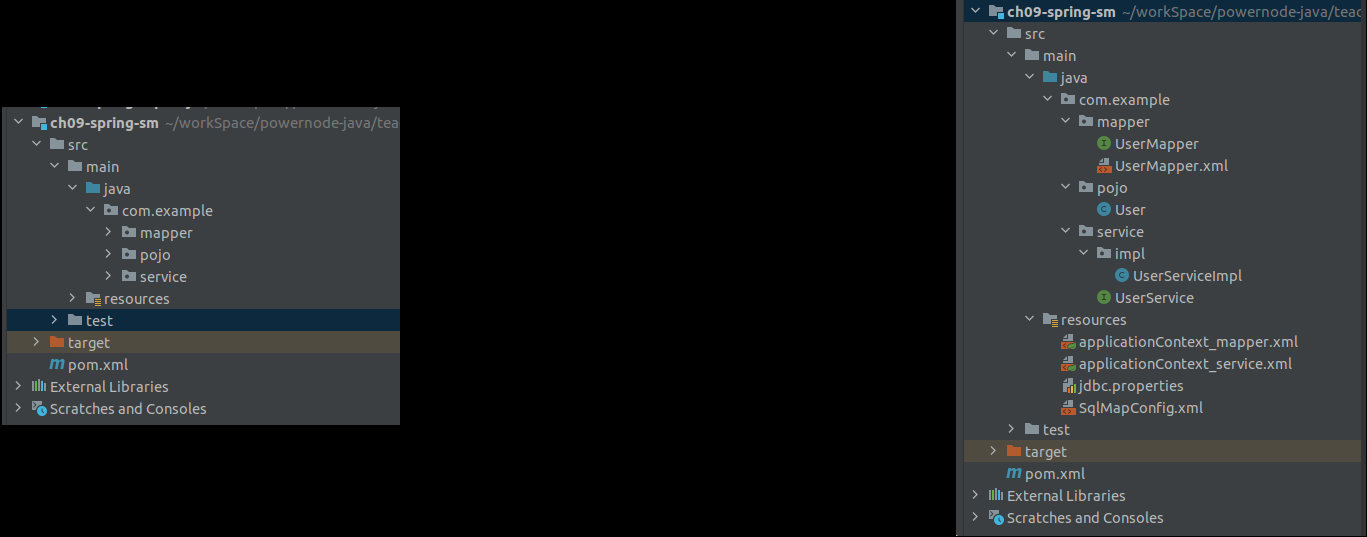
预期项目结构
新建数据库和数据表
- springuser.sql脚本如下
create database ssm;

use ssm;

create table users(

  userid int primary key,

  uname varchar(20),

  upass varchar(20)

);

create table accounts(

 aid  int primary key,

 aname varchar(20),

 acontent varchar(50)

);
新建项目
- 新建maven项目
- 选择quickstart模板
- 修改项目目录,删除自动生成的类和对应测试类
修改pom.xml文件
- 添加相关依赖
<?xml version="1.0" encoding="UTF-8"?>

<project xmlns="http://maven.apache.org/POM/4.0.0" xmlns:xsi="http://www.w3.org/2001/XMLSchema-instance"

  xsi:schemaLocation="http://maven.apache.org/POM/4.0.0 http://maven.apache.org/xsd/maven-4.0.0.xsd">

  <modelVersion>4.0.0</modelVersion>

  <groupId>com.example</groupId>

  <artifactId>ch09-spring-sm</artifactId>

  <version>1.0.0</version>

  <properties>

    <project.build.sourceEncoding>UTF-8</project.build.sourceEncoding>

    <maven.compiler.source>1.8</maven.compiler.source>

    <maven.compiler.target>1.8</maven.compiler.target>

  </properties>

  <dependencies>

    <!-- 添加单元测试的依赖 -->

    <dependency>

      <groupId>junit</groupId>

      <artifactId>junit</artifactId>

      <version>4.13.2</version>

      <scope>test</scope>

    </dependency>

    <!-- 添加spring-context依赖 -->

    <dependency>

      <groupId>org.springframework</groupId>

      <artifactId>spring-context</artifactId>

      <version>5.3.22</version>

    </dependency>

    <!-- 添加spring-aspects依赖 -->

    <dependency>

      <groupId>org.springframework</groupId>

      <artifactId>spring-aspects</artifactId>

      <version>5.3.22</version>

    </dependency>

    <!-- 添加spring-tx依赖,用于事务管理 -->

    <dependency>

      <groupId>org.springframework</groupId>

      <artifactId>spring-tx</artifactId>

      <version>5.3.22</version>

    </dependency>

    <!-- 添加spring-jdbc依赖 -->

    <dependency>

      <groupId>org.springframework</groupId>

      <artifactId>spring-jdbc</artifactId>

      <version>5.3.22</version>

    </dependency>

    <!-- 添加mybatis依赖 -->

    <dependency>

      <groupId>org.mybatis</groupId>

      <artifactId>mybatis</artifactId>

      <version>3.5.10</version>

    </dependency>

    <!-- 添加mysql驱动 -->

    <dependency>

      <groupId>mysql</groupId>

      <artifactId>mysql-connector-java</artifactId>

      <version>8.0.30</version>

    </dependency>

    <!-- 添加mybatis和spring的整合依赖-->

    <dependency>

      <groupId>org.mybatis</groupId>

      <artifactId>mybatis-spring</artifactId>

      <version>2.0.7</version>

    </dependency>

    <!-- 添加数据库连接池 -->

    <dependency>

      <groupId>com.alibaba</groupId>

      <artifactId>druid</artifactId>

      <version>1.2.11</version>

    </dependency>

  </dependencies>

  <build>

    <!-- 添加资源文件指定 -->

    <resources>

      <resource>

        <directory>src/main/java</directory>

        <includes>

          <include>**/*.properties</include>

          <include>**/*.xml</include>

        </includes>

        <filtering>false</filtering>

      </resource>

      <resource>

        <directory>src/main/resources</directory>

        <includes>

          <include>**/*.properties</include>

          <include>**/*.xml</include>

        </includes>

        <filtering>false</filtering>

      </resource>

    </resources>

  </build>

</project>
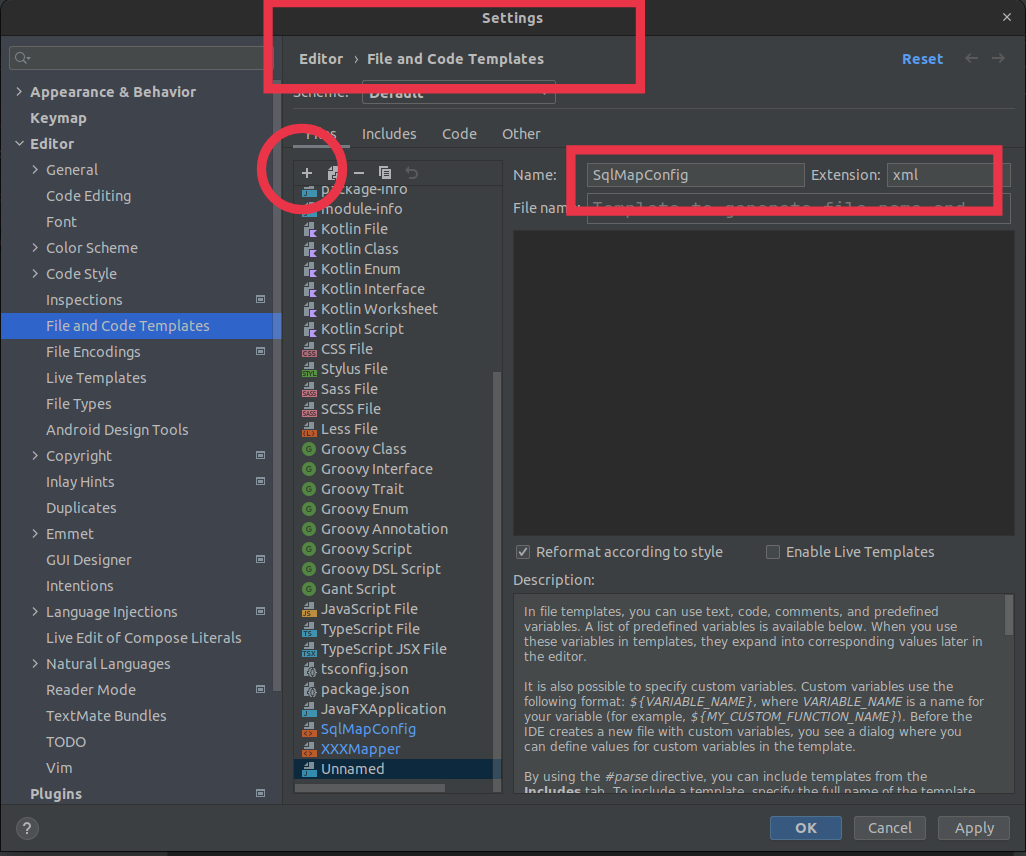
添加模板文件
分别添加MyBatis相应配置文件的模板(SqlMapConfig.xml和XXXXMapper.xml文件,方便以后使用)
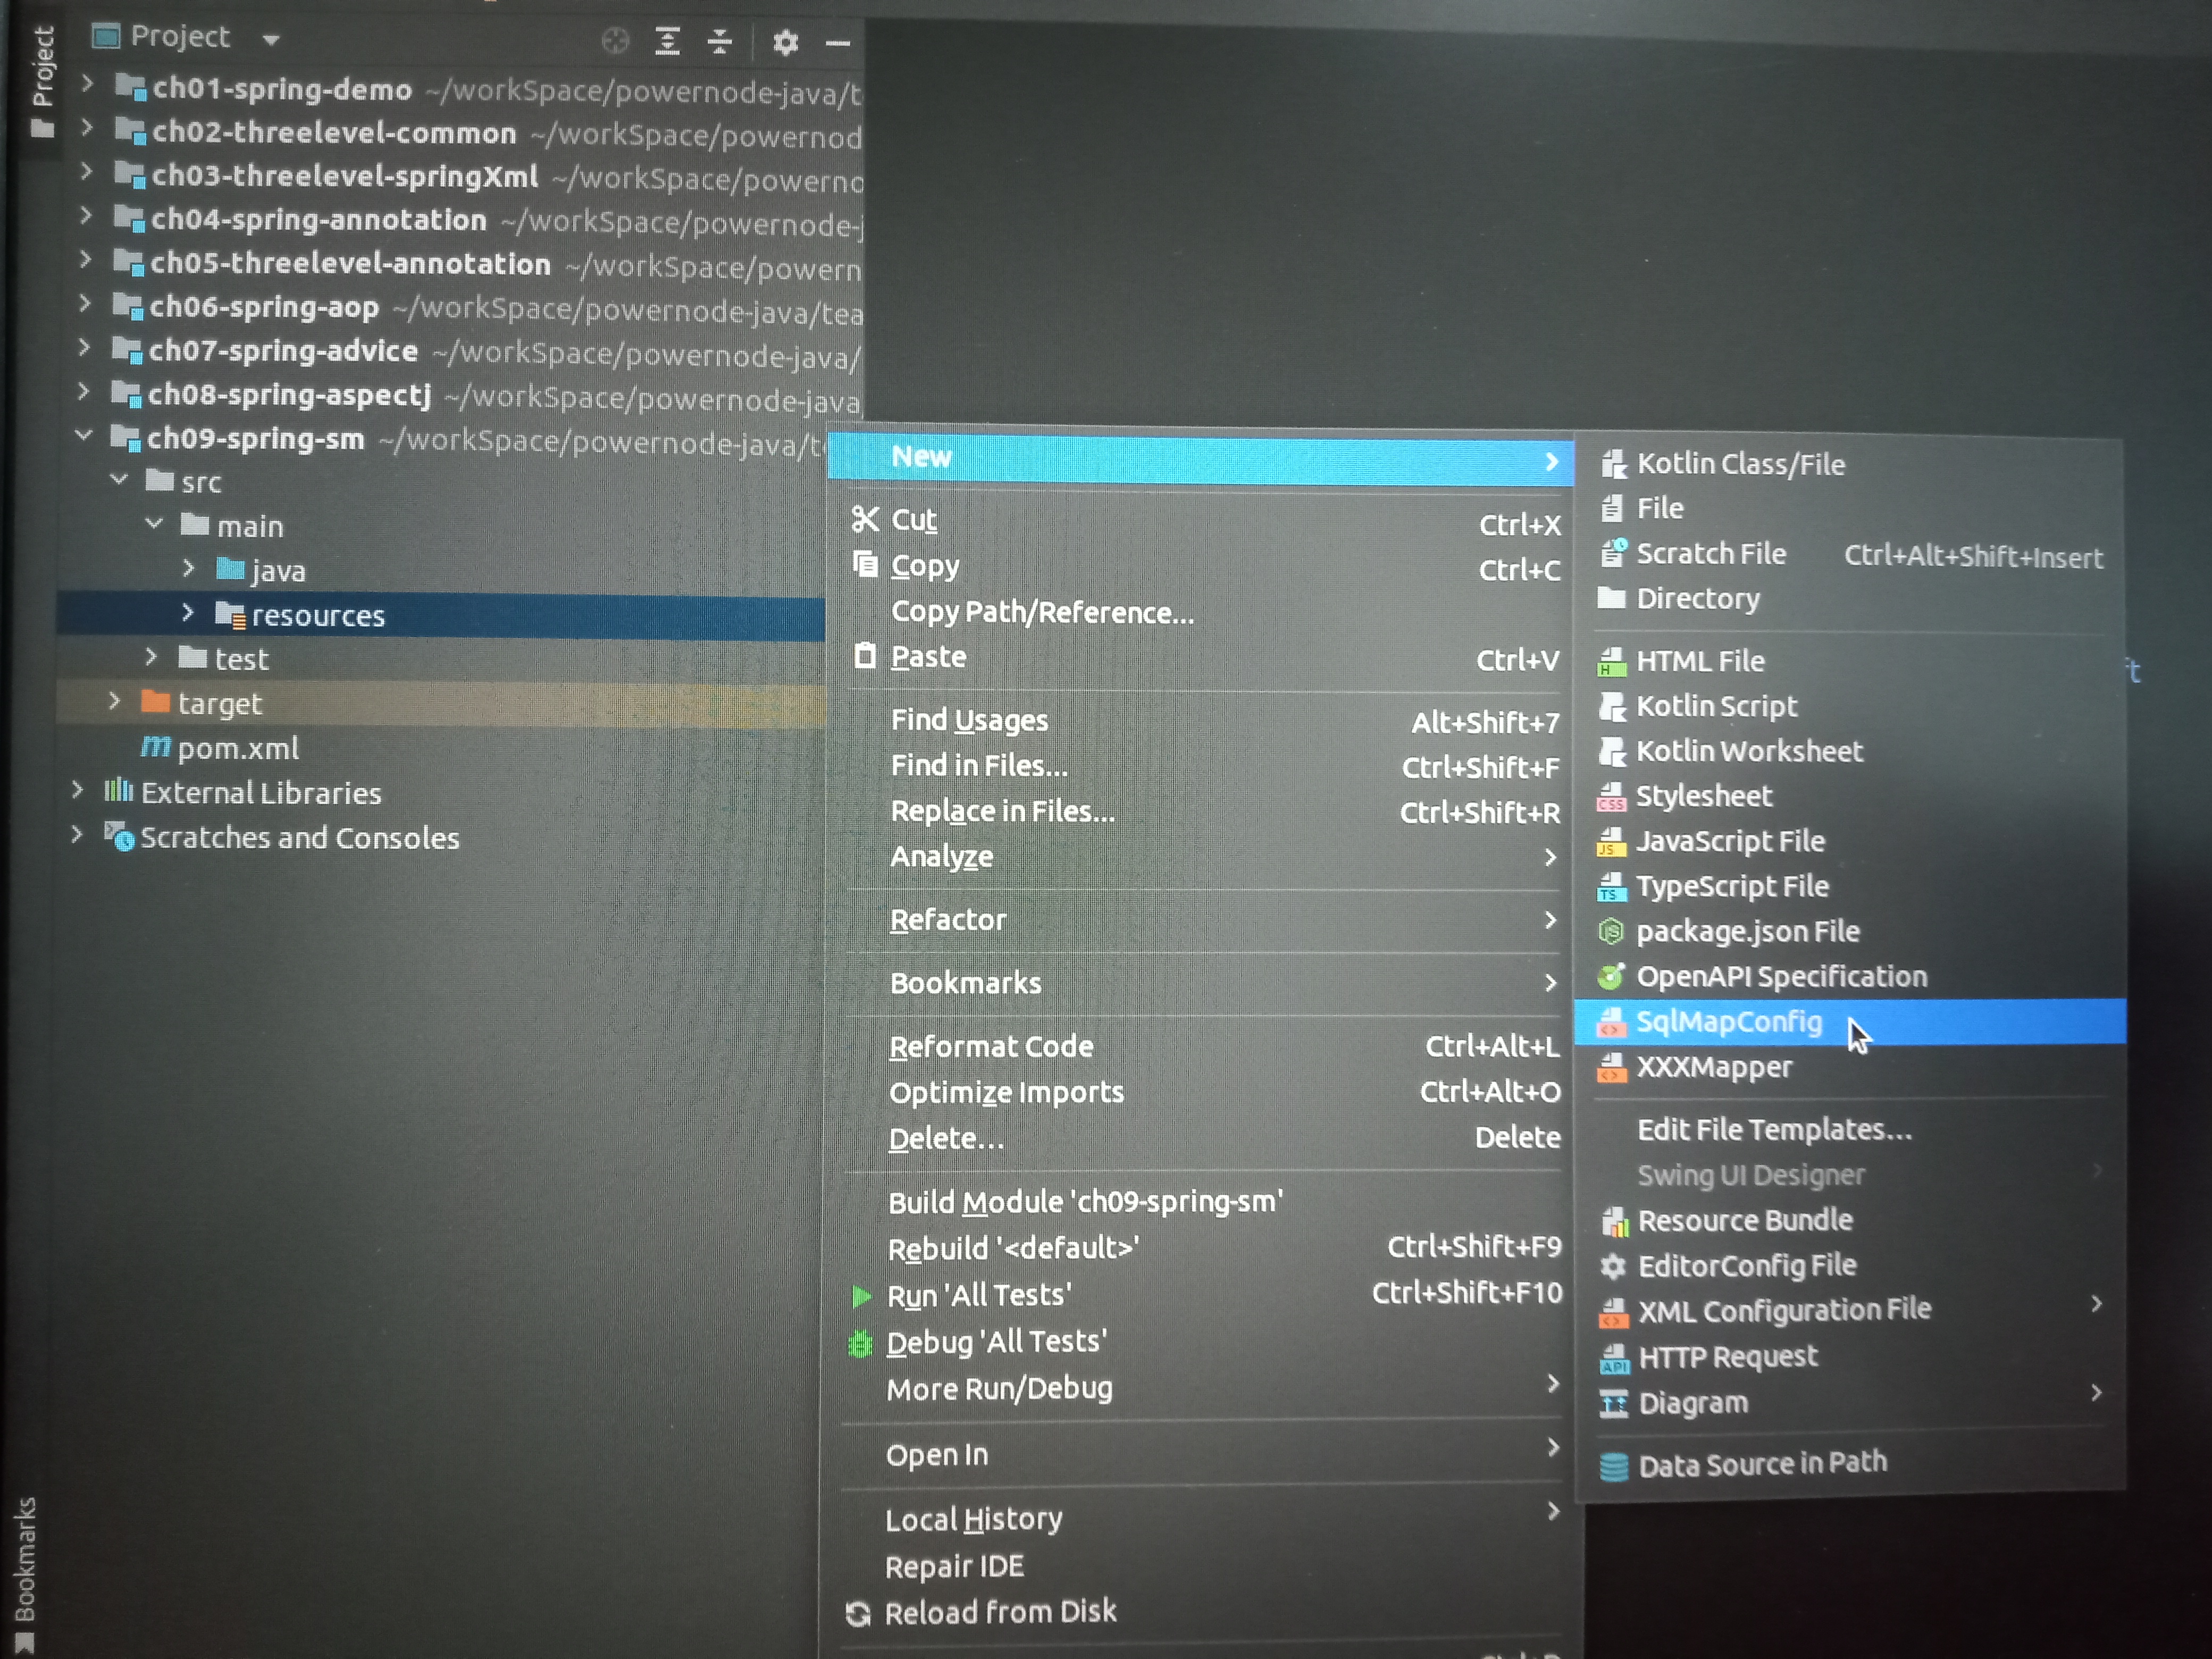
- 如何添加模板文件
- SqlMapConfig.xml模板配置文件
<?xml version="1.0" encoding="UTF-8" ?> <!DOCTYPE configuration PUBLIC "-//mybatis.org//DTD Config 3.0//EN"
"http://mybatis.org/dtd/mybatis-3-config.dtd">
<configuration>
<properties resource="db.properties"></properties>
<settings>
<setting name="logImpl" value="STDOUT_LOGGING"/>
</settings>
<typeAliases>
<package name="com.example.pojo"></package>
</typeAliases>
<environments default="development">
<environment id="development">
<transactionManager type="JDBC"/>
<dataSource type="POOLED">
<property name="driver" value="com.mysql.cj.jdbc.Driver"/>
<property name="url"
value="jdbc:mysql://ip:port/dataBaseName?useSSL=false&serverTimezone=UTC&allowPublicKeyRetrieval=true"/>
<property name="username" value="userName"/>
<property name="password" value="passWord"/>
</dataSource>
</environment>
</environments>
<mappers>
<package name=""></package>
</mappers>
</configuration>
- XXXXMapper.xml模板配置文件
<?xml version="1.0" encoding="UTF-8" ?> <!DOCTYPE mapper PUBLIC "-//mybatis.org//DTD Mapper 3.0//EN"

        "http://mybatis.org/dtd/mybatis-3-mapper.dtd">

<mapper namespace="">

</mapper>
jdbc.properties
- 添加jdbc.properties文件至src/main/resources目录下
jdbc.driverClassName=com.mysql.cj.jdbc.Driver

jdbc.url=jdbc:mysql://自己的服务器ip或localhost:3306/要连接的数据库名称?useUnicode=true&characterEncoding=utf8

jdbc.username=XXXX

jdbc.password=YYYY
SqlMapConfig.xml
- 添加SqlMapConfig.xml文件至src/main/resources目录下:选择我们自己添加的模板文件(该状态下idea无法电脑截图,手机拍摄,包涵包涵)
Spring核心配置文件
- 由于分层开发,需要添加两个配置文件:applicationContext_mapper.xml和applicationContext_service.xml。添加操作见下
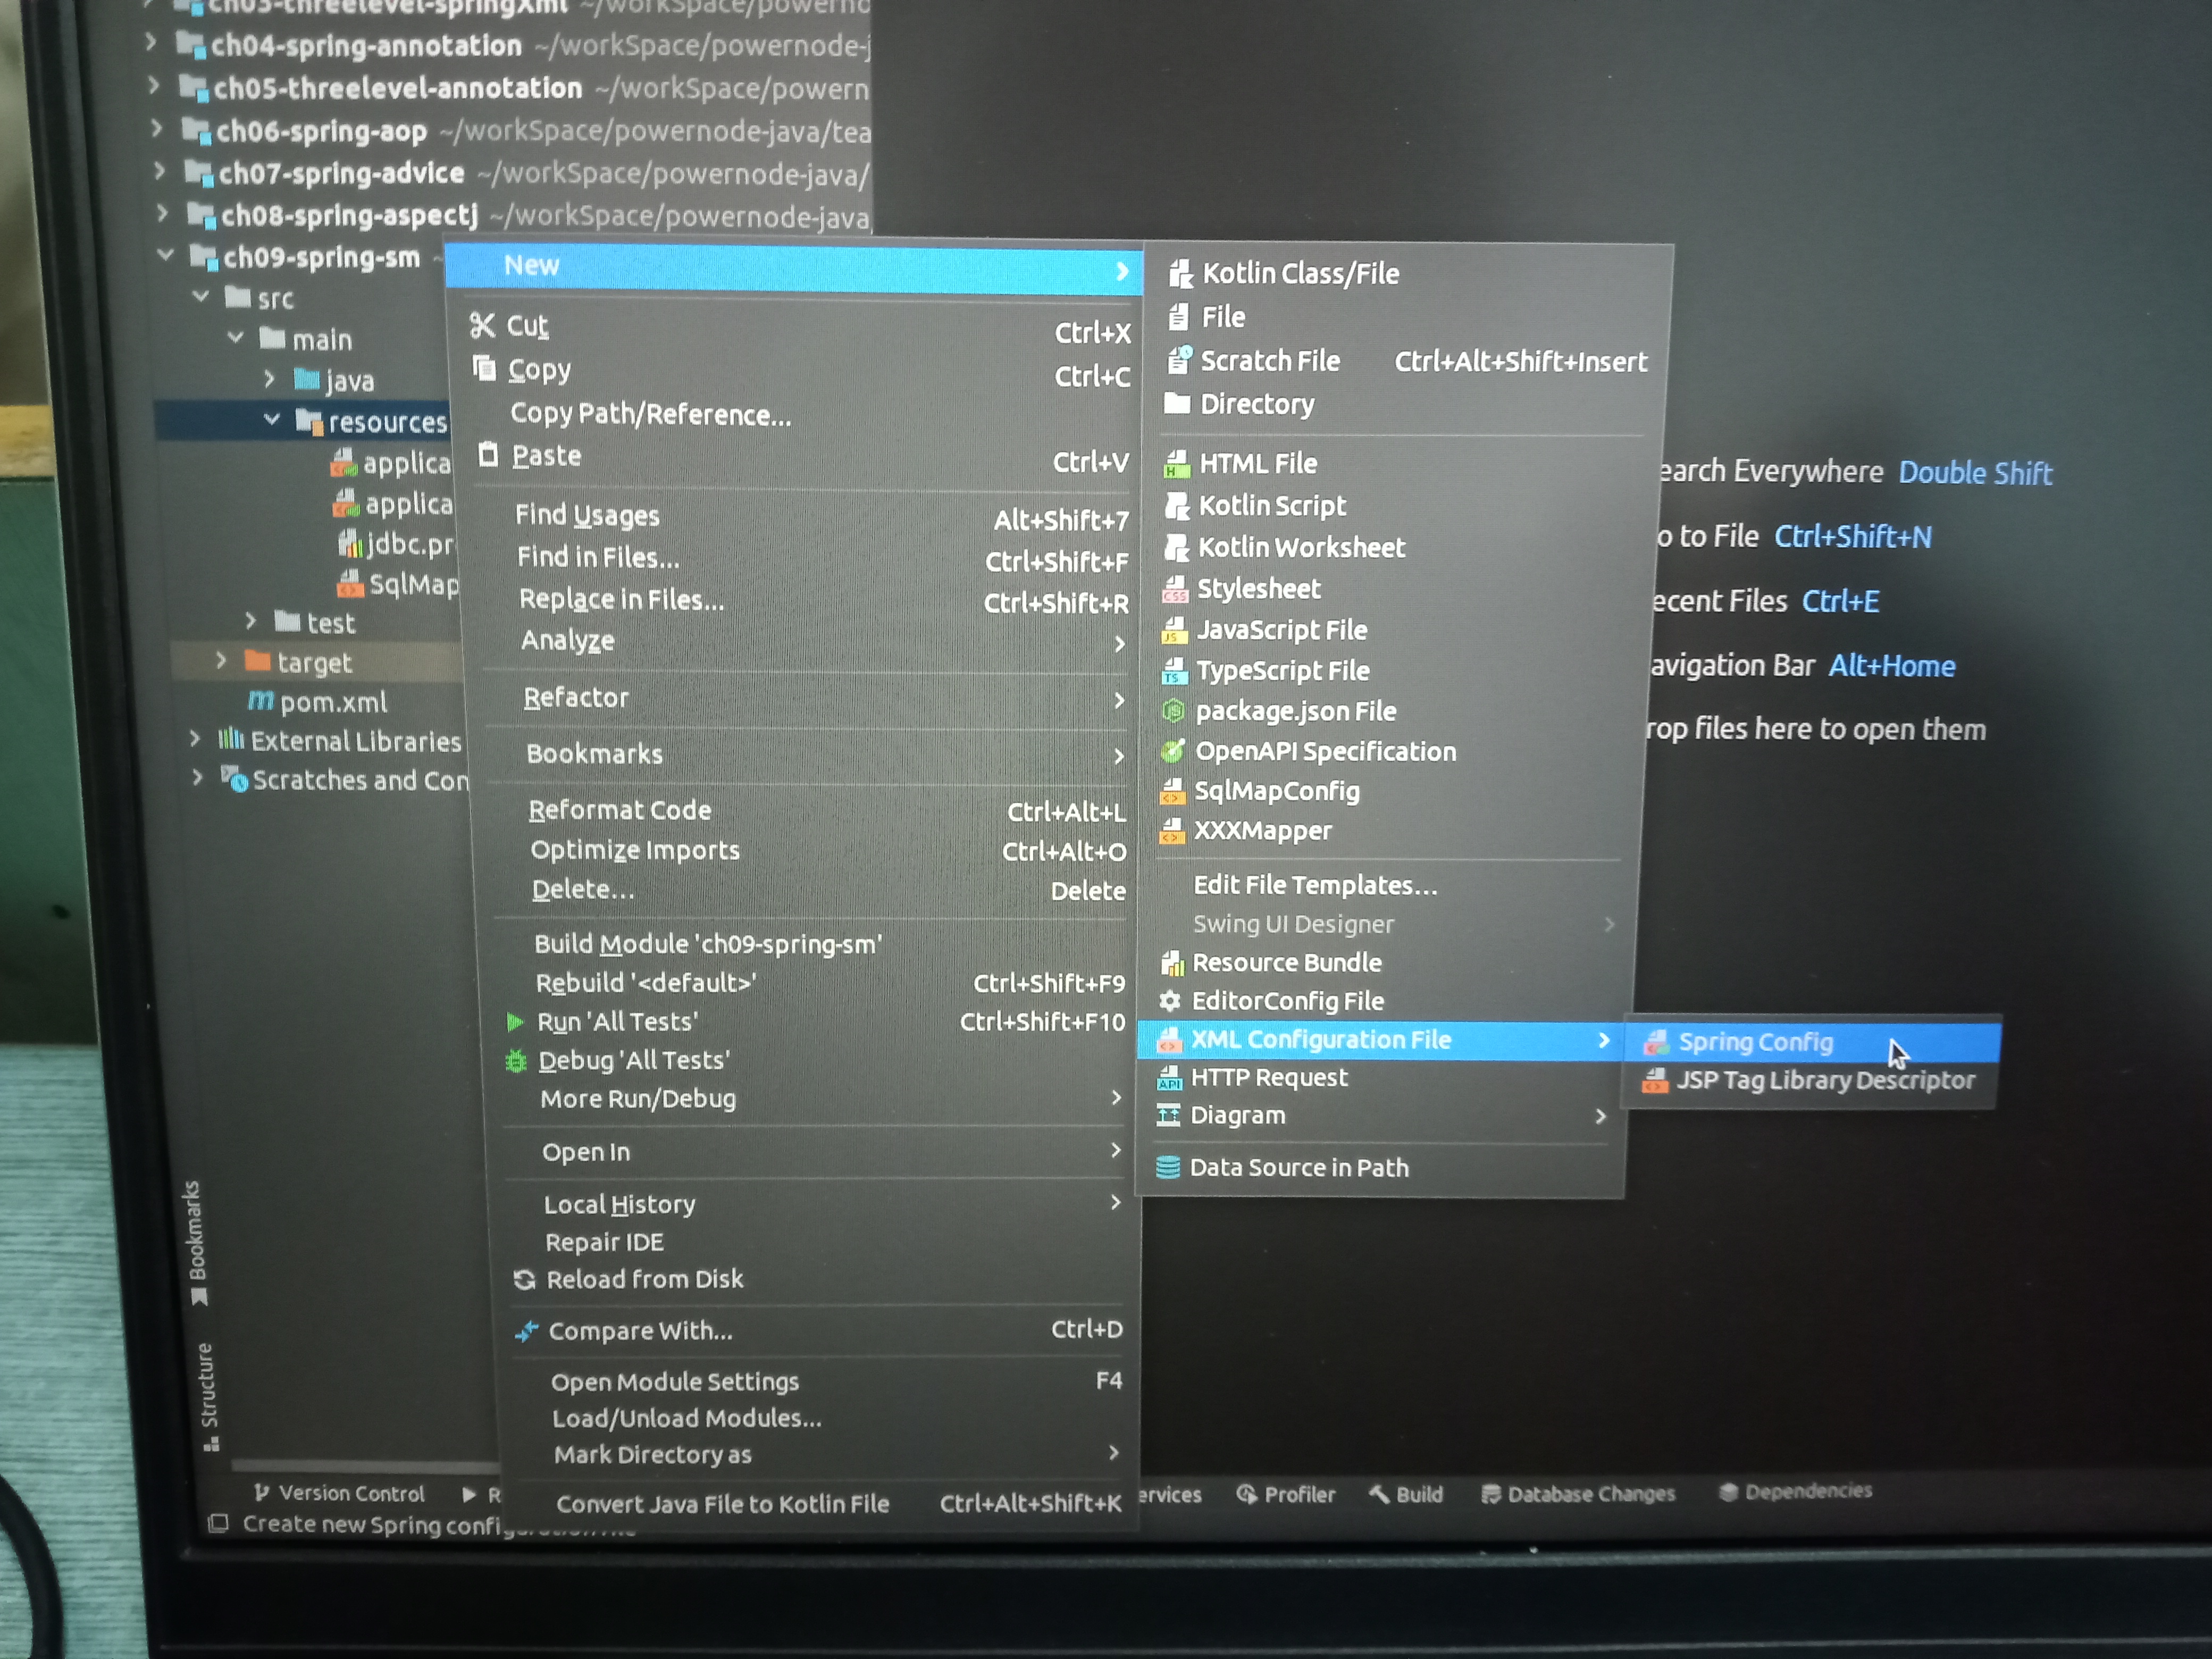
- applicationContext_mapper.xml
<?xml version="1.0" encoding="UTF-8"?>

<beans xmlns="http://www.springframework.org/schema/beans"

       xmlns:xsi="http://www.w3.org/2001/XMLSchema-instance"

       xmlns:context="http://www.springframework.org/schema/context"

       xsi:schemaLocation="http://www.springframework.org/schema/beans http://www.springframework.org/schema/beans/spring-beans.xsd http://www.springframework.org/schema/context https://www.springframework.org/schema/context/spring-context.xsd">

    <!-- 读取数据库连接文件 jdbc.properties -->

    <context:property-placeholder location="jdbc.properties"/>

    <!-- 创建数据源 -->

    <bean id="dataSource" class="com.alibaba.druid.pool.DruidDataSource">

        <property name="driverClassName" value="${jdbc.driverClassName}"/>

        <property name="url" value="${jdbc.url}"/>

        <property name="username" value="${jdbc.username}"/>

        <property name="password" value="${jdbc.password}"/>

    </bean>

    <!-- 配置SqlSessionFactoryBean类 -->

    <bean class="org.mybatis.spring.SqlSessionFactoryBean">

        <!-- 配置数据源 -->

        <property name="dataSource" ref="dataSource"/>

        <!-- 配置MyBatis的核心配置文件 -->

        <property name="configLocation" value="SqlMapConfig.xml"/>

        <!-- 注册实体类的别名 -->

        <property name="typeAliasesPackage" value="com.example.pojo"/>

    </bean>

    <!-- 注册mapper.xml文件 -->

    <bean class="org.mybatis.spring.mapper.MapperScannerConfigurer">

        <property name="basePackage" value="com.example.mapper"/>

    </bean>

</beans>
- applicationContext_service.xml
<?xml version="1.0" encoding="UTF-8"?>

<beans xmlns="http://www.springframework.org/schema/beans"

       xmlns:xsi="http://www.w3.org/2001/XMLSchema-instance"

       xmlns:context="http://www.springframework.org/schema/context"

       xsi:schemaLocation="http://www.springframework.org/schema/beans http://www.springframework.org/schema/beans/spring-beans.xsd http://www.springframework.org/schema/context https://www.springframework.org/schema/context/spring-context.xsd">

    <!-- 导入applicationContext_mapper.xml文件-->

    <import resource="applicationContext_mapper.xml"/>

    <!-- sm框架是基于注解开发的,要添加包扫描 -->

    <context:component-scan base-package="com.example.service.impl"/>

    <!-- 添加事务处理,此时先不管-->

</beans>
添加实体类
- 依据users数据表的字段,创建User实体类
package com.example.pojo;

public class User {

    private Integer userid;

    private String uname;

    private String upass;

    @Override

    public String toString() {

        return "User{" +

                "userid=" + userid +

                ", uname='" + uname + '\'' +

                ", upass='" + upass + '\'' +

                '}';

    }

    public Integer getUserid() {

        return userid;

    }

    public void setUserid(Integer userid) {

        this.userid = userid;

    }

    public String getUname() {

        return uname;

    }

    public void setUname(String uname) {

        this.uname = uname;

    }

    public String getUpass() {

        return upass;

    }

    public void setUpass(String upass) {

        this.upass = upass;

    }

    public User(String uname, String upass) {

        this.uname = uname;

        this.upass = upass;

    }

    public User(Integer userid, String uname, String upass) {

        this.userid = userid;

        this.uname = uname;

        this.upass = upass;

    }

    public User() {

    }

}
数据访问层
- 添加UserMapper接口
package com.example.mapper;

import com.example.pojo.User;

/**

 * 数据访问层的接口

 */

public interface UserMapper {

    int insert(User user);

}
- 添加UserMapper.xml,先选择我们自己添加的XXXMapper.xml模板文件,再进一步配置该文件
<?xml version="1.0" encoding="UTF-8" ?> <!DOCTYPE mapper PUBLIC "-//mybatis.org//DTD Mapper 3.0//EN"

        "http://mybatis.org/dtd/mybatis-3-mapper.dtd">

<mapper namespace="com.example.mapper.UserMapper">

    <!--

        int insert(User user);

        private Integer userid;

        private String uname;

        private String upass;

    -->

    <insert id="insert" parameterType="user">

        insert into users values (#{userid}, #{uname}, #{upass})

    </insert>

</mapper>
业务逻辑层
- 添加UserService接口
package com.example.service;

import com.example.pojo.User;

/**

 * 业务逻辑层接口

 */

public interface UserService {

    int insert(User user);

}
- 添加UserServiceImpl实现类
package com.example.service.impl;

import com.example.mapper.UserMapper;

import com.example.pojo.User;

import com.example.service.UserService;

import org.springframework.beans.factory.annotation.Autowired;

import org.springframework.stereotype.Service;

/**

 * 业务实现类

 */

@Service

public class UserServiceImpl implements UserService {

    //业务逻辑层实现类持有数据访问层的接口类型的变量

    @Autowired

    UserMapper userMapper;

    @Override

    public int insert(User user) {

        return userMapper.insert(user);

    }

}
测试
package com.example.test;

import com.example.pojo.User;

import com.example.service.UserService;

import org.junit.Test;

import org.springframework.context.ApplicationContext;

import org.springframework.context.support.ClassPathXmlApplicationContext;

public class TestUserInsert {

    //测试用户信息导入

    @Test

    public void testUserInsert(){

        //创建Spring容器并启动

        ApplicationContext ac = new ClassPathXmlApplicationContext("applicationContext_service.xml");

        //获取业务逻辑实现类的对象

        UserService userService = (UserService) ac.getBean("userServiceImpl");

        //调用业务功能

        int num = userService.insert(new User(1, "王小涵", "hanzhanghan"));

        if(num == 1){

            System.out.println("用户信息导入成功!");

        }else{

            System.out.println("用户信息导入失败!");

        }

    }

}
测试输出
- 控制台输出
Logging initialized using 'class org.apache.ibatis.logging.stdout.StdOutImpl' adapter.

Creating a new SqlSession

SqlSession [org.apache.ibatis.session.defaults.DefaultSqlSession@475835b1] was not registered for synchronization because synchronization is not active

Aug 28, 2022 10:31:31 AM com.alibaba.druid.support.logging.JakartaCommonsLoggingImpl info

INFO: {dataSource-1} inited

JDBC Connection [com.mysql.cj.jdbc.ConnectionImpl@4d4d8fcf] will not be managed by Spring

==>  Preparing: insert into users values (?, ?, ?)

==> Parameters: 1(Integer), 王小涵(String), hanzhanghan(String)

<==    Updates: 1

Closing non transactional SqlSession [org.apache.ibatis.session.defaults.DefaultSqlSession@475835b1]

用户信息导入成功!

Process finished with exit code 0
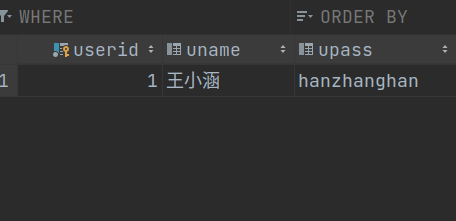
- 数据表变化
Spring 14: Spring + MyBatis初步整合开发的更多相关文章
- spring和mybatis的整合开发(基于MapperFactoryBean的整合开发(方便简单不复杂))
MapperFactoryBean是mybati-spring团队提供的一个用于根据mapper接口生成mapper对象的类. 在spring配置文件中可以配置以下参数: 1.mapperInterf ...
- spring和mybatis的整合开发(传统Dao开发方式)
spring和mybatis整合开发有三种整合方式1.传统DAO方式的开发整合(现在基本上不会用这种方式了,不推荐使用这种方式),2.mapper接口方式的开发整合(基于MapperFactoryBe ...
- SSM(Spring+SpringMVC+MyBatis)框架整合开发流程
回忆了 Spring.SpringMVC.MyBatis 框架整合,完善一个小demo,包括基本的增删改查功能. 开发环境 IDEA MySQL 5.7 Tomcat 9 Maven 3.2.5 需要 ...
- spring、spring mvc、mybatis框架整合基本知识
学习了一个多月的框架知识了,这两天很想将它整合一下.网上看了很多整合案例,基本都是基于Eclipse的,但现在外面公司基本都在用Intellij IDEA了,所以结合所学知识,自己做了个总结,有不足之 ...
- Spring+Spring MVC+Mybatis 框架整合开发(半注解半配置文件)
项目结构: (代码里面都有注释) 一.在pom文件中依赖jar包 因为我这里分了模块,所以有父子级的共两个pom文件 父级: <?xml version="1.0" enco ...
- spring和mybatis的整合开发(基于MapperScannerConfigurer的整合开发(适用于复杂项目,接口较多的情况))
在实际项目中,Dao层会包含很多接口,这样会导致spring配置文件过于臃肿.这时就需要采用扫描包的形式来配置mybaits中的映射器. 采用MapperScannerConfigurer来实现. M ...
- spring mvc与mybatis事务整合
之前公司用的是mybatis,但事务管理这块是用ejb的CMT容器管理的事务.基本原理是ejb请求进来,业务代码会创建一个mybatis的session然后放入当前线程,之后所有的方法操作涉及到数据库 ...
- MyBatis+Spring+Spring MVC整合开发
MyBatis+Spring+Spring MVC整合开发课程观看地址:http://www.xuetuwuyou.com/course/65课程出自学途无忧网:http://www.xuetuwuy ...
- SSM(Spring MVC +Spring+Mybatis)整合——maven工程
所谓的SSM 其实就是Spring MVC下整合mybatis. 具体的定义网络上都有,很详细. 这里只说项目的搭建步骤. 第一步 新建maven工程 工程目录如下: 配置pom.xml文件,引入所需 ...
随机推荐
- 2021.04.24【NOIP提高B组】模拟 总结
2021.04.24[NOIP提高B组]模拟 总结 T1 题意:有一圈数.两两之间有加法或乘法操作, 问你开始断掉那条边使得剩下的序列经过某种操作后的值最大 看上去是个区间 dp .然后直接断环成列, ...
- c++可视化性能测试
阅读前注意 本文所有代码贴出来的目的是帮助大家理解,并非是要引导大家跟写,许多环境问题文件问题没有详细说明,代码也并不全面,达不到跟做的效果.建议直接阅读全文即可,我在最后会给出详细代码地址,对源代码 ...
- 左右手切换工具xmouse v1.2版本发布
Xmouse 方便的切换鼠标左右键,因为功能非常简单,所以支持.net framework 2.0及以上 windows环境就可以了,目前已测试win7.win10可用. 关于为什么做这么个东西,那是 ...
- HDLBits->Circuits->Arithmetic Circuitd->3-bit binary adder
Verilog实例数组 对于一个定义好的简单module,例如加法器之类,如果我们要对其进行几十次几百次的例化,并且这些例化基本都是相同的形式,那么我们肯定不能一个个的单独对其进行例化,此时我们就可以 ...
- SAP OLE download to excel
REPORT RSDEMO01 NO STANDARD PAGE HEADING. * this report demonstrates how to send some ABAP data to a ...
- 梯度下降算法实现原理(Gradient Descent)
概述 梯度下降法(Gradient Descent)是一个算法,但不是像多元线性回归那样是一个具体做回归任务的算法,而是一个非常通用的优化算法来帮助一些机器学习算法求解出最优解的,所谓的通用就是很 ...
- 开通博客-学习java之路
已被西南交通大学录取,毕设也已经进入末期.开始狂神说的Java学习之路,纪念一下!!!
- Tensorflow2 深度学习十必知
博主根据自身多年的深度学习算法研发经验,整理分享以下十条必知. 含参考资料链接,部分附上相关代码实现. 独乐乐不如众乐乐,希望对各位看客有所帮助. 待回头有时间再展开细节说一说深度学习里的那些道道. ...
- Codeforces Round #783 (Div. 2)
A. Direction Change 题意 从(1,1)点出发到(n,m),每次可以向上下左右四个方向移动,但是不能与上次移动方向相同 最少要移动多少不,如果不能到达输出 -1 思路 假设n< ...
- 挑战30天写操作系统-day1-从计算机结构到汇编程序入门
先动手操作 软盘映像文件制作:先采用二进制编辑器编辑我们所需要的映像文件helloos.img 二进制编辑器下载链接:Bz - c.mos (vcraft.jp) 制作好之后,可以选择写入软盘,通过软 ...