Spring Boot+Mybatis:实现数据库登录注册与两种properties配置参数读取
〇、参考资料
1、hutool介绍
https://blog.csdn.net/abst122/article/details/124091375
2、Spring Boot+Mybatis实现登录注册
https://www.cnblogs.com/wiki918/p/16221758.html
3、Spring Boot读取自定义配置文件
https://www.yisu.com/zixun/366877.html
4、Spring Boot读取properties配置文件的两种方式
https://blog.csdn.net/weixin_42352733/article/details/121830775
一、概述
1、技术栈
Spring Boot+Mybatis+Lombok+Hutool+Slf4j+thymeleaf
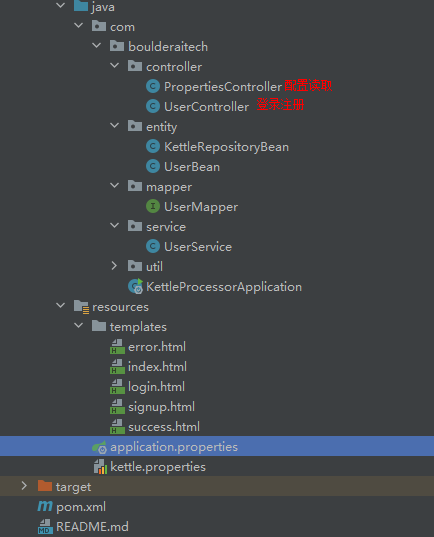
2、项目截图
二、登录注册(后台)
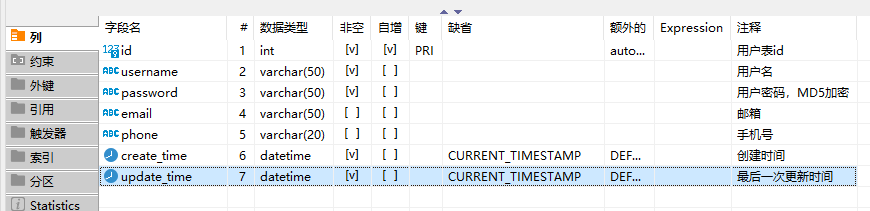
1、数据库设计
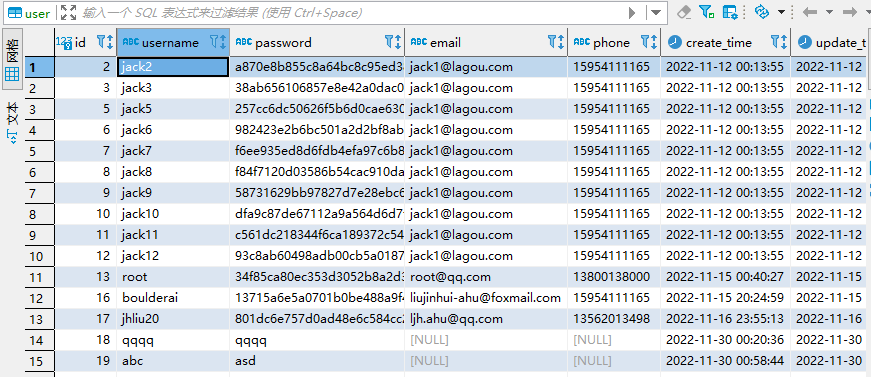
表结构:
表数据:

建表语句:
CREATE TABLE `user` (

  `id` int NOT NULL AUTO_INCREMENT COMMENT '用户表id',

  `username` varchar(50) NOT NULL COMMENT '用户名',

  `password` varchar(50) NOT NULL COMMENT '用户密码,MD5加密',

  `email` varchar(50) DEFAULT NULL COMMENT '邮箱',

  `phone` varchar(20) DEFAULT NULL COMMENT '手机号',

  `create_time` datetime NOT NULL DEFAULT CURRENT_TIMESTAMP COMMENT '创建时间',

  `update_time` datetime NOT NULL DEFAULT CURRENT_TIMESTAMP COMMENT '最后一次更新时间',

  PRIMARY KEY (`id`)

) ENGINE=InnoDB AUTO_INCREMENT=19 DEFAULT CHARSET=utf8mb4 COLLATE=utf8mb4_0900_ai_ci COMMENT='用户表'
2、POJO(Entity)编写-UserBean.java
package com.boulderaitech.entity;

import com.fasterxml.jackson.annotation.JsonFormat;

import lombok.AllArgsConstructor;

import lombok.Data;

import lombok.NoArgsConstructor;

import java.io.Serializable;

import java.util.Date;

@Data //提供了set、get方法及toString

@AllArgsConstructor

@NoArgsConstructor

public class UserBean implements Serializable {

    private Integer id; //为什么用Integer,不用int

    private String username;

    private String password;

    private String email;

    private String phone;

    @JsonFormat(pattern = "yyyy-MM-mm HH:mm:ss")

    private Date create_time;

    @JsonFormat(pattern = "yyyy-MM-mm HH:mm:ss")

    private Date update_time;

}
3、Controller编写-UserController.java
package com.boulderaitech.controller;

import cn.hutool.core.lang.Opt;

import cn.hutool.core.util.StrUtil;

import com.boulderaitech.entity.UserBean;

import com.boulderaitech.service.UserService;

import lombok.extern.slf4j.Slf4j;

import org.springframework.beans.factory.annotation.Autowired;

import org.springframework.stereotype.Controller;

import org.springframework.web.bind.annotation.RequestMapping;

import org.springframework.web.bind.annotation.RequestMethod;

@Slf4j

@Controller // 不能用@RestController

public class UserController {

    //将Service注入Web层

    @Autowired

    UserService userService;

    //用户测试

    @RequestMapping("/hello")

    public String hello() {

        return "login";

    }

    @RequestMapping("/register")

    public String register() {

        return "signup";

    }

    @RequestMapping(value = "/login", method = RequestMethod.POST)

    public String login(String username,String password) {

        UserBean userBean = userService.login(username,password);

        log.info("username:{}",username);

        log.info("password:{}",password);

        //hutool-core	核心,包括Bean操作、日期、各种Util等

        if(StrUtil.isNotEmpty(username)) {

            if(userBean != null) {

                return "success";

                //方法引用-遍历集合

                //Opt.ofEmptyAble(userBean).ifPresent(System.out::println);

            }

        } else {

            return "用户名不允许为空";

        }

        return "error";

    }

    @RequestMapping(value = "/signup", method = RequestMethod.POST)

    public String signup(String username,String password) {

        userService.insert(username,password);

        return "success";

    }

}
4、Service编写-UserService.java
package com.boulderaitech.service;

import com.boulderaitech.entity.UserBean;

import com.boulderaitech.mapper.UserMapper;

import org.springframework.stereotype.Service;

import javax.annotation.Resource;

@Service

public class UserService {

    //将dao层属性注入service层,为什么不用Autowired

    @Resource

    private UserMapper userMapper;

    public UserBean login(String username, String password) {

        return userMapper.getInfo(username,password);

    }

    public void insert(String username, String password) {

        userMapper.saveUser(username,password);

    }

}
5、Mapper编写-UserMapper.java
package com.boulderaitech.mapper;

import com.boulderaitech.entity.UserBean;

import org.apache.ibatis.annotations.Insert;

import org.apache.ibatis.annotations.Mapper;

import org.apache.ibatis.annotations.Param;

import org.apache.ibatis.annotations.Select;

@Mapper //添加Mapper注解,就不用写xml的mapper映射文件了

public interface UserMapper {

    //多个参数要加@Param修饰

    //思考:xml中的<include>代码片段怎么配

    @Select("SELECT * FROM user WHERE username=#{username} AND password= #{password}")

    UserBean getInfo(@Param("username") String username,@Param("password") String password);

    @Insert("INSERT INTO user(username,password) VALUE(#{username},#{password})")

    void saveUser(@Param("username") String username,@Param("password") String password);

}
6、配置文件编写-application.properties
# Spring Boot端口号

server.port=9088

# 数据源配置

spring.datasource.driver-class-name=com.mysql.cj.jdbc.Driver

spring.datasource.password=qaz123

spring.datasource.username=root

spring.datasource.url=jdbc:mysql://192.168.40.111:3306/visualization?serverTimezone=UTC&useUnicode=true&characterEncoding=utf-8&useSSL=true

spring.thymeleaf.prefix=classpath:/templates/
7、启动类编写-KettleProcessorApplication.java
package com.boulderaitech;

import org.springframework.boot.SpringApplication;

import org.springframework.boot.autoconfigure.SpringBootApplication;

/**

 * Spring Boot启动类,加Spring Boot注解,调用Spring的静态run方法

 */

@SpringBootApplication

public class KettleProcessorApplication {

    public static void main(String[] args) {

        SpringApplication.run(KettleProcessorApplication.class);

    }

}
三、登录注册(前台)
1、登录页面-login.html
<!DOCTYPE html>

<html lang="en">

<head>

  <meta charset="UTF-8">

  <title>login</title>

</head>

<body>

<form role="form" action = "/login" method="post">

  账号:<input type="text" id="username" name = "username"> <br>

  密码:<input type="password" id = "password" name = "password"> <br>

  <input type="submit" id = "login" value = "登录">

</form>

<a href="/register">注册</a>

</body>

</html>
2、注册页面-signup.html
<!--注册页面-->

<!DOCTYPE html>

<html lang="en">

<head>

    <meta charset="UTF-8">

    <title>注册</title>

</head>

<body>

<form role="form" action="/signup" method="post">

    请输入姓名:<input type="text" name="username" id="name"><br>

    请输入密码:<input type="password" name="password" id="password"><br>

    <input type="submit" name="sign" value="提交">

</form>

</body>

</html>
3、成功页面-success.html
<!DOCTYPE html>
<html lang="en">
<head>
<meta charset="UTF-8">
<title>success</title>
</head>
<body>
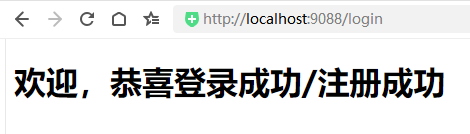
<h1>欢迎,恭喜登录成功/注册成功</h1>
</body>
</html>4、失败页面-error.html
<!DOCTYPE html>

<html lang="en">

<head>

    <meta charset="UTF-8">

    <title>error</title>

</head>

<body>

<h1>登录失败!</h1>

</body>

</html>
四、配置读取
1、配置编写-kettle.properties
# 读取properties的两种方式:https://blog.csdn.net/weixin_42352733/article/details/121830775

environment=xuelei-www

kettle.repository.type=database

kettle.repository.username=admin

kettle.repository.password=admin
2、POJO(Entity)编写-KettleRepositoryBean.java
package com.boulderaitech.entity;

import lombok.AllArgsConstructor;

import lombok.Data;

import lombok.NoArgsConstructor;

import org.springframework.boot.context.properties.ConfigurationProperties;

import org.springframework.stereotype.Component;

@Data

@Component

@NoArgsConstructor

@AllArgsConstructor

@ConfigurationProperties(prefix = "kettle.repository")

public class KettleRepositoryBean {

    private String type;

    private String username;

    private String password;

}
3、Controller编写-PropertiesController.java
package com.boulderaitech.controller;
import com.boulderaitech.entity.KettleRepositoryBean;
import org.springframework.beans.factory.annotation.Autowired;
import org.springframework.beans.factory.annotation.Value;
import org.springframework.context.annotation.PropertySource;
import org.springframework.web.bind.annotation.RequestMapping;
import org.springframework.web.bind.annotation.RestController;
@RestController //Controller和RestCOntroller的区别
@PropertySource("classpath:kettle.properties") //默认是application.properties
public class PropertiesController {
@Value("${environment}")
private String envName;
@Autowired
private KettleRepositoryBean kettleRepositoryBean;
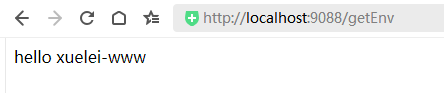
@RequestMapping("/getEnv")
public String getEnv() {
return "hello " + envName;
}
@RequestMapping("/getRepoInfo")
public String getRepoInfo() {
return "hello " + kettleRepositoryBean.toString();
}
}五、验证
1、登录

2、注册

3、读取单个配置
4、读取实体类配置(多个)

Spring Boot+Mybatis:实现数据库登录注册与两种properties配置参数读取的更多相关文章
- Spring boot+mybatis+thymeleaf 实现登录注册,增删改查
本文重在实现理解,过滤器,业务,逻辑需求,样式请无视.. 项目结构如下 1.idea新建Spring boot项目,在pom中加上thymeleaf和mybatis支持.pom.xml代码如下 < ...
- Java Spring+Mysql+Mybatis 实现用户登录注册功能
前言: 最近在学习Java的编程,前辈让我写一个包含数据库和前端的用户登录功能,通过看博客等我先是写了一个最基础的servlet+jsp,再到后来开始用maven进行编程,最终的完成版是一个 Spri ...
- Spring Boot入门教程2-1、使用Spring Boot+MyBatis访问数据库(CURD)注解版
一.前言 什么是MyBatis?MyBatis是目前Java平台最为流行的ORM框架https://baike.baidu.com/item/MyBatis/2824918 本篇开发环境1.操作系统: ...
- spring boot:解决cors跨域问题的两种方法(spring boot 2.3.2)
一,什么是CORS? 1,CORS(跨域资源共享)(CORS,Cross-origin resource sharing), 它是一个 W3C 标准中浏览器技术的规范, 它允许浏览器向非同一个域的服务 ...
- mybatis(二)执行CRUD操作的两种方式配置和注解
一.使用MyBatis对表执行CRUD操作——基于XML的实现 1.定义sql映射xml文件 userMapper.xml文件的内容如下: <?xml version="1.0&quo ...
- Spring Boot 定义系统启动任务,你会几种方式?
在 Servlet/Jsp 项目中,如果涉及到系统任务,例如在项目启动阶段要做一些数据初始化操作,这些操作有一个共同的特点,只在项目启动时进行,以后都不再执行,这里,容易想到web基础中的三大组件( ...
- (45). Spring Boot MyBatis连接Mysql数据库【从零开始学Spring Boot】
大家在开发的时候,会喜欢jdbcTemplate操作数据库,有喜欢JPA操作数据库的,有喜欢MyBatis操作数据库的,对于这些我个人觉得哪个使用顺手就使用哪个就好了,并没有一定要使用哪个,个人在实际 ...
- Spring Boot MyBatis 数据库集群访问实现
Spring Boot MyBatis 数据库集群访问实现 本示例主要介绍了Spring Boot程序方式实现数据库集群访问,读库轮询方式实现负载均衡.阅读本示例前,建议你有AOP编程基础.mybat ...
- Spring Boot + Mybatis + H2 database数据库
H2 Database H2 由纯 Java 编写的开源关系数据库,可以直接嵌入到应用程序中,不受平台约束,便于测试. h2数据库特点 (1)性能.小巧 (2)同时支持网络版和嵌入式版本,另外还提供了 ...
- # spring boot + mybatis 读取数据库
spring boot + mybatis 读取数据库 创建数据库 use testdb; drop table if exists t_city; create table t_city( id i ...
随机推荐
- 不给字段创建索引,字段不存放在source中,字段无法聚合查询等
某个字段不被搜索,也就是说不想为这个字段建立inverted index(反向索引),可以这么做: PUT twitter { "mappings": { "uid&qu ...
- 使用traefik进行金丝雀发布
文章转载自:https://mp.weixin.qq.com/s/nMMN7hAJK6SFn1V1YyxvHA 在 Traefik 2.0 中以服务负载均衡的形式进行了支持.可以将服务负载均衡器看成负 ...
- windows系统下使用bat脚本文件设置 JDK 系统环境变量
号开头的行不要写在bat文件中 # java_init.bat # 注意文件换行符是windows系统下的(CR LF),文件编码是ANSI # path变量追加这个可以拓展到tomcat,mysql ...
- Elasticsearch准实时索引实现(数据写入到es分片并存储到文件中的过程)
溢写到文件系统缓存 当数据写入到ES分片时,会首先写入到内存中,然后通过内存的buffer生成一个segment,并刷到文件系统缓存中,数据可以被检索(注意不是直接刷到磁盘) ES中默认1秒,refr ...
- cifar-10-dataset
import cv2 import numpy as np import os import pickle data_dir = os.path.join("data", &quo ...
- 从SpringBoot启动,阅读源码设计
目录 一.背景说明 二.SpringBoot工程 三.应用上下文 四.资源加载 五.应用环境 六.Bean对象 七.Tomcat服务 八.事件模型 九.配置加载 十.数据库集成 十一.参考源码 服务启 ...
- 动态代理(JDK、CGLIB)
JDK-Proxy(动态代理): 特点:要求被代理的对象必须接口 缺点:如果一个对象没有任何接口实现,则不能使用JDK动态代理 1.创建一个Animal 提供一个方法 2.创建一个cat类.实现Ain ...
- aws上传文件、删除文件、图像识别
目录 aws的上传.删除s3文件以及图像识别文字功能 准备工作 安装aws cli 初始化配置AWS CLI s3存储桶开通 图像识别文字功能开通 aws的sdk 上传文件 方法一 方法二 删除文件 ...
- do-while循环的使用
一.循环结构的4个要素 ① 初始化条件 ② 循环条件 --->是boolean类型 ③ 循环体 ④ 迭代条件 二.do-while循环结构: ①do{ ③; ④;}while(②); 执行过程: ...
- 驱动开发:内核测试模式过DSE签名
微软在x64系统中推出了DSE保护机制,DSE全称(Driver Signature Enforcement),该保护机制的核心就是任何驱动程序或者是第三方驱动如果想要在正常模式下被加载则必须要经过微 ...