CentOS7 初始化配置
一、在安装的时候配置网卡名称的参数
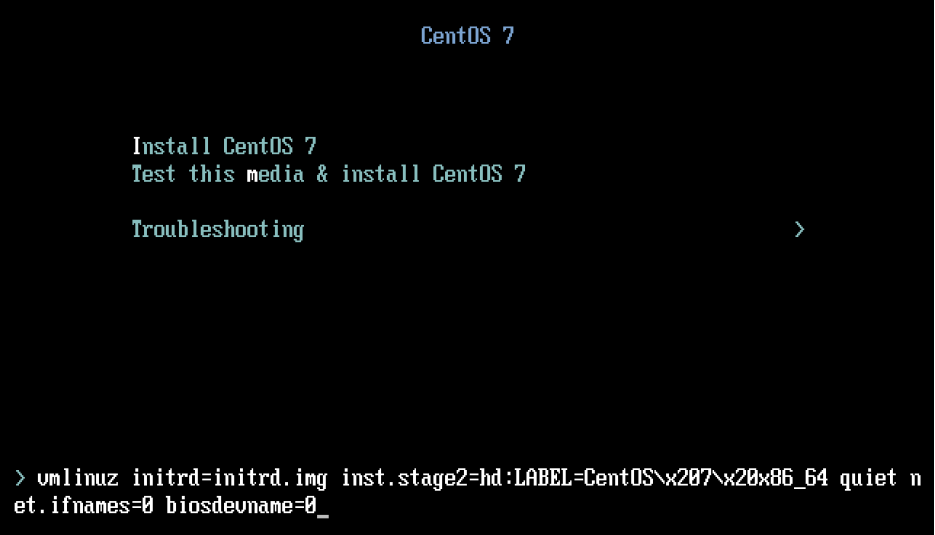
. 选择“Install Centos ”

. 按Tab,打开kernel启动选项后,增加 net.ifnames= biosdevname=
二、最小化安装完成之后必备安装软件
# 添加epel源,安装基础软件,设置主机名
rpm -ivh http://mirrors.aliyun.com/epel/epel-release-latest-7.noarch.rpm
yum install -y net-tools vim lrzsz tree screen lsof tcp wget tcpdump nc mtr nmap openssl-devel ntpdate
hostnamectl set-hostname linux-node1.example.com

# 关闭firewalld和NetworkManager
systemctl stop firewalld
systemctl stop NetworkManager

systemctl disable firewalld

systemctl disable NetworkManager

# 关闭selinux
setenforce 0

sed -i '/SELINUX/s/enforcing/disabled/' /etc/selinux/config

# 设置打开文件描述符的数量

echo "* hard nofile 65536" >> /etc/security/limits.conf

echo "* soft nofile 65536" >> /etc/security/limits.conf

# 设置记录历史命令的格式
echo 'export HISTTIMEFORMAT=" %F %T `whoami` "' >> /etc/profile
source /etc/profile

# 使用tables键的时候补全systemctl命令
yum install -y bash-completion

# 安装killall命令
yum install -y psmisc

# 时间同步,如果没有内网时间同步可以使用公网的
crontab -e
*/5 * * * * /usr/sbin/ntpdate time1.aliyun.com
三、内核参数优化
cat /etc/sysctl.conf

# 系统优化参数

# 关闭ipv6

net.ipv6.conf.all.disable_ipv6 =

net.ipv6.conf.default.disable_ipv6 =

# 避免放大攻击

net.ipv4.icmp_echo_ignore_broadcasts =

# 开启恶意icmp错误消息保护

net.ipv4.icmp_ignore_bogus_error_responses =

# 关闭路由转发

net.ipv4.ip_forward =

net.ipv4.conf.all.send_redirects =

net.ipv4.conf.default.send_redirects =

# 开启反向路径过滤

net.ipv4.conf.all.rp_filter =

net.ipv4.conf.default.rp_filter =

# 处理无源路由的包

net.ipv4.conf.all.accept_source_route =

net.ipv4.conf.default.accept_source_route =

#关闭sysrq功能

kernel.sysrq =

# core文件名中添加pid作为扩展名

kernel.core_uses_pid =

# 开启SYN洪水攻击保护

net.ipv4.tcp_syncookies =

# 修改消息队列长度

kernel.msgmnb =

kernel.msgmax =

# 设置最大内存共享段大小bytes

kernel.shmmax =

kernel.shmall =

# timewait的数量,默认180000

net.ipv4.tcp_max_tw_buckets =

net.ipv4.tcp_sack =

net.ipv4.tcp_window_scaling =

net.ipv4.tcp_rmem =

net.ipv4.tcp_wmem =

net.core.wmem_default =

net.core.rmem_default =

net.core.rmem_max =

net.core.wmem_max =

# 每个网络接口接收数据包的速率比内核处理这些包的速率快时,允许送到队列的数据包的最大数目

net.core.netdev_max_backlog =

# 限制仅仅是为了防止简单的DoS 攻击

net.ipv4.tcp_max_orphans =

# 未收到客户端确认信息的连接请求的最大值

net.ipv4.tcp_max_syn_backlog = 262144

# 启用timewait 快速回收,需要先打开时间戳。注:(NAT的网络和负载均衡器上不能打开)
net.ipv4.tcp_timestamps =
net.ipv4.tcp_tw_recycle =

#开启重用。允许将TIME-WAIT sockets 重新用于新的TCP连接

net.ipv4.tcp_tw_reuse =

net.ipv4.tcp_mem =

net.ipv4.tcp_fin_timeout =

# 当keepalive 起用的时候,TCP 发送keepalive 消息的频度。缺省是2小时

net.ipv4.tcp_keepalive_time =

#允许系统打开的端口范围,不建议从1024开始,因为某些端口会存在10000以内。一般情况下已够用。

net.ipv4.ip_local_port_range =

# 修改防火墙表大小,默认65536

net.netfilter.nf_conntrack_max=

net.netfilter.nf_conntrack_tcp_timeout_established=

# 确保无人能修改路由表

net.ipv4.conf.all.accept_redirects =

net.ipv4.conf.default.accept_redirects =

net.ipv4.conf.all.secure_redirects =

net.ipv4.conf.default.secure_redirects =
Normal
0
7.8 磅
0
2
false
false
false
EN-US
ZH-CN
X-NONE
/* Style Definitions */
table.MsoNormalTable
{mso-style-name:普通表格;
mso-tstyle-rowband-size:0;
mso-tstyle-colband-size:0;
mso-style-noshow:yes;
mso-style-priority:99;
mso-style-parent:"";
mso-padding-alt:0cm 5.4pt 0cm 5.4pt;
mso-para-margin:0cm;
mso-para-margin-bottom:.0001pt;
mso-pagination:widow-orphan;
font-size:10.5pt;
mso-bidi-font-size:11.0pt;
font-family:"Calibri","sans-serif";
mso-ascii-font-family:Calibri;
mso-ascii-theme-font:minor-latin;
mso-hansi-font-family:Calibri;
mso-hansi-theme-font:minor-latin;
mso-bidi-font-family:"Times New Roman";
mso-bidi-theme-font:minor-bidi;
mso-font-kerning:1.0pt;}
CentOS7 初始化配置的更多相关文章
- CentOS7.5最小化安装与初始化配置(做标准化)
本文分享CentOS的标准化安装配置方法,方便集群批量装机配置 ------------------------- 完美的分割线 ---------------------------- 1.安装标准 ...
- 新装系统(CentOS7.4)环境初始化配置笔记
新装系统(CentOS7.4)环境初始化配置笔记 一.概述 设备详情: Dell R730 服务器 (四个网卡,一根网线插在第2个网卡上) CentOS 7.4 x64 最小安装环境 二.网络环境配置 ...
- CentOS7.5 系统最小化安装与初始化配置
CentOS7.5 系统最小化安装与初始化配置 1.安装标准化的系统 1.1.系统安装期间的语言 选择:中文-简体中文,安装完成也会默认支持中文输出,便于管理 1.2.时区选择 亚洲上海,CST时区( ...
- Centos7 Minimal 安装后 初始化配置
安装完成后初始化配置 1:更新yum yum upgrade 2: 安装基础命令 #yum -y install vim* lrzsz gcc-c++ pcre pcre-devel zlib zli ...
- vmware centos7 minimal 配置共享文件夹
使用的是VMware安装CentOS7 minimal版,系统镜像是CentOS-7-x86_64-DVD-1708.iso. 宿主机系统为win10,CentOS7 minimal过程省略,可参考h ...
- virtualBox安装centos7并配置nginx php mysql运行环境
virtualBox安装centos7并配置nginx php mysql运行环境 一:virtualBox安装centos7并进行基础设置 1.下载dvd.iso安装文件,下载地址:https:// ...
- CentOS7 安装配置笔记
CentOS7 安装配置笔记 1.通过镜像安装 CentOS7 ==============================* 使用 UltraISO 9.7 或者 rufus-3.5p 制作ISO的 ...
- CentOS7——初始化
CentOS7--初始化 #禁止关闭显示器 archlinux wiki 提及的方法 echo -ne "\033[9;0]" >> /etc/issue # 重启,c ...
- Centos7安装配置jenkins(Tomcat)
Centos7安装配置jenkins(Tomcat) 一.准备工作 1.1 安装JDK1.8 具体安装过程不在赘述. 1.2 下载jenkins的war包 jenkins官网下载地址:https:// ...
随机推荐
- 使用eclipse遇到的unable to install breakpoint的问题
调试一个tomcat工程,设置好断点,启动工程,结果出现了下面的错误: 继续运行,再进入断点之前,还会再度提示,但是最终会命中断点. 使用CGLIB查找关键字,了解到CGLIB是一个AOP的拦截库,想 ...
- MySQL的前缀索引及Oracle的类似实现
MySQL有一个很有意思的索引类型,叫做前缀索引,它可以给某个文本字段的前面部分单独做索引,从而降低索引的大小. 其实,Oracle也有类似的实现,对于文本,它可以通过substr的函数索引,实现同样 ...
- 封装NSMapTable并简易的使用
封装NSMapTable并简易的使用 NSMapTable是弱引用的字典,可以用来存储对象,该对象消失了也没有关系,对于控制器越级跳转相当有用:) WeakDictionary.h 与 WeakDic ...
- Python 系统学习梳理_【All】
Python学习 1. Python学习---Python安装与基础1205 2. Python学习---PyCharm的使用学习 3. Python学习---Python数据类型1206 4. Py ...
- 详细透彻解读Git与SVN的区别(集中式VS分布式)
Git是目前世界上最先进的分布式版本控制系统,其实 Git 跟 SVN一样有自己的集中式版本库或服务器,但是Git 更倾向于被使用于分布式模式,也就是每个开发人员从中心版本库/服务器上chect ou ...
- 导出类成员里含有stl对象
How to export an instantiation of a Standard Template Library (STL) class and a class that contains ...
- MySQL复制(一)复制原理探讨
1 复制概述 1.1.复制解决的问题 数据复制技术有以下一些特点: (1) 数据分布 (2) 负载平衡(load balancing) (3) 备份 (4) 高可用性(high availabilit ...
- 【转】Android中获取应用程序(包)的信息-----PackageManager的使用(一)
转载请注明出处:http://blog.csdn.net/qinjuning 本节内容是如何获取Android系统中应用程序的信息,主要包括packagename.label.icon.占 ...
- linux 的常用命令---------第一阶段
ls -a 列出所有的文件,包括以 . 开头的隐藏文件 ls -d 列出目录本身,并不包含目录中的文件 ls -h 人类易读 ls -h 长输出 man 帮助使用手册 ...
- jQuery.fn.extend()
jQuery.fn.extend() extend()方法是定义在jQuery构造函数的prototype对象上面的一个方法,这样做就能使得所有jQuery对象的实例都能共享这个方法.jQuery构造 ...