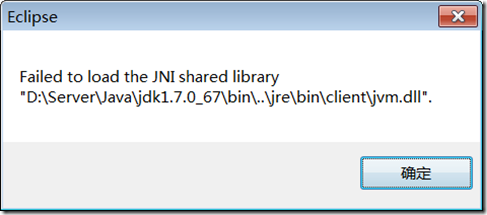
解决Failed to load the JNI shared library xxx/xxx/jvm.dll 错误
原因:jdk发生变化(新装了32位jdk),eclipse在启动时使用了 系统环境变量中的jdk路径(32位).
解决:只要把旧的64位的jre路径指定给eclipse启动文件即可。
在eclipse.ini中,第一行增加
-vm
D:/Server/Java64/jre7/bin/javaw.exe
Eclipse和MyEclipse启动时对jre依赖的区别:
- myeclipse2013的启动依赖自身带的jre环境
#utf8 (do not remove)
-startup
plugins/org.eclipse.equinox.launcher_1.3.0.v20120522-1813.jar
--launcher.library
plugins/org.eclipse.equinox.launcher.i18n.win32.win32.x86_64_3.2.0.v201103301700
-vm
binary/com.sun.java.jdk.win32.x86_64_1.6.0.u43/bin/javaw.exe
-install
D:\Server\MyEclipse2013
-vmargs
-Xmx512m
-XX:MaxPermSize=256m
-XX:ReservedCodeCacheSize=64m
-Dosgi.nls.warnings=ignore
- eclipse的启动 要求安装jre,并首先考虑使用eclipse.ini指定的jre中的javaw.exe, 若找不到会在环境变量中的javaw.exe
-vm
D:/Server/Java64/jre7/bin/javaw.exe
-startup
plugins/org.eclipse.equinox.launcher_1.3.0.v20140415-2008.jar
--launcher.library
plugins/org.eclipse.equinox.launcher.win32.win32.x86_64_1.1.200.v20150204-1316
-product
org.eclipse.epp.package.jee.product
--launcher.defaultAction
openFile
--launcher.XXMaxPermSize
256M
-showsplash
org.eclipse.platform
--launcher.XXMaxPermSize
256m
--launcher.defaultAction
openFile
--launcher.appendVmargs
-vmargs
-Dosgi.requiredJavaVersion=1.6
-Xms40m
-Xmx512m
需要注意的是,eclipse版本若是32位的,那么jre也应该是32位的。也就是说要对应起来,不然无法启动的。
解决Failed to load the JNI shared library xxx/xxx/jvm.dll 错误的更多相关文章
- 如何解决failed to load the jni shared library问题
如何解决failed to load the jni shared library问题 首先,我们来查看JDK是多少位的,在搜索框中输入cmd,然后打开命令行窗口. 在命令行中输入java -ve ...
- 怎么解决Failed to load the JNI shared library
怎么解决Failed to load the JNIshared library 解决Failed to load the JNIshared library唯一的方法就是重新安装eclipse, ...
- 启动 Eclipse 弹出“Failed to load the JNI shared library jvm.dll”错误的解决方法!&&在eclipse.ini中为eclipse指定jdk启动
参考:http://blog.csdn.net/zyz511919766/article/details/7442633 http://blog.sina.com.cn/s/blog_028f0c1c ...
- 启动 Eclipse 弹出“Failed to load the JNI shared library jvm.dll”错误的解决方法!
启动 Eclipse 弹出"Failed to load the JNI shared library jvm.dll"错误的解决方法 http://blog.csdn.net/z ...
- 启动eclipse时出现“Failed to load the JNI shared library jvm.dll”错误及解决-及eclipse版本查看
启动eclipse时出现“Failed to load the JNI shared library jvm.dll”错误及解决-及eclipse版本查看 学习了:https://www.cnblog ...
- 解决eclipse启动时出现“failed to load the jni shared library”
如何解决启动eclipse出现failed to load the jni shared library的问题 问题描述:启动eclipse时,出现以下弹出框 此时,即表示eclispe和jdk位数不 ...
- 启动eclipse时出现“Failed to load the JNI shared library jvm.dll”错误及解决
昨晚安装另一个版本的eclipse,启动时出现了"Failed to load the JNI shared library jvm.dll"错误: 1.刚开始以为是因为当时没有将 ...
- 启动Eclipse 弹出"Failed to load the JNI shared library jvm.dll"错误
启动Eclipse 弹出"Failed to load the JNI shared library jvm.dll"错误,如下 原因:eclipse的版本与jre或者jdk版本不 ...
- Eclipse启动 报错[Failed to load the JNI shared library jvm.dll
准备要做java服务器,在安装开发环境时,启动Eclipse报错[Failed to load the JNI shared library jvm.dll] 研究了下,造成错误的原因是由于eclip ...
随机推荐
- webstorm皮肤外观样式快速设置,CMD的使用方法,webstorm11激活方法
一.皮肤外观设置 因为这里是上班时间写的,其客套话就不多bb.步入正题 1.首先设置webstorm整体面板颜色 file->settings->Appearance&Behavi ...
- springboot jpa 多条件查询(多表)
前几天写的,贴上来. 实体类. package com.syl.demo.daomain; import lombok.Data; import javax.persistence.*; /** * ...
- 基于python的多线程暴破脚本
搭建了一个本地wordpress,写一个基于多线程异步I/O的暴力破解 1 测试 提交错误的表单数据时,查看请求参数 登录时发送的cookie 2 登录分析 经过多次测试,发现无论是输入正确的密码还是 ...
- Facebook回应追踪无账号用户:源于网站插件漏洞
近日,比利时隐私独立委员一项调查披露Facebook跟踪收集大量网站用户的上网足迹,同时触及那些没有注册Facebook账号的访客. 对此,Facebook公司回应这些恶劣跟踪行为在于社交媒体在安装插 ...
- python 历险记(五)— python 中的模块
目录 前言 基础 模块化程序设计 模块化有哪些好处? 什么是 python 中的模块? 引入模块有几种方式? 模块的查找顺序 模块中包含执行语句的情况 用 dir() 函数来窥探模块 python 的 ...
- gRPC 的 RoadMap 20151022 更新
gRPC是一个高性能.通用的开源RPC框架,其由Google主要面向移动应用开发并基于HTTP/2协议标准而设计,基于ProtoBuf(Protocol Buffers)序列化协议开发,且支持众多开发 ...
- ef和mysql使用(二)--让mysql支持EntityFramework.Extended实现批量更新和删除
我们都知道Entity Framework 中不能同时更新多条记录,但是一个老外写的扩展库可以实现此功能EntityFramework.Extended,但是如何是mysql数据库要怎么实现呢 首先实 ...
- css动画笔记
<!DOCTYPE html> <html lang="en"> <head> <meta charset="UTF-8&quo ...
- Git Flow 代码版本控制模型
说到代码版本控制,推荐一下最新的Git.跟SVN相比,最大的区别是它在本地也保存了一个代码库,这样可以离线工作,首先将代码提交到本地仓库,联网之后再同步到服务器端.代码托管网站 Github 和 Bi ...
- windows 静态IP设置举例
IP 172.20.108.239 子网掩码 255.255.255.0 网关 172.20.108.1