Android-fragment-ListView展示-v4支持包
昨天写的这几篇博客,Android-fragment简介-fragment的简单使用,Activity-fragment-ListView展示,Android-fragment生命周期,Android-fragment的替换, 都是讲解使用 android.app.Fragment 自身的Fragment,不是v4包的;
而今天的博客是专门讲解v4.app.Fragment(v4包的),全部都是要导入v4包,使用v4包的Fragment有个好处就是可以兼容低版本
以前的导包:
import android.app.Fragment;

import android.app.FragmentTransaction;
现在的导包:
import android.support.v4.app.Fragment;

import android.support.v4.app.FragmentActivity;

import android.support.v4.app.FragmentManager;

import android.support.v4.app.FragmentTransaction;
Activity的代码:
package liudeli.activity.fragment;

import android.os.Bundle;

import android.support.v4.app.FragmentActivity;

import liudeli.activity.R;

/**

 * 全部使用v4.app.Fragment支持包来实现

 * 既然用了全部使用v4.app.Fragment支持包来实现,所以Activity必须是FragmentActivity才能识别布局的<fragment

 */

public class MyTestFragmentActivity2 extends FragmentActivity {

    @Override

    protected void onCreate(Bundle savedInstanceState) {

        super.onCreate(savedInstanceState);

        setContentView(R.layout.activity_test_fragment2);

    }

}
Activity布局的代码:
<?xml version="1.0" encoding="utf-8"?>

<LinearLayout

    xmlns:android="http://schemas.android.com/apk/res/android"

    android:layout_width="match_parent"

    android:layout_height="match_parent"

    android:orientation="vertical">

    <!--

        android:id="@+id/fragment" 必须要指定好ID,否则运行会报错

        class="liudeli.activity.fragment.MyFragment" 必须要指定class,否则无效果

    -->

    <fragment

        android:id="@+id/fragment"

        class="liudeli.activity.fragment.MyFragment2"

        android:layout_width="match_parent"

        android:layout_height="wrap_content" />

</LinearLayout>
Fragment的代码:
package liudeli.activity.fragment;

import android.os.Bundle;

import android.support.v4.app.Fragment;

import android.view.LayoutInflater;

import android.view.View;

import android.view.ViewGroup;

import android.widget.AdapterView;

import android.widget.ArrayAdapter;

import android.widget.ListAdapter;

import android.widget.ListView;

import android.widget.Toast;

import liudeli.activity.R;

/**

 * 使用v4包的 import android.support.v4.app.Fragment;

 */

public class MyFragment2 extends Fragment {

    /**

     * 创建View

     * @param inflater 布局加载器

     * @param container

     * @param savedInstanceState 临时保存数据用的Bundle 和 Activity-onCreate方法一样

     * @return

     */

    @Override

    public View onCreateView(LayoutInflater inflater, ViewGroup container, Bundle savedInstanceState) {

        super.onCreateView(inflater, container, savedInstanceState);

        // 使用布局加载器加载

        View view = inflater.inflate(R.layout.fragment_layout, null);

        return view;

    }

    private ListView listView;

    /**

     * 此方法代表View创建已经完成✅

     * @param view 上面方法创建View成功后返回过来的View

     * @param savedInstanceState  临时保存数据用的Bundle 和 Activity-onCreate方法一样

     */

    @Override

    public void onViewCreated(View view, Bundle savedInstanceState) {

        super.onViewCreated(view, savedInstanceState);

        listView = view.findViewById(R.id.listview);

        String[] strings = new String[]{"测试数据一", "测试数据二", "测试数据三"};

        // 初始化适配器数据

        final ListAdapter listAdapter = new ArrayAdapter(getActivity(), // 在Fragment不能使用this

                                                           android.R.layout.simple_list_item_1,

                                                           android.R.id.text1,

                                                           strings);

        listView.setAdapter(listAdapter);

        listView.setOnItemClickListener(new AdapterView.OnItemClickListener() {

            @Override

            public void onItemClick(AdapterView<?> parent, View view, int position, long id) {

                String itmeValue = (String) listAdapter.getItem(position);

                Toast.makeText(getActivity(), itmeValue, Toast.LENGTH_SHORT).show();

            }

        });

        listView.setOnItemLongClickListener(new AdapterView.OnItemLongClickListener() {

            @Override

            public boolean onItemLongClick(AdapterView<?> parent, View view, int position, long id) {

                Toast.makeText(getActivity(), "长按Item条目", Toast.LENGTH_SHORT).show();

                return true;

            }

        });

    }

}
Fragment布局的代码:
<?xml version="1.0" encoding="utf-8"?>

<LinearLayout

    xmlns:android="http://schemas.android.com/apk/res/android"

    android:layout_width="match_parent"

    android:layout_height="match_parent">

    <ListView

        android:id="@+id/listview"

        android:layout_width="match_parent"

        android:layout_height="wrap_content"

        android:descendantFocusability="blocksDescendants"

        />

</LinearLayout>
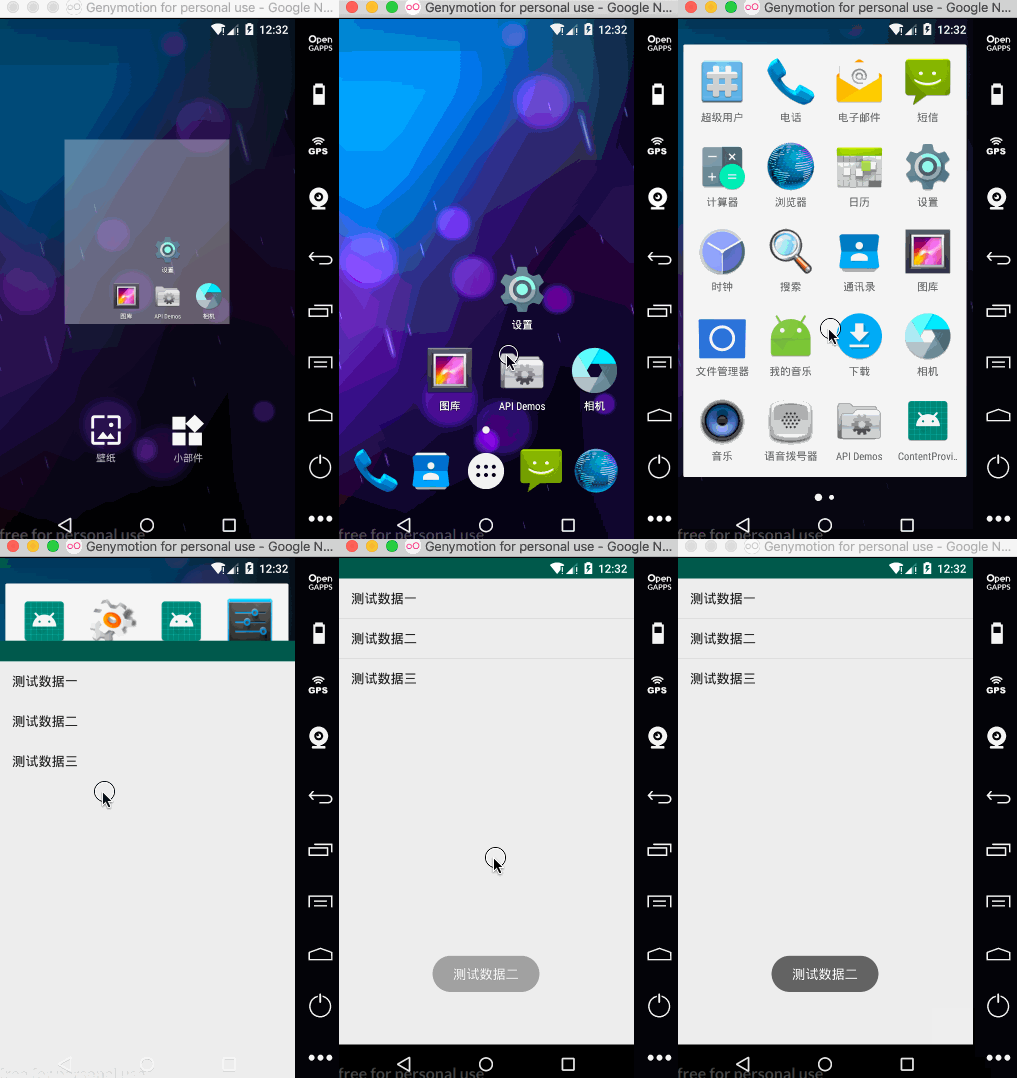
效果:

Android-fragment-ListView展示-v4支持包的更多相关文章
- Android-fragment的替换-V4支持包
昨天写的这几篇博客,Android-fragment简介-fragment的简单使用,Activity-fragment-ListView展示,Android-fragment生命周期,Android ...
- 如何在Android Studio中添加RecyclerView-v7支持包
1.打开SDK Manager,在Extras树下找到Android Support Library,下载好支持包.RecyclerView在v7-21版本就出来了.我这里不用更新了,说明是最新的,怎 ...
- Android中Listview展示及其优化好处
展示效果: 中间的item条目是可以上下滑动的. 代码实现: @Override public View getView(int position, View convertView, ViewGro ...
- Android最新支持包Design简介
Android 5.0 Lollipop是曾经最著名的Android发布之一,这样说很大一部分原因是材料设计的引入,而材料设计则是一种刷新了整个Android体验的设计语言.这个详细说明是开始适应材料 ...
- android v4兼容包
一句话解释android兼容包就是:支持更多的组件,样式更好看了.好粗糙的解释啊! 我们都知道Android一些SDK比较分裂,为此google官方提供了Android Support Library ...
- Android support library支持包常用控件介绍(二)
谷歌官方推出Material Design 设计理念已经有段时间了,为支持更方便的实现 Material Design设计效果,官方给出了Android support design library ...
- 解决viewpager+多个fragment+listview,listview展示内容高度不自适应出现多余空白问题
一.重写viewpager import android.content.Context; import android.support.v4.view.ViewPager; import andro ...
- 安卓v7支持包下的ListView替代品————RecyclerView
RecyclerView这个控件也出来很久了,相信大家也学习的差不多了,如果还没学习的,或许我可以带领大家体验一把这个艺术般的控件. 项目已经同步至github:https://github.com/ ...
- Xamarin.Android 调用Web Api(通过ListView展示远程获取的数据)
xamarin.android如何调用sqlserver 数据库呢(或者其他的),很多新手都会有这个疑问.xamarin.android调用远程数据主要有两种方式: 在Android中保存数据或调用数 ...
随机推荐
- oracle查询锁表
select b.username,b.sid,b.serial#,logon_time from v$locked_object a,v$session b where a.session_id = ...
- 第八章 高级搜索树 (a3)伸展树:算法实现
- ccf认证模拟题之三---最大的矩形
问题描述 在横轴上放了n个相邻的矩形,每个矩形的宽度是1,而第i(1 ≤ i ≤ n)个矩形的高度是hi.这n个矩形构成了一个直方图.例如,下图中六个矩形的高度就分别是3, 1, 6, 5, 2, 3 ...
- Eclipse 中 program arguments 与 VM arguments 的区别
1. program arguments 中的值作为 主函数中的参数args[] 传入 2. VM Arguments 是设置的java虚拟机的属性,这些系统属性都以-D开头, VM argument ...
- 复制带随机指针的链表 · Copy List with Random Pointer
[抄题]: 给出一个链表,每个节点包含一个额外增加的随机指针可以指向链表中的任何节点或空的节点. 返回一个深拷贝的链表. [思维问题]: [一句话思路]: 完完全全地复制,否则不好操作. 1-> ...
- 解决python中csv文件中文写入问题
一.前言 一般来说,为了方便,使用python的时候都会使用csv模块去写数据到csv文件,但是写入中文的时候,经常会报错: UnicodeEncodeError: 'ascii' codec can ...
- iOS - swift项目接入bugly - 报错, 配置符号表,下载Java环境,
1.pod 安装,无需配置任何东西 2.终端找到路径: pod install 3.在 appdelegate 导入 import Bugly extension AppDelegate{ /// ...
- win 下 nginx 与 php的配置
1.下载需要的软件包 php的windows版本(*注意这里下载非线程安全的,nginx使用的是cgi) http://windows.php.net/download/ nginx的window ...
- webstorm使用教程
Webstorm 超实用配置教程 原文来自:http://www.jianshu.com/p/4ce97b360c13 一.下载安装包 Webstorm 2017.1.4 百度云盘下载地址:https ...
- 【Jsoup】Jsoup解析Html标签(Java后台解析)
中文API网站(下载地址): http://www.open-open.com/jsoup/ 有时候编辑器传到后台的内容是带Html标签的,或者有时候需要形成一个完整的Html文档,也或者需要解析其中 ...
