scraoy之日志等级处理
一.Scrapy的日志等级
1.配置
 - 在使用scrapy crawl spiderFileName运行程序时,在终端里打印输出的就是scrapy的日志信息。

  - 日志信息的种类:

        ERROR : 一般错误

        WARNING : 警告

        INFO : 一般的信息

        DEBUG : 调试信息
- 设置日志信息指定输出:
在settings.py配置文件中,加入
LOG_LEVEL = ‘指定日志信息种类’即可。
LOG_FILE = 'log.txt'则表示将日志信息写入到指定文件中进行存储,设置后终端不显示日志内容
注:日志在setting里面默认是没有的,需要自己添加
2.使用
#在需要些日志的py文件中导包

import logging


#这样实例化后可以在输出日志的时候知道错误的位置再那个文件产生的

LOGGER = logging.getLogger(__name__)

def start_requests(self):

     if self.shared_data is not None:

            user = self.shared_data['entry_data']['ProfilePage'][0]['graphql']['user']

            self.user_id = user['id']

            self.count = user['edge_owner_to_timeline_media']['count']

            LOGGER.info('\n{}\nUser id:{}\nTotal {} photos.\n{}\n'.format('-' * 20, self.user_id, self.count, '-' * 20))

            for i, url in enumerate(self.start_urls):

                yield self.request("", self.parse_item)

        else:

            LOGGER.error('-----[ERROR] shared_data is None.')

#如果不实例化也是可以的,直接
logging.info('dasdasdasd')
loggging.debug('sfdghj')
#这样不会日志不会显示产生错误的文件的位置
3.扩展,在普通程序中使用logging
import logging

LOG_FORMAT = "%(asctime)s %(name)s %(levelname)s %(pathname)s %(message)s "#配置输出日志格式

DATE_FORMAT = '%Y-%m-%d  %H:%M:%S %a ' #配置输出时间的格式,注意月份和天数不要搞乱了

logging.basicConfig(level=logging.DEBUG,

                    format=LOG_FORMAT,

                    datefmt = DATE_FORMAT ,

                    filename=r"d:\test\test.log" #有了filename参数就不会直接输出显示到控制台,而是直接写入文件

#实例化一个logger                    )
logger=logging.getLogger(__name__)

logger.debug("msg1")

logger.info("msg2")

logger.warning("msg3")

logger.error("msg4")

logger.critical("msg5")
二.如何提高scrapy的爬取效率
增加并发:

    默认scrapy开启的并发线程为个,可以适当进行增加。在settings配置文件中修改CONCURRENT_REQUESTS = 100值为100,并发设置成了为100。

降低日志级别:

    在运行scrapy时,会有大量日志信息的输出,为了减少CPU的使用率。可以设置log输出信息为INFO或者ERROR即可。在配置文件中编写:LOG_LEVEL = ‘INFO’

禁止cookie:

    如果不是真的需要cookie,则在scrapy爬取数据时可以进制cookie从而减少CPU的使用率,提升爬取效率。在配置文件中编写:COOKIES_ENABLED = False

禁止重试:

    对失败的HTTP进行重新请求(重试)会减慢爬取速度,因此可以禁止重试。在配置文件中编写:RETRY_ENABLED = False

减少下载超时:

    如果对一个非常慢的链接进行爬取,减少下载超时可以能让卡住的链接快速被放弃,从而提升效率。在配置文件中进行编写:DOWNLOAD_TIMEOUT = 10 超时时间为10s
爬虫文件.py
# -*- coding: utf-8 -*-

import scrapy

from xiaohua.items import XiaohuaItem

class XiahuaSpider(scrapy.Spider):

    name = 'xiaohua'

    allowed_domains = ['www.521609.com']

    start_urls = ['http://www.521609.com/daxuemeinv/']

    pageNum = 1

    url = 'http://www.521609.com/daxuemeinv/list8%d.html'

    def parse(self, response):

        li_list = response.xpath('//div[@class="index_img list_center"]/ul/li')

        for li in li_list:

            school = li.xpath('./a/img/@alt').extract_first()

            img_url = li.xpath('./a/img/@src').extract_first()

            item = XiaohuaItem()

            item['school'] = school

            item['img_url'] = 'http://www.521609.com' + img_url

            yield item

        if self.pageNum < 10:

            self.pageNum += 1

            url = format(self.url % self.pageNum)

            #print(url)

            yield scrapy.Request(url=url,callback=self.parse)
items.py
# -*- coding: utf-8 -*-

# Define here the models for your scraped items

#

# See documentation in:

# https://doc.scrapy.org/en/latest/topics/items.html

import scrapy

class XiaohuaItem(scrapy.Item):

    # define the fields for your item here like:

    # name = scrapy.Field()

    school=scrapy.Field()

    img_url=scrapy.Field()
pipline.py
# -*- coding: utf-8 -*-

# Define your item pipelines here

#

# Don't forget to add your pipeline to the ITEM_PIPELINES setting

# See: https://doc.scrapy.org/en/latest/topics/item-pipeline.html

import json

import os

import urllib.request

class XiaohuaPipeline(object):

    def __init__(self):

        self.fp = None

    def open_spider(self,spider):

        print('开始爬虫')

        self.fp = open('./xiaohua.txt','w')

    def download_img(self,item):

        url = item['img_url']

        fileName = item['school']+'.jpg'

        if not os.path.exists('./xiaohualib'):

            os.mkdir('./xiaohualib')

        filepath = os.path.join('./xiaohualib',fileName)

        urllib.request.urlretrieve(url,filepath)

        print(fileName+"下载成功")

    def process_item(self, item, spider):

        obj = dict(item)

        json_str = json.dumps(obj,ensure_ascii=False)

        self.fp.write(json_str+'\n')

        #下载图片

        self.download_img(item)

        return item

    def close_spider(self,spider):

        print('结束爬虫')

        self.fp.close()
settings.py
USER_AGENT = 'Mozilla/5.0 (Macintosh; Intel Mac OS X 10_12_0) AppleWebKit/537.36 (KHTML, like Gecko) Chrome/68.0.3440.106 Safari/537.36'

# Obey robots.txt rules

ROBOTSTXT_OBEY = False

# Configure maximum concurrent requests performed by Scrapy (default: 16)

CONCURRENT_REQUESTS = 100

COOKIES_ENABLED = False

LOG_LEVEL = 'ERROR'

RETRY_ENABLED = False

DOWNLOAD_TIMEOUT = 3

# Configure a delay for requests for the same website (default: 0)

# See https://doc.scrapy.org/en/latest/topics/settings.html#download-delay

# See also autothrottle settings and docs

# The download delay setting will honor only one of:

#CONCURRENT_REQUESTS_PER_DOMAIN = 16

#CONCURRENT_REQUESTS_PER_IP = 16

DOWNLOAD_DELAY = 3
三.反爬处理
1.设置download_delay:设置下载的等待时间,大规模集中的访问对服务器的影响最大。download_delay可以设置在settings.py中,也可以在spider中设置

2.禁止cookies(参考 COOKIES_ENABLED),有些站点会使用cookies来发现爬虫的轨迹。在settings.py中设置COOKIES_ENABLES=False

3.使用user agent池,轮流选择之一来作为user agent。需要编写自己的UserAgentMiddle中间件

4.使用IP池。Crawlera 第三方框架可以解决爬网站的ip限制问题,下载 scrapy-crawlera Crawlera 中间件可以轻松集成该功能

5.分布式爬取。使用 Scrapy-Redis 可以实现分布式爬取蚊
四.多pipeline的处理
为什么需要有多pipeline的情况 :
1.可能有多个spider,不同的pipeline处理不同的内容

2.一个spider可能要做不同的操作,比如,存入不同的数据库当中
方式一:在pipeleine中判断爬虫的名字
class InsCrawlPipeline(object):

    def process_item(self, item, spider):

        if spider.name=='jingdong':

            pass

        return item

class InsCrawlPipeline1(object):

    def process_item(self, item, spider):

        if spider.name=='taobao':

            pass

        return item

class InsCrawlPipeline2(object):

    def process_item(self, item, spider):

        if spider.name=='baidu':

            pass

        return item
或者:一个pipine类中判断爬虫的名字:
class InsCrawlPipeline(object):

    def process_item(self, item, spider):

        if spider.name=='jingdong':

            pass

        elif spider.name=='taobao':

            pass

        elif spider.name=='baidu':

            pass

        return item
方式二:在爬虫文件的item中加一个key
spider.py
def parse():

    item={}

    item['come_from']='badiu'
pipline.py
class InsCrawlPipeline(object):

    def process_item(self, item, spider):

        if item['come_from']=='taobao':

            pass

        elif item['come_from']=='jingdong':

            pass

        elif item['come_from']=='badiu':

            pass

        return item
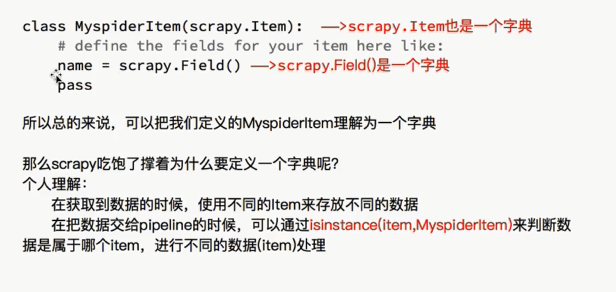
五.多item的处理
在item.py
class YangguangItem(scrapy.Item):

    # define the fields for your item here like:

    # name = scrapy.Field()

    title = scrapy.Field()

    href = scrapy.Field()

    publish_date = scrapy.Field()

    content = scrapy.Field()

    content_img = scrapy.Field()

class TaobaoItem(scrapy.Item):

    # define the fields for your item here like:

    # name = scrapy.Field()

    pass

class JingDongItem(scrapy.Item):

    # define the fields for your item here like:

    # name = scrapy.Field()

    pass
pipeline.py
class YangguangPipeline(object):

     def process_item(self, item, spider):

          if isinstance(item,TaobaoItem):

              collection.insert(dict(item))
      elif isinstance(item,JingDongItem)
return item

scraoy之日志等级处理的更多相关文章
- log4cplus使用(二)-自定义日志等级
log4cplus支持用户自定义日志等级,操作也比较简单,使用之前贴如下宏定义 #define LOG4CPLUS_MACRO_CREASH_LOG_LEVEL(pred) LOG4CPLUS_UNL ...
- 13.scrapy框架的日志等级和请求传参
今日概要 日志等级 请求传参 如何提高scrapy的爬取效率 今日详情 一.Scrapy的日志等级 - 在使用scrapy crawl spiderFileName运行程序时,在终端里打印输出的就是s ...
- python日志等级输出删选
有时候我们会删选一下输出的信息 当做日志进行文件保存 但是我们程序中有可能有自己不想存到日志文件中的输出信息 我们要做一些的删选 然后进行保存 代码如下: #!/usr/bin/python # - ...
- scrapy之日志等级
scrapy之日志等级 在settings.py中配置如下项: LOG_LEVEL = 'ERROR' # 当LOG_LEVEL设置为ERROR时,在进行日志打印时,只是打印ERROR级别的日志 这样 ...
- scrapy框架的日志等级和请求传参
日志等级 请求传参 如何提高scrapy的爬取效率 一.Scrapy的日志等级 - 在使用scrapy crawl spiderFileName运行程序时,在终端里打印输出的就是scrapy的日志信息 ...
- scrapy框架之日志等级和请求传参-cookie-代理
一.Scrapy的日志等级 - 在使用scrapy crawl spiderFileName运行程序时,在终端里打印输出的就是scrapy的日志信息. - 日志信息的种类: ERROR : 一般错误 ...
- Scrapy的日志等级和请求传参
日志等级 日志信息: 使用命令:scrapy crawl 爬虫文件 运行程序时,在终端输出的就是日志信息: 日志信息的种类: ERROR:一般错误: WARNING:警告: INFO:一般的信息: ...
- CEF之CefSettings设置日志等级
CefSettings结构体允许定义全局的CEF配置,经常用到的配置项如下: single_process 设置为true时,Browser和Renderer使用一个进程.此项也可以通过命令行参数“s ...
- scrapy框架的日志等级和请求参数
一 . Scrapy的日志等级 - 在使用 scrapy crawl xxx 允许程序时,在终端里打印输出的就是scrapy的日志信息 - 日志信息的种类 : ERROR : 错误信息 WARNING ...
随机推荐
- linux下安装sz/rz命令
参考 https://blog.csdn.net/kobejayandy/article/details/13291655
- MySQL中having与where
having与where区别: where中不可以用聚合函数(条件字段是未分组中的字段),having中可以用聚合函(条件字段是分组后字段).不过这里也很好理解,SQL语句在执行是先执行select ...
- MSGPACK和PROTOBUF的故事(MSGPACK明显生产力不足)
作者曾经在2014年测试出MSGPACK的关键字和中文字符有很大的冲突,所以后来放弃了,本文为很多年前写的一个对比,后来我们一直在使用HTTP协议和PROTOBUF. 看看MSGPACK的文档,自称效 ...
- SQL语句学习积累·数据的操作
数据的操作 select 取表中前五条数据 select top 5 from table_name 取表中前50%的数据 select top 50 percent from table_name ...
- Highway Networks(高速路神经网络)
Rupesh Kumar Srivastava (邮箱:RUPESH@IDSIA.CH)Klaus Greff (邮箱:KLAUS@IDSIA.CH)J¨ urgen Schmidhuber (邮箱: ...
- xubuntu14.04LTS安装steam后运行的错误解决办法
我在ubuntu14.10中没碰到过这个问题,但在xubuntu14.04LTS中碰到 Steam needs to install these additional packages: libgl1 ...
- 《PRC:更新项目汇总额》报错
请求报红,日志如下: +---------------------------------------------------------------------------+ 项目: Version ...
- [bash] 显示配色
#/bin/bash for STYLE in 0 1 2 3 4 5 6 7; do for FG in 30 31 32 33 34 35 36 37; do for BG in 40 41 42 ...
- [.net 多线程]SpinWait
<CLR via C#>读书笔记-线程同步(四) 混合线程同步构造简介 之前有用户模式构造和内核模式构造,前者快速,但耗费CPU:后者可以阻塞线程,但耗时.耗资源.因此.NET会有一些混合 ...
- arp欺骗进行流量截获-2
上一篇讲了原理,那么这一篇主要讲如何实现.基本上也就是实现上面的两个步骤,这里基于gopacket实现,我会带着大家一步步详细把每个步骤都讲到. ARP 欺骗 首先就是伪造ARP请求,让A和B把数据包 ...
