Spring Boot 2.x 之 H2 数据库
1. Spring Boot下H2数据库的常用配置项
# 指定数据库的类型

spring.datasource.platform=h2

# 数据库连接地址(文件模式)

## AUTO_SERVER=TRUE,启动自动混合模式,允许开启多个连接,该参数不支持在内存中运行模式

## DB_CLOSE_ON_EXIT=FALSE,当虚拟机退出时并不关闭数据库

spring.datasource.url=jdbc:h2:file:./h2/code-generator;AUTO_SERVER=TRUE;DB_CLOSE_ON_EXIT=FALSE

## 内存模式示例

# spring.datasource.url=jdbc:h2:mem:testdb

# 数据库驱动

spring.datasource.driver-class-name=org.h2.Driver

# 用户名

spring.datasource.username=testdb

# 密码

spring.datasource.password=test

# 是否启用H2控制台

spring.h2.console.enabled=true

# H2控制台的访问路径, 缺省是/h2-console

spring.h2.console.path=/h2-console

# 是否允许远程访问H2

spring.h2.console.settings.web-allow-others=true
关于连接URL中的DB_CLOSE_ON_EXIT=FALSE
Don't Close a Database when the VM Exits.
By default, a database is closed when the last connection is closed. However, if it is never closed, the database is closed when the virtual machine exits normally, using a shutdown hook. In some situations, the database should not be closed in this case, for example because the database is still used at virtual machine shutdown (to store the shutdown process in the database for example). For those cases, the automatic closing of the database can be disabled in the database URL. The first connection (the one that is opening the database) needs to set the option in the database URL (it is not possible to change the setting afterwards).
2. h2的内存模式与本地模式
本地文件模式
spring.datasource.url=jdbc:h2:file:~/testdb
该例子中的~是用户目录。
内存模式
spring.datasource.url=jdbc:h2:mem:testdb
内存模式时,应用关闭则数据库同时关闭,数据库中的数据也就清空了。
3. H2的控制台
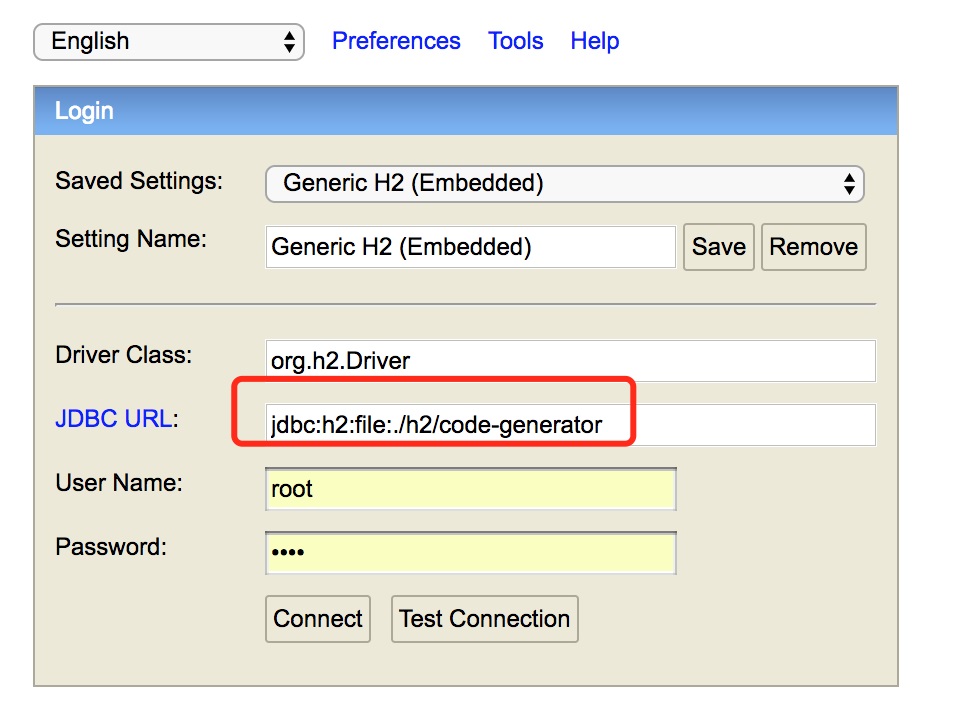
控制台界面如下:
端口号
访问H2的控制台时,URL中的端口号就是所在应用的端口号
路径
访问H2的控制台的路径后缀是spring.h2.console.path配置项的值,默认是/h2-console
Driver Class
填org.h2.Driver
JDBC URL
填配置项spring.datasource.url的值
用户名密码
与application.properties中配置的值对应。
Spring Boot 2.x 之 H2 数据库的更多相关文章
- 【spring boot】12.spring boot对多种不同类型数据库,多数据源配置使用
2天时间,终于把spring boot下配置连接多种不同类型数据库,配置多数据源实现! ======================================================== ...
- Spring Boot中使用JdbcTemplate访问数据库
本文介绍在Spring Boot基础下配置数据源和通过JdbcTemplate编写数据访问的示例. 数据源配置 在我们访问数据库的时候,需要先配置一个数据源,下面分别介绍一下几种不同的数据库配置方式. ...
- spring boot2.x中集成H2数据库
H2数据库介绍 查看 在spring boot中集成 1.添加依赖 <dependency> <groupId>org.springframework.boot</gr ...
- 记录一次Spring boot 搭建框架连接Mysql数据库注解事务不回滚的故障
搭建了一个新框架,使用了spring boot 替换以简化原来繁杂的spring配置,使用Spring注解管理事务,持久层使用mybatis. 连接mysql数据库完成项目的过程中发现不支持事务,因为 ...
- spring boot系列03--spring security (基于数据库)登录和权限控制(下)
(接上篇) 后台 先说一下AuthConfig.java Spring Security的主要配置文件之一 AuthConfig 1 @Configuration 2 @EnableWebSecuri ...
- spring boot快速入门 4: jpa数据库操作 实现增删改查
spring boot jpa逆向生成表 简单实例: 第一步:pom文件: <?xml version="1.0" encoding="UTF-8"?&g ...
- spring boot 集成mybatis连接oracle数据库
1. POM文件添加依赖 <!-- Mybatis --> <dependency> <groupId>org.mybatis.spring.boot</gr ...
- 【Spring Boot】Spring Boot之使用AOP实现数据库多数据源自动切换
一.添加maven坐标 <!-- aop --> <dependency> <groupId>org.springframework.boot</groupI ...
- Spring boot通过JPA访问MySQL数据库
本文展示如何通过JPA访问MySQL数据库. JPA全称Java Persistence API,即Java持久化API,它为Java开发人员提供了一种对象/关系映射工具来管理Java应用中的关系数据 ...
随机推荐
- Skywalking-06:OAL基础
OAL 基础知识 基本介绍 OAL(Observability Analysis Language) 是一门用来分析流式数据的语言. 因为 OAL 聚焦于度量 Service . Service In ...
- SpringBoot开发三
需求介绍-SpringMVC 服务层的三层架构:表现层,业务层,数据层,浏览器访问服务器先访问表现层,期待表现层返回一些数据,表现层呢就访问业务层处理业务,而业务层在处理业务的时候会调用数据层请求数据 ...
- Swagger在线文档使用教程
springboot整合Swagger2 1.首先创建一个springboot工程,在pom文件内导入依赖 <!--swagger依赖--> <!--Swagger2- ...
- mingw+gcc 10.1下载
链接: https://pan.baidu.com/s/1Qyqv1PDppRJvgph9sBmwxw 提取码: fqkp
- 【UGUI源码分析】Unity遮罩之RectMask2D详细解读
遮罩,顾名思义是一种可以掩盖其它元素的控件.常用于修改其它元素的外观,或限制元素的形状.比如ScrollView或者圆头像效果都有用到遮罩功能.本系列文章希望通过阅读UGUI源码的方式,来探究遮罩的实 ...
- docker配置cdn-容器内可以通过域名访问
添加docker的cdn配置 # 没有这个文件创建 vim /etc/docker/daemon.json 添加内容如下 { "dns":["8.8.8.8", ...
- Spring-Boot的动态代理AOP原理
前言 Spring AOP使用了动态代理技术,动态代理在业界比较流行的实现方式有,CGLIB,Javassist,ASM等等. Spring动态代理实现方式 Spring采用了JDK和CGLIB两种方 ...
- C#实现http协议GET、POST请求
using System; using System.Collections.Generic; using System.Text; using System.Net; using System.Ne ...
- 十二:Servlet3.0的注解
1.@WebListener注解 表示的就是我们之前的在xml中配置的 <listener> <listener-class>ListenerClass</listene ...
- ubuntu编译安装python3.6.5
去官网下载安装包放到~/software/ 下 1更新软件库 sudo apt-get update 2安装相应的开发库 sudo apt-get install zlib1g-dev libbz ...