HarmonyOS三方件开发指南(17)-BottomNavigationBar
目录:
引言
BottomNavigationBar底部导航栏,可以说所有的app是这样的页面架构,原因很简单,操作简单,模块化清晰,页面切换流畅,而且每页都可以展示不同的风格。相信开发者已经很熟悉Android的底部导航栏的开发以及开发流程,那么接下来将对比Android来讲解鸿蒙的底部导航栏的实现步骤。
功能介绍
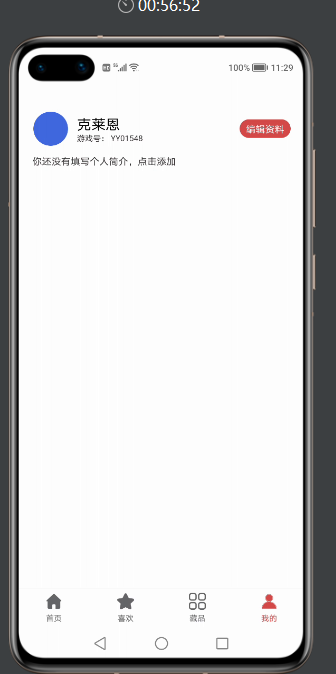
鸿蒙BottomNavigationBar底部导航栏,根据所需要底部button的数量,动态生成对应的底部button,并且可以设置默认字体颜色,选中字体颜色,默认icon,选中icon属性。模拟器效果图如下:

看了效果图,是不是都想知道在实际工作中,是如何使用的呢?接下来给大家详细介绍下BottomNavigationBar如何使用。
BottomNavigationBar使用指南
Ø 新建工程, 添加组件Har包依赖
在应用模块中添加HAR,只需要将mylibrarybottom-debug.har复制到entry\libs目录下即可。
Ø 修改相关文件
1. 修改主页面的布局文件ability_main.xml:

2. 修改MainAbilitySlice代码:

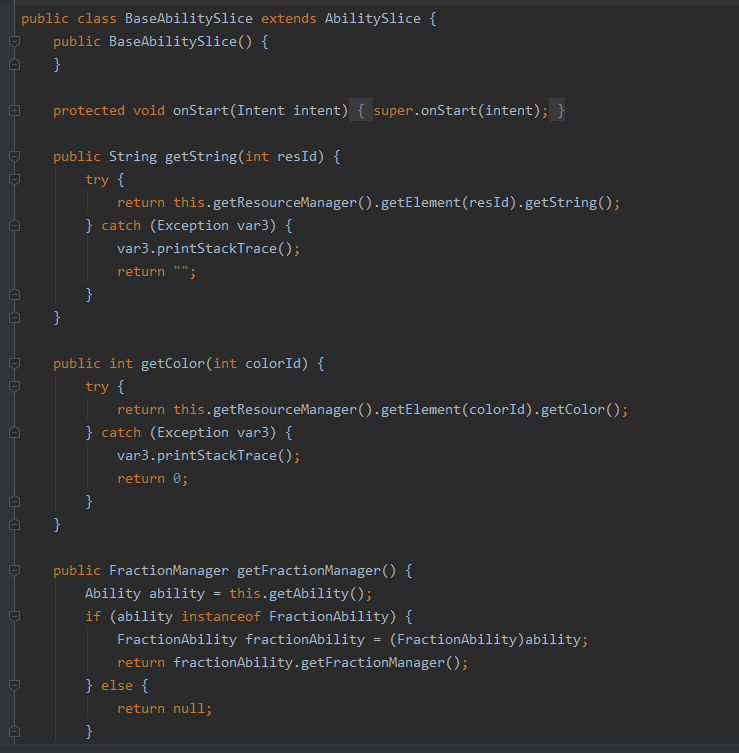
3. 修改BaseAbilitySlinct代码:

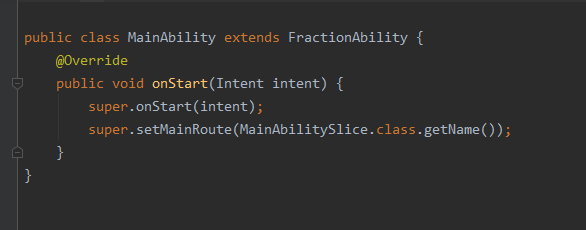
4. MainAbility的代码:

配置好1-4步,接下来就看如何给对应的底部导航栏添加Fraction
1. initBottom 方法如下:
private void initBottom() {

    tabBottomLayout = (BottomNavigationBar)  mAbilitySliceProvider.findComponentById(ResourceTable.Id_bottom_navigation_bar);

    bottomInfoList = new ArrayList<>();

    // 获取string.json文件中定义的字符串

    String home = mAbilitySliceProvider.getString(ResourceTable.String_home);

    String favorite = mAbilitySliceProvider.getString(ResourceTable.String_favorite);

    String category = mAbilitySliceProvider.getString(ResourceTable.String_category);

    String profile = mAbilitySliceProvider.getString(ResourceTable.String_mine);

    // 首页

    BottomBarInfo<Integer> homeInfo = new BottomBarInfo<>(home,

            ResourceTable.Media_category_norma1,

            ResourceTable.Media_category_norma2,

            defaultColor, tintColor);

    homeInfo.fraction = HomeFraction.class;

    // 收藏

    BottomBarInfo<Integer> favoriteInfo = new BottomBarInfo<>(favorite,

            ResourceTable.Media_category_norma1,

            ResourceTable.Media_category_norma2,

            defaultColor, tintColor);

    favoriteInfo.fraction = SecondFraction.class;

    // 分类

    BottomBarInfo<Integer> categoryInfo = new BottomBarInfo<>(category,

            ResourceTable.Media_category_norma1,

            ResourceTable.Media_category_norma2,

            defaultColor, tintColor);

    categoryInfo.fraction = ThirdFraction.class;

    // 我的

    BottomBarInfo<Integer> profileInfo = new BottomBarInfo<>(profile,

            ResourceTable.Media_category_norma1,

            ResourceTable.Media_category_norma2,

            defaultColor, tintColor);

    profileInfo.fraction = MineFraction.class;

    // 将每个条目的数据放入到集合

    bottomInfoList.add(homeInfo);

    bottomInfoList.add(favoriteInfo);

    bottomInfoList.add(categoryInfo);

    bottomInfoList.add(profileInfo);

    // 设置底部导航栏的透明度

    tabBottomLayout.setBarBottomAlpha(0.85f);

    // 初始化所有的条目

    tabBottomLayout.initInfo(bottomInfoList);

    initFractionBarComponent();

    tabBottomLayout.addBarSelectedChangeListener((index, prevInfo, nextInfo) ->

            // 显示fraction

            mFractionBarComponent.setCurrentItem(index));

    // 设置默认选中的条目,该方法一定要在最后调用

    tabBottomLayout.defaultSelected(homeInfo);
2. 创建fraction类,继承BaseFraction
1. 引入需要展示页面的布局文件
  @Override

public int getUIComponent() {

    return ResourceTable.Layout_layout_fraction_home;

}
2. 操作布局文件中的控件
@Override

public void initComponent(Component component) {

    text = (Text) component.findComponentById(ResourceTable.Id_text);

}
BottomNavigationBar开发指南
底部导航栏,在应用中真的非常常见,核心思想就是底部有几个选项,然后点击其中任意一个,切换至对应的页面。接下来主要介绍下核心实现步骤。
主要封装的原则是,动态的,通过外界传递,固定过的则封装起来。其中底部导航栏的图片、文字、文字的颜色是变的,其它的可以封装起来,外界只需要把每个条目的图片、文字以及文字的颜色传入进来即可,内部来实现底部导航栏。在封装的时候,需要面向接口编程,同时使用泛型。
定义接口IBarLayout
1、定义一个IBarLayout接口,第一个泛型就是底部导航栏中的每个条目,第二个泛型是每个条目的数据。在接口里面提供一些方法,可以根据数据查找条目,可以添加监听,可以设置默认选中的条目,可以初始化所有的条目,当某个条目被选中后需要通过回调方法。
代码如下:
public interface IBarLayout<Bar extends ComponentContainer, D> {

    /**

     * 根据数据查找条目

     *

     * @param info 数据

     * @return 条目

     */

    Bar findBar(D info);

    /**

     * 添加监听

     *

     * @param listener

     */

    void addBarSelectedChangeListener(OnBarSelectedListener<D> listener);

    /**

     * 默认选中的条目

     *

     * @param defaultInfo

     */

    void defaultSelected(D defaultInfo);

    /**

     * 初始化所有的条目

     *

     * @param infoList

     */

    void initInfo(List<D> infoList);

    interface OnBarSelectedListener<D> {

        /**

         * 当某个条目被选中后的回调,该方法会被调用多次

         *

         * @param index 点击后选中条目的下标

         * @param preInfo 点击前选中的条目

         * @param nextInfo 点击后选中的条目

         */

        void onBarSelectedChange(int index, D preInfo, D nextInfo);

    }

}
2、再定义一个单个条目的接口IBar,泛型就是每个条目的数据,接口里面定义方法,可以设置条目的数据,可以动态修改某个条目的大小
代码如下:
/**

 * 单个条目的接口

 */

public interface IBar<D> extends IBarLayout.OnBarSelectedListener<D> {

    /**

     * 设置条目的数据

     *

     * @param data

     */

    void setBarInfo(D data);

    /**

     * 动态修改某个条目的大小

     *

     * @param height

     */

    void resetHeight(int height);

}
每个条目所对应的实体类BottomBarInfo
每个条目都有自己的图片、文字、文字的颜色,我们把这些属性定义在一个实体类中。由于颜色可以是整型,也可以是字符串,这里定义泛型,泛型就是文字的颜色。具体是哪种类型的颜色,由调用者来决定。
注意下BarType这个枚举,我们的底部导航栏支持两种类型,IMAGE代表下图,某个条目只显示图片,也可以让某个条目凸出来,只需要将条目的高度变高即可。
public class BottomBarInfo<Color> extends TopBottomBarInfo {

    public enum BarType {

        /**

         * 显示图片和文案

         */

        IMAGE_TEXT,

        /**

         * 只显示图片

         */

        IMAGE

    }

    /**

     * 条目的名称

     */

    public String name;

    public BarType tabType;

    public Class<? extends Fraction> fraction;

    public BottomBarInfo(String name, int defaultImage, int selectedImage) {

        this.name = name;

        this.defaultImage = defaultImage;

        this.selectedImage = selectedImage;

        this.tabType = BarType.IMAGE;

    }

    public BottomBarInfo(String name, int defaultImage, int selectedImage, Color defaultColor, Color tintColor) {

        this.name = name;

        this.defaultImage = defaultImage;

        this.selectedImage = selectedImage;

        this.defaultColor = defaultColor;

        this.tintColor = tintColor;

        this.tabType = BarType.IMAGE_TEXT;

    }

}
单个条目的封装
定义BottomBar,继承相对布局,实现之前定义的IBar接口,泛型就是每个条目所对应的实体类,由于目前并不知道泛型的具体类型,所以泛型直接使用问号来代替。BottomBar就是单个条目。
我们需要将component对象放入到BottomBar中,所以第二个参数传this,第三个参数为true。
public class BottomBar extends DependentLayout implements IBar<BottomBarInfo<?>> {

    /**

     * 当前条目所对应的数据

     */

    private BottomBarInfo<Color> tabInfo;

    private Text mTabName;

    private Image mTabImage;

    public BottomBar(Context context) {

        this(context, null);

    }

    public BottomBar(Context context, AttrSet attrSet) {

        this(context, attrSet, "");

    }

    public BottomBar(Context context, AttrSet attrSet, String styleName) {

        super(context, attrSet, styleName);

        Component component = LayoutScatter.getInstance(context).parse(ResourceTable.Layout_layout_bar_bottom, this, true);

        mTabImage = (Image) component.findComponentById(ResourceTable.Id_image);

        mTabName = (Text) component.findComponentById(ResourceTable.Id_name);

        mTabImage.setScaleMode(Image.ScaleMode.INSIDE);

    }

    /**

     * 设置条目的数据

     *

     * @param data

     */

    @Override

    public void setBarInfo(BottomBarInfo<?> data) {

        tabInfo = (BottomBarInfo<Color>) data;

        inflateInfo(false, true);

    }

    /**

     * 初始化条目

     *

     * @param selected true 选中

     * @param init true 初始化

     */

    private void inflateInfo(boolean selected, boolean init) {

        if (tabInfo.tabType == BottomBarInfo.BarType.IMAGE_TEXT) {

            if (init) {

                // 图片和名称都可见

                mTabName.setVisibility(VISIBLE);

                mTabImage.setVisibility(VISIBLE);

                if (!TextUtils.isEmpty(tabInfo.name)) {

                    // 设置条目的名称

                    mTabName.setText(tabInfo.name);

                }

            }

            if (selected) {

                // 显示选中的图片

                mTabImage.setPixelMap(tabInfo.selectedImage);

                mTabName.setTextColor(new Color(parseColor(tabInfo.tintColor)));

            } else {

                // 显示未选中的图片

                mTabImage.setPixelMap(tabInfo.defaultImage);

                mTabName.setTextColor(new Color(parseColor(tabInfo.defaultColor)));

            }

        } else if (tabInfo.tabType == BottomBarInfo.BarType.IMAGE) {

            if (init) {

                // 仅仅显示图片,将名称隐藏

                mTabName.setVisibility(HIDE);

                mTabImage.setVisibility(VISIBLE);

            }

            if (selected) {

                // 显示选中的图片

                mTabImage.setPixelMap(tabInfo.selectedImage);

            } else {

                // 显示未选中的图片

                mTabImage.setPixelMap(tabInfo.defaultImage);

            }

        }

    }

    private int parseColor(Object color) {

        if (color instanceof String) {

            return Color.getIntColor((String) color);

        } else {

            return (int) color;

        }

    }

    /**

     * 动态修改某个tab的高度

     *

     * @param height tab的高度

     */

    @Override

    public void resetHeight(int height) {

        ComponentContainer.LayoutConfig config = getLayoutConfig();

        config.height = height;

        setLayoutConfig(config);

        mTabName.setVisibility(HIDE);

    }

    /**

     * 当某个条目被选中后的回调,该方法会被调用多次

     *

     * @param index 点击后选中条目的下标

     * @param preInfo 点击前选中的条目

     * @param nextInfo 点击后选中的条目

     */

    @Override

    public void onBarSelectedChange(int index, BottomBarInfo<?> preInfo, BottomBarInfo<?> nextInfo) {

        if (nextInfo.tabType == BottomBarInfo.BarType.IMAGE) {

            // 当前条目的类型是IMAGE类型,则不做任何处理

            return;

        }

        if (preInfo == nextInfo) {

            // 假设当前选中的是条目1,同时点击的也是条目1,那就不需要做任何操作了

            return;

        }

        if (preInfo != tabInfo && nextInfo != tabInfo) {

            /**

             * 假设有三个条目,条目1、条目2、条目3,preInfo是条目1,nextInfo是条目3,tabInfo是条目2,

             * 点击前选中的是条目1,点击后选中的条目3,此时条目2就不需要做任何操作了

             */

            return;

        }

        if (preInfo == tabInfo) {

            // 将点击前的条目反选

            inflateInfo(false, false);

        } else {

            // 选中被点击的条目

            inflateInfo(true, false);

        }

    }

    public BottomBarInfo<Color> getTabInfo() {

        return tabInfo;

    }

    public Text getTabName() {

        return mTabName;

    }

    public Image getImage() {

        return mTabImage;

    }

}
底部导航栏的封装
定义BottomNavigationBar,继承栈布局。第一个泛型就是底部导航栏的条目,第二个泛型就是每个条目的数据。
public class BottomNavigationBar extends StackLayout implements IBarLayout<BottomBar, BottomBarInfo<?>> {

    private static final int ID_TAB_BOTTOM = 0XFF;

    /**

     * 事件监听的集合

     */

    private List<OnBarSelectedListener<BottomBarInfo<?>>> tabSelectedListeners = new ArrayList<>();

    /**

     * 当前选中的条目

     */

    private BottomBarInfo<?> selectedInfo;

    /**

     * 底部导航栏的透明度

     */

    private float barBottomAlpha = 1;

    /**

     * 底部导航栏的高度

     */

    private float barBottomHeight = 50;

    /**

     * 底部导航栏线条的高度

     */

    private float barBottomLineHeight = 0.5f;

    /**

     * 底部导航栏线条的颜色

     */

    private RgbColor barBottomLineColor = new RgbColor(223, 224, 225);

    /**

     * 所有的tab

     */

    private List<BottomBarInfo<?>> infoList;

    public BottomNavigationBar(Context context) {

        this(context, null);

    }

    public BottomNavigationBar(Context context, AttrSet attrSet) {

        this(context, attrSet, "");

    }

    public BottomNavigationBar(Context context, AttrSet attrSet, String styleName) {

        super(context, attrSet, styleName);

    }

    /**

     * 根据数据查找条目

     *

     * @param info 条目的数据

     * @return 条目

     */

    @Override

    public BottomBar findBar(BottomBarInfo<?> info) {

        ComponentContainer componentContainer = (ComponentContainer) findComponentById(ID_TAB_BOTTOM);

        for (int i = 0; i < componentContainer.getChildCount(); i++) {

            Component component = componentContainer.getComponentAt(i);

            if (component instanceof BottomBar) {

                BottomBar bottomBar = (BottomBar) component;

                if (bottomBar.getTabInfo() == info) {

                    return bottomBar;

                }

            }

        }

        return null;

    }

    /**

     * 添加监听

     *

     * @param listener 监听

     */

    @Override

    public void addBarSelectedChangeListener(OnBarSelectedListener<BottomBarInfo<?>> listener) {

        tabSelectedListeners.add(listener);

    }

    /**

     * 默认选中的条目

     *

     * @param defaultInfo 默认选中条目的信息

     */

    @Override

    public void defaultSelected(BottomBarInfo<?> defaultInfo) {

        onSelected(defaultInfo);

    }

    /**

     * 初始化所有的条目

     *

     * @param infoList 所有条目的信息

     */

    @Override

    public void initInfo(List<BottomBarInfo<?>> infoList) {

        if (infoList == null || infoList.isEmpty()) {

            return;

        }

        this.infoList = infoList;

        // 移除之前已经添加的组件,防止重复添加

        removeComponent();

        selectedInfo = null;

        // 添加背景

        addBackground();

        // 添加条目

        addBottomBar();

        // 添加线条

        addBottomLine();

    }

    /**

     * 添加线条

     */

    private void addBottomLine() {

        Component line = new Component(getContext());

        // 目前不支持直接设置背景颜色,只能通过Element来设置背景

        ShapeElement element = new ShapeElement();

        element.setShape(ShapeElement.RECTANGLE);

        element.setRgbColor(barBottomLineColor);

        line.setBackground(element);

        LayoutConfig config = new LayoutConfig(ComponentContainer.LayoutConfig.MATCH_PARENT,

                DisplayUtils.vp2px(getContext(), barBottomLineHeight));

        // 位于底部

        config.alignment = LayoutAlignment.BOTTOM;

        config.setMarginBottom(DisplayUtils.vp2px(getContext(), barBottomHeight - barBottomLineHeight));

        line.setAlpha(barBottomAlpha);

        addComponent(line, config);

    }

    /**

     * 添加条目

     */

    private void addBottomBar() {

        // 每个条目的宽度就是屏幕宽度除以条目的总个数

        int width = DisplayUtils.getDisplayWidthInPx(getContext()) / infoList.size();

        // 高度是固定的值,这里需要做屏幕适配,将vp转换成像素

        int height = DisplayUtils.vp2px(getContext(), barBottomHeight);

        StackLayout stackLayout = new StackLayout(getContext());

        stackLayout.setId(ID_TAB_BOTTOM);

        for (int i = 0; i < infoList.size(); i++) {

            BottomBarInfo<?> info = infoList.get(i);

            // 创建布局配置对象

            LayoutConfig config = new LayoutConfig(width, height);

            // 设置底部对齐

            config.alignment = LayoutAlignment.BOTTOM;

            // 设置左边距

            config.setMarginLeft(i * width);

            BottomBar bottomBar = new BottomBar(getContext());

            tabSelectedListeners.add(bottomBar);

            // 初始化每个条目

            bottomBar.setBarInfo(info);

            // 添加条目

            stackLayout.addComponent(bottomBar, config);

            // 设置点击事件

            bottomBar.setClickedListener(component -> onSelected(info));

        }

        LayoutConfig layoutConfig = new LayoutConfig(ComponentContainer.LayoutConfig.MATCH_PARENT,

                ComponentContainer.LayoutConfig.MATCH_CONTENT);

        layoutConfig.alignment = LayoutAlignment.BOTTOM;

        addComponent(stackLayout, layoutConfig);

    }

    /**

     * 点击条目后给外界回调

     *

     * @param nextInfo 点击后需要选中的条目

     */

    private void onSelected(BottomBarInfo<?> nextInfo) {

        for (OnBarSelectedListener<BottomBarInfo<?>> listener : tabSelectedListeners) {

            listener.onBarSelectedChange(infoList.indexOf(nextInfo), selectedInfo, nextInfo);

        }

        if (nextInfo.tabType == BottomBarInfo.BarType.IMAGE_TEXT) {

            selectedInfo = nextInfo;

        }

    }

    /**

     * 添加背景

     */

    private void addBackground() {

        Component component = new Component(getContext());

        // 目前还不能直接设置背景颜色,只能通过Element来设置背景

        ShapeElement element = new ShapeElement();

        element.setShape(ShapeElement.RECTANGLE);

        RgbColor rgbColor = new RgbColor(255, 255, 255);

        element.setRgbColor(rgbColor);

        component.setBackground(element);

        component.setAlpha(barBottomAlpha);

        LayoutConfig config = new LayoutConfig(ComponentContainer.LayoutConfig.MATCH_PARENT,

                DisplayUtils.vp2px(getContext(), barBottomHeight));

        config.alignment = LayoutAlignment.BOTTOM;

        addComponent(component, config);

    }

    /**

     * 移除之前已经添加的组件,防止重复添加

     */

    private void removeComponent() {

        for (int i = getChildCount() - 1; i > 0; i--) {

            removeComponentAt(i);

        }

        tabSelectedListeners.removeIf(listener ->

                listener instanceof BottomBar);

    }

    /**

     * 设置底部导航栏的透明度

     *

     * @param barBottomAlpha 底部导航栏的透明度

     */

    public void setBarBottomAlpha(float barBottomAlpha) {

        this.barBottomAlpha = barBottomAlpha;

    }

    /**

     * 设置底部导航栏的高度

     *

     * @param barBottomHeight 底部导航栏的高度

     */

    public void setBarBottomHeight(float barBottomHeight) {

        this.barBottomHeight = barBottomHeight;

    }

    /**

     * 设置底部导航栏线条的高度

     *

     * @param barBottomLineHeight 底部导航栏线条的高度

     */

    public void setBarBottomLineHeight(float barBottomLineHeight) {

        this.barBottomLineHeight = barBottomLineHeight;

    }

    /**

     * 设置底部导航栏线条的颜色

     *

     * @param barBottomLineColor 底部导航栏线条的颜色

     */

    public void setBarBottomLineColor(RgbColor barBottomLineColor) {

        this.barBottomLineColor = barBottomLineColor;

    }

}
initInfo(List<BottomBarInfo<?>> infoList)该方法由外界调用,外界将所有的条目信息传递过来,我们将条目添加到底部导航栏。首先移除之前已经添加的组件,防止重复添加,然后添加背景,添加条目,添加线条。
更多原创,请关注:软通动力HarmonyOS学院https://harmonyos.51cto.com/column/30
作者:软通田可辉
想了解更多内容,请访问51CTO和华为合作共建的鸿蒙社区:https://harmonyos.51cto.com/
HarmonyOS三方件开发指南(17)-BottomNavigationBar的更多相关文章
- HarmonyOS三方件开发指南(15)-LoadingView功能介绍
目录: 1. LoadingView组件功能介绍2. Lottie使用方法3. Lottie开发实现4.<HarmonyOS三方件开发指南>系列文章合集 1. LoadingView组件功 ...
- HarmonyOS三方件开发指南(12)——cropper图片裁剪
鸿蒙入门指南,小白速来!0基础学习路线分享,高效学习方法,重点答疑解惑--->[课程入口] 目录:1. cropper组件功能介绍2. cropper使用方法3. cropper组件开发实现4. ...
- HarmonyOS三方件开发指南(13)-SwipeLayout侧滑删除
鸿蒙入门指南,小白速来!0基础学习路线分享,高效学习方法,重点答疑解惑--->[课程入口] 目录:1. SwipeLayout组件功能介绍2. SwipeLayout使用方法3. SwipeLa ...
- HarmonyOS三方件开发指南(14)-Glide组件功能介绍
<HarmonyOS三方件开发指南>系列文章合集 引言 在实际应用开发中,会用到大量图片处理,如:网络图片.本地图片.应用资源.二进制流.Uri对象等,虽然官方提供了PixelMap进行图 ...
- HarmonyOS三方件开发指南(16)-VideoCache 视频缓存
目录: 1.引言 2.功能介绍 3.VideoCache使用指南 4.VideoCache开发指南 5.<HarmonyOS三方件开发指南>系列文章合集 引言 对于视频播放器这个app大家 ...
- HarmonyOS三方件开发指南(19)-BGABadgeView徽章组件
目录: 1.引言 2.功能介绍 3.BGABadgeView 使用指南 4.BGABadgeView 开发指南 5.<HarmonyOS三方件开发指南>系列文章合集 引言 现在很多的APP ...
- HarmonyOS三方件开发指南(4)——Logger组件
目录: 1. Logger功能介绍 2. Logger使用方法 3. Logger开发实现 4. 源码上传地址 1. Logger功能介绍1.1. ...
- HarmonyOS三方件开发指南(5)——Photoview组件
PhotoView使用说明 1. PhotoView功能介绍1.1 组件介绍: PhotoView是一个继承自Image的组件,不同之处在于:它可以进行图击放大功能,手势缩放功能(暂无 ...
- HarmonyOS三方件开发指南(7)——compress组件
目录:1. 组件compress功能介绍2. 组件compress使用方法3. 组件compress开发实现 1. 组件compress功能介绍1.1. 组件介绍: compress是 ...
随机推荐
- 伦尼斯酒庄(Chateau Renice)再次赞助亚洲50大餐厅赛事
连续几年来,伦尼斯酒庄(Chateau Renice)一直是亚洲50大最佳餐厅评选赛(Asia's 50 Best Restaurant Awards)的赞助商.2020年伦尼斯酒庄酒庄(Chatea ...
- 27_MySQL数字函数(重点)
/* SALES部门中工龄超过20年的,底薪增加10% SALES部门中工龄不满20年的,底薪增加5% ACCOUNTING部门,底薪增加300元 RESEARCH部门里低于部门平均底薪的,底薪增加2 ...
- web项目中各工具的作用
一.HTML:用于搭建基础网页,展示网页的内容 Hyper Text Markup Language 超文本标记语言 ,是最基础的网页开发语言. * 超文本: * 超文本是用超链接的方法,将各种不同空 ...
- js中函数调用时,对参数个数和类型没有要求
因为js是一种弱类型的编程语言,对数据类型的要求没有其他编程语言的要求严格,所以在定义函数的时候不需要像java一样对其传入参数的类型进行定,也对传入参数的个数没有要求. js函数的参数与大多数其他语 ...
- ubuntu系统共享桌面的使用和配置
内容转载自我的博客 目录 1. ubuntu共享桌面 2. 局域网登录远程桌面 2.1 ubuntu使用remmina登录远程桌面 2.2 在windows登录远程桌面 2.3 Android使用RD ...
- 女朋友看了会生气的回答 URI和URL有什么区别?
URL是什么 URL 代表着是统一资源定位符(Uniform Resource Locator).作用是为了告诉使用者 某个资源在 Web 上的地址.这个资源可以是一个 HTML 页面,一个 CSS ...
- Ext.Net一般处理程序上传文件
引言 最近公司项目全部转向前端化,故所有aspx页面业务逻辑尽可能的转到用户控件前台页面完成.以方便每次发布项目时只是替换前端页面不会影响客户体验. 既然转到前台逻辑,那么必须走后台的业务也就单独封装 ...
- 如何快速开发Winform应用系统
在实际的业务中,往往还有很多需要使用Winform来开发应用系统的,如一些HIS.MIS.MES等系统,由于Winform开发出来的系统界面友好,响应快速,开发效率高等各方面原因,还有一些原因是独立的 ...
- 漏洞复现-fastjson1.2.24-RCE
0x00 实验环境 攻击机:Win 10.Win Server2012 R2(公网环境,恶意java文件所在服务器) 靶机也可作为攻击机:Ubuntu18 (公网环境,docker ...
- SHELL编程概念&变量剖析
一.shell软件概念和应用场景 1) 学习Linux技术,不是为了学习系统安装.命令操作.用户权限.配置IP.网络管理,学习Linux技术重点:基于Linux系统部署和维护各种应用软件.程序(Apa ...
