如果你的application.properties中还存在明文密码----加密Spring Boot中的application.properties
1 概述
什么?都2020年了还在Spring Boot的配置文件中写明文密码?
虽然是小项目,明文也没人看.
明文简单快捷方便啊!!!
你看直接用户名root密码123456多么简单!!!
...
不废话了,这篇文章主要讲了如何使用jasypt-spring-boot这个开源组件来进行配置文件的加密,包括简单加密以及非对称加密,同时也介绍了使用jar/war部署时如何输入加密口令.
2 简单加密
jasypt简单加密就是直接把加密口令写死在文件中.(好吧这样就差不多大概跟没加密一样... )
2.1 依赖
目前最新版本为3.0.2,具体请查看官方github(戳这里).
<dependency><groupId>com.github.ulisesbocchio</groupId><artifactId>jasypt-spring-boot-starter</artifactId><version>3.0.2</version></dependency>
2.2 加密口令
在application.properties中加上:
jasypt.encryptor.password=xxx
xxx为对称加密的口令.
默认使用PBE算法进行加密,PBE其实并没有包含真正的加密与解密算法,而是将已有的消息摘要算法(如MD5,SHA等)与对称加密算法(如AES,DES,RC2等)进行了组合,默认组合的是HCMA消息认证算法,SHA512消息摘要算法以及AES256对称加密算法.PBE使用口令与随机生成的盐去生成对应的对称加密密钥,再用密钥去进行对称加密.
2.3 输出密文
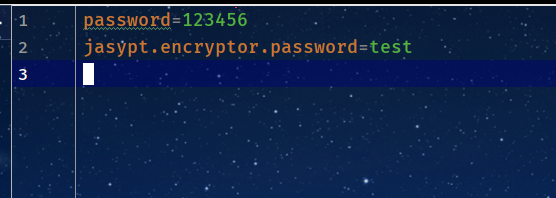
这里在配置文件中加一个测试字段password与密钥test进行测试:
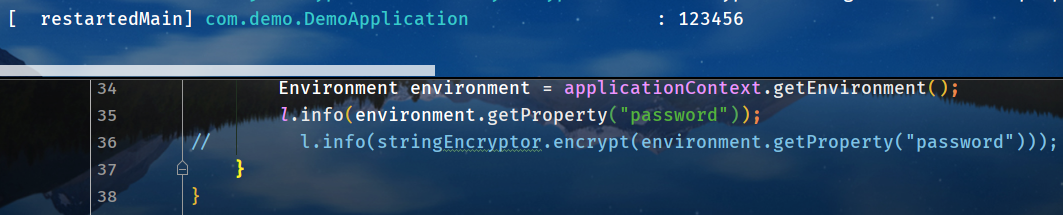
这里为了方便就在run里面测试:
@SpringBootApplication@EnableEncryptablePropertiespublic class DemoApplication implements CommandLineRunner {private static final Logger l = LoggerFactory.getLogger(DemoApplication.class);@Autowiredprivate StringEncryptor stringEncryptor;@Autowiredprivate ApplicationContext applicationContext;public static void main(String[] args) {SpringApplication.run(DemoApplication.class, args);}@Overridepublic void run(String... args) throws Exception {Environment environment = applicationContext.getEnvironment();l.info(stringEncryptor.encrypt(environment.getProperty("password")));}}
注意使用@Autowired进行StringEncryptor的自动装配时,官方文档说加上
@Configuration@EnableEncryptableProperties

由于
@SpringBootApplication
包含了
@Configuration
因此这里只需要后一个.
运行后获取密文输出:

2.4 替换配置文件
把上面的密文替换到原配置文件,加上前缀ENC(与后缀):

这样就加密成功了,直接获取属性可以看到明文:
3 自定义加密
当然,上面的简单加密不能满足实际使用需求,因此,这里需要进行自定义加密.
3.1 自定义加密前后缀
需要使用一个前后缀区分需要加密与不需加密的字段,默认前缀为
ENC(
后缀为:
)
因此加密时需要加上ENC(与).
自定义前后缀指定两个属性就可以了:

密码字段需要对应修改.
3.2 口令参数化
其实就是在启动的时候加上命令行参数或者应用环境变量,或者通过系统环境变量读取口令,详细使用方式请看第4点部署.
命令行参数:
java -jar xxx.jar --jasypt.encryptor.password=xxx
应用环境变量:
java -Djasypt.encryptor.password=xxx -jar xxx.jar
系统环境变量:
jasypt.encryptor.password=${TEST}
前提是已经设置好对应系统变量.
3.3 自定义加密类
可以实现StringEncryptor接口,重写里面的encrypt与decrypt方法,再定义一个加密配置类,指定加密类的名字:
@Configuration@EnableEncryptablePropertiespublic class MyEncryptorConfiguration {@Bean("MyEncryptor")public StringEncryptor getStringEncryptor(){return new StringEncryptor() {@Overridepublic String encrypt(String s) {return "111";}@Overridepublic String decrypt(String s) {return "222";}};}}
这里是一个很简单的例子,加密直接返回111,解密直接返回222,具体加解密算法直接替换函数体即可.
注意需要在配置文件中写上Bean的名字:
jasypt.encryptor.bean=codeSheepEncryptorBean
使用构造函数注入(Autowired也可以):
private final StringEncryptor stringEncryptor;public DemoApplication(MyEncryptorConfiguration encryptorConfiguration){stringEncryptor = encryptorConfiguration.getStringEncryptor();}
测试:
@Overridepublic void run(String... args) throws Exception {Environment environment = applicationContext.getEnvironment();l.info(stringEncryptor.encrypt(environment.getProperty("password")));l.info(stringEncryptor.decrypt(environment.getProperty("password")));}

4 部署
4.1 jar部署
4.1.1 命令行参数方式
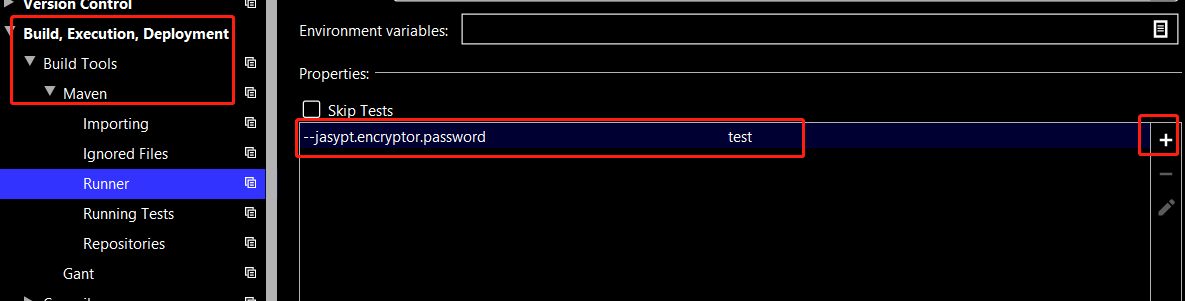
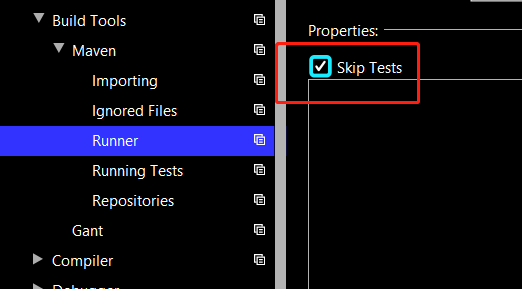
这种方式的话先把配置文件中的jasypt.encryptor.password去掉,然后修改在Spring Boot的运行配置,进行本地测试:

打包时,如果测试的话需要设置Maven的参数,不测试的话直接勾选Skip Tests:
打包后(右侧Maven->package)加上参数运行就可以了:

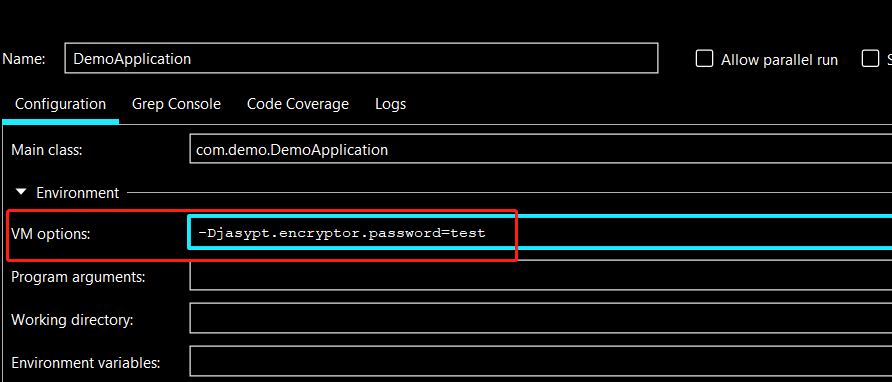
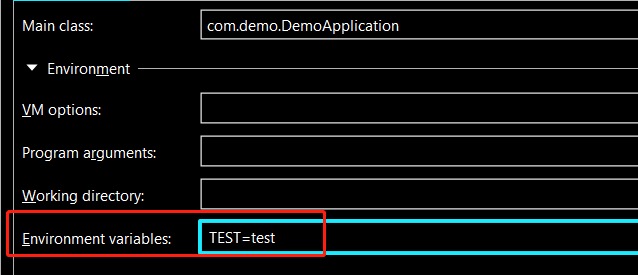
4.1.2 应用环境变量方式
其实和第一种方式差不多,也是把jasypt.encryptor.password去掉,在VM options中设置参数,Spring Boot运行配置如下:
Maven设置(当然也可以跳过测试):

不过遗憾的是笔者测试失败了:

没理由啊,那为什么Spring Boot那里就这样设置就可以....
(有大佬知道为什么会失败的话可以留言,感激不尽.)
这里就直接跳过测试了.
然后就可以愉快地运行了(笔者的win下需要加两个单引号):

4.1.3 系统环境变量方式
设置环境变量这个应该不用怎么说了,直接去设置就行,然后修改一下jasypt.encryptor.password,两个花括号中间是对应的环境变量名:

Spring Boot运行配置:
Maven:
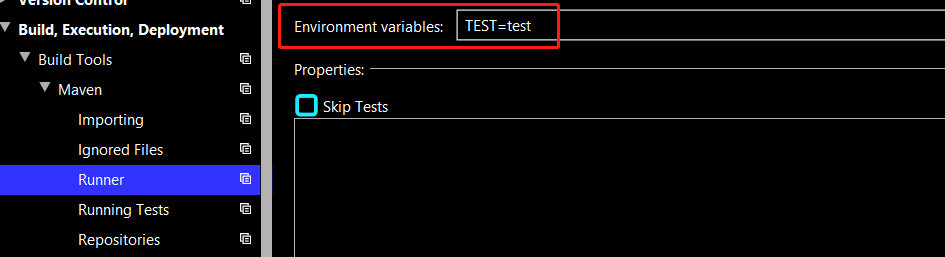
这次Maven测试就没问题了.
真是奇了怪了.
运行(还是这个舒服,直接-jar):

4.2 war部署
4.2.1 jar-war转换
原来的是jar打包,换成war时,需要修改pom.xml中的<packaging>为war,同时加上tomcat依赖:
<packaging>war</packaging>...<dependency><groupId>org.springframework.boot</groupId><artifactId>spring-boot-starter-tomcat</artifactId><scope>provided</scope></dependency>
再添加一个ServletInitializer:
public class ServletInitializer extends SpringBootServletInitializer {@Overrideprotected SpringApplicationBuilder configure(SpringApplicationBuilder builder){return builder.sources(DemoApplication.class);}}
其中DemoApplication为main函数所在的类.
war转为jar时进行对应的相反操作就可以了.
4.2.2 命令行参数方式
Maven设置就不说了,像上面一样,打包之后...
笔者找不到设置Tomcat命令行参数的方式,所以,就跳过这个了...
(欢迎大佬找到的留言补充,感激不尽!!!)
笔者太菜了,害.
4.2.3 应用环境变量方式
win下可以直接修改catalina.bat或者进入tomcat9w.exe(tomcat9,tomcat8是tomcat8w.exe)进行图形化修改,这里选择修改catalina.bat的方式,找到setlocal,后面加上
set "JAVA_OPTS=-Djasypt.encryptor.password=test"

然后把war放到webapps下就可以了.
4.2.4 环境变量方式
这种方式最简单,设置好了环境变量,修改配置文件:

直接war打包部署就行.
5 非对称加密
Spring Boot2.2.1之后支持非对称加密,密钥对的格式可以为PEM/DER.
5.1 加密
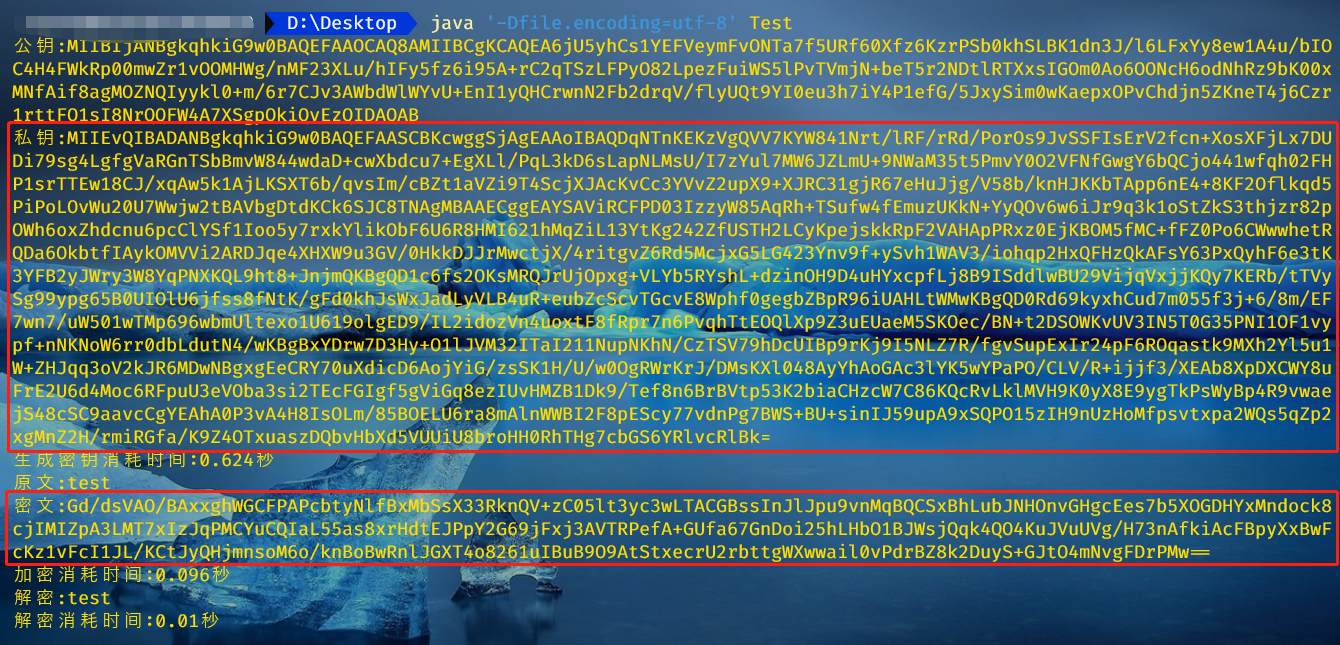
这里使用的一位大佬的RSA自定义位数加密工具类(戳这里),无需额外依赖,仅自带JDK实现(JDK8+).
import java.util.Base64;import javax.crypto.Cipher;import java.security.KeyFactory;import java.security.KeyPair;import java.security.KeyPairGenerator;import java.security.NoSuchAlgorithmException;import java.security.SecureRandom;import java.security.interfaces.RSAPrivateKey;import java.security.interfaces.RSAPublicKey;import java.security.spec.PKCS8EncodedKeySpec;import java.security.spec.X509EncodedKeySpec;import java.util.HashMap;import java.util.Map;/*** Java RSA 加密工具类* 参考: https://blog.csdn.net/qy20115549/article/details/83105736*/public class Test {/*** 密钥长度 于原文长度对应 以及越长速度越慢*/private final static int KEY_SIZE = 2048;/*** 用于封装随机产生的公钥与私钥*/private static Map<Integer, String> keyMap = new HashMap<Integer, String>();/*** 随机生成密钥对*/public static void genKeyPair() throws NoSuchAlgorithmException {// KeyPairGenerator类用于生成公钥和私钥对,基于RSA算法生成对象KeyPairGenerator keyPairGen = KeyPairGenerator.getInstance("RSA");// 初始化密钥对生成器keyPairGen.initialize(KEY_SIZE, new SecureRandom());// 生成一个密钥对,保存在keyPair中KeyPair keyPair = keyPairGen.generateKeyPair();// 得到私钥RSAPrivateKey privateKey = (RSAPrivateKey) keyPair.getPrivate();// 得到公钥RSAPublicKey publicKey = (RSAPublicKey) keyPair.getPublic();String publicKeyString = Base64.getEncoder().encodeToString(publicKey.getEncoded());// 得到私钥字符串String privateKeyString = Base64.getEncoder().encodeToString(privateKey.getEncoded());// 将公钥和私钥保存到Map//0表示公钥keyMap.put(0, publicKeyString);//1表示私钥keyMap.put(1, privateKeyString);}/*** RSA公钥加密** @param str 加密字符串* @param publicKey 公钥* @return 密文* @throws Exception 加密过程中的异常信息*/public static String encrypt(String str, String publicKey) throws Exception {//base64编码的公钥byte[] decoded = Base64.getDecoder().decode(publicKey);RSAPublicKey pubKey = (RSAPublicKey) KeyFactory.getInstance("RSA").generatePublic(new X509EncodedKeySpec(decoded));//RSA加密Cipher cipher = Cipher.getInstance("RSA");cipher.init(Cipher.ENCRYPT_MODE, pubKey);String outStr = Base64.getEncoder().encodeToString(cipher.doFinal(str.getBytes("UTF-8")));return outStr;}/*** RSA私钥解密** @param str 加密字符串* @param privateKey 私钥* @return 明文* @throws Exception 解密过程中的异常信息*/public static String decrypt(String str, String privateKey) throws Exception {//64位解码加密后的字符串byte[] inputByte = Base64.getDecoder().decode(str);//base64编码的私钥byte[] decoded = Base64.getDecoder().decode(privateKey);RSAPrivateKey priKey = (RSAPrivateKey) KeyFactory.getInstance("RSA").generatePrivate(new PKCS8EncodedKeySpec(decoded));//RSA解密Cipher cipher = Cipher.getInstance("RSA");cipher.init(Cipher.DECRYPT_MODE, priKey);String outStr = new String(cipher.doFinal(inputByte));return outStr;}public static void main(String[] args) throws Exception {long temp = System.currentTimeMillis();//生成公钥和私钥genKeyPair();//加密字符串System.out.println("公钥:" + keyMap.get(0));System.out.println("私钥:" + keyMap.get(1));System.out.println("生成密钥消耗时间:" + (System.currentTimeMillis() - temp) / 1000.0 + "秒");// String message = "RSA测试ABCD~!@#$";String message = "test";System.out.println("原文:" + message);temp = System.currentTimeMillis();String messageEn = encrypt(message, keyMap.get(0));System.out.println("密文:" + messageEn);System.out.println("加密消耗时间:" + (System.currentTimeMillis() - temp) / 1000.0 + "秒");temp = System.currentTimeMillis();String messageDe = decrypt(messageEn, keyMap.get(1));System.out.println("解密:" + messageDe);System.out.println("解密消耗时间:" + (System.currentTimeMillis() - temp) / 1000.0 + "秒");}}
5.2 修改配置文件
把明文输入,得到密文与私钥后,替换原来的配置文件:
密文复制到对应加密字段,加上前后缀,同时私钥格式选择der,把私钥复制过去:

运行测试没问题就可以了.
如果你的application.properties中还存在明文密码----加密Spring Boot中的application.properties的更多相关文章
- 是时候搞清楚 Spring Boot 的配置文件 application.properties 了!
在 Spring Boot 中,配置文件有两种不同的格式,一个是 properties ,另一个是 yaml . 虽然 properties 文件比较常见,但是相对于 properties 而言,ya ...
- 在Spring Boot中使用数据缓存
春节就要到了,在回家之前要赶快把今年欠下的技术债还清.so,今天继续.Spring Boot前面已经预热了n篇博客了,今天我们来继续看如何在Spring Boot中解决数据缓存问题.本篇博客是以初识在 ...
- 在Spring Boot中使用数据库事务
我们在前面已经分别介绍了如何在Spring Boot中使用JPA(初识在Spring Boot中使用JPA)以及如何在Spring Boot中输出REST资源(在Spring Boot中输出REST资 ...
- 在Spring Boot中加载初始化数据
文章目录 依赖条件 data.sql文件 schema.sql 文件 @sql注解 @SqlConfig 注解 在Spring Boot中加载初始化数据 在Spring Boot中,Spring Bo ...
- Spring Boot 中配置文件application.properties使用
一.配置文档配置项的调用(application.properties可放在resources,或者resources下的config文件夹里) package com.my.study.contro ...
- Spring Boot加载application.properties配置文件顺序规则
SpringApplication会从以下路径加载所有的application.properties文件: 1.file:./config/(当前目录下的config文件夹) 2.file:./(当前 ...
- Spring Boot中的Properties
文章目录 简介 使用注解注册一个Properties文件 使用属性文件 Spring Boot中的属性文件 @ConfigurationProperties yaml文件 Properties环境变量 ...
- Spring Boot 的配置文件application.properties
Spring Boot 中的application.properties 是一个全局的配置文件,放在src/main/resources 目录下或者类路径的/config下. 作为全局配置文件的app ...
- 第二篇:彻底搞清楚 Spring Boot 的配置文件 application.properties
前言 在Spring Boot中,配置文件有两种不同的格式,一个是properties,另一个是yaml. 虽然properties文件比较常见,但是相对于properties而言,yaml更加简洁明 ...
随机推荐
- es命令测试
1.新建索引并赋值 :put/索引名/文档名/id //文档名后面会逐渐取消 相当表 PUT /test1/type1/1{ "nmae":"hb", &quo ...
- Python爬虫系统化学习(3)
一般来说当我们爬取网页的整个源代码后,是需要对网页进行解析的. 正常的解析方法有三种 ①:正则匹配解析 ②:BeatuifulSoup解析 ③:lxml解析 正则匹配解析: 在之前的学习中,我们学习过 ...
- 《进击吧!Blazor!》第一章 5.组件开发
<进击吧!Blazor!>是本人与张善友老师合作的Blazor零基础入门系列视频,此系列能让一个从未接触过Blazor的程序员掌握开发Blazor应用的能力. 视频地址:https://s ...
- Same Origin Policy 浏览器同源策略详解
同源策略 Same Origin Policy 日常开发中最常与网络打交道,那关于浏览器的同源策略和跨域相关的知识是该整理一下了. 首先需要明确的是,同源策略是浏览器的安全策略,由于存在这个策略,我们 ...
- SpringBoot(八):SpringBoot中配置字符编码 Springboot中文乱码处理
SpringBoot中配置字符编码一共有两种方式 方式一: 使用传统的Spring提供的字符编码过滤器(和第二种比较,此方式复杂,由于时间原因这里先不介绍了,后续补上) 方式二(推荐使用) 在appl ...
- 大数据开发-Spark-Streaming处理数据到mysql
前面一篇讲到streamin读取kafka数据加工处理后写到kafka数据,大数据开发-Spark-开发Streaming处理数据 && 写入Kafka是针对比如推荐领域,实时标签等场 ...
- Android - 利用扩展函数为Bitmap添加文字水印
<异空间>项目技术分享系列--扩展函数为Bitmap添加文字水印 对图片Bitmap绘制文字水印还是比较常见的需求,毕竟版权意识都在增强(用户可以给自己图片加上用户名),还可以为用户提供更 ...
- windows本地连接虚拟机上的ubuntu的redis,以及无法连接解决方法(redisDesktopManager Jedis详细步骤)
一.环境 1.ubuntu20.04 . redis 5.0.7 在ubuntu上下载redis,执行命令 sudo apt install redis 2.redisDesktopManager下载 ...
- HDOJ-3065(AC自动机+每个模板串的出现次数)
病毒侵袭持续中 HDOJ-3065 第一个需要注意的是树节点的个数也就是tree的第一维需要的空间是多少:模板串的个数*最长模板串的长度 一开始我的答案总时WA,原因是我的方法一开始不是这样做的,我是 ...
- 让人头疼的AI bug (随想)
虽然概念上,人工智能和机器学习不等同.但是本文提及的AI,指的是基于机器学习的AI. 一个软件产品,出了错误叫bug,bug需要修.那一个机器学习的模型,准确率在那摆着呢,大伙心知肚明是有一定的犯 ...