深入浅出了解frame和bounds
frame
frame的官方解释如下:
The frame rectangle, which describes the view’s location and size in its superview’s coordinate system.
This rectangle defines the size and position of the view in its superview’s coordinate system. Use this rectangle during layout operations to set the size and position the view. Setting this property changes the point specified by the center property and changes the size in the bounds rectangle accordingly. The coordinates of the frame rectangle are always specified in points.
它定义了一个view相对于父视图坐标系的位置和大小,它会影响center属性和bounds属性的size。
先看一下它究竟是什么?
它是一个CGRect类型,如下:
struct CGRect {

    CGPoint origin;

    CGSize size;

};

typedef struct CG_BOXABLE CGRect CGRect;

struct CGPoint {

    CGFloat x;

    CGFloat y;

};

typedef struct CG_BOXABLE CGPoint CGPoint;

/* Sizes. */

struct CGSize {

    CGFloat width;

    CGFloat height;

};

typedef struct CG_BOXABLE CGSize CGSize;
其中的origin就是该view的位置,它是一个CGPoint类型,也是一个结构体,包含了我们熟知的常用二维坐标系的x、y。根据x、y可以在坐标系里面唯一确定一个点。如下图:
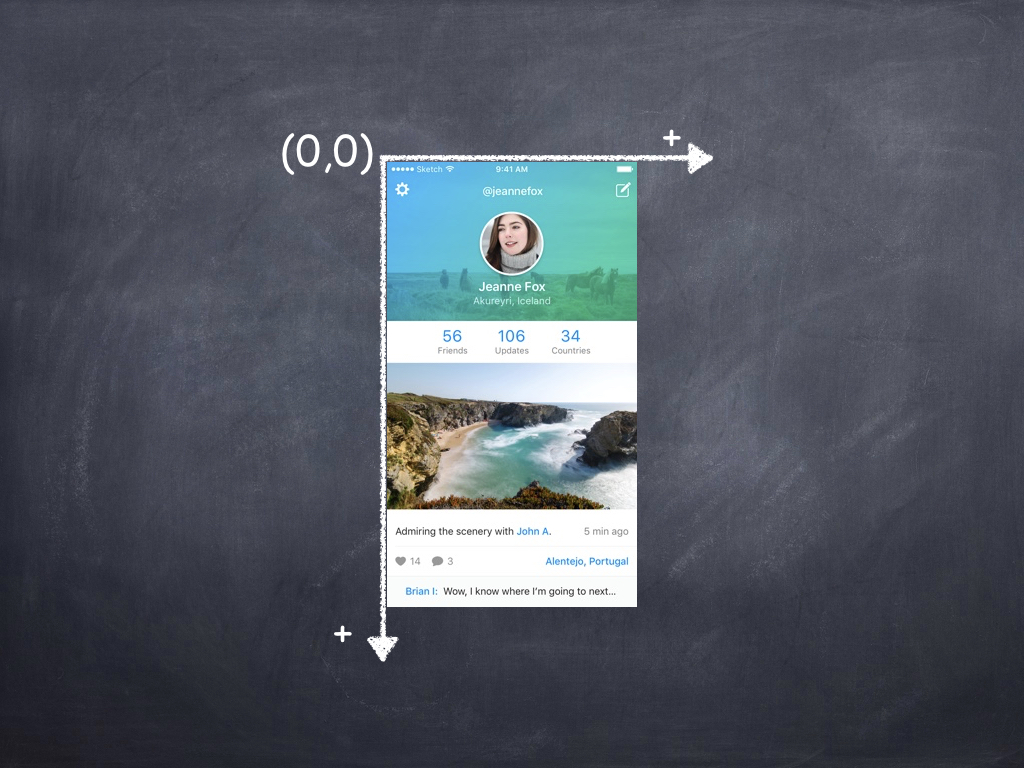
这个坐标系和我们平时接触的还不太一样,它是向右向下为正方向。所以对于window来说,其原点是左上角,比如现在的头像的起始坐标就是(200,40)。按照原来常规的坐标系来说,应该是(200,-40)。
在设置一个CGRect的时候,用到的方法是CGRectMake,其实现如下:
CG_INLINE CGRect

CGRectMake(CGFloat x, CGFloat y, CGFloat width, CGFloat height)

{

  CGRect rect;

  rect.origin.x = x; rect.origin.y = y;

  rect.size.width = width; rect.size.height = height;

  return rect;

}
也就是自己在实现部分创建了一个rect,然后逐个赋值。
关于frame,这里要注意的一点就是:frame是相对于父视图的坐标系来定位的。如果你这样设置frame:(0,0,100,200),也就是在父视图左上角添加了一个宽100,高200的子视图(前提是没有改变父视图的bounds,接下来会有介绍bounds)。
bounds
The bounds rectangle, which describes the view’s location and size in its own coordinate system.
The default bounds origin is (0,0) and the size is the same as the size of the rectangle in the frame property. Changing the size portion of this rectangle grows or shrinks the view relative to its center point. Changing the size also changes the size of the rectangle in the frame property to match. The coordinates of the bounds rectangle are always specified in points.
Changing the bounds rectangle automatically redisplays the view without calling its drawRect: method. If you want UIKit to call the drawRect: method, set the contentMode property to UIViewContentModeRedraw.
Changes to this property can be animated.
它也是描述的是视图的位置和大小,只不过是在自己的坐标系上。也就是说它描述的是当前视图相对于自身坐标系的位置和大小。
举个例子:
- (void)viewDidLoad {

    [super viewDidLoad];

    CGRect rect  = self.view.frame;

    self.parentView = [[ParentView alloc] initWithFrame:CGRectMake(60, 80, rect.size.width-120, rect.size.height - 160)];

    self.parentView.backgroundColor = [UIColor redColor];

    [self.view addSubview:_parentView];

    NSLog(@"frame:%@",NSStringFromCGRect(self.parentView.frame));

    NSLog(@"bounds:%@",NSStringFromCGRect(self.parentView.bounds));

    NSLog(@"center:%@",NSStringFromCGPoint(self.parentView.center));

}
输出的结果如下:
frame:{{60, 80}, {200, 408}}

bounds:{{0, 0}, {200, 408}}

center:{160, 284}
由此可见,如果我们没有去更改bounds的值,它默认的位置坐标点是(0,0)。
center
The center point of the view's frame rectangle.
The center point is specified in points in the coordinate system of its superview. Setting this property updates the origin of the rectangle in the frame property appropriately.
Use this property, instead of the frame property, when you want to change the position of a view. The center point is always valid, even when scaling or rotation factors are applied to the view's transform.
Changes to this property can be animated.
center是view的中点。该属性是想归于父类的坐标系确定的。从bounds小节里面的例子可以看到center的值,其计算方法为:
center.x = frame.origin.x + frame.size.width/2
center.y = frame.origin.y + frame.size.height/2
transform
Specifies the transform applied to the view, relative to the center of its bounds.
Use this property to scale or rotate the view's frame rectangle within its superview's coordinate system. (To change the position of the view, modify the center property instead.) The default value of this property is CGAffineTransformIdentity.
Transformations occur relative to the view's anchor point. By default, the anchor point is equal to the center point of the frame rectangle. To change the anchor point, modify the anchorPoint property of the view's underlying CALayer object.
Changes to this property can be animated.
In iOS 8.0 and later, the transform property does not affect Auto Layout. Auto layout calculates a view’s alignment rectangle based on its untransformed frame.
它用于指定视图的变换。使用这个属性可以放大或者旋转视图,它的frame会因此改变,是以中心点为变换的。看例子:
- (void)viewDidLoad {

    [super viewDidLoad];

    CGRect rect  = self.view.frame;

    self.parentView = [[ParentView alloc] initWithFrame:CGRectMake(60, 80, rect.size.width-120, rect.size.height - 160)];

    self.parentView.backgroundColor = [UIColor redColor];

    [self.view addSubview:_parentView];

    NSLog(@"frame:%@",NSStringFromCGRect(self.parentView.frame));

    NSLog(@"bounds:%@",NSStringFromCGRect(self.parentView.bounds));

    NSLog(@"center:%@",NSStringFromCGPoint(self.parentView.center));

    self.parentView.transform = CGAffineTransformMakeRotation(60);

    NSLog(@"after change transform,frame:%@",NSStringFromCGRect(self.parentView.frame));

    NSLog(@"after change transform,bounds:%@",NSStringFromCGRect(self.parentView.bounds));

    NSLog(@"after change transform,center:%@",NSStringFromCGPoint(self.parentView.center));

}
看输出的结果:
frame:{{60, 80}, {200, 408}}

bounds:{{0, 0}, {200, 408}}

center:{160, 284}

after change transform,frame:{{2.5773352536321568, 59.226689885086444}, {314.84532949273569, 449.54662022982711}}

after change transform,bounds:{{0, 0}, {200, 408}}

after change transform,center:{160, 284}
如图:
![]()
可以看出,当我们对图像通过旋转,旋转后的图片的frame已经变成了{{2.5773352536321568, 59.226689885086444}, {314.84532949273569, 449.54662022982711}},此时的起始位置为图上旋转后标的(2.58,59.2),大小也变成了双箭头黑线标注的大小。
因此得出结论:进行了transform变换,其frame改变了,但是其bounds和center并没有修改。此时bounds的size和frame的size已经没有关系了。当没有进行任何transform时,frame的size总是和bounds相等。
以上便是对frame、bounds、center和transform做了一个简单的介绍。
bounds的使用
接下来看一个例子(例子A):
- (void)viewDidLoad {

    [super viewDidLoad];

    CGRect rect  = self.view.frame;

    self.parentView = [[ParentView alloc] initWithFrame:CGRectMake(60, 80, rect.size.width-120, rect.size.height - 160)];

    self.parentView.backgroundColor = [UIColor redColor];

    [self.view addSubview:_parentView];

    NSLog(@"frame:%@",NSStringFromCGRect(self.parentView.frame));

    NSLog(@"bounds:%@",NSStringFromCGRect(self.parentView.bounds));

    NSLog(@"center:%@",NSStringFromCGPoint(self.parentView.center));

    self.parentView.bounds = CGRectMake(-40, -40, self.parentView.frame.size.width, self.parentView.frame.size.height);

    NSLog(@"parent change bound ,frame:%@",NSStringFromCGRect(self.parentView.frame));

    NSLog(@"parent change bound ,bounds:%@",NSStringFromCGRect(self.parentView.bounds));

    NSLog(@"parent change bound ,center:%@",NSStringFromCGPoint(self.parentView.center));

    self.childView = [[ChildView alloc] initWithFrame:CGRectMake(20, 20, 100, 100)];

    self.childView.backgroundColor = [UIColor yellowColor];

    [self.parentView addSubview:_childView];

    NSLog(@"childView frame:%@",NSStringFromCGRect(self.childView.frame));

    NSLog(@"childView ounds:%@",NSStringFromCGRect(self.childView.bounds));

    NSLog(@"childView center:%@",NSStringFromCGPoint(self.childView.center));

}
这里在parentView上添加了一个childView,然后对parentView的bounds进行修改和不修改进行了测试,结果如下:
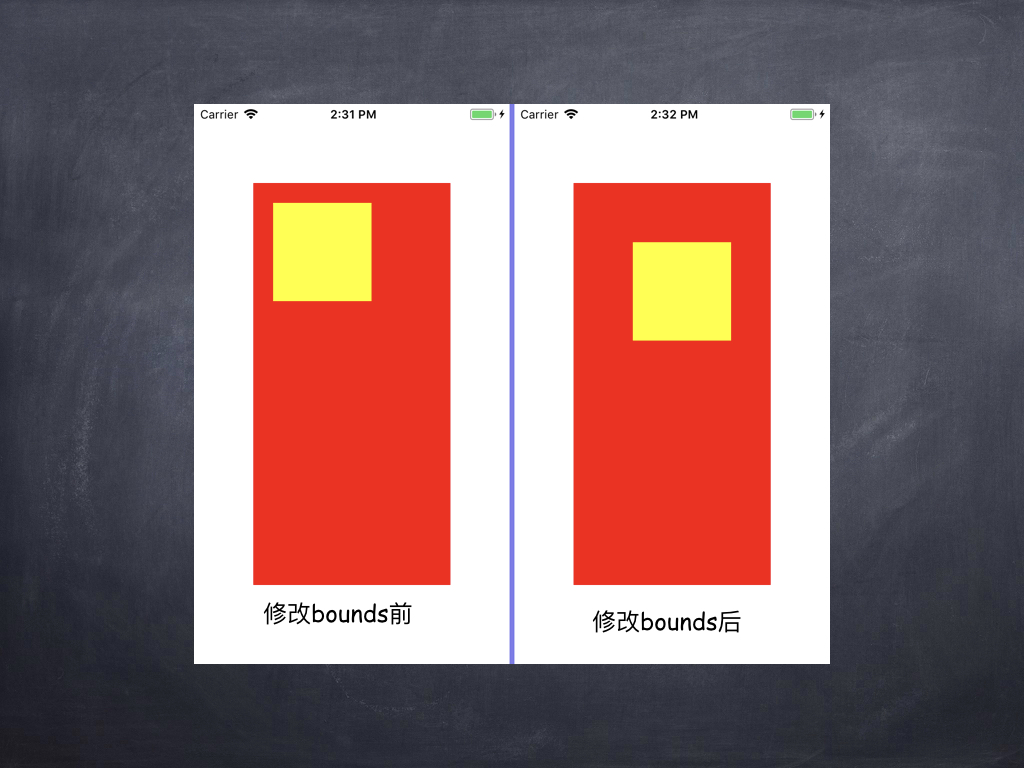
你会发现当修改了parentView的bounds之后,发现childView缺向右向下做了偏移。这里设置parentView的bounds的origin为(-40,-40)为何会发生这种情况呢?接下来先看一下下面这张图:
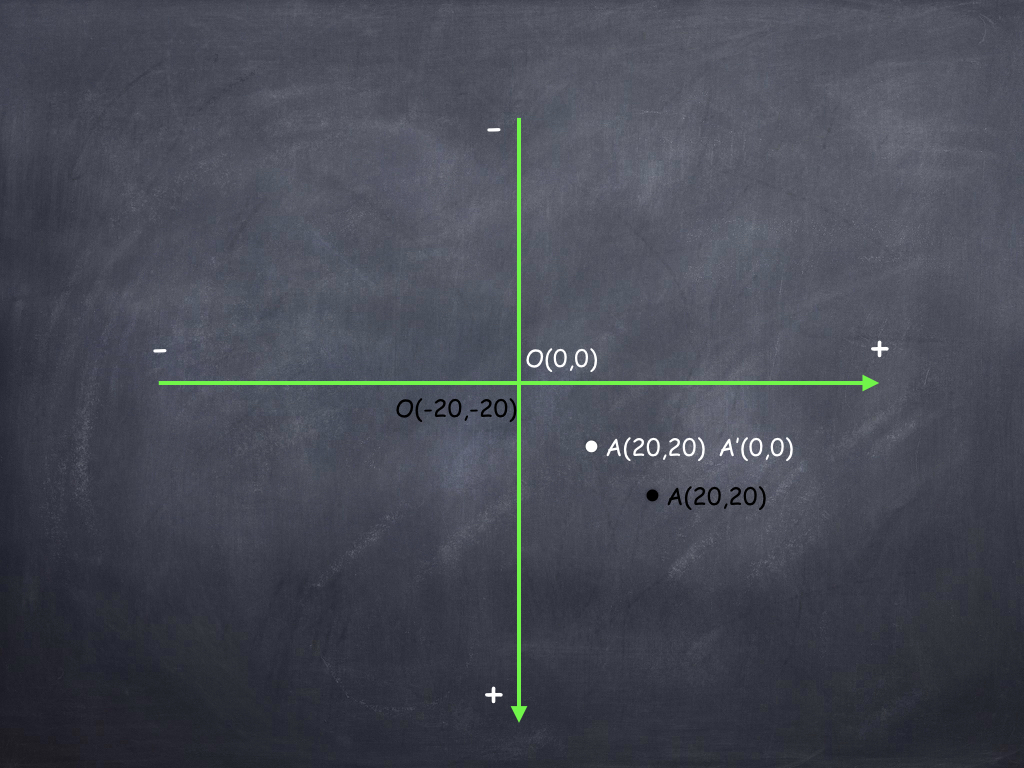
+代表正方向,-代表负方向。
如果此时我们没有改变图中O的坐标,那么此时A的坐标是(20,20),如果我们更改了O的坐标为(-20,-20),那么原来A点的坐标就成了A'(0,0),但是A坐标是不变的,所以它会到黑色A处。所以你改变了原点坐标为负之后,A点会移动到黑色A。相反如果你设置了坐标原点为(20,20),那么A点就会和坐标原点重合。
这就是为什么childView会向右向下移动的原因。
接下来再做如下操作(例子B):
- (void)viewDidLoad {

    [super viewDidLoad];

    CGRect rect  = self.view.frame;

    self.parentView = [[ParentView alloc] initWithFrame:CGRectMake(60, 80, rect.size.width-120, rect.size.height - 160)];

    self.parentView.backgroundColor = [UIColor redColor];

    [self.view addSubview:_parentView];

    NSLog(@"parent change bound ,frame:%@",NSStringFromCGRect(self.parentView.frame));

    NSLog(@"parent change bound ,bounds:%@",NSStringFromCGRect(self.parentView.bounds));

    NSLog(@"parent change bound ,center:%@",NSStringFromCGPoint(self.parentView.center));

    self.childView = [[ChildView alloc] initWithFrame:CGRectMake(self.parentView.frame.origin.x, self.parentView.frame.origin.y+self.parentView.frame.size.height-200, 100, 100)];

    self.childView.backgroundColor = [UIColor yellowColor];

    [self.parentView addSubview:_childView];

    NSLog(@"childView frame:%@",NSStringFromCGRect(self.childView.frame));

    NSLog(@"childView ounds:%@",NSStringFromCGRect(self.childView.bounds));

    NSLog(@"childView center:%@",NSStringFromCGPoint(self.childView.center));

    NSLog(@"\n--------\n");

    CGRect parentBounds = self.parentView.bounds;

    [UIView animateWithDuration:2 animations:^{

        self.parentView.bounds = CGRectMake(parentBounds.origin.x, 400, parentBounds.size.width, parentBounds.size.height);

    } completion:^(BOOL finished) {

        NSLog(@"anim finished,parentView frame:%@",NSStringFromCGRect(self.parentView.frame));

        NSLog(@"anim finished,parentView ounds:%@",NSStringFromCGRect(self.parentView.bounds));

        NSLog(@"anim finished,parentView center:%@",NSStringFromCGPoint(self.parentView.center));

        NSLog(@"anim finished,childView frame:%@",NSStringFromCGRect(self.childView.frame));

        NSLog(@"anim finished,childView bounds:%@",NSStringFromCGRect(self.childView.bounds));

        NSLog(@"anim finished,childView center:%@",NSStringFromCGPoint(self.childView.center));

    }];

}
输出结果如下:
parent change bound ,frame:{{60, 80}, {200, 408}}

parent change bound ,bounds:{{0, 0}, {200, 408}}

parent change bound ,center:{160, 284}

childView frame:{{60, 288}, {100, 100}}

childView ounds:{{0, 0}, {100, 100}}

childView center:{110, 338}

--------

anim finished,parentView frame:{{60, 80}, {200, 408}}

anim finished,parentView ounds:{{0, 400}, {200, 408}}

anim finished,parentView center:{160, 284}

anim finished,childView frame:{{60, 288}, {100, 100}}

anim finished,childView bounds:{{0, 0}, {100, 100}}

anim finished,childView center:{110, 338}
运行效果是childView向上移动,然后停止。结果前后对比图如下:
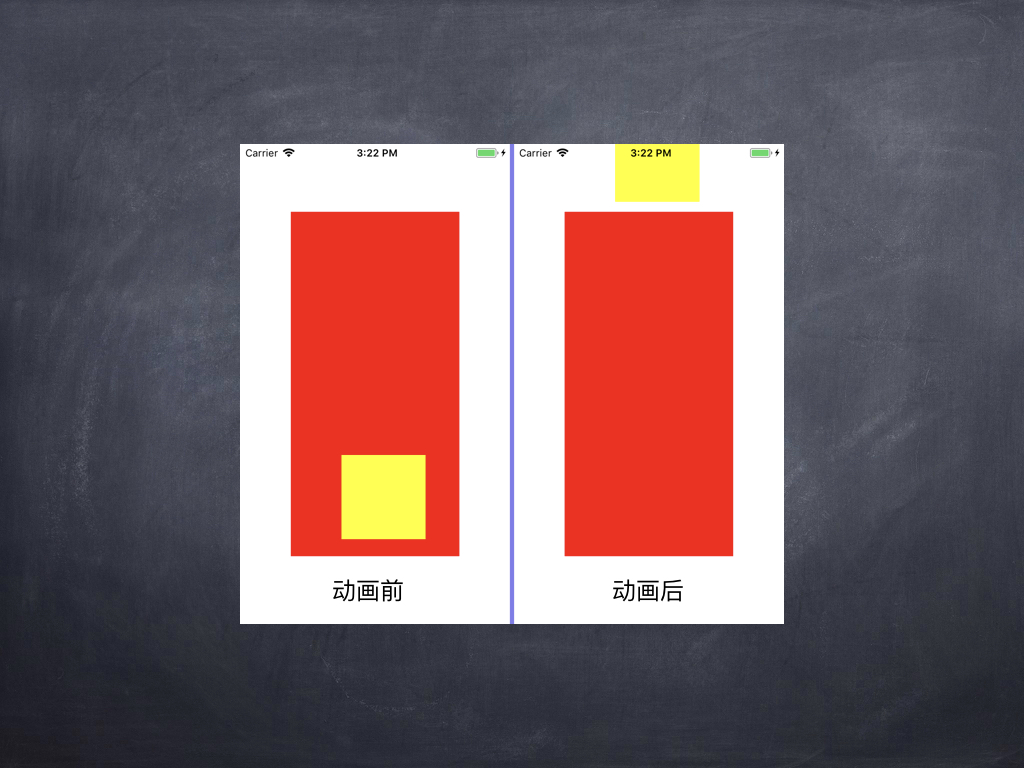
直观来看,按说childView的frame改变了,但是从console输出的结果来看,childView的frame/bounds/center都没有改变,但是直观来看其位置却改变了。再看一下parentView,只有bounds改变了,frame和center却没变,从直观来看parentView没有任何更改。所以很有可能是parentView的bounds修改引起了childView的位置更改。这是为什么呢?这里先不说明为什么,再看一下最常用的UIScrollView:
- (void)viewDidLoad {

    [super viewDidLoad];

    self.scrollView = [[ZGUIScrolLView alloc] initWithFrame:self.view.frame];

    self.scrollView.delegate = self;

    [self.view addSubview:_scrollView];

    NSLog(@"scrollview frame:%@",NSStringFromCGRect(_scrollView.frame));

    NSLog(@"scrollview bounds:%@",NSStringFromCGRect(_scrollView.bounds));

    NSLog(@"scrollview center:%@",NSStringFromCGPoint(_scrollView.center));

    self.scrollView.contentSize = CGSizeMake(800, 800);

    self.parentView = [[ParentView alloc] initWithFrame:CGRectMake(20, 100, 250, 300)];

    self.parentView.backgroundColor = [UIColor redColor];

    [self.scrollView addSubview:_parentView];

    NSLog(@"parentView frame:%@",NSStringFromCGRect(_parentView.frame));

    NSLog(@"parentView bounds:%@",NSStringFromCGRect(_parentView.bounds));

    NSLog(@"parentView center:%@",NSStringFromCGPoint(_parentView.center));

}

- (void)scrollViewDidScroll:(UIScrollView *)scrollView {

    NSLog(@"didScroll scrollview frame:%@",NSStringFromCGRect(_scrollView.frame));

    NSLog(@"didScroll scrollview bounds:%@",NSStringFromCGRect(_scrollView.bounds));

    NSLog(@"didScroll scrollview center:%@",NSStringFromCGPoint(_scrollView.center));

    NSLog(@"didScroll parentView frame:%@",NSStringFromCGRect(_parentView.frame));

    NSLog(@"didScroll parentView bounds:%@",NSStringFromCGRect(_parentView.bounds));

    NSLog(@"didScroll parentView center:%@",NSStringFromCGPoint(_parentView.center));

    printf("\n-------------------------------------------\n");

}
当滚动视图的时候,console输出结果如下:
scrollview frame:{{0, 0}, {320, 568}}

scrollview bounds:{{0, 0}, {320, 568}}

scrollview center:{160, 284}

parentView frame:{{20, 100}, {250, 300}}

parentView bounds:{{0, 0}, {250, 300}}

parentView center:{145, 250}

didScroll scrollview frame:{{0, 0}, {320, 568}}

didScroll scrollview bounds:{{0, -20}, {320, 568}}

didScroll scrollview center:{160, 284}

didScroll parentView frame:{{20, 100}, {250, 300}}

didScroll parentView bounds:{{0, 0}, {250, 300}}

didScroll parentView center:{145, 250}

-------------------------------------------

didScroll scrollview frame:{{0, 0}, {320, 568}}

didScroll scrollview bounds:{{8.5, 31.5}, {320, 568}}

didScroll scrollview center:{160, 284}

didScroll parentView frame:{{20, 100}, {250, 300}}

didScroll parentView bounds:{{0, 0}, {250, 300}}

didScroll parentView center:{145, 250}

-------------------------------------------

didScroll scrollview frame:{{0, 0}, {320, 568}}

didScroll scrollview bounds:{{25.5, 162}, {320, 568}}

didScroll scrollview center:{160, 284}

didScroll parentView frame:{{20, 100}, {250, 300}}

didScroll parentView bounds:{{0, 0}, {250, 300}}

didScroll parentView center:{145, 250}
根据输出结果可以看到,parentView的center、frame、bounds在滚动过程中都没有作出更改,但是我们看到的它的位置的确改变了。而对于scrollView来说,其frame和center也没有更改,但是bounds更改了。
这种现象和上面提到的(例子B)的现象一样,都是对bounds进行了修改。然后子视图从新进行了布局。说道子视图重新布局,让我想到了一个方法:
- (void)layoutSubviews;
从字面意思看就是布局某个视图的子视图,那么会不会和这个方法有关呢?因此我在自定义的ZGUIScrollView里面实现了该方法:
- (void)layoutSubviews {

    NSLog(@"scrollview's layoutSubViews called");

    [super layoutSubviews];

}
再次滚动界面,发现每次滚动都会调用scrollview的layoutSubViews方法。苹果官方文档介绍:
Lays out subviews.
The default implementation of this method does nothing on iOS 5.1 and earlier. Otherwise, the default implementation uses any constraints you have set to determine the size and position of any subviews.
Subclasses can override this method as needed to perform more precise layout of their subviews. You should override this method only if the autoresizing and constraint-based behaviors of the subviews do not offer the behavior you want. You can use your implementation to set the frame rectangles of your subviews directly.
You should not call this method directly. If you want to force a layout update, call the setNeedsLayout method instead to do so prior to the next drawing update. If you want to update the layout of your views immediately, call the layoutIfNeeded method.
它的作用就是布局一个视图上的子视图。确定子视图的大小和位置。如果你想强制布局更新,你不能直接去调用这个方法,而是在下次更新图形之前调用setNeedsLayout方法,如果你要立即更新视图布局,调用layoutIfNeeded方法。
由此可知,UIScrollView的实现就是通过bounds来实现的。contentOffset是bounds的origin。然后当bounds修改之后,会在layoutSubviews方法里面对子视图进行布局。对子类进行更新。
另外,我们还可以用bounds实现如下效果:
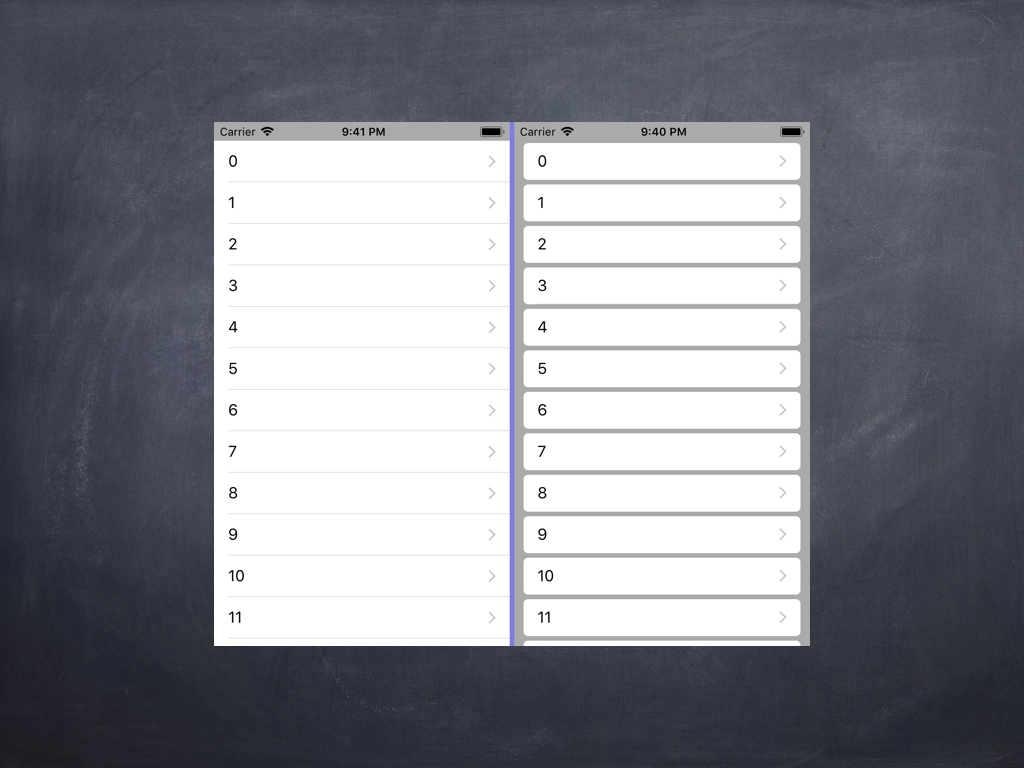
图上右侧便是使用了bounds实现的效果。实现方式就是在自定义cell中重写drawReact:
- (void)drawRect:(CGRect)rect {

     self.bounds = CGRectMake(self.bounds.origin.x, self.bounds.origin.y, self.frame.size.width-20, self.frame.size.height - 5);

    [super drawRect:rect];

}
其实UITableView(它是UIScrollView)的实现也是类似,更改了bounds,来实现滚动加载cell。
总结
对bounds和frame的理解就是这些,其实系统用bounds的地方还是很多的。例如UIScrollView的实现就用到了。有疑问的话可以留言交流。
注:转载请标明来源:张贵的博客
深入浅出了解frame和bounds的更多相关文章
- ios视图frame和bounds的对比
bounds坐标:自己定义的坐标系统,setbound指明了本视图左上角在该坐标系统中的坐标, 默认值(0,0) frame坐标: 子视图左上角在父视图坐标系统(bounds坐标系统)中的坐标, ...
- iOS--------坐标系统(UIView的frame、bounds跟center属性)
1.概要翻开ios官方开发文档,赫然发现上面对这三个属性的解释如下: frame:描述当前视图在其父视图中的位置和大小. bounds:描述当前视图在其自身坐标系统中的位置和大小. center:描述 ...
- ios基础之 view的frame 与 bounds 的区别 (转)
前言: 学习ios开发有一段时间了,项目也做了两个了,今天看视频,突然发现view的frame和bound两个属性,发现bound怎么也想不明白,好像饶你了死胡同里,经过一番尝试和思考,终于弄明白bo ...
- frame和bounds区别
学习ios开发有一段时间了,项目也做了两个了,今天看视频,突然发现view的frame和bound两个属性,发现bound怎么也想不明白,好像饶你了死胡同里,经过一番尝试和思考,终于弄明白bound的 ...
- AutoLayout 约束与frame、bounds的设置
介绍 关于AutoLayout的介绍可参考: 使用解读: https://segmentfault.com/a/1190000004386278 iOS 屏幕适配,autoResizing autoL ...
- iOS 中的frame,bounds,center,transform关联
这里有一篇好文章 http://www.winddisk.com/2012/06/07/transform/ 先看几个知识点,UIView 的frame,bounds,center,transform ...
- 《View Programming Guide for iOS》之frame、bounds和center之间的关系
The frame property contains the frame rectangle, which specifies the size and location of the view i ...
- ios view的frame和bounds之区别(位置和大小)
前言: 学习ios开发有一段时间了,项目也做了两个了,今天看视频,突然发现view的frame和bound两个属性,发现bound怎么也想不明白,好像饶你了死胡同里,经过一番尝试和思考,终于弄明白bo ...
- iphone/ipad关于size, frame and bounds总结和UIScroll view学习笔记
1. iphone/ipad大小 Device Screen dimensions(in points) iphone and ipod 320 X 480 ipad 768 X 1024 2. UI ...
随机推荐
- CSS与JS中的相对路径引用
javascript和css文件中采用相对路径,其基准路径是完全不同的. 1.javascript引用资源(比如图片)相对路径是以宿主路径(被引用的网页比如你在首页index.php引用了某js文件, ...
- SQL Server 2008对日期时间类型的改进
微软在备受多年的争议后,终于对日期时间数据类型开刀了,在新版的SQL Server 2008中一口气增加了4种新的日期时间数据类型,包括: Date:一个纯的日期数据类型. Time:一个纯的时间数据 ...
- "use strict"详解
参考:http://www.ruanyifeng.com/blog/2013/01/javascript_strict_mode.html 目的: 消除JavaScript语法的一些不合理.不严谨之处 ...
- Linux 基本命令-----常用操作分类
Linux/Unix 命令格式: 命令名 [选项] [参数] 注:[]中的内容代表内容可以省略 例:$ ls $ ls -l #-l 是选项 开始符号: 文件名 或 文件夹名 .当前文件夹 ..上一级 ...
- Linux系列教程(十八)——Linux文件系统管理之文件系统常用命令
通过前面两篇博客,我们介绍了Linux系统的权限管理.Linux权限管理之ACL权限 介绍了通过设定 ACL 权限,我们为某个用户指定某个文件的特定权限,这在Linux只能对于一个文件只能有所有者权限 ...
- RabbitMQ的简单应用
虽然后台使用了读写分离技术,能够在一定程度上抗击高并发,但是如果并发量特别巨大时,主数据库不能同时处理高并发的请求,这时数据库容易宕机. 问题: 现在的问题是如何既能保证数据库正常运行,又能实现用户数 ...
- python基础-------函数(一)
一 为何要有函数?不加区分地将所有功能的代码垒到一起, 问题是: 代码可读性差 代码冗余 代码可扩展差 如何解决?函数即工具,事先准备工具的过程是定义函数,拿来就用指的就是函数调用 结论:函数使用必须 ...
- 1)C语言简介(C自考学习)
C语言历史由来 世界上第一个高级语言是"ALFOL",而C的前身是ALGOL语言.1970年美国贝尔实验室的肯·汤普逊对BCPL(基本复合程序设计语言)进行了进一步的简化,突出了硬 ...
- Pyqt5学习系列
最近在学习Pyqt5做界面,找到了一个非常棒的博主的学习系列 在此记录下来: http://blog.csdn.net/zhulove86/article/category/6381941
- 为什么我的子线程更新了 UI 没报错?借此,纠正一些Android 程序员的一个知识误区
开门见山: 这个误区是:子线程不能更新 UI ,其应该分类讨论,而不是绝对的. 半小时前,我的 XRecyclerView 群里面,一位群友私聊我,问题是: 为什么我的子线程更新了 UI 没报错? 我 ...