2.1 摄像头V4L2驱动框架分析
学习目标:学习V4L2(V4L2:vidio for linux version 2)摄像头驱动框架,分析vivi.c(虚拟视频硬件相关)驱动源码程序,总结V4L2硬件相关的驱动的步骤;
一、V4L2架构
1. 字符类驱动
V4L2(V4L2:vidio for linux version 2)摄像头驱动属于字符类驱动,
对于一般的字符类驱动程序,其编写步骤一般分为:
1)构造一个file_operations: 编写open=drv_open .read=drv_read
2)注册设备,告诉内核:register_chrdev(主设备号,名字,&file_operations)
3)入口函数:调用register_chrdev
4)出口函数:卸载
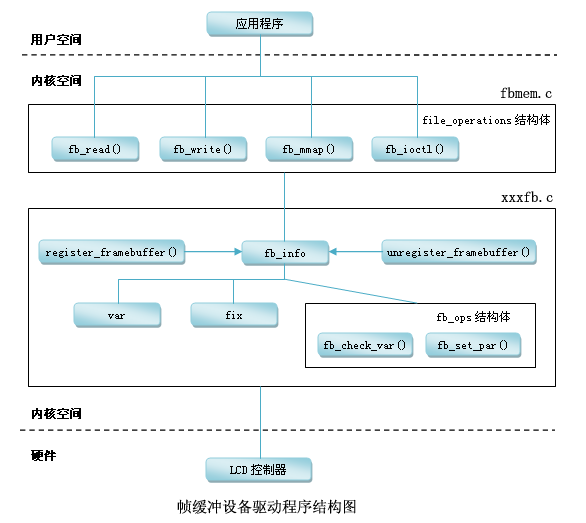
对于复杂的字符类驱动程序,其程序是一种分层结构。例如LCD驱动程序。如下图所示。
--> 上层为核心层(内核已经做好的),在fbmem.c中 ,主要的作用为:
1)构造file_operations(open read write 函数);2)注册;3)入口、出口。
--> 硬件相关层(用户需要做的),供核心层的file_operations调用,主要完成:
1) 分配一个fb_info 结构体;2) 设置fb_info 结构体等;3) 注册;4) 硬件相关的操作。
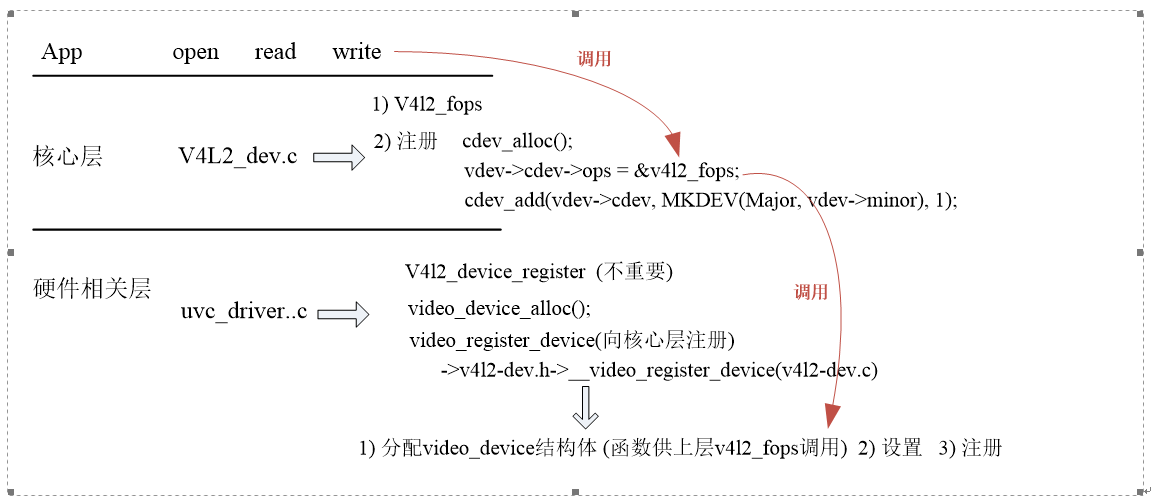
2. V4L2驱动架构
由以上字符类设备驱动架构可知,摄像头驱动也是分层结构的。
其中,ucv_driver.c中,定义了uvc_driver结构体,根据ucv_ids查找匹配的设备,如果支持,则会进入probe函数
 struct uvc_driver uvc_driver = {

     .driver = {

         .name        = "uvcvideo",

         .probe        = uvc_probe,

         .disconnect    = uvc_disconnect,

         .suspend    = uvc_suspend,

         .resume        = uvc_resume,

         .reset_resume    = uvc_reset_resume,

         .id_table    = uvc_ids,

         .supports_autosuspend = ,

     },

 };
二. vivi.c虚拟视频驱动程序架构
由于V4L2驱动程序是一种分层架构,用户只需要完成硬件相关驱动程序即可。这里主要以vivi虚拟视频驱动程序为例分析源码的调用过程和框架。
1. 进入入口的vivi_init(void)函数:
 static int __init vivi_create_instance(int inst)

 {

     struct vivi_dev *dev;

     struct video_device *vfd; //video_device结构体定义

     struct v4l2_ctrl_handler *hdl;

     struct vb2_queue *q;

     int ret;

     dev = kzalloc(sizeof(*dev), GFP_KERNEL);

     if (!dev)

         return -ENOMEM;

     snprintf(dev->v4l2_dev.name, sizeof(dev->v4l2_dev.name),

             "%s-%03d", VIVI_MODULE_NAME, inst);

     ret = v4l2_device_register(NULL, &dev->v4l2_dev);

     if (ret)

         goto free_dev;

    //摄像头相关属性设置

     dev->fmt = &formats[];

     dev->width = ;

     dev->height = ;

     hdl = &dev->ctrl_handler;

     v4l2_ctrl_handler_init(hdl, );

     dev->volume = v4l2_ctrl_new_std(hdl, &vivi_ctrl_ops,

             V4L2_CID_AUDIO_VOLUME, , , , );

     dev->brightness = v4l2_ctrl_new_std(hdl, &vivi_ctrl_ops,

             V4L2_CID_BRIGHTNESS, , , , );

     dev->contrast = v4l2_ctrl_new_std(hdl, &vivi_ctrl_ops,

             V4L2_CID_CONTRAST, , , , );

     dev->saturation = v4l2_ctrl_new_std(hdl, &vivi_ctrl_ops,

             V4L2_CID_SATURATION, , , , );

     dev->hue = v4l2_ctrl_new_std(hdl, &vivi_ctrl_ops,

             V4L2_CID_HUE, -, , , );

     dev->autogain = v4l2_ctrl_new_std(hdl, &vivi_ctrl_ops,

             V4L2_CID_AUTOGAIN, , , , );

     dev->gain = v4l2_ctrl_new_std(hdl, &vivi_ctrl_ops,

             V4L2_CID_GAIN, , , , );

     /* initialize queue */

     q = &dev->vb_vidq;

     memset(q, , sizeof(dev->vb_vidq));

     q->type = V4L2_BUF_TYPE_VIDEO_CAPTURE;

     q->io_modes = VB2_MMAP | VB2_USERPTR | VB2_READ;

     q->drv_priv = dev;

     q->buf_struct_size = sizeof(struct vivi_buffer);

     q->ops = &vivi_video_qops;

     q->mem_ops = &vb2_vmalloc_memops;

     vb2_queue_init(q);

     mutex_init(&dev->mutex);

     /* init video dma queues */

     INIT_LIST_HEAD(&dev->vidq.active);

     init_waitqueue_head(&dev->vidq.wq);

     ret = -ENOMEM;
     //分配video_device结构体

     vfd = video_device_alloc();

     if (!vfd)

         goto unreg_dev;

     //设置

     *vfd = vivi_template;
  /******************************************************************
    其中,以赋值的方式进行设置vfd,进入vivi_template:
.name = "vivi",
.fops = &vivi_fops,
.ioctl_ops = &vivi_ioctl_ops,
.release = video_device_release,
.current_norm = V4L2_STD_NTSC_M,
};
  *******************************************************************//

     vfd->debug = debug;

     vfd->v4l2_dev = &dev->v4l2_dev;

     set_bit(V4L2_FL_USE_FH_PRIO, &vfd->flags);

     /*

      * Provide a mutex to v4l2 core. It will be used to protect

      * all fops and v4l2 ioctls.

      */

     vfd->lock = &dev->mutex;

     //注册

     ret = video_register_device(vfd, VFL_TYPE_GRABBER, video_nr);

     video_set_drvdata(vfd, dev);

     /* Now that everything is fine, let's add it to device list */

     list_add_tail(&dev->vivi_devlist, &vivi_devlist);

     dev->vfd = vfd;

     v4l2_info(&dev->v4l2_dev, "V4L2 device registered as %s\n",

           video_device_node_name(vfd));

     return ;
     video_device_release(vfd);     v4l2_device_unregister(&dev->v4l2_dev); }
vivi_init函数的调用结构如下:
vivi_init
-->vivi_create_instance
-->v4l2_device_register // 不是主要, 只是用于初始化一些东西,比如自旋锁、引用计数
vfd = video_device_alloc(); //分配video_device结构体
1. *vfd = vivi_template; // 设置
.fops = &vivi_fops,
.ioctl_ops = &vivi_ioctl_ops,
.release = video_device_release,
2. vfd->v4l2_dev = &dev->v4l2_dev;
3. 设置"ctrl属性"(用于APP的ioctl):
v4l2_ctrl_handler_init(hdl, 11);
dev->volume = v4l2_ctrl_new_std(hdl, &vivi_ctrl_ops,
V4L2_CID_AUDIO_VOLUME, 0, 255, 1, 200);
dev->brightness = v4l2_ctrl_new_std(hdl, &vivi_ctrl_ops,
V4L2_CID_BRIGHTNESS, 0, 255, 1, 127);
dev->contrast = v4l2_ctrl_new_std(hdl, &vivi_ctrl_ops,
V4L2_CID_CONTRAST, 0, 255, 1, 16);
4. video_register_device(vfd, VFL_TYPE_GRABBER, video_nr); //注册
--> __video_register_device(vdev, type, nr, 1, vdev->fops->owner);
-->vdev->cdev = cdev_alloc(); (v4l2.dev.c程序中)
vdev->cdev->ops = &v4l2_fops;
cdev_add(vdev->cdev, MKDEV(VIDEO_MAJOR, vdev->minor), 1);
2. vivi.c的open,read,write,ioctl过程
 static const struct v4l2_file_operations vivi_fops = {

     .owner        = THIS_MODULE,

     .open           = v4l2_fh_open,

     .release        = vivi_close,

     .read           = vivi_read,

     .poll         = vivi_poll,

     .unlocked_ioctl = video_ioctl2, /* V4L2 ioctl handler */

     .mmap           = vivi_mmap,

 };
1)open
app: open("/dev/video0",....)向下层调用
-------------------------------------------------------------------
drv: v4l2_fops.v4l2_open
vdev = video_devdata(filp); // 根据次设备号从数组中得到video_device
return video_device[iminor(file->f_path.dentry->d_inode)];
if (vdev->fops->open) //如果有open函数
if (video_is_registered(vdev))
ret = vdev->fops->open(filp);//调用open 函数
调用vivi.c 里的v4l2_fh_open函数
2)read
app: read("/dev/video0",....)向下层调用
-------------------------------------------------------------------
drv: v4l2_fops.v4l2_read
struct video_device *vdev = video_devdata(filp);
if (video_is_registered(vdev))
ret = vdev->fops->read(filp, buf, sz, off);
调用vivi.c 里的vivi_read
app: ioctl
----------------------------------------------------
drv: v4l2_fops.unlocked_ioctl => v4l2_ioctl
struct video_device *vdev = video_devdata(filp);
if (video_is_registered(vdev))
ret = vdev->fops->unlocked_ioctl(filp, cmd, arg);
调用vivi.c 里的video_ioctl2
video_usercopy(file, cmd, arg, __video_do_ioctl); //从用户空间把用户的命令cmd复制进来,调用__video_do_ioctl
__video_do_ioctl
struct video_device *vfd = video_devdata(file); //根据次设备号从数组中得到video_device
switch (cmd) { ..... // 根据APP传入的cmd来获得、设置"某些属性"
{
struct v4l2_queryctrl *p = arg;
if (vfh && vfh->ctrl_handler)
ret = v4l2_queryctrl(vfh->ctrl_handler, p);
else if (vfd->ctrl_handler) // 在video_register_device设置 vivi_create_instance-->hdl = &dev->ctrl_handler; v4l2_ctrl_handler_init(hdl, 11);
ret = v4l2_queryctrl(vfd->ctrl_handler, p); // 根据ID在ctrl_handler里找到v4l2_ctrl,返回它的值
 1 hdl = &dev->ctrl_handler;

 2     v4l2_ctrl_handler_init(hdl, 11);

     dev->volume = v4l2_ctrl_new_std(hdl, &vivi_ctrl_ops,

             V4L2_CID_AUDIO_VOLUME, , , , );

     dev->brightness = v4l2_ctrl_new_std(hdl, &vivi_ctrl_ops,

             V4L2_CID_BRIGHTNESS, , , , );

     dev->contrast = v4l2_ctrl_new_std(hdl, &vivi_ctrl_ops,

             V4L2_CID_CONTRAST, , , , );

     dev->saturation = v4l2_ctrl_new_std(hdl, &vivi_ctrl_ops,

             V4L2_CID_SATURATION, , , , );

     dev->hue = v4l2_ctrl_new_std(hdl, &vivi_ctrl_ops,

             V4L2_CID_HUE, -, , , );

     dev->autogain = v4l2_ctrl_new_std(hdl, &vivi_ctrl_ops,

             V4L2_CID_AUTOGAIN, , , , );

     dev->gain = v4l2_ctrl_new_std(hdl, &vivi_ctrl_ops,

             V4L2_CID_GAIN, , , , );
三、怎么写v4l2驱动?
1. 分配、设置、注册:v4l2_device --》 v4l2_device_register()(辅助作用,提供自旋锁、引用计数等功能)
2. 分配一个video_device:video_device_alloc()
3. 设置
1)vfd->v4l2_dev
2) .fops 设置vfd的fops 里的open、read、write 被上层调用
.ioctl_ops 设置属性被上层调用
3)注册:video_register_device()
4. 接下来,应用层App可以通过ioctl来设置(获得)亮度等某些属性,在驱动程序里,谁来接收、存储、设置到硬件(提供这些信息)?
在驱动程序中抽象出来一个结构体v4l2_ctrl,每个Ctrl对应其中的一项(音量、亮度等等);
v4l2_ctrl_handler来管理他们,在vivi.c的vivi_create_instance函数中:
1.初始化
v4l2_ctrl_handler_init
2.设置
v4l2_ctrl_new_std
v4l2_ctrl_new_custom
这些函数就是创建各个属性,并且放入v4l2_ctrl_handler的链表
3.跟vdev关联
dev->v4l2_dev.ctrl_handler = hdl;
 static int __init vivi_create_instance(int inst)

 {

     struct vivi_dev *dev;

     struct video_device *vfd;

     struct v4l2_ctrl_handler *hdl; //定义v4l2_ctrl_handler结构体

     struct vb2_queue *q;

     int ret;

     dev = kzalloc(sizeof(*dev), GFP_KERNEL);

     if (!dev)

         return -ENOMEM;

     snprintf(dev->v4l2_dev.name, sizeof(dev->v4l2_dev.name),

             "%s-%03d", VIVI_MODULE_NAME, inst);

     ret = v4l2_device_register(NULL, &dev->v4l2_dev);

     if (ret)

         goto free_dev;

     dev->fmt = &formats[];

     dev->width = ;

     dev->height = ;

     hdl = &dev->ctrl_handler;

     v4l2_ctrl_handler_init(hdl, ); //初始化

     dev->volume = v4l2_ctrl_new_std(hdl, &vivi_ctrl_ops, //创建一个属性设置其值,并且放入v4l2_ctrl_handler的链表

             V4L2_CID_AUDIO_VOLUME, , , , );

     dev->brightness = v4l2_ctrl_new_std(hdl, &vivi_ctrl_ops,

             V4L2_CID_BRIGHTNESS, , , , );

     dev->contrast = v4l2_ctrl_new_std(hdl, &vivi_ctrl_ops,

             V4L2_CID_CONTRAST, , , , );

     dev->saturation = v4l2_ctrl_new_std(hdl, &vivi_ctrl_ops,

             V4L2_CID_SATURATION, , , , );

     dev->hue = v4l2_ctrl_new_std(hdl, &vivi_ctrl_ops,

             V4L2_CID_HUE, -, , , );

     dev->autogain = v4l2_ctrl_new_std(hdl, &vivi_ctrl_ops,

             V4L2_CID_AUTOGAIN, , , , );

     dev->gain = v4l2_ctrl_new_std(hdl, &vivi_ctrl_ops,

             V4L2_CID_GAIN, , , , );

     dev->button = v4l2_ctrl_new_custom(hdl, &vivi_ctrl_button, NULL);

     dev->int32 = v4l2_ctrl_new_custom(hdl, &vivi_ctrl_int32, NULL);

     dev->int64 = v4l2_ctrl_new_custom(hdl, &vivi_ctrl_int64, NULL);

     dev->boolean = v4l2_ctrl_new_custom(hdl, &vivi_ctrl_boolean, NULL);

     dev->menu = v4l2_ctrl_new_custom(hdl, &vivi_ctrl_menu, NULL);

     dev->v4l2_dev.ctrl_handler = hdl;
    .........
  }
2.1 摄像头V4L2驱动框架分析的更多相关文章
- Linux USB驱动框架分析(2)【转】
转自:http://blog.chinaunix.net/uid-23046336-id-3243543.html 看了http://blog.chinaunix.net/uid-11848011 ...
- Linux USB驱动框架分析 【转】
转自:http://blog.chinaunix.net/uid-11848011-id-96188.html 初次接触与OS相关的设备驱动编写,感觉还挺有意思的,为了不至于忘掉看过的东西,笔记跟总结 ...
- linux驱动基础系列--linux spi驱动框架分析
前言 主要是想对Linux 下spi驱动框架有一个整体的把控,因此会忽略某些细节,同时里面涉及到的一些驱动基础,比如平台驱动.设备模型等也不进行详细说明原理.如果有任何错误地方,请指出,谢谢! spi ...
- linux驱动基础系列--linux spi驱动框架分析(续)
前言 这篇文章是对linux驱动基础系列--linux spi驱动框架分析的补充,主要是添加了最新的linux内核里设备树相关内容. spi设备树相关信息 如之前的文章里所述,控制器的device和s ...
- Linux USB驱动框架分析【转】
转自:http://blog.csdn.net/jeffade/article/details/7701431 Linux USB驱动框架分析(一) 初次接触和OS相关的设备驱动编写,感觉还挺有意思的 ...
- uart驱动框架分析(二)uart_add_one_port
作者:lizuobin (百问网论坛答疑助手) 原文: https://blog.csdn.net/lizuobin2/article/details/51801183 (所用开发板:mini2440 ...
- 【原创】Linux PCI驱动框架分析(二)
背 景 Read the fucking source code! --By 鲁迅 A picture is worth a thousand words. --By 高尔基 说明: Kernel版本 ...
- 【原创】Linux PCI驱动框架分析(三)
背 景 Read the fucking source code! --By 鲁迅 A picture is worth a thousand words. --By 高尔基 说明: Kernel版本 ...
- USB摄像头驱动框架分析(五)
一.USB摄像头驱动框架如下所示:1.构造一个usb_driver2.设置 probe: 2.1. 分配video_device:video_device_alloc ...
随机推荐
- SQL Server ->> 数据一致性检查命令 -- DBCC CHECKDB
Comming soon!!! 参考文献: CHECKDB From Every Angle: Complete description of all CHECKDB stages
- tempdb过大事故记录-sqlserver
今天收到预警消息,提示磁盘空间已经满了,感觉很奇怪.刚装的新机器怎么可能会磁盘空间不足.登陆看了看 可以看的到tempdb已经65G的了,而且显示是百分百可用.这个就很奇怪了,为什么会出现这种情况呢. ...
- skype for business server 2015 报错“不可用:试图检查架构状态时发生故障,请确保能够访问Active Direcotry”
报错“不可用:试图检查架构状态时发生故障,请确保能够访问Active Direcotry” 遇到错误后就上网查询了下,有的人说用下面方法解决了 用域的administrator 登入就可以了(之前是用 ...
- TIAGO机器人传感器参数简介 手册翻译
本来认为这篇文章是最没人气的,竟然收到了回复,看来要继续更新本文了.留下笔者联系方式,邮箱leop22@163.com,欢迎邮件交流. 防止不良爬虫,原文链接:http://www.cnblogs.c ...
- java访问windows远端共享文件的方法
没密码的,直接用url访问就可以了,跟本地文件相同. 有密码的,用smb. 远端需要开启smb. win10启动smb的方法:https://jingyan.baidu.com/article/47a ...
- 浅谈SAP Cloud for Sales 自动化
在Jerry还在本科进行计算机理论知识学习时,我曾经把软件开发里的质量工程师(Quality Engineer)理解成是每天只是简单地做着运行开发人员编写好的软件,如果发现问题,通知开发人员去修改这种 ...
- ASN.1详解
Chapter 4 ASN.1 4.1 网络数据表示及编码4.2 ASN.1的基本概念4.3 基本编码规则 4.1 网络数据表示及编码ASN.1(Abstract Syntax Notation 1) ...
- 「C语言」数据类型及混合运算与类型转换
深入学习C语言时,有必要先了解一下数据类型的概念,以及它们之间的混合运算与类型转换. 本篇文章便是根据<C语言程序设计教程>和在线翻阅资料后整理而出.(练习题将逐步更新) 目录: ...
- 巧用padding生成正方形DIV
<!DOCTYPE html> <html lang="en"> <head> <meta charset="UTF-8&quo ...
- BZOJ 3680: 吊打XXX (模拟退火)
//yy:今天简单入门学了下ORZ 爬山算法:兔子朝着比现在高的地方跳去.它找到了不远处的最高山峰.但是这座山不一定是珠穆朗玛峰.这就是爬山算法,它不能保证局部最优值就是全局最优值. 模拟退火:兔子喝 ...