python3 爬取汽车之家所有车型数据操作步骤(更新版)
题记:
互联网上关于使用python3去爬取汽车之家的汽车数据(主要是汽车基本参数,配置参数,颜色参数,内饰参数)的教程已经非常多了,但大体的方案分两种:
1.解析出汽车之家某个车型的网页,然后正则表达式匹配出混淆后的数据对象与混淆后的js,并对混淆后的js使用pyv8进行解析返回正常字符,然后通过字符与数据对象进行匹配,具体方法见这位园友,传送门:https://www.cnblogs.com/my8100/p/js_qichezhijia.html (感谢这位大神前半部分的思路)
2.解析出汽车之家某个车型的网页,然后正则表达式匹配出混淆后的数据对象与混淆后的js,针对混淆后的js进行进行手动匹配,因为混淆的js大概分为8大类(无参数 返回常量,无参数 返回函数,参数等于返回值函数,无参数 返回常量,无参数 返回常量中间无混淆代码,字符串拼接时使无参常量,字符串拼接时使用返回参数的函数),然后通过正则表达式进行解析出8类内容并进行逐个替换,最终也会返回一个带有顺序的字符串,将这个字符串与前边的数据对象再次替换,最终数据对象中的所有span都会被替换成中文,具体操作见园友的地址,传送门:https://www.cnblogs.com/dyfblog/p/6753251.html (感谢这位大神前半部分的思路)
不过鉴于作者技术有限,上述的两种方案,我都没有完整的执行完成,哪怕花了一周的时间也没有,但是没有办法,谁让我是一个很爱钻牛角尖的人呢,下一步提出我自己琢磨出来的方案,流程上稍微有点复杂,但是稳打稳扎,还是可以爬出来的,好了话不多说了,贴出步骤;
1.获取所有车型的网页,保存到本地:
import bs4
import requests as req
'''
第一步,下载出所有车型的网页。
'''
def mainMethod():
    '''
    解析汽车之家所有车型数据保存到D盘
    '''
    li = [chr(i) for i in range(ord("T"),ord("Z")+1)]
    firstSite="https://www.autohome.com.cn/grade/carhtml/"
    firstSiteSurfixe=".html"
    secondSite = "https://car.autohome.com.cn/config/series/"
    secondSiteSurfixe = ".html"

    for a in li:
        if a is not None:
            requestUrl = firstSite+a+firstSiteSurfixe
            print(requestUrl)
            #开始获取每个品牌的车型
            resp = req.get(requestUrl)
            # print(str(resp.content,"gbk"))
            bs = bs4.BeautifulSoup(str(resp.content,"gbk"),"html.parser")
            bss = bs.find_all("li")
            con = 0
            for b in bss:
                d = b.h4
                if d is not None:
                    her = str(d.a.attrs['href'])
                    her = her.split("#")[0]
                    her = her[her.index(".cn")+3:].replace("/",'')
                    if her is not None:
                        secSite = secondSite +her + secondSiteSurfixe
                        print("secSite="+secSite)
                        # print(secSite)
                        #奥迪A3
                        if her is not None:
                            resp = req.get(secSite)
                            text = str(resp.content,encoding="utf-8")
                            print(a)
                            fil = open("d:\\autoHome\\html\\"+str(her),"a",encoding="utf-8")
                            fil.write(text)
                    con = (con+1)
            else:
                print(con)
if __name__ =="__main__":
    mainMethod()
2.解析出每个车型的关键js并拼装成一个html,保存到本地。
import os
import re
'''
第二步,解析出每个车型的关键js拼装成一个html
'''
if __name__=="__main__":
    print("Start...")
    rootPath = "D:\\autoHome\\html\\"
    files = os.listdir(rootPath)
    for file in files:
        print("fileName=="+file.title())
        text = ""
        for fi in open(rootPath+file,'r',encoding="utf-8"):
            text = text+fi
        else:
            print("fileName=="+file.title())
        #解析数据的json
        alljs = ("var rules = '2';"
                 "var document = {};"
                 "function getRules(){return rules}"
                 "document.createElement = function() {"
                 "      return {"
                 "              sheet: {"
                 "                      insertRule: function(rule, i) {"
                 "                              if (rules.length == 0) {"
                 "                                      rules = rule;"
                 "                              } else {"
                 "                                      rules = rules + '#' + rule;"
                 "                              }"
                 "                      }"
                 "              }"
                 "      }"
                 "};"
                 "document.querySelectorAll = function() {"
                 "      return {};"
                 "};"
                 "document.head = {};"
                 "document.head.appendChild = function() {};"

                 "var window = {};"
                 "window.decodeURIComponent = decodeURIComponent;")
        try:
            js = re.findall('(\(function\([a-zA-Z]{2}.*?_\).*?\(document\);)', text)
            for item in js:
                alljs = alljs + item
        except Exception as e:
            print('makejs function exception')

        newHtml = "<html><meta http-equiv='Content-Type' content='text/html; charset=utf-8' /><head></head><body>    <script type='text/javascript'>"
        alljs = newHtml + alljs+" document.write(rules)</script></body></html>"
        f = open("D:\\autoHome\\newhtml\\"+file+".html","a",encoding="utf-8")
        f.write(alljs)
        f.close()
3.解析出每个车型的数据json,比如var config ,var option , var bag var innerbag..但我就解析了基本信息跟配置信息,其他的无所谓。
import os
import re
'''
第三步 解析出每个车型的数据json,保存到本地。
'''
if __name__=="__main__":
    print("Start...")
    rootPath = "D:\\autoHome\\html\\"
    files = os.listdir(rootPath)
    for file in files:
        print("fileName=="+file.title())
        text = ""
        for fi in open(rootPath+file,'r',encoding="utf-8"):
            text = text+fi
        else:
            print("fileName=="+file.title())
        #解析数据的json
        jsonData = ""
        config = re.search('var config = (.*?){1,};',text)
        if config!= None:
            print(config.group(0))
            jsonData = jsonData+ config.group(0)
        option = re.search('var option = (.*?)};',text)
        if option != None:
            print(option.group(0))
            jsonData = jsonData+ option.group(0)
        bag = re.search('var bag = (.*?);',text)
        if bag != None:
            print(bag.group(0))
            jsonData = jsonData+ bag.group(0)
        # print(jsonData)
        f = open("D:\\autoHome\\json\\"+file,"a",encoding="utf-8")
        f.write(jsonData)
        f.close()
4.生成样式文件,保存 到本地。
import os
from selenium import webdriver

'''
    第四步,浏览器执行第二步生成的html文件,抓取执行结果,保存到本地。
'''
class Crack():
    def __init__(self,keyword,username,passod):
        self.url = 'https://www.baidu.com'
        self.browser = webdriver.Chrome('E:\work\ChromePortable\App\Google Chrome\chromedriver.exe')

if __name__=="__main__":
    lists = os.listdir("D:/autoHome/newHtml/")
    crack = Crack('测试公司','17610177519','17610177519')
    for fil in lists:
        file = os.path.exists("D:\\autoHome\\content\\"+fil)
        if file :
            print('文件已经解析。。。'+str(file))
            continue
        print(fil)
        crack.browser.get("file:///D:/autoHome/newHtml/"+fil+"")
        text = crack.browser.find_element_by_tag_name('body')
        print(text.text)
        f = open("D:\\autoHome\\content\\"+fil,"a",encoding="utf-8")
        f.write(text.text)
    else:
        f.close()
        crack.browser.close()
5.读取样式文件,匹配数据文件,生成正常数据文件
 import os
import re
'''
第五步 匹配样式文件与json数据文件,生成正常的数据文件。
'''
if __name__ =="__main__":
    rootPath = "D:\\autoHome\\json\\"
    listdir = os.listdir(rootPath)
    for json_s in listdir:
        print(json_s.title())
        jso = ""
        #读取json数据文件
        for fi in open(rootPath+json_s,'r',encoding="utf-8"):
            jso = jso+fi
        content = ""
        #读取样式文件
        spansPath = "D:\\autoHome\\content\\"+json_s.title()+".html"
        # print(spansPath)
        for spans in  open(spansPath,"r",encoding="utf-8"):
            content = content+ spans
        print(content)
        #获取所有span对象
        jsos = re.findall("<span(.*?)></span>",jso)
        num = 0
        for js in jsos:
            print("匹配到的span=>>"+js)
            num = num +1
            #获取class属性值
            sea = re.search("'(.*?)'",js)
            print("匹配到的class==>"+sea.group(1))
            spanContent = str(sea.group(1))+"::before { content:(.*?)}"
            #匹配样式值
            spanContentRe = re.search(spanContent,content)
            if spanContentRe != None:
                if sea.group(1) != None:
                    print("匹配到的样式值="+spanContentRe.group(1))
                    jso = jso.replace(str("<span class='"+sea.group(1)+"'></span>"),re.search("\"(.*?)\"",spanContentRe.group(1)).group(1))
        print(jso)
        fi = open("D:\\autoHome\\newJson\\"+json_s.title(),"a",encoding="utf-8")
        fi.write(jso)
        fi.close()
6.到前五步已经可以看到json数据文件都已经是混淆前的了,说明已经爬取成功了。
7.读取数据文件,生成excel
import json
import os
import re
import xlwt
'''
第七步读取数据文件,生成excel
'''
if __name__ == "__main__":
    rootPath = "D:\\autoHome\\newJson\\"
    workbook = xlwt.Workbook(encoding = 'ascii')#创建一个文件
    worksheet = workbook.add_sheet('汽车之家')#创建一个表
    files = os.listdir(rootPath)
    startRow = 0
    isFlag = True #默认记录表头
    for file in files:
        list = []
        carItem = {}
        print("fileName=="+file.title())
        text = ""
        for fi in open(rootPath+file,'r',encoding="utf-8"):
            text = text+fi
        # else:
            # print("文件内容=="+text)
        #解析基本参数配置参数,颜色三种参数,其他参数
        config = "var config = (.*?);"
        option = "var option = (.*?);var"
        bag = "var bag = (.*?);"

        configRe = re.findall(config,text)
        optionRe = re.findall(option,text)
        bagRe = re.findall(bag,text)
        for a in configRe:
            config = a
        print("++++++++++++++++++++++\n")
        for b in optionRe:
            option = b
            print("---------------------\n")
        for c in bagRe:
            bag = c
        # print(config)
        # print(option)
        # print(bag)

        # print(bag)
        try:
            config = json.loads(config)
            option = json.loads(option)
            bag = json.loads(bag)
            # print(config)
            # print(option)
            # print(bag)
            path = "D:\\autoHome\\autoHome.xls"

            configItem = config['result']['paramtypeitems'][0]['paramitems']
            optionItem = option['result']['configtypeitems'][0]['configitems']
        except Exception as e:
            f =  open("D:\\autoHome\\异常数据\\exception.txt","a",encoding="utf-8")
            f.write(file.title()+"\n")
            continue

        #解析基本参数
        for car in configItem:
            carItem[car['name']]=[]
            for ca in car['valueitems']:
                carItem[car['name']].append(ca['value'])
        # print(carItem)
        #解析配置参数
        for car in optionItem:
            carItem[car['name']]=[]
            for ca in car['valueitems']:
                carItem[car['name']].append(ca['value'])

        if isFlag:
            co1s = 0

            for co in carItem:
                co1s = co1s +1
                worksheet.write(startRow,co1s,co)
            else:
                startRow = startRow+1
                isFlag = False

        #计算起止行号
        endRowNum = startRow + len(carItem['车型名称']) #车辆款式记录数
        for row in range(startRow,endRowNum):
            print(row)
            colNum = 0
            for col in carItem:

                colNum = colNum +1
                print(str(carItem[col][row-startRow]),end='|')
                worksheet.write(row,colNum,str(carItem[col][row-startRow]))

        else:
            startRow  = endRowNum
    workbook.save('d:\\autoHome\\Mybook.xls')
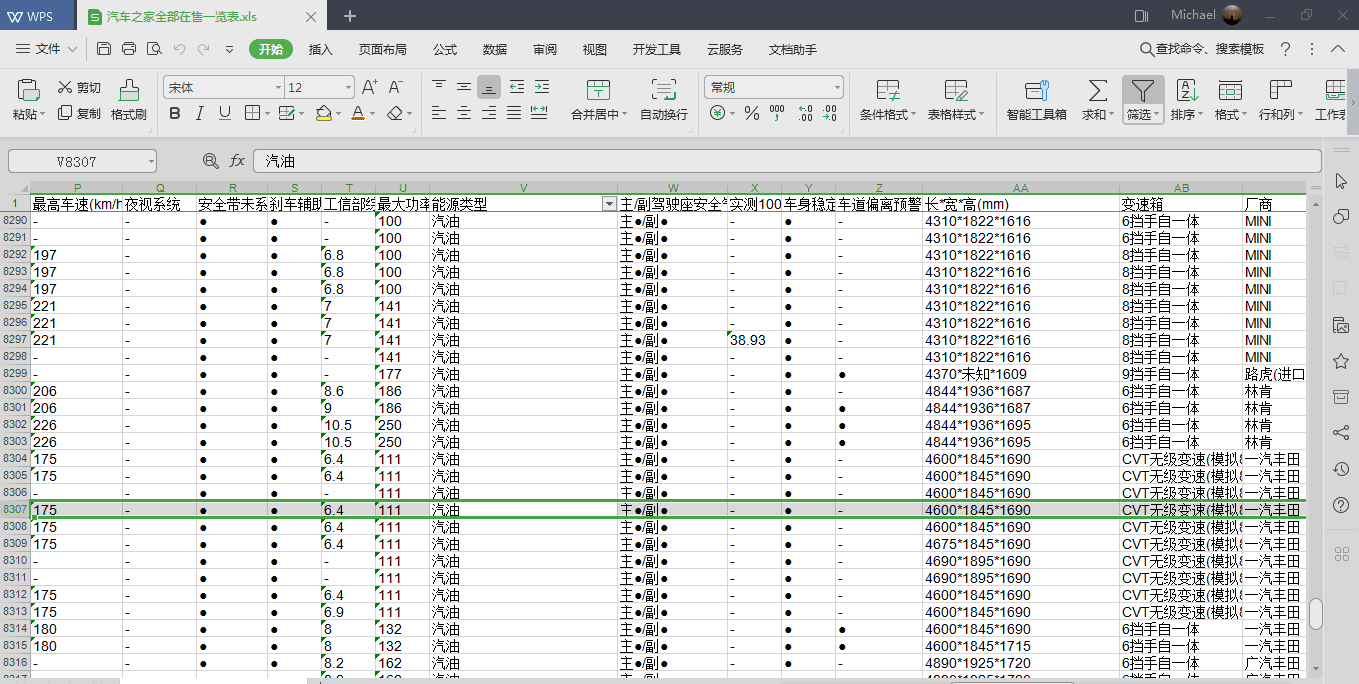
8.最后打开excel文件,给你们看看。

数据量大概有8300的样子。以后买车就用这个参考了。
python3 爬取汽车之家所有车型数据操作步骤(更新版)的更多相关文章
- nodejs爬虫——汽车之家所有车型数据
应用介绍 项目Github地址:https://github.com/iNuanfeng/node-spider/ nodejs爬虫,爬取汽车之家(http://www.autohome.com.cn ...
- python3 爬取boss直聘职业分类数据(未完成)
import reimport urllib.request # 爬取boss直聘职业分类数据def subRule(fileName): result = re.findall(r'<p cl ...
- java爬虫入门--用jsoup爬取汽车之家的新闻
概述 使用jsoup来进行网页数据爬取.jsoup 是一款Java 的HTML解析器,可直接解析某个URL地址.HTML文本内容.它提供了一套非常省力的API,可通过DOM,CSS以及类似于jQuer ...
- Python 爬虫实例(15) 爬取 汽车之家(汽车授权经销商)
有人给我吹牛逼,说汽车之家反爬很厉害,我不服气,所以就爬取了一下这个网址. 本片博客的目的是重点的分析定向爬虫的过程,希望读者能学会爬虫的分析流程. 一:爬虫的目标: 打开汽车之家的链接:https: ...
- Python爬虫——使用 lxml 解析器爬取汽车之家二手车信息
本次爬虫的目标是汽车之家的二手车销售信息,范围是全国,不过很可惜,汽车之家只显示100页信息,每页48条,也就是说最多只能够爬取4800条信息. 由于这次爬虫的主要目的是使用lxml解析器,所以在信息 ...
- Python 爬取汽车之家口碑数据
本文仅供学习交流使用,如侵立删!联系方式见文末 汽车之家口碑数据 2021.8.3 更新 增加用户信息参数.认证车辆信息等 2021.3.24 更新 更新最新数据接口 2020.12.25 更新 添加 ...
- 使用BeautifulSoup爬取汽车之家新闻
1 先select到改数据上层的标签,取第一个[0],然后attrs获取单标签里面的内容,或者get_text获取成对标签内文本2 find就是明确了标签之后,是唯一的,就可以使用find(标签名). ...
- 爬取汽车之家新闻图片的python爬虫代码
import requestsfrom bs4 import BeautifulSouprespone=requests.get('https://www.autohome.com.cn/news/' ...
- python3爬取网页
爬虫 python3爬取网页资源方式(1.最简单: import'http://www.baidu.com/'print2.通过request import'http://www.baidu.com' ...
随机推荐
- myBatis执行测试批量删除,出现测试类正常显示,但数据库数据没变
一般在测试myBatis运行正常,但数据库数据不变时,有可能是SQL语句有问题,检查SQL语句没问题,但数据库依然没变,就说明myBatis方法执行后并未提交到数据库,可尝试在测试类添加 sess ...
- 一起来学Spring Cloud | 第一章 :如何搭建一个多模块的springcloud项目
在spring cloud系列章节中,本来已经写了几个章节了,但是自己看起来有些东西写得比较杂,所以重构了一下springcloud的章节内容,新写了本章节,先教大家在工作中如何搭建一个多模块的spr ...
- websocket的加密和解密
补充个小知识点:按位与运算 按位与运算是同位都为1才为1,有一个不为1就是0 websocket_hand import socket, base64, hashlib import websocke ...
- php 出现空格,换行原因
1.空格:转换成utf-8无bom格式 2.空格:<?php ?>标签结尾有中文,英文空格 3.换行,一个文件中有多个<?php ?>标签,标签间隔中有换行符合
- springBoot jpa uuid生成策略
实体类 import org.hibernate.annotations.GenericGenerator; import javax.persistence.*; @Entity @Table(na ...
- 【Python】python2 html safe string
import cgi s = '<>&' s += u'哈哈' print type(s) print s r = cgi.escape(s) print type(r) prin ...
- angularjs嵌套路由
index.html <!DOCTYPE html> <html lang="en"> <head> <meta charset=&quo ...
- JavaScript获取URL参数公共方法
写一个JavaScript获取URL参数的通用方法,可以把它放到常用方法的JS文件中调用,直接上代码例子,新手可以学习一下! <!DOCTYPE html> <html lang=& ...
- nginx 中 root和alias
根本区别 一个请求的url= http://ip:port/path 在location中配置root和alias的区别: root是在location的正则之前拼接了路径 alias是在locati ...
- 实战:ADFS3.0单点登录系列-集成Exchange
本文将介绍如何将Exchange与ADFS集成,从而实现对于Exchange的SSO. 目录: 实战:ADFS3.0单点登录系列-总览 实战:ADFS3.0单点登录系列-前置准备 实战:ADFS3.0 ...
