消息队列(五) ---RocketMQ-消息存储3
问题:
- consumeQueue 如何工作
- 刷盘机制如何工作
概述
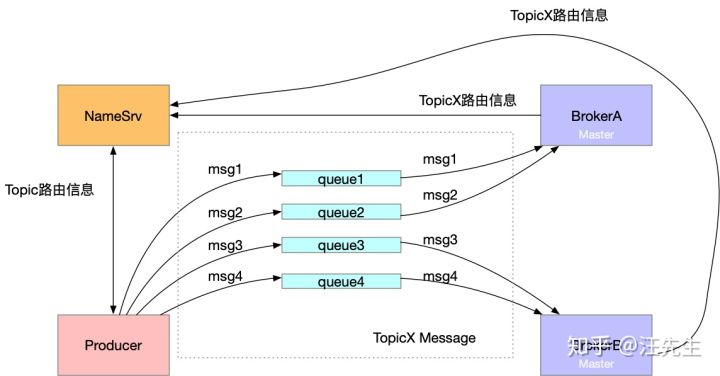
该节我们将学习 consumeQueue 如何工作,先来看一下消息发送的大概过程。

而为什么需要 consumeQueue 的存在呢?我们只有一个 commitLog 文件,那么假如需要查找某个主题下的消息,那么我们不得不遍历整个commmitLog 来完成查询,consumeQueue 的存在方便的消息的查询获取。首先来看一下 consumeQueue 文件的结构,其中 TopicTest 和 TopicTest1 是 topic ,里面的编号0~3表示该主题下的4个队列。
├─TopicTest

│  ├─0

│  ├─1

│  ├─2

│  └─3

└─TopicTest1

    ├─0

    ├─1

    ├─2

    └─3
ConsumeQueue 相关
DefaultMessageStore在初始化时开启了一个线程,该线程的作用是**(当生产者新生产一条消息)更新消息到 consumeQueue 中去** ,然后consumeQueue在回刷回去磁盘持久化。
可以看到这里分为两部分。
我们看一下这个线程是在哪里启动的
    public void start() throws Exception {

        if (this.messageStore != null) {

            this.messageStore.start();

        }

        ...

    }
DefaultMessageStore#start 方法
        //No.3 开启 reputMessageService

        if (this.getMessageStoreConfig().isDuplicationEnable()) {

            this.reputMessageService.setReputFromOffset(this.commitLog.getConfirmOffset());

        } else {

            this.reputMessageService.setReputFromOffset(this.commitLog.getMaxOffset());

        }

        this.reputMessageService.start();
reputMessageService#run 方法
        @Override

        public void run() {

            DefaultMessageStore.log.info(this.getServiceName() + " service started");

            while (!this.isStopped()) {

                try {

                    Thread.sleep(1);

                    //一直执行 doReput 方法

                    this.doReput();

                } catch (Exception e) {

                    DefaultMessageStore.log.warn(this.getServiceName() + " service has exception. ", e);

                }

            }

            DefaultMessageStore.log.info(this.getServiceName() + " service end");

        }
下面总结来自参考文章,侵删
doReput做了以下几件事
1:获取CommitLog中存储的新消息。
SelectMappedBufferResult result = DefaultMessageStore.this.commitLog.getData(reputFromOffset);
reputFromOffset记录了本次需要拉取的消息在CommitLog中的偏移。这里将reputFromOffset传递给CommitLog,获取CommitLog在reputFromOffset处存储的消息。
2:如果第一步获取的消息不为空,则表明有新消息被存储到CommitLog中,此时便会通知ConsumeQueue更新消息偏移。
DispatchRequest dispatchRequest =

                                DefaultMessageStore.this.commitLog.checkMessageAndReturnSize(result.getByteBuffer(), false, false);

......
DefaultMessageStore.this.doDispatch(dispatchRequest);
3:更新reputFromOffset,设置为下次需要拉取的消息在CommitLog中的偏移。
this.reputFromOffset = result.getStartOffset();

......

int size = dispatchRequest.getMsgSize();

......

this.reputFromOffset += size;
上面的重点在第二步中,这里调用 DefaultMessageStore.this.doDispatch(dispatchRequest) 来通知ConsumeQueue。
DefaultMessageStore中存储了一个dispatcherList,其中存放了几个CommitLogDispatcher对象,它们都是用来监听CommitLog中新消息存储的。
this.dispatcherList = new LinkedList<>();

//用于分发给 ConsumeQueue

this.dispatcherList.addLast(new CommitLogDispatcherBuildConsumeQueue());

//用于分发给 Index

this.dispatcherList.addLast(new CommitLogDispatcherBuildIndex());
其中第二步比较重要,这里我们这里也可以知道 commitLog 的分发器有两个,一个用于 ConsumeQueue ,另外一个用于 Index
    class CommitLogDispatcherBuildConsumeQueue implements CommitLogDispatcher {

        @Override

        public void dispatch(DispatchRequest request) {

            final int tranType = MessageSysFlag.getTransactionValue(request.getSysFlag());

            switch (tranType) {

                case MessageSysFlag.TRANSACTION_NOT_TYPE:

                case MessageSysFlag.TRANSACTION_COMMIT_TYPE:

                    DefaultMessageStore.this.putMessagePositionInfo(request);

                    break;

                case MessageSysFlag.TRANSACTION_PREPARED_TYPE:

                case MessageSysFlag.TRANSACTION_ROLLBACK_TYPE:

                    break;

            }

        }

    }

    public void putMessagePositionInfo(DispatchRequest dispatchRequest) {

        //找到对应的 ConsumeQueue

        ConsumeQueue cq = this.findConsumeQueue(dispatchRequest.getTopic(), dispatchRequest.getQueueId());

        //调用ConsumeQueue的存储逻辑

        cq.putMessagePositionInfoWrapper(dispatchRequest);

    }
    // 存储体的封装

    public void putMessagePositionInfoWrapper(DispatchRequest request) {

        final int maxRetries = 30;

        boolean canWrite = this.defaultMessageStore.getRunningFlags().isCQWriteable();

        for (int i = 0; i < maxRetries && canWrite; i++) {

            long tagsCode = request.getTagsCode();

            if (isExtWriteEnable()) {

                ConsumeQueueExt.CqExtUnit cqExtUnit = new ConsumeQueueExt.CqExtUnit();

                cqExtUnit.setFilterBitMap(request.getBitMap());

                cqExtUnit.setMsgStoreTime(request.getStoreTimestamp());

                cqExtUnit.setTagsCode(request.getTagsCode());

                long extAddr = this.consumeQueueExt.put(cqExtUnit);

                if (isExtAddr(extAddr)) {

                    tagsCode = extAddr;

                } else {

                    log.warn("Save consume queue extend fail, So just save tagsCode! {}, topic:{}, queueId:{}, offset:{}", cqExtUnit,

                        topic, queueId, request.getCommitLogOffset());

                }

            }

            //存储操作

            boolean result = this.putMessagePositionInfo(request.getCommitLogOffset(),

                request.getMsgSize(), tagsCode, request.getConsumeQueueOffset());

            if (result) {

                this.defaultMessageStore.getStoreCheckpoint().setLogicsMsgTimestamp(request.getStoreTimestamp());

                return;

            } else {

                // XXX: warn and notify me

                log.warn("[BUG]put commit log position info to " + topic + ":" + queueId + " " + request.getCommitLogOffset()

                    + " failed, retry " + i + " times");

                try {

                    Thread.sleep(1000);

                } catch (InterruptedException e) {

                    log.warn("", e);

                }

            }

        }

        // XXX: warn and notify me

        log.error("[BUG]consume queue can not write, {} {}", this.topic, this.queueId);

        this.defaultMessageStore.getRunningFlags().makeLogicsQueueError();

    }

    //存储操作

    private boolean putMessagePositionInfo(final long offset, final int size, final long tagsCode,

        final long cqOffset) {

        if (offset <= this.maxPhysicOffset) {

            return true;

        }

        this.byteBufferIndex.flip();

        this.byteBufferIndex.limit(CQ_STORE_UNIT_SIZE);

        //offset -> size -> tagsCode

        this.byteBufferIndex.putLong(offset);

        this.byteBufferIndex.putInt(size);

        this.byteBufferIndex.putLong(tagsCode);

        final long expectLogicOffset = cqOffset * CQ_STORE_UNIT_SIZE;

        //找到对应的 MappedFile

        MappedFile mappedFile = this.mappedFileQueue.getLastMappedFile(expectLogicOffset);

        if (mappedFile != null) {

            if (mappedFile.isFirstCreateInQueue() && cqOffset != 0 && mappedFile.getWrotePosition() == 0) {

                this.minLogicOffset = expectLogicOffset;

                this.mappedFileQueue.setFlushedWhere(expectLogicOffset);

                this.mappedFileQueue.setCommittedWhere(expectLogicOffset);

                this.fillPreBlank(mappedFile, expectLogicOffset);

                log.info("fill pre blank space " + mappedFile.getFileName() + " " + expectLogicOffset + " "

                    + mappedFile.getWrotePosition());

            }

            if (cqOffset != 0) {

                long currentLogicOffset = mappedFile.getWrotePosition() + mappedFile.getFileFromOffset();

                if (expectLogicOffset < currentLogicOffset) {

                    log.warn("Build  consume queue repeatedly, expectLogicOffset: {} currentLogicOffset: {} Topic: {} QID: {} Diff: {}",

                        expectLogicOffset, currentLogicOffset, this.topic, this.queueId, expectLogicOffset - currentLogicOffset);

                    return true;

                }

                if (expectLogicOffset != currentLogicOffset) {

                    LOG_ERROR.warn(

                        "[BUG]logic queue order maybe wrong, expectLogicOffset: {} currentLogicOffset: {} Topic: {} QID: {} Diff: {}",

                        expectLogicOffset,

                        currentLogicOffset,

                        this.topic,

                        this.queueId,

                        expectLogicOffset - currentLogicOffset

                    );

                }

            }

            this.maxPhysicOffset = offset;

            //调用 MappedFile 直接加入

            return mappedFile.appendMessage(this.byteBufferIndex.array());

        }

        return false;

    }
从上面我们可以知道 consumeQueue 的存储底层使用的是 mapfile 。
异步刷盘
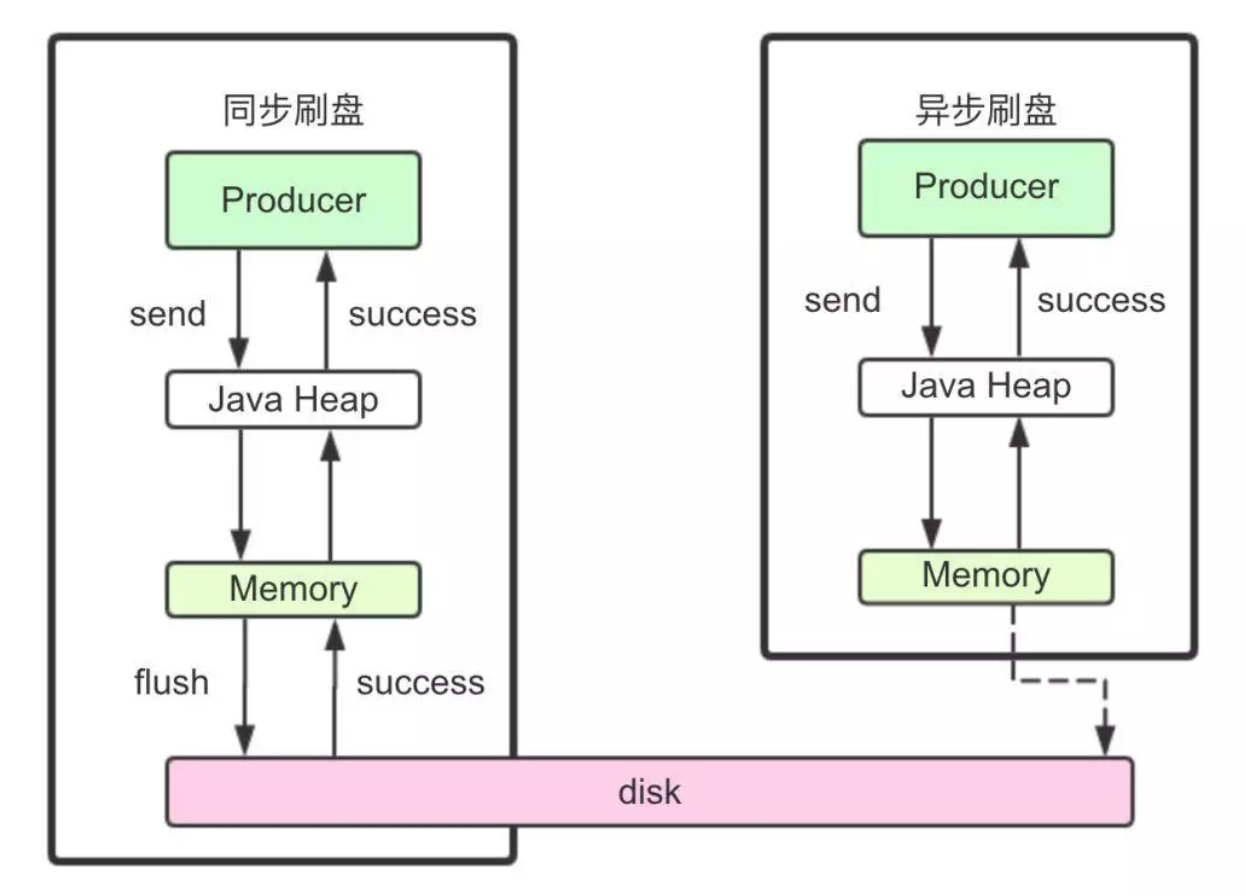
刷盘的方式分为异步和同步,rocketmq 默认是异步刷盘,根据我们前面的分析,消息最后是落地的,那么刷盘的最终调用应该会是 mappfile 的flush 方法 。

异步刷盘
异步刷盘相关的服务是FlushRealTimeService ,位于 CommitLog 这个类里面。
FlushRealTimeService 的 run 方法 。
        public void run() {

            CommitLog.log.info(this.getServiceName() + " service started");

            while (!this.isStopped()) {

                boolean flushCommitLogTimed = CommitLog.this.defaultMessageStore.getMessageStoreConfig().isFlushCommitLogTimed();

                int interval = CommitLog.this.defaultMessageStore.getMessageStoreConfig().getFlushIntervalCommitLog();

                int flushPhysicQueueLeastPages = CommitLog.this.defaultMessageStore.getMessageStoreConfig().getFlushCommitLogLeastPages();

                int flushPhysicQueueThoroughInterval =

                        CommitLog.this.defaultMessageStore.getMessageStoreConfig().getFlushCommitLogThoroughInterval();

                boolean printFlushProgress = false;

                // Print flush progress

                long currentTimeMillis = System.currentTimeMillis();

                if (currentTimeMillis >= (this.lastFlushTimestamp + flushPhysicQueueThoroughInterval)) {

                    this.lastFlushTimestamp = currentTimeMillis;

                    flushPhysicQueueLeastPages = 0;

                    printFlushProgress = (printTimes++ % 10) == 0;

                }

                // 前面的都是获刷盘时间

                try {

                    if (flushCommitLogTimed) {

                        Thread.sleep(interval);

                    } else {

                        this.waitForRunning(interval);

                    }

                    if (printFlushProgress) {

                        this.printFlushProgress();

                    }

                    long begin = System.currentTimeMillis();

                    // 核心逻辑

                    CommitLog.this.mappedFileQueue.flush(flushPhysicQueueLeastPages);

                    long storeTimestamp = CommitLog.this.mappedFileQueue.getStoreTimestamp();

                    if (storeTimestamp > 0) {

                        CommitLog.this.defaultMessageStore.getStoreCheckpoint().setPhysicMsgTimestamp(storeTimestamp);

                    }

                    long past = System.currentTimeMillis() - begin;

                    if (past > 500) {

                        log.info("Flush data to disk costs {} ms", past);

                    }

                } catch (Throwable e) {

                    CommitLog.log.warn(this.getServiceName() + " service has exception. ", e);

                    this.printFlushProgress();

                }

            }

            // Normal shutdown, to ensure that all the flush before exit

            boolean result = false;

            for (int i = 0; i < RETRY_TIMES_OVER && !result; i++) {

                result = CommitLog.this.mappedFileQueue.flush(0);

                CommitLog.log.info(this.getServiceName() + " service shutdown, retry " + (i + 1) + " times " + (result ? "OK" : "Not OK"));

            }

            this.printFlushProgress();

            CommitLog.log.info(this.getServiceName() + " service end");

        }
同步刷盘
同步刷盘使用的是 GroupCommitService
总结
参考文章
- https://zhuanlan.zhihu.com/p/59516998
- https://zhuanlan.zhihu.com/p/58728454
- https://juejin.im/post/5d3f00aaf265da03e1685097 (深入分析)
消息队列(五) ---RocketMQ-消息存储3的更多相关文章
- 消息队列之-RocketMQ入门
简介 RocketMQ是阿里开源的消息中间件,目前已经捐献个Apache基金会,它是由Java语言开发的,具备高吞吐量.高可用性.适合大规模分布式系统应用等特点,经历过双11的洗礼,实力不容小觑. 官 ...
- [分布式学习]消息队列之rocketmq笔记
文档地址 RocketMQ架构 哔哩哔哩上的视频 mq有很多,近期买了<分布式消息中间件实践>这本书,学习关于mq的相关知识.mq大致有有4个功能: 异步处理.比如业务端需要给用户发送邮件 ...
- 消息队列之--RocketMQ
序言 资料 https://github.com/alibaba/RocketMQ http://rocketmq.apache.org/
- 消息队列中间件 RocketMQ 源码分析 —— Message 存储
- 阿里消息队列中间件 RocketMQ源码解析:Message发送&接收
- 阿里消息队列中间件 RocketMQ 源码分析 —— Message 拉取与消费(上)
- IPC之消息队列详解与使用
一. 概念 消息队列就是一个消息的链表.对消息队列有写权限的进程可以向其中按照一定的规则添加新消息:对消息队列有读权限的进程可以从消息队列中读出消息.消息队列是随内核持续的.下面介绍三个概念: ...
- C#消息队列(RabbitMQ)零基础从入门到实战演练
一.课程介绍 如果您从工作中之听过但未有接触过消息对队列(MQ),如果你接触过一点关于MQ的知识,如果没有这么的多如果的话......,那么阿笨将通过本次<C#消息队列零基础从入门到实战演练&g ...
- 【windows 操作系统】进程间通信(IPC)简述|无名管道和命名管道 消息队列、信号量、共享存储、Socket、Streams等
一.进程间通信简述 每个进程各自有不同的用户地址空间,任何一个进程的全局变量在另一个进程中都看不到,所以进程之间要交换数据必须通过内核,在内核中开辟一块缓冲区,进程1把数据从用户空间拷到内核缓冲区,进 ...
- IM开发基础知识补课(五):通俗易懂,正确理解并用好MQ消息队列
1.引言 消息是互联网信息的一种表现形式,是人利用计算机进行信息传递的有效载体,比如即时通讯网坛友最熟悉的即时通讯消息就是其具体的表现形式之一. 消息从发送者到接收者的典型传递方式有两种: 1)一种我 ...
随机推荐
- centos7解压压缩zip文件
一.安装支持ZIP的工具 yum install -y unzip zip 二.解压zip文件 unzip 文件名.zip 二. 压缩一个zip文件 zip 文件名.zip 文件夹名称或文件名称
- C++ 深拷贝实例-改变原生数组
深拷贝 main.cpp #include <stdio.h> #include "IntArray.h" int main() { IntArray a(); ; i ...
- ubuntu 安装谷歌
下载ubuntugoogle官网:http://www.ubuntuchrome.com/ 我的是ubuntuLTS稳定版: 上传Ubuntu: 执行解压操作: sudo dpkg -i goo ...
- POJ3258 River Hopscotch(二分最大化最小值)
题目链接:http://poj.org/problem?id=3258 题意:给n个石头,起点和终点也是两个石头,去掉这石头中的m个,使得石头间距的最小值最大. 思路:二分石头间的最短距离,每次贪心地 ...
- JS高级---bind方法的使用
bind方法的使用 //通过对象,调用方法,产生随机数 function ShowRandom() { //1-10的随机数 this.number = parseInt(Math.random() ...
- python面试的100题(6)
7.请反转字符串 "aStr"? print("aStr"[::-1]) python实现字符串反转 第一种:使用字符串切片 result = s[::-1] ...
- 使用 NuGet 包管理器在 Visual Studio 中安装和管理包
https://docs.microsoft.com/zh-cn/nuget/consume-packages/install-use-packages-visual-studio 通过 Window ...
- 以管理员身份运行 Microsoft Edge 时不支持登录
之前一直用 edge chromium bate版本 一直不能登录 今天试了正式版 还是这样 然后百度一大堆没找到解决方案 设置兼容性为windown7 是可以的 但是 UI显示会有问题 再次打开 又 ...
- Iris项目结构
- 计算机系统概论之CPU(central processing unit)
CPI表示每条指令(Instruction)周期数,即执行一条指令所需的平均时钟周期数.可用下式计算: CPI=执行某段程序所需的CPU(Centrol Processing Unit)时钟周期数/程 ...
