Nginx应用详解及配置
一、Nginx简介
概述:Nginx是一款由俄罗斯开发的开源的高性能HTTP服务器和反向代理服务器,同时支持IMAP/POP3/SMTP代理服务,其性能优势着为显著,官网上称:单台nginx服务器可以处理50000并发;
特点:高性能、稳定、消耗硬件资源小、能够处理大并发,主要用于静态的解析,动静页面的分离;
功能:
1.作为Web服务器,nginx处理静态文件、索引文件以及自动索引效率非常高。
2.作为代理服务器,Nginx可以实现无缓存的反向代理加速,提高网站运行速度。
3.作为负载均衡服务器,Nginx既可以在内部直接支持Rails和PHP,也可以支持HTTP代理服务器,对外进行服务。同时支持简单的容错和利用算法进行负载均衡。
优势:
1.在性能方面,Nginx在实现上非常注重效率。它采用内核Poll模型,可以支持更多的并发连接,最大可以支持对50 000个并发连接数的响应,而且占用很低的内存资源。
2.在稳定性方面,Nginx采取了分阶段资源分配技术,使得对CPU与内存的占用率非常低。Nginx官方表示Nginx保持10 000个没有活动的连接,这些连接只占2.5M内存,因此,类似DOS这样的攻击对Nginx来说基本上是没有任何作用的。
3.在高可用性方面,Nginx支持热部署,启动速度特别迅速,因此可以在不间断服务的情况下,对软件版本或者配置进行升级,即使运行数月也无需重新启动,几乎可以做到7*24小时的不间断运行。
二、Nginx实现原理
Nginx核心组件:
核心模块:HTTP模块、EVENT事件模块、MAIL模块。
基础模块:HTTP Access模块、HTTP FastCGI模块、HTTP Proxy模块、HTTP Rewrite模块
第三方模块:HTTP Upstream Request Hash模块、Notice模块、HTTP Access Key模块。
Nginx模块分类(基于功能):
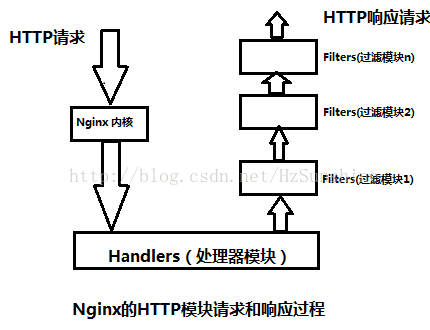
Handlers:处理器模块,此类模块直接处理请求,并进行输出内容和修改headers信息等操作。Handlers处理器模块一般只能有一个。
Filters:过滤器模块,此类模块主要对其他处理器模块输出的内容进行修改操作,最后由Nginx输出。
Proxies:代理类模块,此类模块是Nginx的HTTP Upstream之类的模块,这些模块主要与后端一些服务比如FastCGI等进行交互,实现服务代理和负载均衡等功能。

Nginx的进程模型:
单工作进程模式:除主进程外,还有一个工作进程,工作进程是单线程的,默认为此模式;
多工作进程模式:每个工作进程包含多个线程;

master进程:
1.接收外界传递给Nginx的信号,进而管理服务的状态等;
2.管理worker进程,向各worker进程发送信号,监控worker进程的运行状态,当worker进程异常情况下退出后,会自动重新启动新的worker进程;
3.master进程充当整个进程组与用户的交互接口,同时对进程进行监护。它不需要处理网络事件,不负责业务的执行,只会通过管理worker进程来实现重启服务、平滑升级、更换日志文件、配置文件实时生效等功能。
worker进程:
1.处理基本的网络事件,多个worker进程之间是对等的,他们同等竞争来自客户端的请求,各进程互相之间是独立的。
2.一个请求,只可能在一个worker进程中处理,一个worker进程,不可能处理其它进程的请求。
3.worker进程的个数是可以设置的,一般我们会设置与机器cpu核心数量一致。
扩展:
http://blog.csdn.net/hguisu/article/details/8930668 ##nginx实现原理
三、Nginx支持高并发的原因
I/O模型之select:
1.每个连接对应一个描述。select模型受限于 FD_SETSIZE(即进程最大打开的描述符数),linux2.6.35为1024,实际上linux每个进程所能打开描数字的个数仅受限于内存大小,然而在设计select的系统调用时,却是参考FD_SETSIZE的值。可通过重新编译内核更改此值,但不能根治此问题,对于百万级的用户连接请求即便增加相应进程数,仍显得杯水车薪;
2.select每次请求都会扫描一个文件描述符的集合,这个集合的大小是作为select第一个参数传入的值。但是每个进程所能打开文件描述符若是增加了,扫描的效率也将减小;
3.内核到用户空间,采用内存复制方式传递信息,这样就增加了不必要的复制延迟;
I/O模型之epoll模型:
1.请求无文件描述字大小限制,仅与内存大小相关;
2.epoll返回时已经明确的知道哪个socket fd发生了什么事件,不用像select那样再一个个比对;
3.内核到用户空间,采用共享内存方式传递消息,使用mmap加速内核与用户空间的消息传递;
Apache:Apache 2.2.9之前只支持select模型,2.2.9之后支持epoll模型;
Nginx:支持epoll模型;
四、案例:搭建Nginx网站服务
案例环境:
| 系统类型 | IP地址 | 主机名 | 所需软件 | 硬件 |
| Centos 6.5 64bit | 192.168.100.150 | www.linuxfan.cn | nginx-1.12.2.tar.gz |
内存:2G CPU:8核 |
案例步骤:
安装nginx程序;
优化nginx服务并启动服务;
客户端访问测试;
开启nginx的状态监听模块;
客户端访问nginx的状态监听界面;
企业级优化Nginx服务;
访问测试优化后nginx服务;
安装webbench压力测试工具,进行测试nginx性能;
自主学习:Nginx服务器内核优化;
安装nginx程序
[root@www ~]# rpm -e httpd --nodeps

[root@www ~]# yum -y install pcre-devel zlib-devel

[root@www ~]# useradd -M -s /sbin/nologin nginx

[root@www ~]# tar zxvf nginx-1.12..tar.gz -C /usr/src/

[root@www ~]# cd /usr/src/nginx-1.12./

[root@www nginx-1.12.]# ./configure --prefix=/usr/local/nginx --user=nginx --group=nginx --with-http_stub_status_module

注解:

--prefix=/usr/local/nginx ##指定安装位置

--user=nginx --group=nginx ##指定运行服务的用户和组

--with-http_stub_status_module ##开启状态监听模块

--conf-path= ##指向配置文件存放位置

--error-log-path= ##指向错误日志存放位置

--pid-path= ##指向pid文件存放位置

--with-rtsig_module ##启用rtsig模块支持(实时信号)

--with-select_module ##启用select模块支持(一种轮询模式,不推荐在高载环境下使用)禁用:--without-select_module

--with-http_ssl_module ##启用ngx_http_ssl_module支持(使支持https请求,需已安装openssl)

--with-http_xslt_module   ##启用ngx_http_xslt_module支持(过滤转换XML请求)

--with-http_image_filter_module ##启用ngx_http_image_filter_module支持(传输JPEG/GIF/PNG 图片的一个过滤器)(默认为不启用,要用到gd库)

--with-http_gzip_static_module ##启用ngx_http_gzip_static_module支持(在线实时压缩输出数据流)

--with-http_degradation_module   ##启用ngx_http_degradation_module支持(允许在内存不足的情况下返回204或444码)

--without-http_access_module ##禁用ngx_http_access_module支持(该模块提供了一个简单的基于主机的访问控制,允许或拒绝基于ip地址)

--without-http_auth_basic_module ##禁用ngx_http_auth_basic_module(该模块是可以使用用户名和密码基于http基本认证方法,来保护你的站点或其部分内容)

---without-http_rewrite_module ##禁用ngx_http_rewrite_module支持(该模块允许使用正则表达式改变URL)

--without-http_fastcgi_module ##禁用ngx_http_fastcgi_module支持(该模块允许Nginx 与FastCGI 进程交互,并通过传递参数来控制FastCGI 进程工作。)

[root@www nginx-1.12.]# make &&make install

[root@www nginx-1.12.]# ls /usr/local/nginx/

client_body_temp  conf  fastcgi_temp  html  logs  proxy_temp  sbin  scgi_temp  uwsgi_temp
优化nginx服务并启动服务
[root@www ~]# ln -s /usr/local/nginx/sbin/nginx /usr/local/sbin/   ##优化命令执行路径

[root@www ~]# vi /etc/init.d/nginx

#!/bin/bash

# chkconfig: -

# description: Nginx Server Control Script

NP="/usr/local/nginx/sbin/nginx"

NPF="/usr/local/nginx/logs/nginx.pid"

case "$1" in

  start)

    $NP;

    if [ $? -eq  ]

    then

      echo "nginx is starting!! "

    fi

  ;;

  stop)

    kill -s QUIT $(cat $NPF)

    if [ $? -eq  ]

    then

    echo "nginx is stopping!! "

    fi

  ;;

  restart)

    $ stop

    $ start

  ;;

  reload)

    kill -s HUP $(cat $NPF)

    if [ $? -eq  ]

    then

      echo "nginx config file is reload! "

    fi

  ;;

  *)

    echo "Usage: $0 {start|stop|restart|reload}"

    exit

esac

exit

[root@www ~]# chmod +x /etc/init.d/nginx

[root@www ~]# chkconfig --add nginx

[root@www ~]# chkconfig nginx on

[root@www ~]# /etc/init.d/nginx start

nginx is starting!!

[root@www ~]# netstat -utpln |grep nginx

tcp               0.0.0.0:                  0.0.0.0:*                   LISTEN      /nginx
客户端访问测试

开启nginx的状态监听模块
[root@www ~]# vi /usr/local/nginx/conf/nginx.conf   ##编辑配置文件在server中添加如下行:

    location /status {

        stub_status on;

        access_log off;

    }

[root@www ~]# /etc/init.d/nginx restart

nginx is stopping!!

nginx is starting!!
客户端访问nginx的状态监听界面
http://192.168.100.150/status

活动的连接数
已处理的连接数 成功的tcp握手次数 已处理的请求数
企业级优化Nginx服务

[root@www ~]# vi  /usr/local/nginx/conf/nginx.conf

worker_processes ;

worker_cpu_affinity               ;

error_log  /usr/local/nginx/logs/nginx_error.log  crit;

pid  /usr/local/nginx/logs/nginx.pid;

worker_rlimit_nofile ;

events  {

        use epoll;

        worker_connections ;

}

http            {

include mime.types;

default_type  application/octet-stream;

charset  utf-;

server_names_hash_bucket_size  ;

client_header_buffer_size 2k;

large_client_header_buffers  4k;

client_max_body_size 8m;

sendfile  on;

tcp_nopush  on;

keepalive_timeout ;

fastcgi_cache_path /usr/local/nginx/fastcgi_cache levels=:

        keys_zone=TEST:10m  inactive=5m;

fastcgi_connect_timeout ;

fastcgi_send_timeout ;

fastcgi_read_timeout ;

fastcgi_buffer_size 4k;

fastcgi_buffers  4k;

fastcgi_busy_buffers_size 8k;

fastcgi_temp_file_write_size 8k;

fastcgi_cache TEST;

fastcgi_cache_valid   1h;

fastcgi_cache_valid  1d;

fastcgi_cache_valid any 1m;

fastcgi_cache_min_uses ;

fastcgi_cache_use_stale error timeout invalid_header http_500;

open_file_cache max=  inactive=20s;

open_file_cache_min_uses ;

open_file_cache_valid 30s;

tcp_nodelay on;

gzip on;

gzip_min_length  1k;

gzip_buffers      16k;

gzip_http_version 1.0;

gzip_comp_level ;

gzip_types  text/plain application/x-javascript text/css application/xml;

gzip_vary on;

log_format  access  '$remote_addr - $remote_user [$time_local] "$request" '

                                  '$status $body_bytes_sent "$http_referer" '

                                  '"$http_user_agent" $http_x_forwarded_for';

server  {

listen ;

server_name  www.linuxfan.cn;

location / {

        root /usr/local/nginx/html/;

        index index.html index.htm;

}

location /status        {

        stub_status on;

        access_log off;

}

location ~ .*\.(gif|jpg|jpeg|png|bmp|swf|js|css)$               {

        expires 30d;

}

access_log  /usr/local/nginx/logs/access.log  access;

        }

}
注解:

worker_processes ; ##设置worker进程数量

worker_cpu_affinity               ; ##设置每个worker进程对应一个cpu的核心

error_log  /usr/local/nginx/logs/nginx_error.log  crit; ##指定错误日志

pid  /usr/local/nginx/logs/nginx.pid; ##指定运行时产生的pid文件

worker_rlimit_nofile ; ##指定nginx进程最多能够打开多少个文件描述符,通常与系统中的ulimit -n保持一致;

events  { ##事件区域配置

        use epoll; ##指定处理模型为epoll

        worker_connections ; ##每个进程最多能够处理多少个连接

}

http            { ##http服务配置区域

include mime.types; ##指定文件扩展名和文件类型映射表

default_type  application/octet-stream; ##指定文件类型

charset  utf-; ##指定字符集

server_names_hash_bucket_size  ; ##服务器名字的hash表大小

client_header_buffer_size 2k; ##客户端请求头部buffer大小

large_client_header_buffers  4k; ##指定客户端请求中较大的消息头的缓存数量和大小

client_max_body_size 8m; ##指定客户端请求的单个文件的最大字节数

sendfile  on; ##开启高效传输模式

tcp_nopush  on; ##防止网络阻塞

keepalive_timeout ; ##客户端连接超时时间

#FastCGI相关参数是为了改善网站的性能:减少资源占用,提高访问速度。

fastcgi_cache_path /usr/local/nginx/fastcgi_cache levels=: ##配置fastcgi缓存路径和目录结构等级

        keys_zone=TEST:10m  inactive=5m; ##关键字区域存储时间和非活动删除时间

fastcgi_connect_timeout ; ##连接到后端FastCGI的超时时间

fastcgi_send_timeout ; ##向FastCGI传送请求的超时时间

fastcgi_read_timeout ; ##接收FastCGI应答的超时时间

fastcgi_buffer_size 4k; ##指定读取FastCGI应答第一部分需要多大的缓冲区

fastcgi_buffers  4k; ##指定本地需要用多少和多大的缓冲区来缓冲FastCGI的应答请求

fastcgi_busy_buffers_size 8k; ##通常为fastcgi_buffer_size大小的两倍

fastcgi_temp_file_write_size 8k; ##写入缓存文件时使用多大的数据块,大小同上

fastcgi_cache TEST; ##开启Fastcgi的缓存并且为其指定一个名称

fastcgi_cache_valid   1h; ##指定不同的状态码,其缓存的时间

fastcgi_cache_valid  1d;

fastcgi_cache_valid any 1m;

fastcgi_cache_min_uses ; ##URL经过被访问多少次将被缓存

fastcgi_cache_use_stale error timeout invalid_header http_500; ##指定什么情况下不进行缓存

open_file_cache max=  inactive=20s; ##指定缓存文件最大数量,经过多长时间文件没有被请求后则删除缓存,

open_file_cache_min_uses ; ##指令中的inactive参数时间内文件的最少使用次数,如果超过这个数字,文件更改信息一直是在缓存中打开的;

open_file_cache_valid 30s; ##指定多长时间检查一次缓存的有效信息,检查该缓存的源文件是否发生变化修改等;

tcp_nodelay on; ## nagle算法,有需要发送的就立即发送,连接转换为长连接时使用;

gzip on; ##开启gzip压缩

gzip_min_length  1k; ##指定最小压缩文件的大小

gzip_buffers      16k; ##指定压缩缓冲区的个数和大小

gzip_http_version 1.0; ##指定压缩版本

gzip_comp_level ; ##指定压缩等级1-,9等级最高

gzip_types  text/plain application/x-javascript text/css application/xml; ##指定压缩文件类型

gzip_vary on; ##前端缓存服务器缓存经过压缩的页面

log_format  access  '$remote_addr - $remote_user [$time_local] "$request" '

                                  '$status $body_bytes_sent "$http_referer" '

                                  '"$http_user_agent" $http_x_forwarded_for';

##配置日志格式,具体变量表示请结合百度,日志格式为access

server  {

listen ;

server_name  www.linuxfan.cn;

location / {

        root /usr/local/nginx/html/;

        index index.html index.htm;

}

location /status        {

        stub_status on;

        access_log off;

}

location ~ .*\.(gif|jpg|jpeg|png|bmp|swf|js|css)$               {

        expires 30d; ##指定以上格式的文件将进行缓存

}

access_log  /usr/local/nginx/logs/access.log  access;

        }

}
[root@www~]# /etc/init.d/nginx start

nginx: [warn] no "fastcgi_cache_key" for "fastcgi_cache" in /usr/local/nginx/conf/nginx.conf:

nginx: [warn] no "fastcgi_cache_key" for "fastcgi_cache" in /usr/local/nginx/conf/nginx.conf:

nginx: [warn] no "fastcgi_cache_key" for "fastcgi_cache" in /usr/local/nginx/conf/nginx.conf:

nginx is starting!!

[root@www ~]# netstat -utpln |grep nginx

tcp               0.0.0.0:                  0.0.0.0:*                   LISTEN      /nginx

[root@www ~]# ps aux |grep nginx |grep -v grep

root        0.0  0.0      ?        Ss   :   : nginx: master process /usr/local/nginx/sbin/nginx

nginx       0.1 11.6   ?        S    :   : nginx: worker process

nginx       0.0 11.1   ?        S    :   : nginx: worker process

nginx       0.0  9.7   ?        S    :   : nginx: worker process

nginx       0.0  9.6   ?        S    :   : nginx: worker process

nginx       0.0  9.8   ?        S    :   : nginx: worker process

nginx       0.0 10.5   ?        S    :   : nginx: worker process

nginx       0.0 11.5   ?        S    :   : nginx: worker process

nginx       0.0  9.4   ?        S    :   : nginx: worker process

nginx       0.0  0.0      ?        S    :   : nginx: cache manager process
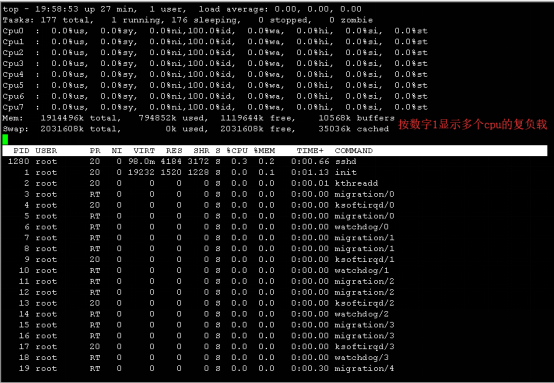
[root@www ~]# top

访问测试优化后nginx服务

安装webbench压力测试工具,进行测试nginx性能
[root@www ~]# yum -y install gcc ctags

[root@www ~]# wget http://home.tiscali.cz/~cz210552/distfiles/webbench-1.5.tar.gz

[root@www ~]# tar zxvf webbench-1.5.tar.gz -C /usr/src/

[root@www ~]# cd /usr/src/webbench-1.5/

[root@www webbench-1.5]# mkdir /usr/local/man

[root@www webbench-1.5]# make && make install

[root@www webbench-1.5]# cd

[root@www~]# webbench -c  -t  http://www.linuxfan.cn:80/index.html ##并发数为10000,时间为5秒

Webbench - Simple Web Benchmark 1.5

Copyright (c) Radim Kolar -, GPL Open Source Software.

Benchmarking: GET http://www.linuxfan.cn:80/index.html

 clients, running  sec.

Speed= pages/min,  bytes/sec.

Requests:  susceed,  failed.

[root@www ~]# netstat -nat | awk '/^tcp/ {++S[$NF]} END {for(key in S) print key,"\t",S[key]}' ##查看数据库状态

TIME_WAIT   ##表示收到了对方的FIN报文,并发送出了ACK报文

FIN_WAIT1   ##已发送FIN报文,等待对方的ACK

SYN_SENT   ##这个状态与SYN_RCVD遥相呼应,用于建立连接

FIN_WAIT2   ##半关闭状态

ESTABLISHED   ##已经建立连接

SYN_RECV   ##已经接收到对方的SYN报文,等待ACK报文

LISTEN   ##监听状态
浏览器访问监控界面刷新测试

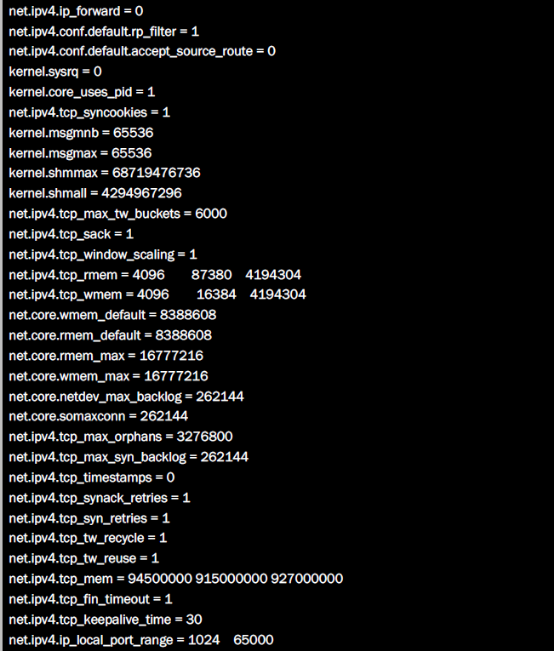
Nginx服务器内核优化
[root@www ~]# vi /etc/sysctl.conf

[root@www ~]# sysctl -p
Nginx应用详解及配置的更多相关文章
- Nginx中文详解、配置部署及高并发优化
一.Nginx常用命令: 1. 启动 Nginx /usr/local/nginx/sbin/nginxpoechant@ubuntu:sudo ./sbin/nginx2. 停 ...
- nginx的gzip模块详解以及配置
文章来源 运维公会:nginx的gzip模块详解以及配置 1.gzip模块作用 gzip这个模块无论在测试环境还是生产环境都是必须要开启,这个模块能高效的将页面的内容,无论是html或者css.j ...
- Nginx Rewrite详解
Nginx Rewrite详解 引用链接:http://blog.cafeneko.info/2010/10/nginx_rewrite_note/ 原文如下: 在新主机的迁移过程中,最大的困难就是W ...
- nginx之旅(第一篇):nginx下载安装、nginx启动与关闭、nginx配置文件详解、nginx默认网站
一.nginx下载安装 版本nginx 1.15.5 系统环境centos7.5(本机ip192.168.199.228) 关闭selinux 和防火墙firewall 1.下载 wget http: ...
- log4j.properties 详解与配置步骤(转)
找的文章,供参考使用 转自 log4j.properties 详解与配置步骤 一.log4j.properties 的使用详解 1.输出级别的种类 ERROR.WARN.INFO.DEBUGERROR ...
- C3P0连接池详解及配置
C3P0连接池详解及配置 本人使用的C3P0的jar包是:c3p0-0.9.1.jar <bean id = "dataSource" class = "com.m ...
- rsync的介绍及参数详解,配置步骤,工作模式介绍
rsync的介绍及参数详解,配置步骤,工作模式介绍 rsync是类unix系统下的数据镜像备份工具.它是快速增量备份.全量备份工具. Sync可以远程同步,支持本地复制,或者与其他SSH.rsync主 ...
- 磁盘分区对齐详解与配置 – Linux篇
在之前一篇<磁盘分区对齐详解与配置 – Windows篇>中,我介绍了磁盘分区对齐的作用和适用于MBR和GPT的两种磁盘类型的配置,以及Windows平台设置磁盘分区对齐的方法. 本文作为 ...
- tomcat启动nio,apr详解以及配置
tomcat启动nio,apr详解以及配置 前言 在正文开始之前,我们先在idea工具中看看启动的信息,顺便看下启动的基本信息 在这里插入图片描述可以看到信息有tomcat版本操作系统版本java版本 ...
随机推荐
- Emu8086三种格式的代码-(顺序,分支,循环)
这个学期准备考研,于是就没有怎么听别的课,现在临近期末,汇编成了个难题.下面是我学校的实验报告 做一个复习的记录吧,下面的代码都是在Emu8086上运行出来的代码 下面先介绍一下,汇编里面的格式问题 ...
- CF1178F Short/Long Colorful Strip(DP)
说起来,这题好像也不难-- 先考虑 F1 怎么做. 既然别的方法都不行不如试试\(f_{i,j}\) 表示在刚刚准备开始涂 \([i,j]\) 中最小编号的颜色之前,整个区间是同色的,且最后能做到 \ ...
- [LeetCode] 794. Valid Tic-Tac-Toe State 验证井字棋状态
A Tic-Tac-Toe board is given as a string array board. Return True if and only if it is possible to r ...
- [LeetCode] 378. Kth Smallest Element in a Sorted Matrix 有序矩阵中第K小的元素
Given a n x n matrix where each of the rows and columns are sorted in ascending order, find the kth ...
- Spring事物隔离级别及事物传播行为@Transactional实现
阅读本篇文章前,请先阅读如下文章: 四种事物隔离级别详解 先看下@Transactional可以配制那些参数及以其所代表的意义. isolation 枚举org.springframework.tra ...
- CopyOnWriteArrayList 源码分析 基于jdk1.8
CopyOnWriteArrayList 源码分析: 1:成员属性: final transient ReentrantLock lock = new ReentrantLock(); //内部是 ...
- arcgis js api 4.X 自定义工具按钮
// All material copyright ESRI, All Rights Reserved, unless otherwise specified. // See https://js.a ...
- Javascript Object常用方法总结
Object.keys方法 Object.keys方法是JavaScript中用于遍历对象属性的一个方法 .它传入的参数是一个对象,返回的是一个数组,数组中包含的是该对象所有的属性名. 如: var ...
- 基于FlexBox的无约束自适应
全手打原创,转载请标明出处:https://www.cnblogs.com/dreamsqin/p/11972664.html,多谢,=.=~ 一.背景描述 对于通用型带过滤条件的列表查询项目中, ...
- 【51nod1355】斐波那契的最小公倍数(min-max容斥)
[51nod1355]斐波那契的最小公倍数(min-max容斥) 题面 51nod 题解 显然直接算还是没法算的,所以继续考虑\(min-max\)容斥计算. \[lcm(S)=\prod_{T\su ...
