Flume 概述/企业案例
概述
1 Flume定义
Flume是Cloudera提供的一个高可用的,高可靠的,分布式的海量日志采集、聚合和传输的系统。Flume基于流式架构,灵活简单。

下面我们来详细介绍一下Flume架构中的组件。
1.2.1 Agent
Agent是一个JVM进程,它以事件的形式将数据从源头送至目的,是Flume数据传输的基本单元。
Agent主要有3个部分组成,Source、Channel、Sink。
1.2.2 Source
Source是负责接收数据到Flume Agent的组件。Source组件可以处理各种类型、各种格式的日志数据,包括avro、thrift、exec、jms、spooling directory、netcat、sequence generator、syslog、http、legacy。
1.2.3 Channel
Channel是位于Source和Sink之间的缓冲区。因此,Channel允许Source和Sink运作在不同的速率上。Channel是线程安全的,可以同时处理几个Source的写入操作和几个Sink的读取操作。
Flume自带两种Channel:Memory Channel和File Channel。
Memory Channel是内存中的队列。Memory Channel在不需要关心数据丢失的情景下适用。如果需要关心数据丢失,那么Memory Channel就不应该使用,因为程序死亡、机器宕机或者重启都会导致数据丢失。
File Channel将所有事件写到磁盘。因此在程序关闭或机器宕机的情况下不会丢失数据。
1.2.4 Sink
Sink不断地轮询Channel中的事件且批量地移除它们,并将这些事件批量写入到存储或索引系统、或者被发送到另一个Flume Agent。
Sink是完全事务性的。在从Channel批量删除数据之前,每个Sink用Channel启动一个事务。批量事件一旦成功写出到存储系统或下一个Flume Agent,Sink就利用Channel提交事务。事务一旦被提交,该Channel从自己的内部缓冲区删除事件。
Sink组件目的地包括hdfs、logger、avro、thrift、ipc、file、null、HBase、solr、自定义。
1.2.5 Event
传输单元,Flume数据传输的基本单元,以事件的形式将数据从源头送至目的地。
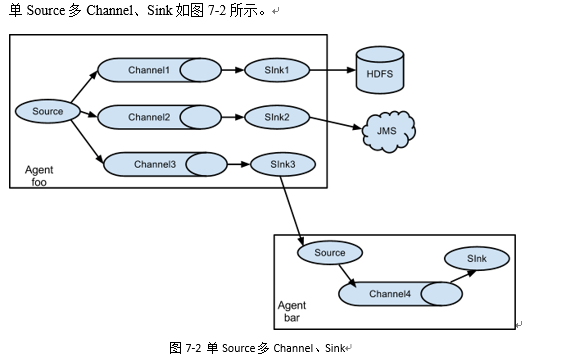
1.3 Flume拓扑结构
Flume的拓扑结构如图1-3、1-4、1-5和1-6所示:
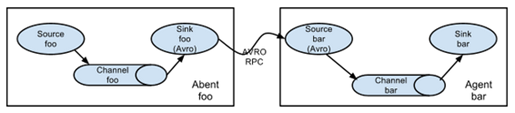
图1-3 Flume Agent连接
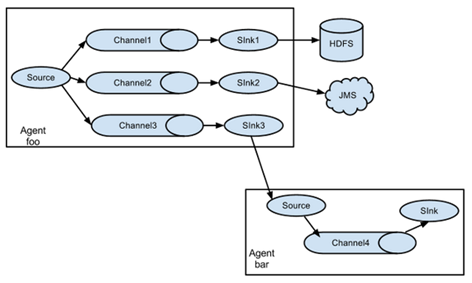
图1-4 单source,多channel、sink

图1-5 Flume负载均衡
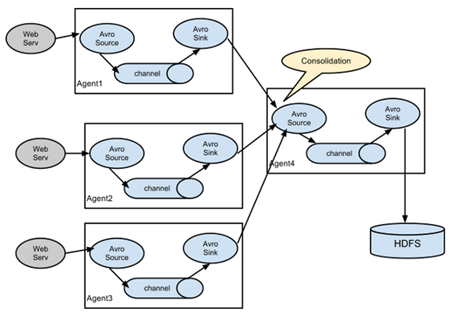
图1-6 Flume Agent聚合
1.4 Flume Agent内部原理

第2章 快速入门
2.1 Flume安装地址
1) Flume官网地址
2)文档查看地址
http://flume.apache.org/FlumeUserGuide.html
3)下载地址
http://archive.apache.org/dist/flume/
2.2 安装部署
1)将apache-flume-1.7.0-bin.tar.gz上传到linux的/opt/software目录下
2)解压apache-flume-1.7.0-bin.tar.gz到/opt/module/目录下
[FLY@hadoop102 software]$ tar -zxf apache-flume-1.7.0-bin.tar.gz -C /opt/module/
3)修改apache-flume-1.7.0-bin的名称为flume
[FLY@hadoop102 module]$ mv apache-flume-1.7.0-bin flume
4) 将flume/conf下的flume-env.sh.template文件修改为flume-env.sh,并配置flume-env.sh文件
[FLY@hadoop102 conf]$ mv flume-env.sh.template flume-env.sh
[FLY@hadoop102 conf]$ vi flume-env.sh
export JAVA_HOME=/opt/module/jdk1.8.0_144
第3章 企业开发案例
3.1 监控端口数据官方案例
1)案例需求:首先,Flume监控本机44444端口,然后通过telnet工具向本机44444端口发送消息,最后Flume将监听的数据实时显示在控制台。
2)需求分析:
3)实现步骤:
1.安装telnet工具
将rpm软件包(xinetd-2.3.14-40.el6.x86_64.rpm、telnet-0.17-48.el6.x86_64.rpm和telnet-server-0.17-48.el6.x86_64.rpm)拷入/opt/software文件夹下面。执行RPM软件包安装命令:
[FLY@hadoop102 software]$ sudo rpm -ivh xinetd-2.3.14-40.el6.x86_64.rpm

[FLY@hadoop102 software]$ sudo rpm -ivh telnet-0.17-48.el6.x86_64.rpm

[FLY@hadoop102 software]$ sudo rpm -ivh telnet-server-0.17-48.el6.x86_64.rpm
2.判断44444端口是否被占用
[FLY@hadoop102 flume-telnet]$ sudo netstat -tunlp | grep 44444
功能描述:netstat命令是一个监控TCP/IP网络的非常有用的工具,它可以显示路由表、实际的网络连接以及每一个网络接口设备的状态信息。
基本语法:netstat [选项]
选项参数:
-t或--tcp:显示TCP传输协议的连线状况;
-u或--udp:显示UDP传输协议的连线状况;
-n或--numeric:直接使用ip地址,而不通过域名服务器;
-l或--listening:显示监控中的服务器的Socket;
-p或--programs:显示正在使用Socket的程序识别码和程序名称;
3.创建Flume Agent配置文件flume-telnet-logger.conf
在flume目录下创建job文件夹并进入job文件夹。
[FLY@hadoop102 flume]$ mkdir job

[FLY@hadoop102 flume]$ cd job/
在job文件夹下创建Flume Agent配置文件flume-telnet-logger.conf。
[FLY@hadoop102 job]$ touch flume-telnet-logger.conf
在flume-telnet-logger.conf文件中添加如下内容。
[FLY@hadoop102 job]$ vim flume-telnet-logger.conf
添加内容如下:
# Name the components on this agent

a1.sources = r1

a1.sinks = k1

a1.channels = c1

# Describe/configure the source

a1.sources.r1.type = netcat

a1.sources.r1.bind = localhost

a1.sources.r1.port = 44444

# Describe the sink

a1.sinks.k1.type = logger

# Use a channel which buffers events in memory

a1.channels.c1.type = memory

a1.channels.c1.capacity = 1000

a1.channels.c1.transactionCapacity = 100

# Bind the source and sink to the channel

a1.sources.r1.channels = c1

a1.sinks.k1.channel = c1
注:配置文件来源于官方手册http://flume.apache.org/FlumeUserGuide.html

4. 先开启flume监听端口
[FLY@hadoop102 flume]$ bin/flume-ng agent --conf conf/ --name a1 --conf-file job/flume-telnet-logger.conf -Dflume.root.logger=INFO,console
参数说明:
--conf conf/ :表示配置文件存储在conf/目录
--name a1 :表示给agent起名为a1
--conf-file job/flume-telnet.conf :flume本次启动读取的配置文件是在job文件夹下的flume-telnet.conf文件。
-Dflume.root.logger==INFO,console :-D表示flume运行时动态修改flume.root.logger参数属性值,并将控制台日志打印级别设置为INFO级别。日志级别包括:log、info、warn、error。
5.使用telnet工具向本机的44444端口发送内容
[FLY@hadoop102 ~]$ telnet localhost
6.在Flume监听页面观察接收数据情况

3.2 实时读取本地文件到HDFS案例
1)案例需求:实时监控Hive日志,并上传到HDFS中
2)需求分析:
3)实现步骤:
1.Flume要想将数据输出到HDFS,必须持有Hadoop相关jar包
将commons-configuration-1.6.jar、
hadoop-auth-2.7.2.jar、
hadoop-common-2.7.2.jar、
hadoop-hdfs-2.7.2.jar、
commons-io-2.4.jar、
htrace-core-3.1.0-incubating.jar
拷贝到/opt/module/flume/lib文件夹下。
2.创建flume-file-hdfs.conf文件
创建文件
[FLY@hadoop102 job]$ touch flume-file-hdfs.conf
注:要想读取Linux系统中的文件,就得按照Linux命令的规则执行命令。由于Hive日志在Linux系统中所以读取文件的类型选择:exec即execute执行的意思。表示执行Linux命令来读取文件。
[FLY@hadoop102 job]$ vim flume-file-hdfs.conf
添加如下内容
# Name the components on this agent
a2.sources = r2
a2.sinks = k2
a2.channels = c2
# Describe/configure the source
a2.sources.r2.type = exec
a2.sources.r2.command = tail -F /opt/module/hive/logs/hive.log
a2.sources.r2.shell = /bin/bash -c
# Describe the sink
a2.sinks.k2.type = hdfs
a2.sinks.k2.hdfs.path = hdfs://hadoop102:9000/flume/%Y%m%d/%H
#上传文件的前缀
a2.sinks.k2.hdfs.filePrefix = logs-
#是否按照时间滚动文件夹
a2.sinks.k2.hdfs.round = true
#多少时间单位创建一个新的文件夹
a2.sinks.k2.hdfs.roundValue = 1
#重新定义时间单位
a2.sinks.k2.hdfs.roundUnit = hour
#是否使用本地时间戳
a2.sinks.k2.hdfs.useLocalTimeStamp = true
#积攒多少个Event才flush到HDFS一次
a2.sinks.k2.hdfs.batchSize = 1000
#设置文件类型,可支持压缩
a2.sinks.k2.hdfs.fileType = DataStream
#多久生成一个新的文件
a2.sinks.k2.hdfs.rollInterval = 600
#设置每个文件的滚动大小
a2.sinks.k2.hdfs.rollSize = 134217700
#文件的滚动与Event数量无关
a2.sinks.k2.hdfs.rollCount = 0
#最小冗余数
a2.sinks.k2.hdfs.minBlockReplicas = 1
# Use a channel which buffers events in memory
a2.channels.c2.type = memory
a2.channels.c2.capacity = 1000
a2.channels.c2.transactionCapacity = 100
# Bind the source and sink to the channel
a2.sources.r2.channels = c2
a2.sinks.k2.channel = c2

3.执行监控配置
[FLY@hadoop102 flume]$ bin/flume-ng agent --conf conf/ --name a2 --conf-file job/flume-file-hdfs.conf
4.开启Hadoop和Hive并操作Hive产生日志
[FLY@hadoop102 hadoop-2.7.]$ sbin/start-dfs.sh

[FLY@hadoop103 hadoop-2.7.]$ sbin/start-yarn.sh

[FLY@hadoop102 hive]$ bin/hive

hive (default)>
5.在HDFS上查看文件。
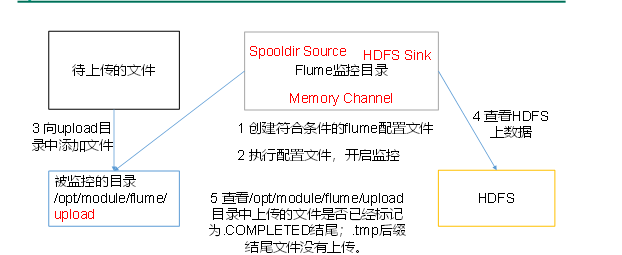
3.3 实时读取目录文件到HDFS案例
1)案例需求:使用Flume监听整个目录的文件
2)需求分析:
3)实现步骤:
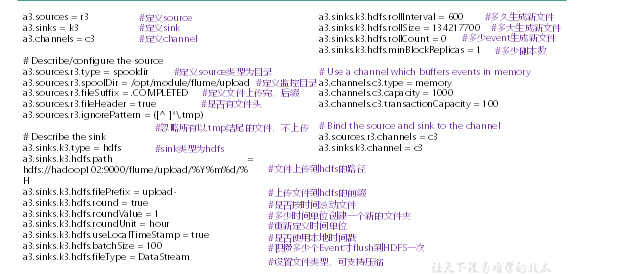
1.创建配置文件flume-dir-hdfs.conf
创建一个文件
[FLY@hadoop102 job]$ touch flume-dir-hdfs.conf
打开文件
[FLY@hadoop102 job]$ vim flume-dir-hdfs.conf
添加如下内容
a3.sources = r3

a3.sinks = k3

a3.channels = c3

# Describe/configure the source

a3.sources.r3.type = spooldir

a3.sources.r3.spoolDir = /opt/module/flume/upload

a3.sources.r3.fileSuffix = .COMPLETED

a3.sources.r3.fileHeader = true

#忽略所有以.tmp结尾的文件,不上传

a3.sources.r3.ignorePattern = ([^ ]*\.tmp)

# Describe the sink

a3.sinks.k3.type = hdfs

a3.sinks.k3.hdfs.path = hdfs://hadoop102:9000/flume/upload/%Y%m%d/%H

#上传文件的前缀

a3.sinks.k3.hdfs.filePrefix = upload-

#是否按照时间滚动文件夹

a3.sinks.k3.hdfs.round = true

#多少时间单位创建一个新的文件夹

a3.sinks.k3.hdfs.roundValue =

#重新定义时间单位

a3.sinks.k3.hdfs.roundUnit = hour

#是否使用本地时间戳

a3.sinks.k3.hdfs.useLocalTimeStamp = true

#积攒多少个Event才flush到HDFS一次

a3.sinks.k3.hdfs.batchSize =

#设置文件类型,可支持压缩

a3.sinks.k3.hdfs.fileType = DataStream

#多久生成一个新的文件

a3.sinks.k3.hdfs.rollInterval =

#设置每个文件的滚动大小大概是128M

a3.sinks.k3.hdfs.rollSize =

#文件的滚动与Event数量无关

a3.sinks.k3.hdfs.rollCount =

#最小冗余数

a3.sinks.k3.hdfs.minBlockReplicas =

# Use a channel which buffers events in memory

a3.channels.c3.type = memory

a3.channels.c3.capacity =

a3.channels.c3.transactionCapacity =

# Bind the source and sink to the channel

a3.sources.r3.channels = c3

a3.sinks.k3.channel = c3
2. 启动监控文件夹命令
[FLY@hadoop102 flume]$ bin/flume-ng agent --conf conf/ --name a3 --conf-file job/flume-dir-hdfs.conf
说明: 在使用Spooling Directory Source时
1) 不要在监控目录中创建并持续修改文件
2) 上传完成的文件会以.COMPLETED结尾
3) 被监控文件夹每500毫秒扫描一次文件变动
3. 向upload文件夹中添加文件
在/opt/module/flume目录下创建upload文件夹
[FLY@hadoop102 flume]$ mkdir upload
向upload文件夹中添加文件
[FLY@hadoop102 upload]$ touch FLY.txt

[FLY@hadoop102 upload]$ touch FLY.tmp

[FLY@hadoop102 upload]$ touch FLY.log
4. 查看HDFS上的数据

5. 等待1s,再次查询upload文件夹
[FLY@hadoop102 upload]$ ll

总用量

-rw-rw-r--.  FLY FLY  5月   : FLY.log.COMPLETED

-rw-rw-r--.  FLY FLY  5月   : FLY.tmp

-rw-rw-r--.  FLY FLY  5月   : FLY.txt.COMPLETED
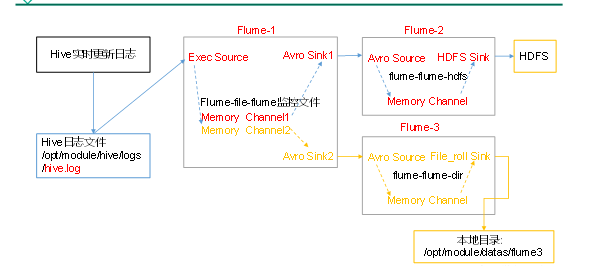
3.4 单数据源多出口案例(选择器)
1)案例需求:使用Flume-1监控文件变动,Flume-1将变动内容传递给Flume-2,Flume-2负责存储到HDFS。同时Flume-1将变动内容传递给Flume-3,Flume-3负责输出到Local FileSystem。
3)实现步骤:
0.准备工作
在/opt/module/flume/job目录下创建group1文件夹
[FLY@hadoop102 job]$ cd group1/
在/opt/module/datas/目录下创建flume3文件夹
[FLY@hadoop102 datas]$ mkdir flume3
1.创建flume-file-flume.conf
配置1个接收日志文件的source和两个channel、两个sink,分别输送给flume-flume-hdfs和flume-flume-dir。
创建配置文件并打开
[FLY@hadoop102 group1]$ touch flume-file-flume.conf

[FLY@hadoop102 group1]$ vim flume-file-flume.conf
添加如下内容
# Name the components on this agent

a1.sources = r1

a1.sinks = k1 k2

a1.channels = c1 c2

# 将数据流复制给所有channel

a1.sources.r1.selector.type = replicating

# Describe/configure the source

a1.sources.r1.type = exec

a1.sources.r1.command = tail -F /opt/module/hive/logs/hive.log

a1.sources.r1.shell = /bin/bash -c

# Describe the sink

a1.sinks.k1.type = avro

a1.sinks.k1.hostname = hadoop102

a1.sinks.k1.port =

a1.sinks.k2.type = avro

a1.sinks.k2.hostname = hadoop102

a1.sinks.k2.port =

# Describe the channel

a1.channels.c1.type = memory

a1.channels.c1.capacity =

a1.channels.c1.transactionCapacity =

a1.channels.c2.type = memory

a1.channels.c2.capacity =

a1.channels.c2.transactionCapacity =

# Bind the source and sink to the channel

a1.sources.r1.channels = c1 c2

a1.sinks.k1.channel = c1

a1.sinks.k2.channel = c2
注:Avro是由Hadoop创始人Doug Cutting创建的一种语言无关的数据序列化和RPC框架。
注:RPC(Remote Procedure Call)—远程过程调用,它是一种通过网络从远程计算机程序上请求服务,而不需要了解底层网络技术的协议。
2.创建flume-flume-hdfs.conf
配置上级Flume输出的Source,输出是到HDFS的Sink。
创建配置文件并打开
[FLY@hadoop102 group1]$ touch flume-flume-hdfs.conf

[FLY@hadoop102 group1]$ vim flume-flume-hdfs.conf
添加如下内容
# Name the components on this agent

a2.sources = r1

a2.sinks = k1

a2.channels = c1

# Describe/configure the source

a2.sources.r1.type = avro

a2.sources.r1.bind = hadoop102

a2.sources.r1.port = 4141

# Describe the sink

a2.sinks.k1.type = hdfs

a2.sinks.k1.hdfs.path = hdfs://hadoop102:9000/flume2/%Y%m%d/%H

#上传文件的前缀

a2.sinks.k1.hdfs.filePrefix = flume2-

#是否按照时间滚动文件夹

a2.sinks.k1.hdfs.round = true

#多少时间单位创建一个新的文件夹

a2.sinks.k1.hdfs.roundValue = 1

#重新定义时间单位

a2.sinks.k1.hdfs.roundUnit = hour

#是否使用本地时间戳

a2.sinks.k1.hdfs.useLocalTimeStamp = true

#积攒多少个Event才flush到HDFS一次

a2.sinks.k1.hdfs.batchSize = 100

#设置文件类型,可支持压缩

a2.sinks.k1.hdfs.fileType = DataStream

#多久生成一个新的文件

a2.sinks.k1.hdfs.rollInterval = 600

#设置每个文件的滚动大小大概是128M

a2.sinks.k1.hdfs.rollSize = 134217700

#文件的滚动与Event数量无关

a2.sinks.k1.hdfs.rollCount = 0

#最小冗余数

a2.sinks.k1.hdfs.minBlockReplicas = 1

# Describe the channel

a2.channels.c1.type = memory

a2.channels.c1.capacity = 1000

a2.channels.c1.transactionCapacity = 100

# Bind the source and sink to the channel

a2.sources.r1.channels = c1

a2.sinks.k1.channel = c1
3.创建flume-flume-dir.conf
配置上级Flume输出的Source,输出是到本地目录的Sink。
创建配置文件并打开
[FLY@hadoop102 group1]$ touch flume-flume-dir.conf

[FLY@hadoop102 group1]$ vim flume-flume-dir.conf
添加如下内容
# Name the components on this agent

a3.sources = r1

a3.sinks = k1

a3.channels = c2

# Describe/configure the source

a3.sources.r1.type = avro

a3.sources.r1.bind = hadoop102

a3.sources.r1.port =

# Describe the sink

a3.sinks.k1.type = file_roll

a3.sinks.k1.sink.directory = /opt/module/datas/flume3

# Describe the channel

a3.channels.c2.type = memory

a3.channels.c2.capacity =

a3.channels.c2.transactionCapacity =

# Bind the source and sink to the channel

a3.sources.r1.channels = c2

a3.sinks.k1.channel = c2
提示:输出的本地目录必须是已经存在的目录,如果该目录不存在,并不会创建新的目录。
4.执行配置文件
分别开启对应配置文件:flume-flume-dir,flume-flume-hdfs,flume-file-flume。
[FLY@hadoop102 flume]$ bin/flume-ng agent --conf conf/ --name a3 --conf-file job/group1/flume-flume-dir.conf

[FLY@hadoop102 flume]$ bin/flume-ng agent --conf conf/ --name a2 --conf-file job/group1/flume-flume-hdfs.conf

[FLY@hadoop102 flume]$ bin/flume-ng agent --conf conf/ --name a1 --conf-file job/group1/flume-file-flume.conf
5.启动Hadoop和Hive
[FLY@hadoop102 hadoop-2.7.2]$ sbin/start-dfs.sh
[FLY@hadoop103 hadoop-2.7.2]$ sbin/start-yarn.sh
[FLY@hadoop102 hive]$ bin/hive
hive (default)>
6.检查HDFS上数据
7检查/opt/module/datas/flume3目录中数据
[FLY@hadoop102 flume3]$ ll

总用量

-rw-rw-r--.  FLY FLY  5月   : -
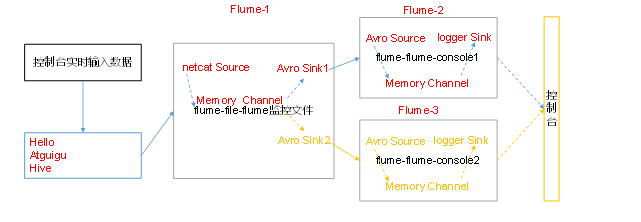
3.5 单数据源多出口案例(Sink组)

1)案例需求:使用Flume-1监控文件变动,Flume-1将变动内容传递给Flume-2,Flume-2负责存储到HDFS。同时Flume-1将变动内容传递给Flume-3,Flume-3也负责存储到HDFS
2)需求分析:
3)实现步骤:
0.准备工作
在/opt/module/flume/job目录下创建group2文件夹
[FLY@hadoop102 job]$ cd group2/
1.创建flume-netcat-flume.conf
配置1个接收日志文件的source和1个channel、两个sink,分别输送给flume-flume-console1和flume-flume-console2。
创建配置文件并打开
[FLY@hadoop102 group2]$ touch flume-netcat-flume.conf

[FLY@hadoop102 group2]$ vim flume-netcat-flume.conf
添加如下内容
# Name the components on this agent

a1.sources = r1

a1.channels = c1

a1.sinkgroups = g1

a1.sinks = k1 k2

# Describe/configure the source

a1.sources.r1.type = netcat

a1.sources.r1.bind = localhost

a1.sources.r1.port =

a1.sinkgroups.g1.processor.type = load_balance

a1.sinkgroups.g1.processor.backoff = true

a1.sinkgroups.g1.processor.selector = round_robin

a1.sinkgroups.g1.processor.selector.maxTimeOut=

# Describe the sink

a1.sinks.k1.type = avro

a1.sinks.k1.hostname = hadoop102

a1.sinks.k1.port =

a1.sinks.k2.type = avro

a1.sinks.k2.hostname = hadoop102

a1.sinks.k2.port =

# Describe the channel

a1.channels.c1.type = memory

a1.channels.c1.capacity =

a1.channels.c1.transactionCapacity =

# Bind the source and sink to the channel

a1.sources.r1.channels = c1

a1.sinkgroups.g1.sinks = k1 k2

a1.sinks.k1.channel = c1

a1.sinks.k2.channel = c1
注:Avro是由Hadoop创始人Doug Cutting创建的一种语言无关的数据序列化和RPC框架。
注:RPC(Remote Procedure Call)—远程过程调用,它是一种通过网络从远程计算机程序上请求服务,而不需要了解底层网络技术的协议。
2.创建flume-flume-console1.conf
配置上级Flume输出的Source,输出是到本地控制台。
创建配置文件并打开
[FLY@hadoop102 group2]$ touch flume-flume-console1.conf

[FLY@hadoop102 group2]$ vim flume-flume-console1.conf
添加如下内容
# Name the components on this agent

a2.sources = r1

a2.sinks = k1

a2.channels = c1

# Describe/configure the source

a2.sources.r1.type = avro

a2.sources.r1.bind = hadoop102

a2.sources.r1.port =

# Describe the sink

a2.sinks.k1.type = logger

# Describe the channel

a2.channels.c1.type = memory

a2.channels.c1.capacity =

a2.channels.c1.transactionCapacity =

# Bind the source and sink to the channel

a2.sources.r1.channels = c1

a2.sinks.k1.channel = c1
3.创建flume-flume-console2.conf
配置上级Flume输出的Source,输出是到本地控制台。
创建配置文件并打开
[FLY@hadoop102 group2]$ touch flume-flume-console2.conf

[FLY@hadoop102 group2]$ vim flume-flume-console2.conf
添加如下内容
# Name the components on this agent

a3.sources = r1

a3.sinks = k1

a3.channels = c2

# Describe/configure the source

a3.sources.r1.type = avro

a3.sources.r1.bind = hadoop102

a3.sources.r1.port = 4142

# Describe the sink

a3.sinks.k1.type = logger

# Describe the channel

a3.channels.c2.type = memory

a3.channels.c2.capacity = 1000

a3.channels.c2.transactionCapacity = 100

# Bind the source and sink to the channel

a3.sources.r1.channels = c2

a3.sinks.k1.channel = c2
4.执行配置文件
分别开启对应配置文件:flume-flume-console2,flume-flume-console1,flume-netcat-flume。
[FLY@hadoop102 flume]$ bin/flume-ng agent --conf conf/ --name a3 --conf-file job/group2/flume-flume-console2.conf -Dflume.root.logger=INFO,console

[FLY@hadoop102 flume]$ bin/flume-ng agent --conf conf/ --name a2 --conf-file job/group2/flume-flume-console1.conf -Dflume.root.logger=INFO,console

[FLY@hadoop102 flume]$ bin/flume-ng agent --conf conf/ --name a1 --conf-file job/group2/flume-netcat-flume.conf
5. 使用telnet工具向本机的44444端口发送内容
$ telnet localhost
6. 查看Flume2及Flume3的控制台打印日志
3.6 多数据源汇总案例
多Source汇总数据到单Flume如图7-4所示。
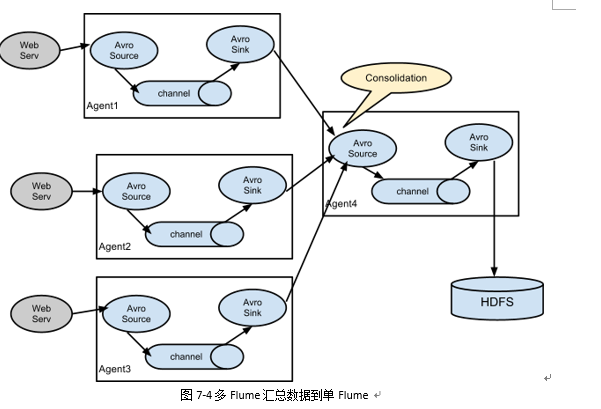
1) 案例需求:
hadoop103上的Flume-1监控文件/opt/module/group.log,
hadoop102上的Flume-2监控某一个端口的数据流,
Flume-1与Flume-2将数据发送给hadoop104上的Flume-3,Flume-3将最终数据打印到控制台。

3)实现步骤:
0.准备工作
分发Flume
[FLY@hadoop102 module]$ xsync flume
在hadoop102、hadoop103以及hadoop104的/opt/module/flume/job目录下创建一个group3文件夹。
[FLY@hadoop102 job]$ mkdir group3

[FLY@hadoop103 job]$ mkdir group3

[FLY@hadoop104 job]$ mkdir group3
1.创建flume1-logger-flume.conf
配置Source用于监控hive.log文件,配置Sink输出数据到下一级Flume。
在hadoop103上创建配置文件并打开
[FLY@hadoop103 group3]$ touch flume1-logger-flume.conf

[FLY@hadoop103 group3]$ vim flume1-logger-flume.conf
添加如下内容
# Name the components on this agent

a1.sources = r1

a1.sinks = k1

a1.channels = c1

# Describe/configure the source

a1.sources.r1.type = exec

a1.sources.r1.command = tail -F /opt/module/group.log

a1.sources.r1.shell = /bin/bash -c

# Describe the sink

a1.sinks.k1.type = avro

a1.sinks.k1.hostname = hadoop104

a1.sinks.k1.port = 4141

# Describe the channel

a1.channels.c1.type = memory

a1.channels.c1.capacity = 1000

a1.channels.c1.transactionCapacity = 100

# Bind the source and sink to the channel

a1.sources.r1.channels = c1

a1.sinks.k1.channel = c1
2.创建flume2-netcat-flume.conf
配置Source监控端口44444数据流,配置Sink数据到下一级Flume:
在hadoop102上创建配置文件并打开
[FLY@hadoop102 group3]$ touch flume2-netcat-flume.conf

[FLY@hadoop102 group3]$ vim flume2-netcat-flume.conf
添加如下内容
# Name the components on this agent

a2.sources = r1

a2.sinks = k1

a2.channels = c1

# Describe/configure the source

a2.sources.r1.type = netcat

a2.sources.r1.bind = hadoop102

a2.sources.r1.port =

# Describe the sink

a2.sinks.k1.type = avro

a2.sinks.k1.hostname = hadoop104

a2.sinks.k1.port =

# Use a channel which buffers events in memory

a2.channels.c1.type = memory

a2.channels.c1.capacity =

a2.channels.c1.transactionCapacity =

# Bind the source and sink to the channel

a2.sources.r1.channels = c1

a2.sinks.k1.channel = c1
3.创建flume3-flume-logger.conf
配置source用于接收flume1与flume2发送过来的数据流,最终合并后sink到控制台。
在hadoop104上创建配置文件并打开
[FLY@hadoop104 group3]$ touch flume3-flume-logger.conf

[FLY@hadoop104 group3]$ vim flume3-flume-logger.conf
添加如下内容
# Name the components on this agent

a3.sources = r1

a3.sinks = k1

a3.channels = c1

# Describe/configure the source

a3.sources.r1.type = avro

a3.sources.r1.bind = hadoop104

a3.sources.r1.port =

# Describe the sink

# Describe the sink

a3.sinks.k1.type = logger

# Describe the channel

a3.channels.c1.type = memory

a3.channels.c1.capacity =

a3.channels.c1.transactionCapacity =

# Bind the source and sink to the channel

a3.sources.r1.channels = c1

a3.sinks.k1.channel = c1
4.执行配置文件
分别开启对应配置文件:flume3-flume-logger.conf,flume2-netcat-flume.conf,flume1-logger-flume.conf。
[FLY@hadoop104 flume]$ bin/flume-ng agent --conf conf/ --name a3 --conf-file job/group3/flume3-flume-logger.conf -Dflume.root.logger=INFO,console

[FLY@hadoop102 flume]$ bin/flume-ng agent --conf conf/ --name a2 --conf-file job/group3/flume2-netcat-flume.conf

[FLY@hadoop103 flume]$ bin/flume-ng agent --conf conf/ --name a1 --conf-file job/group3/flume1-logger-flume.conf
5.在hadoop103上向/opt/module目录下的group.log追加内容
[FLY@hadoop103 module]$ echo 'hello' > group.log
6.在hadoop102上向44444端口发送数据
[FLY@hadoop102 flume]$ telnet hadoop102
7.检查hadoop104上数据
Flume 概述/企业案例的更多相关文章
- Flume概述和简单实例
Flume概述 Flume是一个分布式.可靠.和高可用的海量日志采集.聚合和传输的系统.支持在日志系统中定制各类数据发送方,用于收集数据;同时,Flume提供对数据进行简单处理,并写到各种数据接受方( ...
- MySQL mysqlbinlog企业案例
内容待补充 案例文字说明: 7.3 故障时间点: 周四上午10点,开发人员误删除了一个表,如何恢复? 7.4 思路: 1.停业务,避免数据的二次伤害 2.找一个临时库,恢复周三23:00全备 3.截取 ...
- 企业案例:查找当前目录下所有文件,并把文件中的https://www.cnblogs.com/zhaokang2019/字符串替换成https://www.cnblogs.com/guobaoyan2019/
企业案例:查找当前目录下所有文件,并把文件中的https://www.cnblogs.com/zhaokang2019/字符串替换成https://www.cnblogs.com/guobaoyan2 ...
- Flume在企业大数据仓库架构中位置及功能
Flume在企业大数据仓库架构中位置及功能 hadoop 数据仓库 flume 数据仓库架构 1.如下图所示,外部数据中,关系型数据库导入到HDFS用sqoop,由Nginx产生的文件实时监控用Flu ...
- 20.Linux进程管理-企业案例
1.管理进程状态 当程序运行为进程后,如果希望停止进程,怎么办呢? 那么此时我们可以使用linux的kill命令对进程发送关闭信号.当然除了kill.还有killall,pkill 1.使用kill ...
- Flume 测试 Kafka 案例
Flume Kafka 测试案例,Flume 的配置. a1.sources = s1 a1.channels = c1 a1.sinks = k1 a1.sources.s1.type = netc ...
- Shell企业案例实战和企业面试题
shell企业面试题 1.批量创建带有随机小写字符文件程序 使用for循环在/pizza目录下创建10个html文件,其中每个文件包含10个随机小写字母加固定字母_pizza 1.思路分析: 核心是: ...
- Flume使用(案例分析)
Flume官方文档 Usage: bin/flume-ng <command> [options]... commands: help display this help text age ...
- Flume 概述+环境配置+监听Hive日志信息并写入到hdfs
Flume介绍Flume是Apache基金会组织的一个提供的高可用的,高可靠的,分布式的海量日志采集.聚合和传输的系统,Flume支持在日志系统中定制各类数据发送方,用于收集数据:同时,Flume提供 ...
随机推荐
- Tomcat 的端口被占用的解决办法
在dos下,输入 netstat -ano|findstr 8080 //说明:查看占用8080端口的进程 显示占用端口的进程 taskkill /pid 6856 /f //说明,运行 ...
- linux vi/vim 编辑器学习总结
linux vi/vim 编辑器学习总结 很多时候我们开发人员不可避免的会涉及到项目部署,这个时候使用的就不是我们所熟知的 Windows 和 Mac OS 操作系统了,而是类 Unix 系统.项目部 ...
- Linux nfs服务讲解
nfs服务介绍 nfs(Network File System) 网络文件系统,能使用户访问服务器的文件系统,就像访问自己的本机的文件系统一样,并且多个 客户端共享访问该文件系统. 目前nfs服务,较 ...
- python入门基础 03
整型 -- 数字 (int) 用于比较和运算的 32位 -2 ** 31 -1 ~ 2 ** 31 -1 64位 -2 ** 63 -1 ~ 2 ** 63 -1 + - * / // ** % &q ...
- Python之路【第二十三篇】:数据库基础
数据库的简介 数据库 数据库(database,DB)是指长期存储在计算机内的,有组织,可共享的数据的集合.数据库中的数据按一定的数学模型组织.描述和存储,具有较小的冗余,较高的数据独立性和易扩展性, ...
- Ubuntu中shell脚本无法使用source命令的原因与解决方法
本文简要描述了在ubuntu系统下无法使用source命令的原因,及对应的两种解决方法,并在附录中引用一篇文章来详细解释source命令的用法 问题: 由于在交叉编译时,需要在当前shell内执行so ...
- 【数据结构】11.java源码关于TreeMap
目录 1.TreehMap的内部结构 2.TreehMap构造函数 3.元素新增策略 4.元素删除 5.元素修改和查找 6.特殊操作 7.扩容 8.总结 1.TreeMap的内部结构 首先确认一点,t ...
- Jenkins服务使用 宿主机的docker、docker-compose (Jenkins 执行sudo命令时出现“sudo: no tty present and no askpass program specified”,以及 docker-compose command not found解决办法)
若要转载本文,请务必声明出处:https://www.cnblogs.com/zhongyuanzhao000/p/11681474.html 原因: 本人最近正在尝试CI/CD,所以就使用了 Jen ...
- ubuntu中安装python3和pip
python3: 在ubuntu的包中,python的二代和三代版本的命名:二代:python,三代:python3 安装python3: sudo apt install python3 同理:pi ...
- C# List<string>之间的转换
List<string> 转换为 string List<string> list = new List<string>(); list.Add("a&q ...