Linux DHCP 中继

具体到一个公司的网络环境中,不可能只有一个VLAN,更不可能对每个VLAN都架设一个DHCP服务器,这时就要做一个DHCP的中继,使得DHCP的广播可以通过VLAN。
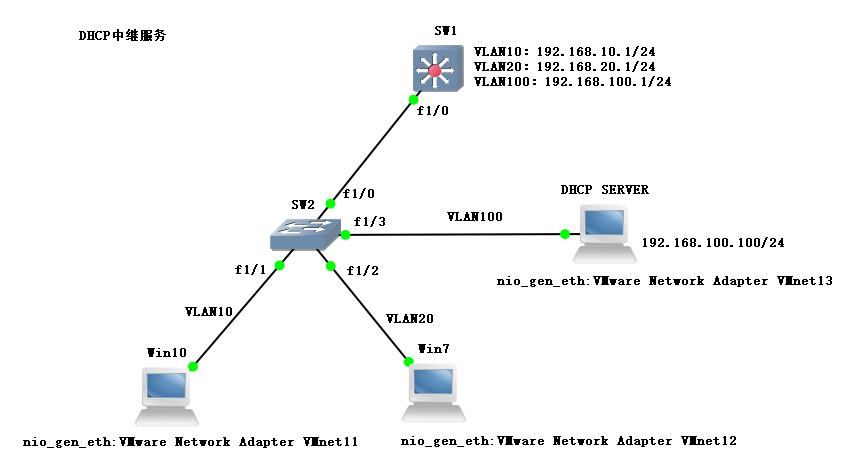
实验拓扑

三层交换机下面连接一台二层交换机,二层交换机下面连接一台DHCP SERVER、两台客户机Win10和Win7。地址规划如下:
| 名称 | IP地址 |
|---|---|
| DHCP SERVER | 192.168.100.100/24 |
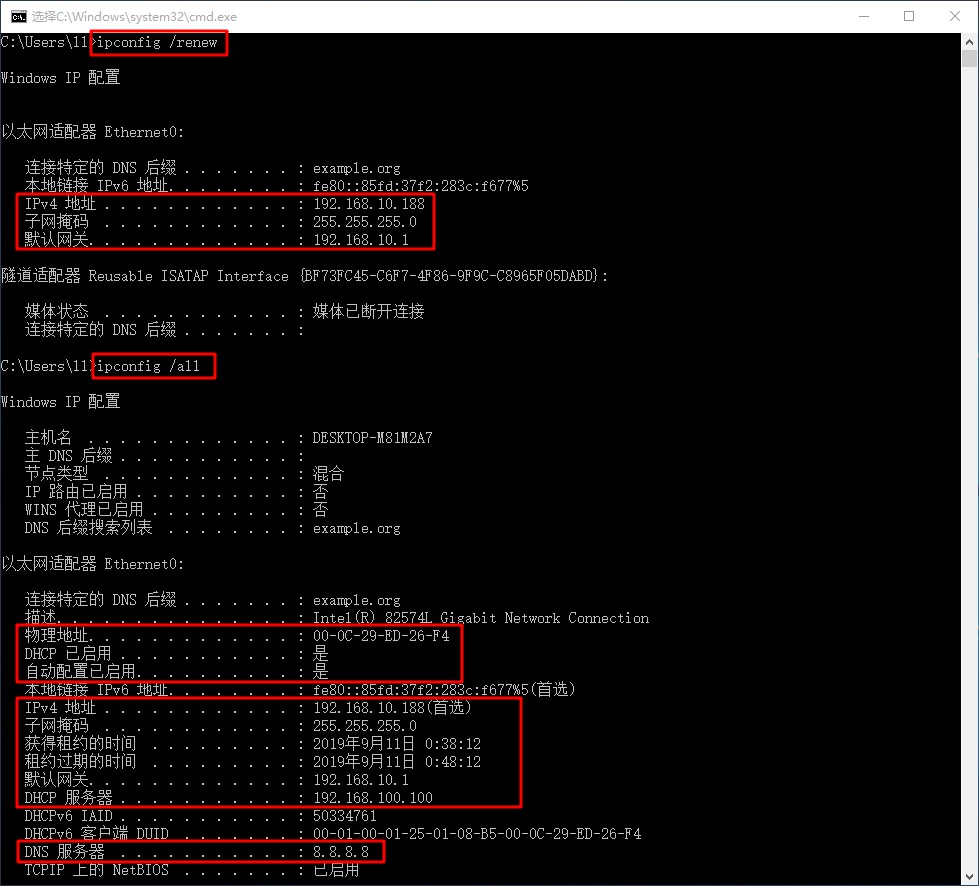
| Win10 | DHCP(192.168.10.188/24) |
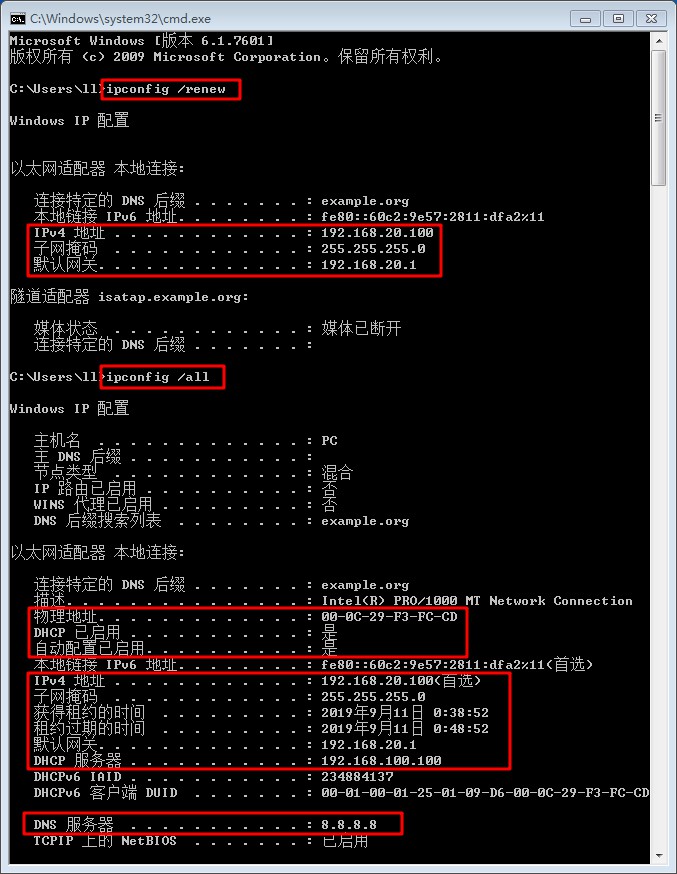
| Win7 | DHCP(192.168.20.100/24) |
配置方法
网关上配置
ip helper-address。
SW1(config)#int vlan 10

SW1(config-if)#ip add 192.168.10.1 255.255.255.0

SW1(config-if)#ip helper-address 192.168.100.100

SW1(config-if)#no sh

SW1(config-if)#ex
NETWORK 配置过程
SW2
- 添加
VLAN10、VLAN20、VLAN100。
SW2#configure terminal

Enter configuration commands, one per line.  End with CNTL/Z.
SW2(config)#vlan 10,20,100

SW2(config-vlan)#ex

SW2(config)#do show vlan-sw b

VLAN Name                             Status    Ports

---- -------------------------------- --------- -------------------------------

1    default                          active    Fa1/0, Fa1/1, Fa1/2, Fa1/3

                                                Fa1/4, Fa1/5, Fa1/6, Fa1/7

                                                Fa1/8, Fa1/9, Fa1/10, Fa1/11

                                                Fa1/12, Fa1/13, Fa1/14, Fa1/15

10   VLAN0010                         active

20   VLAN0020                         active

100  VLAN0100                         active

1002 fddi-default                     act/unsup

1003 token-ring-default               act/unsup

1004 fddinet-default                  act/unsup

1005 trnet-default                    act/unsup
- 端口添加到
VLAN。
SW2(config)#int f1/1

SW2(config-if)#sw m a

SW2(config-if)#sw a vlan 10

SW2(config-if)#ex

SW2(config)#int f1/2

SW2(config-if)#sw m a

SW2(config-if)#sw a vlan 20

SW2(config-if)#ex

SW2(config)#int f1/3

SW2(config-if)#sw m a

SW2(config-if)#sw a vlan 100

SW2(config-if)#ex

SW2(config)#do show vlan-sw b

VLAN Name                             Status    Ports

---- -------------------------------- --------- -------------------------------

1    default                          active    Fa1/0, Fa1/4, Fa1/5, Fa1/6

                                                Fa1/7, Fa1/8, Fa1/9, Fa1/10

                                                Fa1/11, Fa1/12, Fa1/13, Fa1/14

                                                Fa1/15

10   VLAN0010                         active    Fa1/1

20   VLAN0020                         active    Fa1/2

100  VLAN0100                         active    Fa1/3

1002 fddi-default                     act/unsup

1003 token-ring-default               act/unsup

1004 fddinet-default                  act/unsup

1005 trnet-default                    act/unsup
- 配置
Trunk。
SW2(config)#int f1/0

SW2(config-if)#sw m t

SW2(config-if)#sw t e d

SW2(config-if)#ex

SW2(config)#do show int f1/0 switchport

Name: Fa1/0

Switchport: Enabled

Administrative Mode: trunk

Operational Mode: trunk

Administrative Trunking Encapsulation: dot1q

Operational Trunking Encapsulation: dot1q

Negotiation of Trunking: Disabled

Access Mode VLAN: 0 ((Inactive))

Trunking Native Mode VLAN: 1 (default)

Trunking VLANs Enabled: ALL

Trunking VLANs Active: 1,10,20,100

Protected: false

Priority for untagged frames: 0

Override vlan tag priority: FALSE

Voice VLAN: none

Appliance trust: none
- 关闭路由功能。
SW2(config)#no ip routing
SW1
- 配置
Trunk。
SW1#configure terminal

Enter configuration commands, one per line.  End with CNTL/Z.
SW1(config)#int f1/0

SW1(config-if)#sw m t

SW1(config-if)#sw t e d

SW1(config-if)#ex

SW1(config)#do show int f1/0 switchport

Name: Fa1/0

Switchport: Enabled

Administrative Mode: trunk

Operational Mode: trunk

Administrative Trunking Encapsulation: dot1q

Operational Trunking Encapsulation: dot1q

Negotiation of Trunking: Disabled

Access Mode VLAN: 0 ((Inactive))

Trunking Native Mode VLAN: 1 (default)

Trunking VLANs Enabled: ALL

Trunking VLANs Active: 1,10,20,100

Protected: false

Priority for untagged frames: 0

Override vlan tag priority: FALSE

Voice VLAN: none

Appliance trust: none
- 添加
VLAN10、VLAN20、VLAN100。
SW1(config)#vlan 10,20,100

SW1(config-vlan)#ex

SW1(config)#do show vlan-sw b

VLAN Name                             Status    Ports

---- -------------------------------- --------- -------------------------------

1    default                          active    Fa1/0, Fa1/1, Fa1/2, Fa1/3

                                                Fa1/4, Fa1/5, Fa1/6, Fa1/7

                                                Fa1/8, Fa1/9, Fa1/10, Fa1/11

                                                Fa1/12, Fa1/13, Fa1/14, Fa1/15

10   VLAN0010                         active

20   VLAN0020                         active

100  VLAN0100                         active

1002 fddi-default                     act/unsup

1003 token-ring-default               act/unsup

1004 fddinet-default                  act/unsup

1005 trnet-default                    act/unsup
- 配置网关地址、
ip helper-address。
SW1(config)#int vlan 10

SW1(config-if)#ip add 192.168.10.1 255.255.255.0

SW1(config-if)#ip helper-address 192.168.100.100

SW1(config-if)#no sh

SW1(config-if)#ex

SW1(config)#int vlan 20

SW1(config-if)#ip add 192.168.20.1 255.255.255.0

SW1(config-if)#ip helper-address 192.168.100.100

SW1(config-if)#no sh

SW1(config-if)#ex

SW1(config)#int vlan 100

SW1(config-if)#ip add 192.168.100.1 255.255.255.0

SW1(config-if)#ip helper-address 192.168.100.100

SW1(config-if)#no sh

SW1(config-if)#ex

SW1(config)#do show ip int b

Interface                  IP-Address      OK? Method Status                Protocol

FastEthernet0/0            unassigned      YES unset  administratively down down

FastEthernet0/1            unassigned      YES unset  administratively down down

FastEthernet1/0            unassigned      YES unset  up                    up

FastEthernet1/1            unassigned      YES unset  up                    down

FastEthernet1/2            unassigned      YES unset  up                    down

FastEthernet1/3            unassigned      YES unset  up                    down

FastEthernet1/4            unassigned      YES unset  up                    down

FastEthernet1/5            unassigned      YES unset  up                    down

FastEthernet1/6            unassigned      YES unset  up                    down

FastEthernet1/7            unassigned      YES unset  up                    down

FastEthernet1/8            unassigned      YES unset  up                    down

FastEthernet1/9            unassigned      YES unset  up                    down

FastEthernet1/10           unassigned      YES unset  up                    down

FastEthernet1/11           unassigned      YES unset  up                    down

FastEthernet1/12           unassigned      YES unset  up                    down

FastEthernet1/13           unassigned      YES unset  up                    down

FastEthernet1/14           unassigned      YES unset  up                    down

FastEthernet1/15           unassigned      YES unset  up                    down

Vlan1                      unassigned      YES unset  up                    up

Vlan10                     192.168.10.1    YES manual up                    up

Vlan20                     192.168.20.1    YES manual up                    up

Vlan100                    192.168.100.1   YES manual up                    up
DHCP 配置过程
安装 DHCP 服务
[root@localhost ~]# yum install dhcp -y
配置网卡静态 IP
[root@localhost ~]# cat > /etc/sysconfig/network-scripts/ifcfg-ens33 << EOF

> TYPE=Ethernet

> BOOTPROTO=static

> DEVICE=ens33

> ONBOOT=yes

> IPADDR=192.168.100.100

> NETMASK=255.255.255.0

> GATEWAY=192.168.100.1

> EOF
[root@localhost ~]# service network restart

Restarting network (via systemctl):                        [  OK  ]
[root@localhost ~]# ifconfig ens33

ens33: flags=4163<UP,BROADCAST,RUNNING,MULTICAST>  mtu 1500

        inet 192.168.100.100  netmask 255.255.255.0  broadcast 192.168.100.255

        inet6 fe80::20c:29ff:febc:ab96  prefixlen 64  scopeid 0x20<link>

        ether 00:0c:29:bc:ab:96  txqueuelen 1000  (Ethernet)

        RX packets 2142  bytes 1951874 (1.8 MiB)

        RX errors 0  dropped 0  overruns 0  frame 0

        TX packets 691  bytes 64359 (62.8 KiB)

        TX errors 0  dropped 0 overruns 0  carrier 0  collisions 0
编辑 DHCP 配置文件
[root@localhost ~]# cp /usr/share/doc/dhcp-4.2.5/dhcpd.conf.example /etc/dhcp/dhcpd.conf

cp: overwrite ‘/etc/dhcp/dhcpd.conf’? y
[root@localhost ~]# vim /etc/dhcp/dhcpd.conf
- 在
7-8行可以配置DNS服务器名称、地址。
option domain-name "example.org";

option domain-name-servers 8.8.8.8;
- 在
10-11行可以配置DHCP租约时间。
default-lease-time 600;

max-lease-time 7200;
- 在
22行可以配置日志信息。
log-facility local7;
- 在
27-40行配置网段信息。
subnet 192.168.10.0 netmask 255.255.255.0 {

  range 192.168.10.100 192.168.10.200;

  option routers 192.168.10.1;

}

subnet 192.168.20.0 netmask 255.255.255.0 {

  range 192.168.20.100 192.168.20.200;

  option routers 192.168.20.1;

}

subnet 192.168.100.0 netmask 255.255.255.0 {

  range 192.168.100.100 192.168.100.200;

  option routers 192.168.100.1;

}
- 在
87-90配置指定IP地址分配。
host win10 {

  hardware ethernet 00:0C:29:ED:26:F4;

  fixed-address 192.168.10.188;

}
启动 DHCP 服务
[root@localhost ~]# systemctl start dhcpd

[root@localhost ~]# systemctl enable dhcpd

Created symlink from /etc/systemd/system/multi-user.target.wants/dhcpd.service to /usr/lib/systemd/system/dhcpd.service.

[root@localhost ~]# netstat -nuap | grep dhcpd

udp        0      0 0.0.0.0:67              0.0.0.0:*                           42901/dhcpd
- 关闭防火墙、
SELinux。
[root@localhost ~]# systemctl stop firewalld

[root@localhost ~]# setenforce 0
结果测试
Win10

Win7

Linux DHCP 中继的更多相关文章
- Linux配置DHCP服务器,DHCP中继配置
配置dhcp服务器 第一步:配置网卡 第二步: 安装dhcp (需要先构建yum仓库,构建yum仓库的方法在之前的博客里有) 编写dhcp.conf文件 进去以后会出现这个内容 需要执行下面的内容将内 ...
- DHCP中继
DHCP中继 要求: 假设公司现在有两个部门分别为 销售部门,生产部门 对这两个部门分配不同网段, 销售部门 192.168.1.0/24 生产部门 192.168.2.0/24 为了节约使用LINU ...
- 搭建DHCP服务器以及DHCP中继服务器
一.DHCP服务器 1.首先配置DHCP服务器的IP地址(DHCP服务器网卡桥接在VMnet1) .配置好IP后重启DHCP服务 3.安装DHCP服务器,在这里我用的是YUM安装的(关于YUM ...
- 如何搭建DHCP及DHCP中继服务器
当局域网中有大量的主机时,如果逐台设置ip地址.默认网关.dns服务器地址时等网络参数,显然是一个费力也未必讨好的方法,这时使用DHCP的方式分发ip地址,能够动态配置各客户机的网络地址参数,大大减轻 ...
- 编写脚本实现DHCP服务与DHCP中继自动化执行
编写脚本实现DHCP服务与DHCP中继自动化执行 本脚本是在liunx搭建DHCP服务器以及DHCP中继服务器实验环境下实现的https://www.cnblogs.com/yuzly/p/10539 ...
- liunx搭建DHCP服务器以及DHCP中继服务器
liunx搭建DHCP服务器以及DHCP中继服务器 一.实验拓扑 二.实验条件 虚拟机取消VMnet1和VMnet8的dhcp动态获取ip地址,以免影响实验 DHCPserver 网关以及DHCP中继 ...
- CentOS7.3下关于DHCP中继代理服务器的详细配置
DHCP服务器只作用于局域网同一网段内,客户端是通过广播消息来获得DHCP服务器响应后才能得到IP地址的,但广播消息不能跨越子网,那么如何让客户端获取到DHCP服务器提供的IP地址呢?这就是DHCP中 ...
- DHCP与DHCP中继原理与配置!(重点)
一 .DHCP 服务概述 0:dhcp原理: 集中的管理.分配IP地址,使client动态的获得IP地址.Gateway地址.DNS服务器地址等信息,并能够提升地址的使用率.简单来说,DHCP就是一 ...
- Linux DHCP通过OPTION43为H3C的AP下发AC地址(总结)
对于DHCP服务,可以在很多平台上进行设置.那么这里我们就主要讲解一下在Linux DHCP服务器上通过option 43实现H3C的AP自动联系AC注册的相关内容.原来的DHCP Server是放在 ...
随机推荐
- 【iCore4 双核心板_FPGA】实验二十:NIOS II之UART串口通信实验
实验指导书及源代码下载地址: 链接:https://pan.baidu.com/s/1g_tWYYJxh4EgiGvlfkVu1Q 提取码:dwwa 复制这段内容后打开百度网盘手机App,操作更方便哦 ...
- 解决ImportError: No module named utils
转载:https://blog.csdn.net/weixin_43979572/article/details/86159265 在Python中遇到了导包错误,其实包已经有了.原因是我再B文件的a ...
- Egret《决战沙城》框架学习
源码地址:https://github.com/yicaoyimuys/EgretGameEngine 虽然走花观马看了看,但是收获还是蛮多. mvc: BaseController ...
- djang-celery使用带密码的redis
前言: 网上很多django-celery使用redis(使用不带密码的redis)的用法都是千篇一律,那带密码的redis该怎么使用了呢,没有看到一篇有帮助的,在官网搜了下,发现以下用法,请看下面 ...
- 将博客转成pdf
前些天无意间看到了“birdben”的博客,写的比较详细,但是最新的文章更新时间是“2017-05-07”,时间很是久远,本打算有时间认真学习一下博主所写的文章,但是担心网站会因为某些原因停止服务,于 ...
- [UE4] Adding a custom shading model
转自:https://blog.felixkate.net/2016/05/22/adding-a-custom-shading-model-1/ This was written in Februa ...
- Laravel实现from的curl文件转发
文件的使用curl分发时发现不能直接将其传入curl,需要使用CURLFile()来实现 分发类 <?php /** * 请求转发控制器 * Created by PhpStorm. * Use ...
- Postgres-XL集群ERROR :Failed to get pooled connections原因说明
集群说明 6台服务器.其中1台(rt67-1)运行GTM,其余5台均运行1个GTM_PROXY.1个Coordinator node.3个Data node.每个服务器连接到3组网络中,每个Data ...
- Maven手动导本地jar到项目
第一步:先把目标jar安装在本地,下面是安装到本地的步骤:在cmd命令中,输入:mvn install:install-file -Dfile=C:\Users\Ter\Desktop\jqd_doc ...
- Graph machine learning 工具
OGB: Open Graph Benchmark https://ogb.stanford.edu/ https://github.com/snap-stanford/ogb OGB is a co ...
