Kubernetes 学习19基于canel的网络策略
一、概述
1、我们说过,k8s的可用插件有很多,除了flannel之外,还有一个流行的叫做calico的组件,不过calico在很多项目中都会有这个名字被应用,所以他们把自己称为project calico,但是很多时候我们在kubernets的语境中通常会单独称呼他为calico。其本身支持bgp的方式来构建pod网络。通过bgp协议的路由学习能使得去每一节点上生成到达另一节点上pod之间的路由表信息。会在变动时自动执行改变和修改,另外其也支持IP-IP,就是基于IP报文来承载一个IP报文,不像我们VXLAN是通过一个所谓的以太网帧来承载另外一个以太网帧的报文的方式来实现的。因此从这个角度来讲他是一个三层隧道,也就意外着说如果我们期望在calico的网络中实现隧道的方式进行应用,来实现更为强大的控制逻辑,他也支持隧道,不过他是IP-IP隧道,和LVS中所谓的IP-IP的方式很相像。不过calico的配置依赖于我们对bgp等协议的理解工作起来才能更好的去了解他。我们这儿就不再讲calico怎么去作为网络插件去提供网络功能的,而是把他重点集中在calico如何去提供网络策略。因为flannel本身提供不了网络策略。而flannel和calico二者本身已经合二为一了,即canel。事实上,就算我们此前不了解canel的时候类似于使用kubectl的提示根据很多文章的提示直接安装并部署了flannel这样的网络插件都想把flannel换掉。但在这基础之上我们又想去使用网络策略。其实也是有解决方案的,我们可以在flannel提供网络功能的基础之上在额外去给他提供calico去提供网络策略。
2、在实现部署之前要先知道,calico默认使用的网段不是10.244.0.0,如果要拿calico作为网络插件使用的话它工作于192.168.0.0网络。而且是16位掩码。每一个节点网络分配是按照192.168.0.0/24,192.168.1.0/24来分配的。但此处我们不把其当做网络插件提供者而是当做网络策略提供者,我们仍然使用10.244.0.0网段。
二、安装calico
1、可以在官方文档中看到calico有多种安装方式(目前为止calico还不支持ipvs模式)

2、安装教程链接https://docs.projectcalico.org/v3.1/getting-started/kubernetes/installation/flannel
3、calico新版本中部署比较复杂,calico对集群节点的所有的地址分配都没有自己介入,而是需要依赖于etcd来介入,这就比较麻烦了,首先,大家知道我们k8s自己有etcd database,而calico也需要etcd database,它是两套集群,各自是各自的etcd,这样子分裂起来进行管理来讲对我们k8s工程师都不是一个轻松的事情,那我们应该怎么做呢?后来的calico也支持不把数据放在自己专用的etcd集群中,而是掉apiserver的功能,直接把所有的设置都发给apiserver,由apiserver再存储在etcd中,因为整个k8s集群任何节点的功能,任何组件都不能直接写k8s的etcd,必须apiserver写,主要是确保数据一致性。这样一来也就意外着说我们calico部署有两种方式。第一就是和k8s的etcd分开;第二,直接使用k8s的etcd,不过是要通过apiserver去调用。这儿我们直接使用第二种方式部署。官网对部署方式描述如下
Installing with the Kubernetes API datastore (recommended)

Ensure that the Kubernetes controller manager has the following flags set:

--cluster-cidr=10.244.0.0/ and --allocate-node-cidrs=true.

Tip: If you’re using kubeadm, you can pass --pod-network-cidr=10.244.0.0/ to kubeadm to set the Kubernetes controller flags.

If your cluster has RBAC enabled, issue the following command to configure the roles and bindings that Calico requires.

kubectl apply -f \

https://docs.projectcalico.org/v3.1/getting-started/kubernetes/installation/hosted/canal/rbac.yaml

Note: You can also view the manifest in your browser.

Issue the following command to install Calico.

kubectl apply -f \

https://docs.projectcalico.org/v3.1/getting-started/kubernetes/installation/hosted/canal/canal.yaml

Note: You can also view the manifest in your browser.
4、现在我们来部署
a、首先我们部署一个rbac.yaml配置文件
[root@k8smaster flannel]# kubectl apply -f https://docs.projectcalico.org/v3.1/getting-started/kubernetes/installation/hosted/canal/rbac.yaml

clusterrole.rbac.authorization.k8s.io/calico created

clusterrole.rbac.authorization.k8s.io/flannel configured

clusterrolebinding.rbac.authorization.k8s.io/canal-flannel created

clusterrolebinding.rbac.authorization.k8s.io/canal-calico created
b、第二步我们部署canal.yaml
[root@k8smaster flannel]# kubectl apply -f \

> https://docs.projectcalico.org/v3.1/getting-started/kubernetes/installation/hosted/canal/canal.yaml

configmap/canal-config created

daemonset.extensions/canal created

customresourcedefinition.apiextensions.k8s.io/felixconfigurations.crd.projectcalico.org created

customresourcedefinition.apiextensions.k8s.io/bgpconfigurations.crd.projectcalico.org created

customresourcedefinition.apiextensions.k8s.io/ippools.crd.projectcalico.org created

customresourcedefinition.apiextensions.k8s.io/clusterinformations.crd.projectcalico.org created

customresourcedefinition.apiextensions.k8s.io/globalnetworkpolicies.crd.projectcalico.org created

customresourcedefinition.apiextensions.k8s.io/networkpolicies.crd.projectcalico.org created

customresourcedefinition.apiextensions.k8s.io/globalnetworksets.crd.projectcalico.org created

customresourcedefinition.apiextensions.k8s.io/hostendpoints.crd.projectcalico.org created
c、接下来我们来看一下对应的组件是否已经启动起来了
三、canel的使用
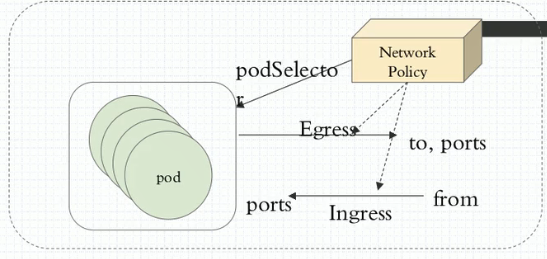
1、部署完canel后我们怎么去控制我们对应的pod间通信呢?现在我们在我们的cluster上创建两个namespaces,一个叫dev,一个叫pro,然后在两个名称空间中创建两个pod,我们看看两个名称空间中跨名称空间通信能不能直接进行,如果能进行的话我们如何让他不能进行。并且我们还可以这样来设计,我们可以为一个名称空间设置一个默认通信策略,任何到达此名称空间的通信流量都不被允许。简单来讲我们所用的网络控制策略是通过这种方式来定义的。如图,我们网络控制策略(Network Policy)他通过Egress或Ingress规则分别来控制不同的通信需求,什么意思呢?Egress即出栈的意思,Ingress即入栈的意思(此处Ingress和我们k8sIngress是两回事)。Egress表示我们pod作为客户端去访问别人的。即自己作为源地址对方作为目标地址来进行通信,Ingress表示自己是目标,远程是源。所以我们要控制这两个方向的不同的通信,而控制Egress的时候客户端端口是随机的而服务端端口是固定的,因此作为出栈的时候去请求别人很显然对方是服务端,对方的端口可预测,对方的地址也可预测,但自己的地址能预测端口却不能预测。同样的逻辑,如果别人访问自己,自己的地址能预测,自己的端口也能预测,但对方的端口是不能预测的。因为对方是客户端。

2、因此去定义规则时如果定义的是Egress规则(出栈的),那么我们可以定义目标地址和目标端口。如果我们定义的是Ingress规则(入栈的),我们能限制对方的地址,能限制自己的端口,那我们这种限制是针对于哪一个Pod来说的呢?这个网络策略规则是控制哪个pod和别人通信或接受别人通信的呢?我们使用podSelector(pod选择器)去选择pod,意思是这个规则生效在哪个pod上,我们一般使用单个pod进行控制,也可以控制一组pod,所以我们使用podSelector就相当于说我这一组pod都受控于这个Egress和Ingress规则,而且更重要的是我们将来定义规则时还可以指定单方向。意思是入栈我们做控制出栈都允许或出栈做控制入栈都允许。因此定义时可以很灵活的去定义,可以发现他和iptables没有太大的区别。那种方式最安全呢?肯定是拒绝所有放行已知。甚至于如果说你是托管了每一个名称空间托管了不同项目的,甚至不同客户的项目。我们名称空间直接设置默认策略。我们在名称空间内所有pod可以无障碍的通信,但是跨名称空间都不被允许。这种都可以叫一个名称空间的默认策略。
3、接下来我们看这些策略怎么工作起来
a、我们可以看到我们加载的canal pod已经启动起来了
[root@k8smaster ~]# kubectl get pods -n kube-system |grep canal

canal-hmc47                            /       Running             45m

canal-sw5q6                            /       Running             45m

canal-xxvzk                            /       Running             45m
b、我们看我们网络策略怎么定义
[root@k8smaster ~]# kubectl explain networkpolicy

KIND:     NetworkPolicy

VERSION:  extensions/v1beta1

DESCRIPTION:

     DEPRECATED 1.9 - This group version of NetworkPolicy is deprecated by

     networking/v1/NetworkPolicy. NetworkPolicy describes what network traffic

     is allowed for a set of Pods

FIELDS:

   apiVersion    <string>

     APIVersion defines the versioned schema of this representation of an

     object. Servers should convert recognized schemas to the latest internal

     value, and may reject unrecognized values. More info:

     https://git.k8s.io/community/contributors/devel/api-conventions.md#resources

   kind    <string>

     Kind is a string value representing the REST resource this object

     represents. Servers may infer this from the endpoint the client submits

     requests to. Cannot be updated. In CamelCase. More info:

     https://git.k8s.io/community/contributors/devel/api-conventions.md#types-kinds

   metadata    <Object>

     Standard object's metadata. More info:

     https://git.k8s.io/community/contributors/devel/api-conventions.md#metadata

   spec    <Object>

     Specification of the desired behavior for this NetworkPolicy.
[root@k8smaster ~]# kubectl explain networkpolicy.spec

KIND:     NetworkPolicy

VERSION:  extensions/v1beta1

RESOURCE: spec <Object>

DESCRIPTION:

     Specification of the desired behavior for this NetworkPolicy.

     DEPRECATED 1.9 - This group version of NetworkPolicySpec is deprecated by

     networking/v1/NetworkPolicySpec.

FIELDS:

   egress    <[]Object> #出栈规则

     List of egress rules to be applied to the selected pods. Outgoing traffic

     is allowed if there are no NetworkPolicies selecting the pod (and cluster

     policy otherwise allows the traffic), OR if the traffic matches at least

     one egress rule across all of the NetworkPolicy objects whose podSelector

     matches the pod. If this field is empty then this NetworkPolicy limits all

     outgoing traffic (and serves solely to ensure that the pods it selects are

     isolated by default). This field is beta-level in 1.8

   ingress    <[]Object> #入栈规则

     List of ingress rules to be applied to the selected pods. Traffic is

     allowed to a pod if there are no NetworkPolicies selecting the pod OR if

     the traffic source is the pod's local node, OR if the traffic matches at

     least one ingress rule across all of the NetworkPolicy objects whose

     podSelector matches the pod. If this field is empty then this NetworkPolicy

     does not allow any traffic (and serves solely to ensure that the pods it

     selects are isolated by default).

   podSelector    <Object> -required-   #规则应用在哪个pod上

     Selects the pods to which this NetworkPolicy object applies. The array of

     ingress rules is applied to any pods selected by this field. Multiple

     network policies can select the same set of pods. In this case, the ingress

     rules for each are combined additively. This field is NOT optional and

     follows standard label selector semantics. An empty podSelector matches all

     pods in this namespace.

   policyTypes    <[]string>  #策略类型,指的是假如我在当前这个策略中即定义了Egress又定义了Ingress,那么谁生效呢?虽然他们并不冲突,但是你可以定义在某个时候某一方向的规则生效。

     List of rule types that the NetworkPolicy relates to. Valid options are

     Ingress, Egress, or Ingress,Egress. If this field is not specified, it will

     default based on the existence of Ingress or Egress rules; policies that

     contain an Egress section are assumed to affect Egress, and all policies

     (whether or not they contain an Ingress section) are assumed to affect

     Ingress. If you want to write an egress-only policy, you must explicitly

     specify policyTypes [ "Egress" ]. Likewise, if you want to write a policy

     that specifies that no egress is allowed, you must specify a policyTypes

     value that include "Egress" (since such a policy would not include an

     Egress section and would otherwise default to just [ "Ingress" ]). This

     field is beta-level in 1.8
我们来看egress定义
[root@k8smaster ~]# kubectl explain networkpolicy.spec.egress

KIND:     NetworkPolicy

VERSION:  extensions/v1beta1

RESOURCE: egress <[]Object>

DESCRIPTION:

     List of egress rules to be applied to the selected pods. Outgoing traffic

     is allowed if there are no NetworkPolicies selecting the pod (and cluster

     policy otherwise allows the traffic), OR if the traffic matches at least

     one egress rule across all of the NetworkPolicy objects whose podSelector

     matches the pod. If this field is empty then this NetworkPolicy limits all

     outgoing traffic (and serves solely to ensure that the pods it selects are

     isolated by default). This field is beta-level in 1.8

     DEPRECATED 1.9 - This group version of NetworkPolicyEgressRule is

     deprecated by networking/v1/NetworkPolicyEgressRule.

     NetworkPolicyEgressRule describes a particular set of traffic that is

     allowed out of pods matched by a NetworkPolicySpec's podSelector. The

     traffic must match both ports and to. This type is beta-level in 1.8

FIELDS:

   ports    <[]Object> #目标端口,可以是端口名和相关的协议

     List of destination ports for outgoing traffic. Each item in this list is

     combined using a logical OR. If this field is empty or missing, this rule

     matches all ports (traffic not restricted by port). If this field is

     present and contains at least one item, then this rule allows traffic only

     if the traffic matches at least one port in the list.

   to    <[]Object>

     List of destinations for outgoing traffic of pods selected for this rule.

     Items in this list are combined using a logical OR operation. If this field

     is empty or missing, this rule matches all destinations (traffic not

     restricted by destination). If this field is present and contains at least

     one item, this rule allows traffic only if the traffic matches at least one

     item in the to list.
我们看看这个to,to表示目标地址,可以是三种情况中的一个,也可以是合并起来的,如果同时使用的话是要取交集。
[root@k8smaster ~]# kubectl explain networkpolicy.spec.egress.to

KIND:     NetworkPolicy

VERSION:  extensions/v1beta1

RESOURCE: to <[]Object>

DESCRIPTION:

     List of destinations for outgoing traffic of pods selected for this rule.

     Items in this list are combined using a logical OR operation. If this field

     is empty or missing, this rule matches all destinations (traffic not

     restricted by destination). If this field is present and contains at least

     one item, this rule allows traffic only if the traffic matches at least one

     item in the to list.

     DEPRECATED 1.9 - This group version of NetworkPolicyPeer is deprecated by

     networking/v1/NetworkPolicyPeer.

FIELDS:

   ipBlock    <Object> #目标地址也可以是一个IP地址块,是一个IP地址范围内的所有端点。不管它是pod或主机都行。

     IPBlock defines policy on a particular IPBlock. If this field is set then

     neither of the other fields can be.

   namespaceSelector    <Object> #意思是名称空间选择器,意思是我们控制的pod能到达其它名称空间的,那个名称空间内的所有pod都在这个范围内。我使用这个选择器选择一组名称空间是指用于控制这组源pod是怎么去访问这组名称空间之内的所有pod或者某一个pod。

     Selects Namespaces using cluster-scoped labels. This field follows standard

     label selector semantics; if present but empty, it selects all namespaces.

     If PodSelector is also set, then the NetworkPolicyPeer as a whole selects

     the Pods matching PodSelector in the Namespaces selected by

     NamespaceSelector. Otherwise it selects all Pods in the Namespaces selected

     by NamespaceSelector.

   podSelector    <Object> #目标地址也可以是另外一组pod,控制两组pod之间通信。源是一组pod,目标地址也是一组pod。

     This is a label selector which selects Pods. This field follows standard

     label selector semantics; if present but empty, it selects all pods. If

     NamespaceSelector is also set, then the NetworkPolicyPeer as a whole

     selects the Pods matching PodSelector in the Namespaces selected by

     NamespaceSelector. Otherwise it selects the Pods matching PodSelector in

     the policy's own Namespace.
Ingress只是由to变成了from
c、policyTypes下有几个规则需要我们注意,如果这个字段没有定义,那么只要存在的Egress和Ingress都会生效。但凡出现的定义的都会生效。若我们只定义了Ingress规则,但是在policyTypes中定义了Egress和Ingress,那么Egress的默认规则会生效。如果默认是允许的那么所有规则都被允许,如果默认是拒绝的那么所有规则都被拒绝。我们默认的规则是拒绝的。这里Egress将会使用默认规则拒绝所有。
4、我们去设置一个Ingress默认策略。我们把一个名称空间上所有的入栈规则都关了,都拒绝,谁都不允许入栈。然后我们只放行特定的,这样更安全。比如我们dev名称空间默认所有pod都是被别人能访问的,我们不允许别人访问应该是一个默认规则,那么我们怎么去定义这个规则呢?
a、首先我们创建名称空间dev,pro
[root@k8smaster networkpolicy]# kubectl create namespace dev

namespace/dev created

[root@k8smaster networkpolicy]# kubectl create namespace prod

namespace/prod created
b、接下来我们创建Ingress默认规则并运用于dev名称空间中
[root@k8smaster networkpolicy]# cat ingress-def.yml

apiVersion: networking.k8s.io/v1

kind: NetworkPolicy

metadata:

  name: deny-all-ingress

spec:

  podSelector: {} #空表示选择所有pod,表示指定名称空间中的所有pod,就相当于控制整个名称空间了

  policyTypes:

  - Ingress  #表示只对Ingress生效,因为没有定义Ingress因此没有任何规则是生效的。没有任何显示定义的规则就意味着默认是拒绝所有的。但是我们没有加Egress意味着,因为policyTypes没有将其定义进来因

此默认是允许的。[root@k8smaster networkpolicy]# kubectl apply -f ingress-def.yml -n dev

networkpolicy.networking.k8s.io/deny-all-ingress created

[root@k8smaster networkpolicy]#
查看我们定义的NetworkPolicy
[root@k8smaster networkpolicy]# kubectl get netpol -n dev

NAME               POD-SELECTOR   AGE

deny-all-ingress   <none>         1m
c、接下来我们dev名称空间创建一个pod看能否被访问到
[root@k8smaster networkpolicy]# cat pod-a.yaml

apiVersion: v1

kind: Pod

metadata:

  name: pod1

spec:

  containers:

  - name: myapp

    image: ikubernetes/myapp:v1

[root@k8smaster networkpolicy]# kubectl apply -f pod-a.yaml -n dev

pod/pod1 created

[root@k8smaster networkpolicy]# kubectl get pods -n dev

NAME      READY     STATUS    RESTARTS   AGE

pod1      /       Running             7s
[root@k8smaster networkpolicy]# kubectl get pods -n dev -o wide

NAME      READY     STATUS    RESTARTS   AGE       IP           NODE

pod1      /       Running             1m        10.244.2.2   k8snode2

[root@k8smaster networkpolicy]# curl 10.244.2.2 #可以看到无法访问

^C
d、我们在prod名称空间中创建一个pod看能否被访问
[root@k8smaster networkpolicy]# kubectl apply -f pod-a.yaml -n prod

pod/pod1 created

[root@k8smaster networkpolicy]# kubectl get pods -n prod -o wide

NAME      READY     STATUS    RESTARTS   AGE       IP           NODE

pod1      /       Running             12s       10.244.1.2   k8snode1

[root@k8smaster networkpolicy]# curl 10.244.1.2 #可以看到因为没有定义规则所以能够访问

Hello MyApp | Version: v1 | <a href="hostname.html">Pod Name</a>
5、现在我们放行2.2,dev名称空间中默认是拒绝一切入栈请求的,现在我们要放行别人对于dev中我们单个pod pod1
[root@k8smaster networkpolicy]# cat ingress-def.yml

apiVersion: networking.k8s.io/v1

kind: NetworkPolicy

metadata:

  name: deny-all-ingress

spec:

  podSelector: {} #空表示选择所有pod,表示指定名称空间中的所有pod,就相当于控制整个名称空间了

  ingress:

  - {}  #这个所有就表示所有的都允许

  policyTypes:

  - Ingress  #表示只对Ingress生效,此时我们ingress是允许的,Egress也是允许的

[root@k8smaster networkpolicy]# kubectl get pods -n dev -o wide

NAME      READY     STATUS    RESTARTS   AGE       IP           NODE

pod1      /       Running             15m       10.244.2.2   k8snode2

[root@k8smaster networkpolicy]# curl 10.244.2.2 #可以看到可以访问了

Hello MyApp | Version: v1 | <a href="hostname.html">Pod Name</a>
6、接下来加一组规则说我们期望允许别人去访问我们这个2.2这个pod,或者允许一组pod,我们要定义一组pod我们可以这么来定义,比如这组pod给其打一个标签为myapp
a、首先我们给dev中的pod1打上标签myapp,再此之前我们还是先设置为拒绝所有
[root@k8smaster networkpolicy]# cat ingress-def.yml.bak

apiVersion: networking.k8s.io/v1

kind: NetworkPolicy

metadata:

  name: deny-all-ingress

spec:

  podSelector: {} #空表示选择所有pod,表示指定名称空间中的所有pod,就相当于控制整个名称空间了

  policyTypes:

  - Ingress  #表示只对Ingress生效,因为没有定义Ingress因此没有任何规则是生效的。没有任何显示定义的规则就意味着默认是拒绝所有的。但是我们没有加Egress意味着,因为policyTypes没有将其定义进来因

此默认是允许的。[root@k8smaster networkpolicy]# kubectl apply -f ingress-def.yml.bak -n dev

networkpolicy.networking.k8s.io/deny-all-ingress unchanged
[root@k8smaster networkpolicy]# kubectl label pods pod1 app=myapp -n dev

pod/pod1 labeled

[root@k8smaster networkpolicy]# kubectl get pods -n dev -o wide --show-labels

NAME      READY     STATUS    RESTARTS   AGE       IP           NODE       LABELS

pod1      /       Running             22m       10.244.2.2   k8snode2   app=myapp
b、我们设置这样一条Ingress规则:我们放行特定的入栈流量。即我们允许来自于10.244.0.0/16网段的客户端访问我们本地拥有app标签且值为myapp的一组本地pod,对这组pod的访问只要访问到80端口都是允许的,其它端口都没有说明。默认是拒绝的
[root@k8smaster networkpolicy]# cat allow-netpol-demo.yaml

apiVersion: networking.k8s.io/v1

kind: NetworkPolicy

metadata:

  name: allow-myapp-ingress

spec:

  podSelector:

    matchLabels:

      app: myapp #匹配标签为myapp的pod

  ingress:

  - from:

    - ipBlock: #网段

        cidr: 10.244.0.0/ #放行这个网络

        except:  #排除这个网络

        - 10.244.1.2/  #即排除10.244.1.2这个地址

    ports: #允许访问本机的哪个端口,我们myapp只开放了一个80端口因此我们开放80端口的访问

    - protocol: TCP

      port:

[root@k8smaster networkpolicy]# kubectl apply -f allow-netpol-demo.yaml -n dev

networkpolicy.networking.k8s.io/allow-myapp-ingress unchanged

[root@k8smaster networkpolicy]# kubectl get netpol -n dev

NAME                  POD-SELECTOR   AGE

allow-myapp-ingress   app=myapp      34s

deny-all-ingress      <none>         49m

[root@k8smaster networkpolicy]# curl 10.244.2.2

Hello MyApp | Version: v1 | <a href="hostname.html">Pod Name</a>
我们访问443端口发现也被拒绝,当我们放行后发现能收到访问失败的信息
[root@k8smaster networkpolicy]# curl 10.244.2.2: #可以看到被拒绝

^C

[root@k8smaster networkpolicy]# cat allow-netpol-demo.yaml

apiVersion: networking.k8s.io/v1

kind: NetworkPolicy

metadata:

  name: allow-myapp-ingress

spec:

  podSelector:

    matchLabels:

      app: myapp #匹配标签为myapp的pod

  ingress:

  - from:

    - ipBlock: #网段

        cidr: 10.244.0.0/ #放行这个网络

        except:  #排除这个网络

        - 10.244.1.2/  #即排除10.244.1.2这个地址

    ports: #允许访问本机的哪个端口,我们myapp只开放了一个80端口因此我们开放80端口的访问

    - protocol: TCP

      port:

    - protocol: TCP

      port:

[root@k8smaster networkpolicy]# kubectl apply -f allow-netpol-demo.yaml -n dev

networkpolicy.networking.k8s.io/allow-myapp-ingress configured

[root@k8smaster networkpolicy]# curl 10.244.2.2: #可以看到被放行了

curl: () Failed connect to 10.244.2.2:; Connection refused
c、我们要管控出栈流量的方式和管控入栈流量的方式是一样的,只不过将其Ingress改为Egress。
7、以prod名称空间为例,我们将其出栈规则先设置为拒绝,然后我们再慢慢放行,能访问出去,我们让进来都允许
a、首先我们定义netpol
[root@k8smaster networkpolicy]# cat egress-def.yml

apiVersion: networking.k8s.io/v1

kind: NetworkPolicy

metadata:

  name: deny-all-egress

spec:

  podSelector: {} #空表示选择所有pod,表示指定名称空间中的所有pod,就相当于控制整个名称空间了

  policyTypes:

  - Egress  #表示只对Egress生效,此时我们egress默认拒绝所有,ingress是允许的

[root@k8smaster networkpolicy]# kubectl apply -f egress-def.yml -n prod

networkpolicy.networking.k8s.io/deny-all-egress created

[root@k8smaster networkpolicy]# kubectl get netpol -n prod

NAME              POD-SELECTOR   AGE

deny-all-egress   <none>         16s
b、此时我们看到我们prod 中的pod1是ping不出去的,因为egress默认拒绝了所有流量,要放行所有egress流量也很简单,和ingress处定义方式一样
[root@k8smaster networkpolicy]# cat egress-def.yml

apiVersion: networking.k8s.io/v1

kind: NetworkPolicy

metadata:

  name: deny-all-egress

spec:

  podSelector: {} #空表示选择所有pod,表示指定名称空间中的所有pod,就相当于控制整个名称空间了

  egress:

  - {}

  policyTypes:

  - Egress  #表示只对Egress生效,此时我们egress默认拒绝所有,ingress是允许的

[root@k8smaster networkpolicy]# kubectl apply -f egress-def.yml -n prod

networkpolicy.networking.k8s.io/deny-all-egress unchanged

[root@k8smaster networkpolicy]# kubectl exec -it pod1 -n prod /bin/sh

/ # ping 10.244.0.26

PING 10.244.0.26 (10.244.0.26):  data bytes

 bytes from 10.244.0.26: seq= ttl= time=3.317 ms

 bytes from 10.244.0.26: seq= ttl= time=0.630 ms
此时我们还是将egress改回拒绝状态,发现无法ping通
[root@k8smaster networkpolicy]# kubectl exec -it pod1 -n prod /bin/sh

PING 10.244.0.26 (10.244.0.26):  data bytes

^C
egress我们要定义他们特定的放行出站流量的时候我们只能定义对方的端口和对方的地址,事实上自己作为客户端的话是允许访问所有的客户端和所有的远程地址的。应该放行所有,出栈一般没问题,入栈我们控制只有哪些能进来就行,就不再详细说了。如果想做的苛刻一点,对所有名称空间,拒绝所有入栈,拒绝所有出栈,单独放行。但是拒绝所有入栈和出栈就有一个问题,使用podselect写完以后会导致同一个名称空间中pod与pod之间也没法通信了,因为podselect不是在namespace级别控制的而是在pod级别控制的。就表示无论他在不在名称空间彼此之间都不能通信。所以必要的情况下就应该定义先拒绝所有出栈拒绝所有入栈以后再加两条规则,就是本名称空间中的pod出,然后又到本名称空间的pod是允许的。这样就能放行同一个名称空间中的pod通信。
8、一般来说网络策略我们可以这样干
对于名称空间来说,我们先拒绝所有出栈和入栈,然后再放行所有出栈目标为本地所有名称空间内的所有pod;这样至少内部通信没问题了,剩下的跨名称空间再单独定义就行。而放行所有出栈为本名称空间,入栈也是本名称空间,因此此时Ingress和Egress都需要定义。但是我们使用namespaceselector来选择哪个名称空间,或者入栈和出栈的时候都写成podselector,写Ingress和Egress时都写成{},即本地所有的就行了。
Kubernetes 学习19基于canel的网络策略的更多相关文章
- k8s基于canel的网络策略
Kubernetes能够把集群中不同Node节点上的Pod连接起来,并且默认情况下,每个Pod之间是可以相互访问的.但在某些场景中,不同的Pod不应该互通,这个时候就需要进行访问控制.亲测:在kube ...
- kubernetes学习笔记之十三:基于calico的网络策略入门
一..安装calico [root@k8s-master01 ~]# kubectl apply -f https://docs.projectcalico.org/v3.3/getting-star ...
- canel的网络策略
资源: https://docs.projectcalico.org/v3.2/getting-started/kubernetes/installation/flannel 基于pod Egress ...
- k8s-基于canel的网络策略-十九
一.前提 上一节学习了flannel,但是我们应该了解flannel只能提供网络通讯,而不能提供网络策略.因此,我们本节学习canal,让它来提供网络策略,来配合flannel使用. canal是ca ...
- k8s系列---基于canal的网络策略
文章拷自:http://blog.itpub.net/28916011/viewspace-2215383/ 加上自己遇到的问题简单记录 安装文档:https://docs.projectcalico ...
- k8s之网络插件flannel及基于Calico的网络策略
1.k8s网络通信 a.容器间通信:同一个pod内的多个容器间的通信,通过lo即可实现; b.pod之间的通信:pod ip <---> pod ip,pod和pod之间不经过任何转换即可 ...
- 爬虫学习之基于Scrapy的网络爬虫
###概述 在上一篇文章<爬虫学习之一个简单的网络爬虫>中我们对爬虫的概念有了一个初步的认识,并且通过Python的一些第三方库很方便的提取了我们想要的内容,但是通常面对工作当作复杂的需求 ...
- Kubernetes 学习20调度器,预选策略及优选函数
一.概述 1.k8s集群中能运行pod资源的其实就是我们所谓的节点,也称为工作节点.master从本质上来讲,他其实是运行整个集群的控制平面组件的比如apiserver,scheal,controlm ...
- Kubernetes 学习26 基于kubernetes的Paas概述
一.概述 1.通过以往的学习应该可以了解到k8s 和以往提到的devops概念更容易落地了.比如我们说的CI,CD,CD a.CI(Continuous Integration):持续集成 b.CD( ...
随机推荐
- CharacterEncodingFilter cannot be cast to javax.servlet.Filter
java.lang.ClassCastException: org.springframework.web.filter.CharacterEncodingFilter cannot be cast ...
- Java代码生成器Easy Code
EasyCode是基于IntelliJ IDEA开发的代码生成插件,支持自定义任意模板(Java,html,js,xml).只要是与数据库相关的代码都可以通过自定义模板来生成.支持数据库类型与java ...
- 转:JVM的符号引用和直接引用
在JVM中类加载过程中,在解析阶段,Java虚拟机会把类的二级制数据中的符号引用替换为直接引用. 1.符号引用(Symbolic References): 符号引用以一组符号来描述所引用的目标,符号可 ...
- .net core使用ocelot---第四篇 限流熔断
简介 .net core使用ocelot---第一篇 简单使用 .net core使用ocelot---第二篇 身份验证 .net core使用ocelot---第三篇 日志记录 前几篇文章我们陆续介 ...
- Javascript实现的智能消防栓状态监测画面
系统需要添加智能消防栓模块.集成了一家采用NbIOT通讯的智能消防栓产品.由第厂家平台对接NbIot特联网平台,我们平台提供一个api从第三方平台接收消防栓状态,用SignlaR把状态推送到前端.需要 ...
- python 简单工厂模式
abc 是抽象类模块abc.ABC 是继承抽象类 也可直接继承 (metaclass=ABCMeta)abc.abstractmethod 是定义抽象方法 简单工厂模式:通过接口创建对象,但不会暴露 ...
- elementui switch 开关,点击确认按钮后在进行开关
<el-table-column label="上头条" align="center"> <template slot-scope=" ...
- 设置 SQL*Plus 的运行环境
SQL*Plus 的运行环境是用来输入.执行 SQL*Plus 命令和显示返回结果的场所,设置合适的 SQL*Plus 运行环境,可以使 SQL*Plus 按照用户的要求运行和执行各种操作.set 命 ...
- ArrayList集合实现RandomAccess接口有何作用?为何LinkedList集合却没实现这接口
详见:https://blog.csdn.net/weixin_39148512/article/details/79234817 众所周知,在List集合中,我们经常会用到ArrayList以及Li ...
- 蓝桥杯-入门训练 :A+B问题
问题描述 输入A.B,输出A+B. 说明:在“问题描述”这部分,会给出试题的意思,以及所要求的目标. 输入格式 输入的第一行包括两个整数,由空格分隔,分别表示A.B. 输出格式 输出一行,包括一个整数 ...
