grpc使用记录(三)简单异步服务实例
grpc使用记录(三)简单异步服务实例
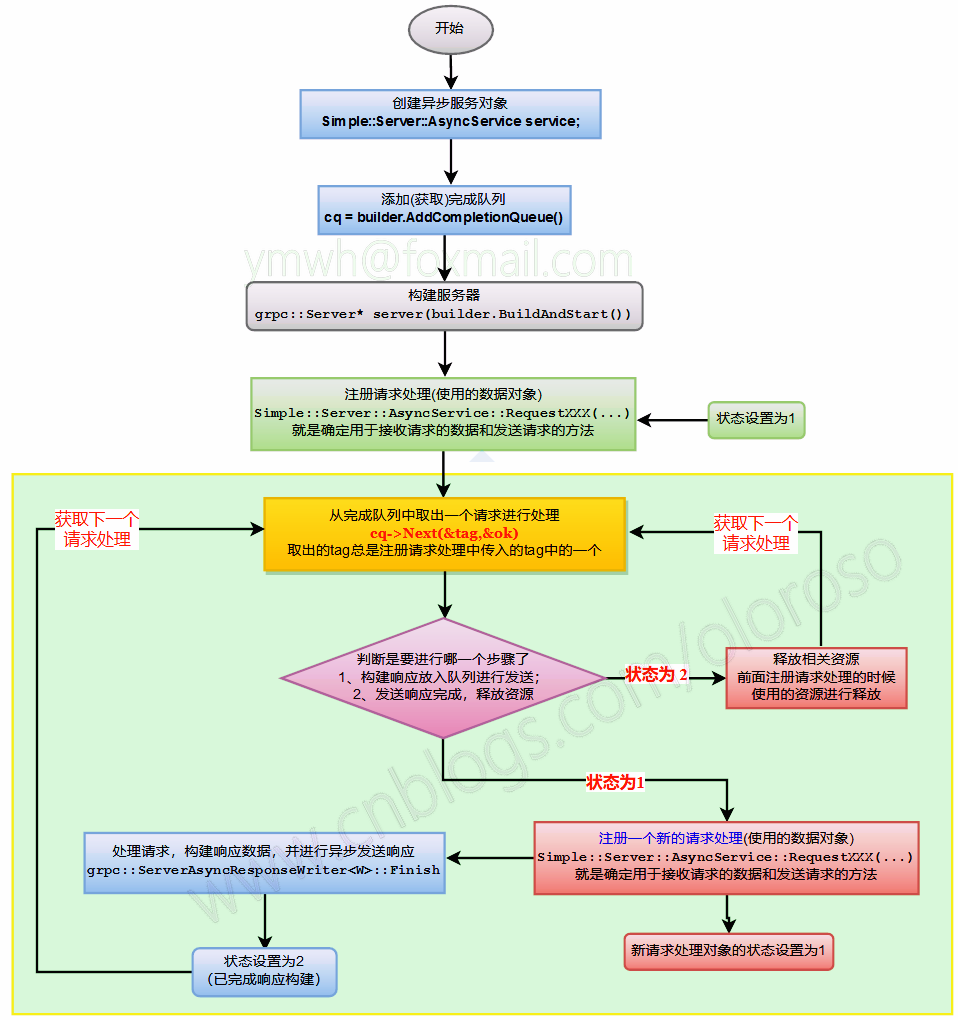
编写异步服务和编写同步服务的基本流程都差不多,稍有点区别。
同步服务你只需要实现相关服务接口的实现即可,不需要管理太多东西。异步服务GRPC运行时会把读取到的客户端请求放入CompletionQueue中,需要主动从中取出,然后进行相关的处理,可以多线程也可以单线程。
1、编写proto文件,定义服务
这里和grpc使用记录(二)简单同步服务实例中的一样,这里就不多说了。
2、编译proto文件,生成代码
这里也是和grpc使用记录(二)简单同步服务实例中的一样的。
3、编写服务端代码
这里可以复用前面同步服务的代码,只需要做简单的修改即可。
简单说一下创建一个GRPC异步服务的要点:
- 1、创建服务对象的时候要创建
AsyncService,而不是Service。 - 2、至少需要添加一个
grpc::ServerCompletionQueue用于异步任务操作。 - 3、必须要通过
AsyncService::RequestXXXX来注册XXXX接口的处理。 - 4、一个客户端请求的处理可简单的分为两个步骤:1、构建返回给客户端的响应数据;2、发送响应数据给客户端。
- 5、完成队列和注册请求处理都可以有多个,不一定非得是一个。
async_service.cpp
下面代码简单的创建了3个HandlerContext的结构体类型,用于保存三个接口请求处理过程中的数据,实际的请求处理还是和之前同步服务的一样,这里只是写成了Test1、Test2、Test3三个函数的形式。
// > g++ -o aservice async_service.cpp  simple.grpc.pb.cc simple.pb.cc -std=c++11 -I. -lgrpc++ -lgrpc -lprotobuf -lgpr -lz -lcares -laddress_sorting -lpthread -Wno-deprecated

#include "simple.grpc.pb.h"

#include <grpcpp/grpcpp.h>

#include <memory>

#include <iostream>

#include <strstream>

struct HandlerContext {

  // 当前处理状态(处理分为两步:1处理请求构建响应数据;2发送响应)

  // 这里记录一下完成到哪一步了,以便进行相关操作

  int                 status_; // (1构建响应完成;2发送完成)

  // rpc的上下文,允许通过它进行诸如压缩、身份验证,以及把元数据发回客户端等。

  grpc::ServerContext ctx_;

};

struct HandlerTest1Context:public HandlerContext {

  // 用于接收客户端发送的请求

  Simple::TestRequest req_;

  // 用于发送响应给客户端

  Simple::TestNull    rep_;

  // 发送到客户端的方法对象

  grpc::ServerAsyncResponseWriter<Simple::TestNull> responder_;

  // 构造函数

  HandlerTest1Context()

    :responder_(&ctx_)

  {}

};

struct HandlerTest2Context:public HandlerContext  {

  // 用于接收客户端发送的请求

  Simple::TestNull req_;

  // 用于发送响应给客户端

  Simple::TestReply   rep_;

  // 发送到客户端的方法对象

  grpc::ServerAsyncResponseWriter<Simple::TestReply> responder_;

  // 构造函数

  HandlerTest2Context()

    :responder_(&ctx_)

  {}

};

struct HandlerTest3Context:public HandlerContext {

  // 用于接收客户端发送的请求

  Simple::TestRequest req_;

  // 用于发送响应给客户端

  Simple::TestReply   rep_;

  // 发送到客户端的方法对象

  grpc::ServerAsyncResponseWriter<Simple::TestReply> responder_;

  // 构造函数

  HandlerTest3Context()

    :responder_(&ctx_)

  {}

};

// Test1 实现都是差不都的,这里只是为了测试,就随便返回点数据了

grpc::Status Test1(grpc::ServerContext*       context,

                   const Simple::TestRequest* request,

                   Simple::TestNull*          response)

{

  printf("%s %d\n",__func__,__LINE__);

  std::ostrstream os;

  os << "Client Name = " << request->name() << '\n';

  os << "Clinet ID   = " << request->id()   << '\n';

  os << "Clinet Value= " << request->value()<< '\n';

  std::string message = os.str();

  // grpc状态可以设置message,所以也可以用来返回一些信息

  return grpc::Status(grpc::StatusCode::OK,message);

}

// Test2

grpc::Status Test2(grpc::ServerContext*       context,

                   const Simple::TestNull*    request,

                   Simple::TestReply*         response)

{

  printf("%s %d\n",__func__,__LINE__);

  response->set_tid(100);

  response->set_svrname("Simple Server");

  response->set_takeuptime(0.01);

  return grpc::Status::OK;

}

// Test3

grpc::Status Test3(grpc::ServerContext*       context,

                   const Simple::TestRequest* request,

                   Simple::TestReply*         response)

{

  printf("%s %d\n",__func__,__LINE__);

  std::ostrstream os;

  os << "Client Name = " << request->name() << '\n';

  os << "Clinet ID   = " << request->id()   << '\n';

  os << "Clinet Value= " << request->value()<< '\n';

  std::string message = os.str();

  response->set_tid(__LINE__);

  response->set_svrname(__FILE__);

  response->set_takeuptime(1.234);

  // grpc状态可以设置message

  return grpc::Status(grpc::StatusCode::OK,std::move(message));

}

int main()

{

  // 服务构建器,用于构建同步或者异步服务

  grpc::ServerBuilder builder;

  // 添加监听的地址和端口,后一个参数用于设置认证方式,这里选择不认证

  builder.AddListeningPort("0.0.0.0:33333",grpc::InsecureServerCredentials());

  // 创建一个异步服务对象

  Simple::Server::AsyncService service;

  // 注册服务

  builder.RegisterService(&service);

  // 添加一个完成队列,用于与 gRPC 运行时异步通信

  std::unique_ptr<grpc::ServerCompletionQueue> cq_ptr = builder.AddCompletionQueue();

  // 构建服务器

  std::unique_ptr<grpc::Server> server(builder.BuildAndStart());

  std::cout<<"Server Runing"<<std::endl;

  // 这里用一个map来记录一下下面要进行处理的请求

  // 因为这里也是单线程的,所以不加锁了

  std::map<HandlerContext*,int> handlerMap; // value用于记录是Test1还是2、3

  {

    // 先创建三个类型接口的请求处理上下文对象

    HandlerTest1Context* htc1 = new HandlerTest1Context;

    htc1->status_ = 1; // 设置状态为1(因为只需要区分是否已经发送响应完成)

    HandlerTest2Context* htc2 = new HandlerTest2Context;

    htc2->status_ = 1;

    HandlerTest3Context* htc3 = new HandlerTest3Context;

    htc3->status_ = 1;

    // 将三个上下文对象存入map中

    handlerMap[htc1] = 1; // 值用于区分是哪个类型

    handlerMap[htc2] = 2;

    handlerMap[htc3] = 3;

    // 进入下面死循环前需要先注册一下请求

    service.RequestTest1(

        &htc1->ctx_         /*服务上下文对象*/,

        &htc1->req_         /*用于接收请求的对象*/,

        &htc1->responder_   /*异步写响应对象*/,

        cq_ptr.get()        /*新的调用使用的完成队列*/,

        cq_ptr.get()        /*通知使用的完成队列*/,

        htc1                /*唯一标识tag*/);

    service.RequestTest2(&htc2->ctx_,&htc2->req_,&htc2->responder_,cq_ptr.get(),cq_ptr.get(),htc2);

    service.RequestTest3(&htc3->ctx_,&htc3->req_,&htc3->responder_,cq_ptr.get(),cq_ptr.get(),htc3);

  }

  // 异步服务这里不能使用 server.Wait() 来等待处理,因为是异步服务

  // 服务器会把到达的请求放入队列,需要自己从完成队列取出请求进行处理

  // 所以这里需要一个死循环来获取请求并进行处理

  while(true){

    // 前面已经注册了请求处理,这里阻塞从完成队列中取出一个请求进行处理

    HandlerContext* htc = NULL;

    bool ok = false;

    GPR_ASSERT(cq_ptr->Next((void**)&htc, &ok));

    GPR_ASSERT(ok);

    // 根据tag判断是哪一个请求

    // 因为前面注册请求处理的时候使用的就是对象地址

    // 所以这里直接从map里面取出来判断即可

    int type = handlerMap[htc];

    // 判断状态,看是不是已经响应发送了

    if(htc->status_ == 2) {

      // 从map中移除

      handlerMap.erase(htc);

      // 因为这里并不是多态类,必须根据类型操作

      switch(type) {

        case 1:

          {

            // 释放对象(这里未对这个对象进行复用)

            delete (HandlerTest1Context*)htc;

          }

          break;

        case 2:

          {

            delete (HandlerTest2Context*)htc;

          }

          break;

        case 3:

          {

            delete (HandlerTest3Context*)htc;

          }

          break;

      }

      continue; // 回到从完成队列获取下一个

    }

    // 根据type进行相应的处理

    switch(type) {

      case 1: /*Test1的处理*/

        {

          // 重新创建一个请求处理上下文对象(以便不影响下一个请求的处理)

          HandlerTest1Context* htc1 = new HandlerTest1Context;

          htc1->status_ = 1;    // 设置状态为1

          handlerMap[htc1] = 1; // 保存到handlerMap中

          service.RequestTest1(&htc1->ctx_,&htc1->req_,&htc1->responder_,

                               cq_ptr.get(),cq_ptr.get(),htc1);

          HandlerTest1Context* h = (HandlerTest1Context*)htc;

          grpc::Status status = Test1(&h->ctx_,&h->req_,&h->rep_);

          // 设置状态为发送响应

          h->status_ = 2;

          // 调用responder_进行响应发送(异步)

          h->responder_.Finish(h->rep_/*发送的响应*/,status/*状态码*/,htc/*请求处理的唯一tag*/);

        }

        break;

      case 2: /*Test2的处理*/

        {

          HandlerTest2Context* htc2 = new HandlerTest2Context;

          htc2->status_ = 1;    // 设置状态为1

          handlerMap[htc2] = 2; // 保存到handlerMap中

          service.RequestTest2(&htc2->ctx_,&htc2->req_,&htc2->responder_,

                               cq_ptr.get(),cq_ptr.get(),htc2);

          HandlerTest2Context* h = (HandlerTest2Context*)htc;

          grpc::Status status = Test2(&h->ctx_,&h->req_,&h->rep_);

          // 设置状态为发送响应

          h->status_ = 2;

          // 调用responder_进行响应发送(异步)

          h->responder_.Finish(h->rep_/*发送的响应*/,status/*状态码*/,htc/*请求处理的唯一tag*/);

        }

        break;

      case 3: /*Test3的处理*/

        {

          HandlerTest3Context* htc3 = new HandlerTest3Context;

          htc3->status_ = 1;    // 设置状态为1

          handlerMap[htc3] = 3; // 保存到handlerMap中

          service.RequestTest3(&htc3->ctx_,&htc3->req_,&htc3->responder_,

                               cq_ptr.get(),cq_ptr.get(),htc3);

          HandlerTest3Context* h = (HandlerTest3Context*)htc;

          grpc::Status status = Test3(&h->ctx_,&h->req_,&h->rep_);

          // 设置状态为发送响应

          h->status_ = 2;

          // 调用responder_进行响应发送(异步)

          h->responder_.Finish(h->rep_/*发送的响应*/,status/*状态码*/,htc/*请求处理的唯一tag*/);

        }

        break;

    }

  }

  return 0;

}
async_service2.cpp
上面虽然是使用到了grpc的异步服务机制,但是只是为了描述清楚异步服务的创建过程,是一个单线程的简陋实现。下面写一个使用线程池的实现。
// > g++ -o aservice2 async_service2.cpp  simple.grpc.pb.cc simple.pb.cc -std=c++11 -I. -lgrpc++ -lgrpc -lprotobuf -lgpr -lz -lcares -laddress_sorting -lpthread -Wno-deprecated

// 线程池的代码可见 https://www.cnblogs.com/oloroso/p/5881863.html

#include "threadpool.h"

#include "simple.grpc.pb.h"

#include <grpcpp/grpcpp.h>

#include <memory>

#include <iostream>

#include <strstream>

#include <chrono>

struct HandlerContextBase {

  // 当前对象类型,用于确定是Test1/2/3哪一个请求的

  int                 type_;

  // 当前处理状态(处理分为两步:1处理请求构建响应数据;2发送响应)

  // 这里记录一下完成到哪一步了,以便进行相关操作

  int                 status_; // (1构建响应完成;2发送完成)

  // rpc的上下文,允许通过它进行诸如压缩、身份验证,以及把元数据发回客户端等。

  grpc::ServerContext ctx_;

};

template<typename RequestType,typename ReplyType>

struct HandlerContext:public HandlerContextBase {

  // 用于接收客户端发送的请求

  RequestType         req_;

  // 用于发送响应给客户端

  ReplyType           rep_;

  // 发送到客户端的方法对象

  grpc::ServerAsyncResponseWriter<ReplyType> responder_;

  //================================================

  // 构造函数

  HandlerContext()

    :responder_(&ctx_)

  {}

};

typedef HandlerContext<Simple::TestRequest,Simple::TestNull>  HandlerTest1Context;

typedef HandlerContext<Simple::TestNull,Simple::TestReply>    HandlerTest2Context;

typedef HandlerContext<Simple::TestRequest,Simple::TestReply> HandlerTest3Context;

unsigned long get_tid()

{

  std::thread::id tid = std::this_thread::get_id();

  std::ostrstream os;

  os << tid;

  unsigned long tidx = std::stol(os.str());

  return tidx;

}

// Test1 实现都是差不都的,这里只是为了测试,就随便返回点数据了

grpc::Status Test1(grpc::ServerContext*       context,

                   const Simple::TestRequest* request,

                   Simple::TestNull*          response)

{

  printf("%s %d\n",__func__,__LINE__);

  std::ostrstream os;

  os << "Client Name = " << request->name() << '\n';

  os << "Clinet ID   = " << request->id()   << '\n';

  os << "Clinet Value= " << request->value()<< '\n';

  std::string message = os.str();

  // grpc状态可以设置message,所以也可以用来返回一些信息

  return grpc::Status(grpc::StatusCode::OK,message);

}

// Test2

grpc::Status Test2(grpc::ServerContext*       context,

                   const Simple::TestNull*    request,

                   Simple::TestReply*         response)

{

  printf("%s %d\n",__func__,__LINE__);

  response->set_tid(100);

  response->set_svrname("Simple Server");

  response->set_takeuptime(0.01);

  return grpc::Status::OK;

}

// Test3

grpc::Status Test3(grpc::ServerContext*       context,

                   const Simple::TestRequest* request,

                   Simple::TestReply*         response)

{

  printf("%s %d\n",__func__,__LINE__);

  int tid = get_tid();

  std::ostrstream os;

  os << "Client Name = " << request->name() << '\n';

  os << "Clinet ID   = " << request->id()   << '\n';

  os << "Clinet Value= " << request->value()<< '\n';

  os << "Server TID  = " << tid<<'\n';

  std::string message = os.str();

  // 休眠0.5秒,以便观察异步执行的效果

  std::this_thread::sleep_for(std::chrono::milliseconds(500));

  response->set_tid(tid);

  response->set_svrname(__FILE__);

  response->set_takeuptime(1.234);

  // grpc状态可以设置message

  return grpc::Status(grpc::StatusCode::OK,std::move(message));

}

int main()

{

  // 服务构建器,用于构建同步或者异步服务

  grpc::ServerBuilder builder;

  // 添加监听的地址和端口,后一个参数用于设置认证方式,这里选择不认证

  builder.AddListeningPort("0.0.0.0:33333",grpc::InsecureServerCredentials());

  // 创建一个异步服务对象

  Simple::Server::AsyncService service;

  // 注册服务

  builder.RegisterService(&service);

  // 添加一个完成队列,用于与 gRPC 运行时异步通信

  std::unique_ptr<grpc::ServerCompletionQueue> cq_ptr = builder.AddCompletionQueue();

  // 构建服务器

  std::unique_ptr<grpc::Server> server(builder.BuildAndStart());

  std::cout<<"Server Runing"<<std::endl;

  // 下面可以有几个工作线程就先注册几个,也可以仅注册一个(至少一个)

  /*for(int i=0;i<4;++i)*/ {

    // 先创建三个类型接口的请求处理上下文对象

    HandlerTest1Context* htc1 = new HandlerTest1Context;

    htc1->status_ = 1; // 设置状态为1(因为只需要区分是否已经发送响应完成)

    htc1->type_   = 1; // 设置类型为1

    HandlerTest2Context* htc2 = new HandlerTest2Context;

    htc2->status_ = 1;

    htc2->type_   = 2;

    HandlerTest3Context* htc3 = new HandlerTest3Context;

    htc3->status_ = 1;

    htc3->type_   = 3;

    // 进入下面死循环前需要先注册一下请求

    service.RequestTest1(

        &htc1->ctx_         /*服务上下文对象*/,

        &htc1->req_         /*用于接收请求的对象*/,

        &htc1->responder_   /*异步写响应对象*/,

        cq_ptr.get()        /*新的调用使用的完成队列*/,

        cq_ptr.get()        /*通知使用的完成队列*/,

        htc1                /*唯一标识tag*/);

    service.RequestTest2(&htc2->ctx_,&htc2->req_,&htc2->responder_,cq_ptr.get(),cq_ptr.get(),htc2);

    service.RequestTest3(&htc3->ctx_,&htc3->req_,&htc3->responder_,cq_ptr.get(),cq_ptr.get(),htc3);

  }

  // 创建线程池,使用4个工作线程,用于构建请求的响应

  ThreadPool pool(4);

  // 异步服务这里不能使用 server->Wait() 来等待处理,因为是异步服务

  // 服务器会把到达的请求放入队列,需要自己从完成队列取出请求进行处理

  // 所以这里需要一个死循环来获取请求并进行处理

  while(true){

    // 前面已经注册了请求处理,这里阻塞从完成队列中取出一个请求进行处理

    HandlerContextBase* htc = NULL;

    bool ok = false;

    GPR_ASSERT(cq_ptr->Next((void**)&htc, &ok));

    GPR_ASSERT(ok);

    // 根据tag判断是哪一个请求

    // 因为前面注册请求处理的时候使用的就是对象地址

    // 所以这里直接从map里面取出来判断即可

    int type = htc->type_;

    // 判断状态,看是不是已经响应发送了

    if(htc->status_ == 2) {

      // 因为这里并不是多态类,必须根据类型操作

      switch(type) {

        case 1:

          {

            // 释放对象(这里未对这个对象进行复用)

            delete (HandlerTest1Context*)htc;

          }

          break;

        case 2:

          {

            delete (HandlerTest2Context*)htc;

          }

          break;

        case 3:

          {

            delete (HandlerTest3Context*)htc;

          }

          break;

      }

      continue; // 回到从完成队列获取下一个

    }

    // 重新创建一个请求处理上下文对象(以便能够接受下一个请求进行处理)

    switch(type) {

      case 1:

        {

          HandlerTest1Context* htc1 = new HandlerTest1Context;

          htc1->status_ = 1;    // 设置状态为1

          htc1->type_   = 1;    // 设置类型为1

          service.RequestTest1(&htc1->ctx_,&htc1->req_,&htc1->responder_,

                               cq_ptr.get(),cq_ptr.get(),htc1);

        }

        break;

      case 2:

        {

          HandlerTest2Context* htc2 = new HandlerTest2Context;

          htc2->status_ = 1;    // 设置状态为1

          htc2->type_   = 1;    // 设置类型为2

          service.RequestTest2(&htc2->ctx_,&htc2->req_,&htc2->responder_,

                               cq_ptr.get(),cq_ptr.get(),htc2);

        }

        break;

      case 3:

        {

          HandlerTest3Context* htc3 = new HandlerTest3Context;

          htc3->status_ = 1;    // 设置状态为1

          htc3->type_   = 3;    // 设置类型为3

          service.RequestTest3(&htc3->ctx_,&htc3->req_,&htc3->responder_,

                               cq_ptr.get(),cq_ptr.get(),htc3);

        }

        break;

    }

    pool.enqueue([type,htc](){

    // 根据type进行相应的处理

    switch(type) {

      case 1: /*Test1的处理*/

        {

          HandlerTest1Context* h = (HandlerTest1Context*)htc;

          grpc::Status status = Test1(&h->ctx_,&h->req_,&h->rep_);

          // 设置状态为发送响应

          h->status_ = 2;

          // 调用responder_进行响应发送(异步)

          h->responder_.Finish(h->rep_/*发送的响应*/,status/*状态码*/,htc/*请求处理的唯一tag*/);

        }

        break;

      case 2: /*Test2的处理*/

        {

          HandlerTest2Context* h = (HandlerTest2Context*)htc;

          grpc::Status status = Test2(&h->ctx_,&h->req_,&h->rep_);

          // 设置状态为发送响应

          h->status_ = 2;

          // 调用responder_进行响应发送(异步)

          h->responder_.Finish(h->rep_/*发送的响应*/,status/*状态码*/,htc/*请求处理的唯一tag*/);

        }

        break;

      case 3: /*Test3的处理*/

        {

          HandlerTest3Context* h = (HandlerTest3Context*)htc;

          grpc::Status status = Test3(&h->ctx_,&h->req_,&h->rep_);

          // 设置状态为发送响应

          h->status_ = 2;

          // 调用responder_进行响应发送(异步)

          h->responder_.Finish(h->rep_/*发送的响应*/,status/*状态码*/,htc/*请求处理的唯一tag*/);

        }

        break;

    }

  });

  }

  return 0;

}
grpc使用记录(三)简单异步服务实例的更多相关文章
- grpc使用记录(二)简单同步服务实例
目录 1.编写proto文件,定义服务 2.编译proto文件,生成代码 3.编写服务端代码 server.cpp 代码 编译 4.编写客户端代码 client.cpp代码 5.简单测试一下 已经折腾 ...
- AngularJS 的异步服务测试与Mocking
测试 AngularJS 的异步服务 最近,在做项目时掉进了 AngularJS 异步调用 $q 测试的坑中,直接躺枪了.折腾了许久日子,终于想通了其中的道道,但并不确定是最佳的解决方案,最后还是决定 ...
- 搭建简单Django服务并通过HttpRequester实现GET/POST http请求提交表单
调试Django框架写的服务时,需要模拟客户端发送POST请求,然而浏览器只能模拟简单的GET请求(将参数写在url内),网上搜索得到了HttpRequester这一firefox插件,完美的实现了模 ...
- 【gRPC】C++异步服务端客户端API实例及代码解析
对于同步API而言,程序的吞吐量并不高.因为在每次发送一个gRPC请求时,会阻塞整个线程,必须等待服务端的ack回到客户端才能继续运行或者发送下一个请求,因此异步API是提升程序吞吐量的必要手段. g ...
- 【gRPC】C++异步服务端优化版,多服务接口样例
官方的C++异步服务端API样例可读性并不好,理解起来非常的费劲,各种状态机也并不明了,整个运行过程也容易读不懂,因此此处参考网上的博客进行了重写,以求顺利读懂. C++异步服务端实例,详细注释版 g ...
- Docker & k8s 系列三:在k8s中部署单个服务实例
本章将会讲解: pod的概念,以及如何向k8s中部署一个单体应用实例. 在上面的篇幅中,我们了解了docker,并制作.运行了docker镜像,然后将镜像发布至中央仓库了.然后又搭建了本机的k8s环境 ...
- Spring Cloud Netflix Zuul 重试会自动跳过经常超时的服务实例的简单说明和分析
在使用E版本的Spring Cloud Netflix Zuul内置的Ribbon重试功能时,发现Ribbon有一个非常有用的特性: 如果某个服务的某个实例经常需要重试,Ribbon则会在自己维护的一 ...
- MySQL之单表查询 一 单表查询的语法 二 关键字的执行优先级(重点) 三 简单查询 四 WHERE约束 五 分组查询:GROUP BY 六 HAVING过滤 七 查询排序:ORDER BY 八 限制查询的记录数:LIMIT 九 使用正则表达式查询
MySQL之单表查询 阅读目录 一 单表查询的语法 二 关键字的执行优先级(重点) 三 简单查询 四 WHERE约束 五 分组查询:GROUP BY 六 HAVING过滤 七 查询排序:ORDER B ...
- [WCF REST] 一个简单的REST服务实例
Get:http://www.cnblogs.com/artech/archive/2012/02/04/wcf-rest-sample.html [01] 一个简单的REST服务实例 [02] We ...
随机推荐
- k8s之Deployment 声明式地升级应用(五)
Deployment 声明式地升级应用 现在你已经知道如何将应用程序组件打包进容器,将他们分组到pod中,并为它们提供临时或者持久存储,将密钥或配置文件注入,并可以使pod之间互相通信.这就是微服务化 ...
- flask 源码浅析(flask 如何处理请求(多线程,多进程,IO多路复用))
2018-04-04 13:09:47 lucky404 阅读数 5724更多 分类专栏: python 版权声明:本文为博主原创文章,遵循CC 4.0 BY-SA版权协议,转载请附上原文出处链接 ...
- 接口自动化--unittest
今天我介绍一个测试框架:不管我们是做接口自动化还是UI自动化,我们都要用的一个框架---unittest unittest是python里面的一个单元测试框架,我们做自动化测试的话,都是要用到这个测试 ...
- [转]etcdctl v2 v3 使用指南
原文:https://blog.csdn.net/kozazyh/article/details/79586530 ------------------------------------------ ...
- 配置VScode c语言环境
vscode 提示 <sys/socket.h>找不到, 原来是不同平台上,头文件不一样. 参考:https://blog.csdn.net/qq_28581077/article/det ...
- @NotBlank注解地正确使用
@NotNull:不能为null,但可以为empty @NotEmpty:不能为null,而且长度必须大于0@NotBlank:只能作用在String上,不能为null,而且调用trim()后,长度必 ...
- POJ1475 Pushing Boxes(BFS套BFS)
描述 Imagine you are standing inside a two-dimensional maze composed of square cells which may or may ...
- 12、Python函数高级(命名空间、作用域、装饰器)
一.名称空间和作用域 1.命名空间(Namespace) 命名空间是从名称到对象的映射,大部分的命名空间都是通过 Python 字典来实现的. 命名空间提供了在项目中避免名字冲突的一种方法.各个命名空 ...
- SpringBoot——SpringBoot学习记录【一】
前言 公司目前主要的业务,用的语言是java,所以学习下相关的技术呀,还好大学基础语言学的JAVA SpringBoot简介 官网 SpringBoot 简介 SpringBoot是用来简化Sprin ...
- 前段性能----repaint和reflow
在前面小节,我们对网页渲染过程做了介绍,其中最后两步就是layout与paint,当渲染对象被创建并添加到树中,它们并没有位置和大小,计算这些值的过程称为layout或reflow.绘制阶段,遍历渲染 ...