基于Spring Boot自建分布式基础应用
目前刚入职了一家公司,要求替换当前系统(单体应用)以满足每日十万单量和一定系统用户负载以及保证开发质量和效率。由我来设计一套基础架构和建设基础开发测试运维环境,github地址。
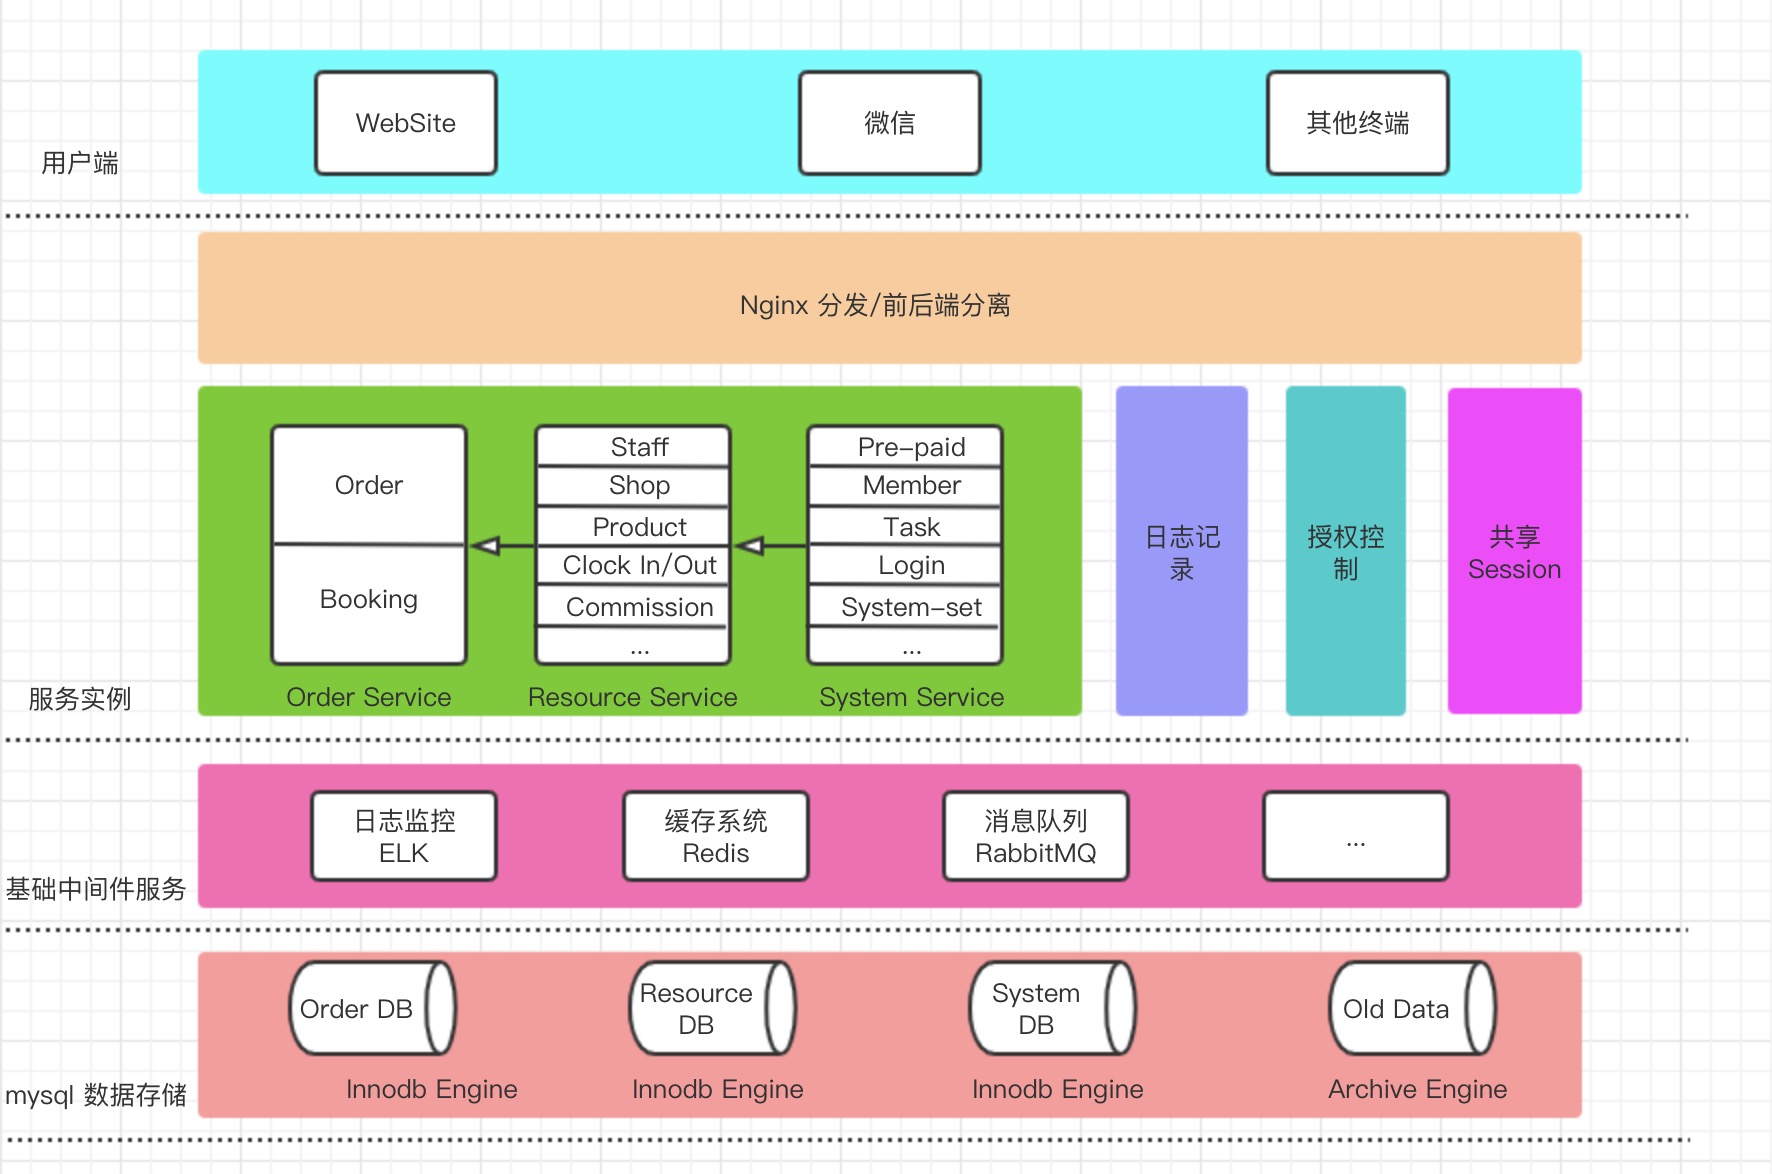
出于本公司开发现状及成本考虑,我摒弃了市面上流行的Spring Cloud以及Dubbo分布式基础架构,舍弃了集群的设计,以Spring Boot和Netty为基础自建了一套RPC分布式应用架构。可能这里各位会有疑问,为什么要舍弃应用的高可用呢?其实这也是跟公司的产品发展有关的,避免过度设计是非常有必要的。下面是整个系统的架构设计图。
这里简单介绍一下,这里ELK或许并非最好的选择,可以另外采用zabbix或者prometheus,我只是考虑了后续可能的扩展。数据库采用了两种存储引擎,便是为了因对上面所说的每天十万单的大数据量,可以采用定时脚本的形式完成数据的转移。
权限的设计主要是基于JWT+Filter+Redis来做的。Common工程中的com.imspa.web.auth.Permissions定义了所有需要的permissions:
 package com.imspa.web.auth;

 /**

  * @author Pann

  * @description TODO

  * @date 2019-08-12 15:09

  */

 public enum Permissions {

     ALL("/all", "所有权限"),

     ROLE_GET("/role/get/**", "权限获取"),

     USER("/user", "用户列表"),

     USER_GET("/user/get", "用户查询"),

     RESOURCE("/resource", "资源获取"),

     ORDER_GET("/order/get/**","订单查询");

     private String url;

     private String desc;

     Permissions(String url, String desc) {

         this.url = url;

         this.desc = desc;

     }

     public String getUrl() {

         return this.url;

     }

     public String getDesc() {

         return this.desc;

     }

 }
如果你的没有为你的接口在这里定义权限,那么系统是不会对该接口进行权限的校验的。在数据库中User与Role的设计如下:
 CREATE TABLE IF NOT EXISTS `t_user` (

   `id`                   VARCHAR(36)  NOT NULL,

   `name`                 VARCHAR(20)  NOT NULL UNIQUE,

   `password_hash`        VARCHAR(255) NOT NULL,

   `role_id`              VARCHAR(36)  NOT NULL,

   `role_name`            VARCHAR(20)  NOT NULL,

   `last_login_time`      TIMESTAMP(6) NULL,

   `last_login_client_ip` VARCHAR(15)  NULL,

   `created_time`         TIMESTAMP(6) NOT NULL DEFAULT CURRENT_TIMESTAMP(6),

   `created_by`           VARCHAR(36)  NOT NULL,

   `updated_time`         TIMESTAMP(6) NULL,

   `updated_by`           VARCHAR(36)  NULL,

   PRIMARY KEY (`id`)

 );

 CREATE TABLE IF NOT EXISTS `t_role` (

   `id`           VARCHAR(36)  NOT NULL,

   `role_name`    VARCHAR(20)  NOT NULL UNIQUE,

   `description`  VARCHAR(90)  NULL,

   `permissions`  TEXT         NOT NULL, #其数据格式类似于"/role/get,/user"或者"/all"

   `created_time` TIMESTAMP(6) NOT NULL DEFAULT CURRENT_TIMESTAMP(6),

   `created_by`   VARCHAR(36)  NOT NULL,

   `updated_time` TIMESTAMP(6) NULL,

   `updated_by`   VARCHAR(36)  NULL,

   PRIMARY KEY (`id`)

 );
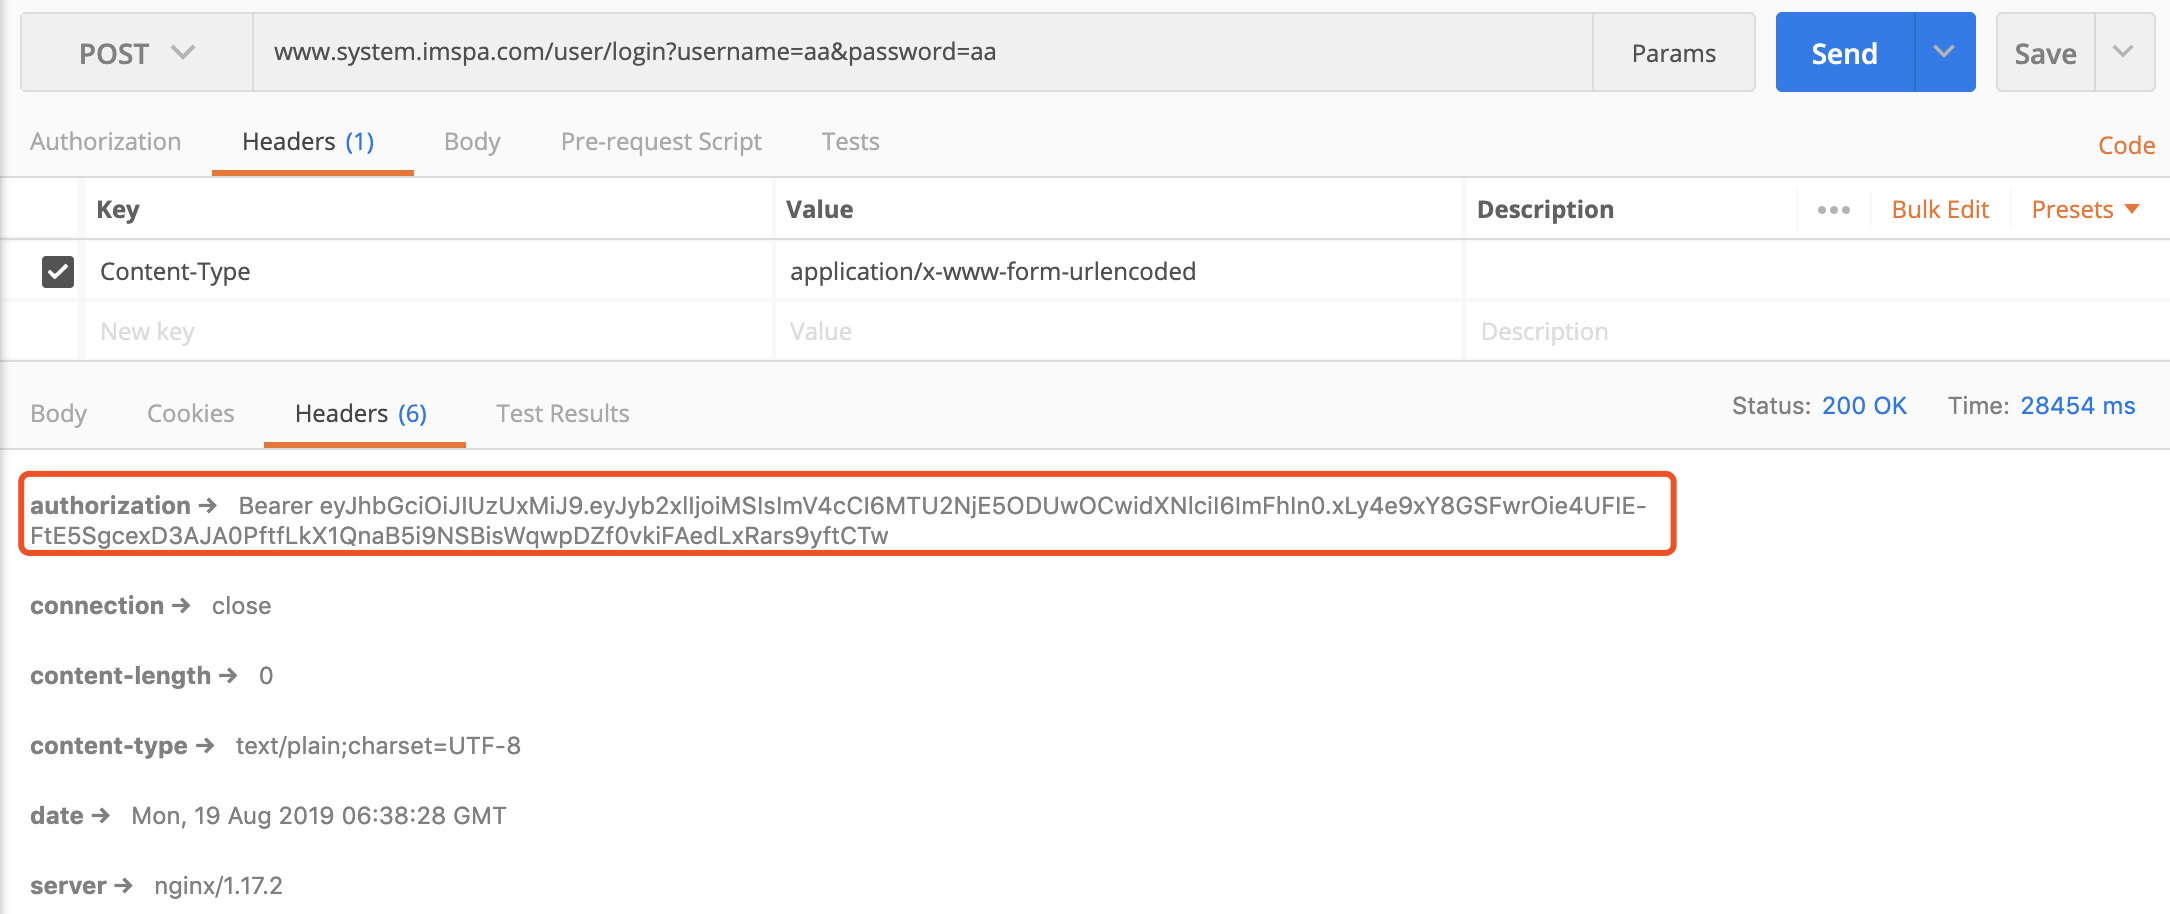
需要注意的是"/all"代表了所有权限,表示root权限。我们通过postman调用登陆接口可以获取相应的token:

这个token是半个小时失效的,如果你需要更长一些的话,可以通过com.imspa.web.auth.TokenAuthenticationService进行修改:
 package com.imspa.web.auth;

 import com.imspa.web.util.WebConstant;

 import io.jsonwebtoken.Jwts;

 import io.jsonwebtoken.SignatureAlgorithm;

 import java.util.Date;

 import java.util.Map;

 /**

  * @author Pann

  * @description TODO

  * @date 2019-08-14 23:24

  */

 public class TokenAuthenticationService {

     static final long EXPIRATIONTIME = 30 * 60 * 1000; //TODO

     public static String getAuthenticationToken(Map<String, Object> claims) {

         return "Bearer " + Jwts.builder()

                 .setClaims(claims)

                 .setExpiration(new Date(System.currentTimeMillis() + EXPIRATIONTIME))

                 .signWith(SignatureAlgorithm.HS512, WebConstant.WEB_SECRET)

                 .compact();

     }

 }
Refresh Token目前还没有实现,后续我会更新,请关注我的github。如果你跟踪登陆逻辑代码,你可以看到我把role和user都缓存到了Redis:
     public User login(String userName, String password) {

         UserExample example = new UserExample();

         example.createCriteria().andNameEqualTo(userName);

         User user = userMapper.selectByExample(example).get(0);

         if (null == user)

             throw new UnauthorizedException("user name not exist");

         if (!StringUtils.equals(password, user.getPasswordHash()))

             throw new UnauthorizedException("user name or password wrong");

         roleService.get(user.getRoleId()); //for role cache

         hashOperations.putAll(RedisConstant.USER_SESSION_INFO_ + user.getName(), hashMapper.toHash(user));

         hashOperations.getOperations().expire(RedisConstant.USER_SESSION_INFO_ + user.getName(), 30, TimeUnit.MINUTES);

         return user;

     }
在Filter中,你可以看到过滤器的一系列逻辑,注意返回http状态码401,403和404的区别:
 package com.imspa.web.auth;

 import com.imspa.web.Exception.ForbiddenException;

 import com.imspa.web.Exception.UnauthorizedException;

 import com.imspa.web.pojo.Role;

 import com.imspa.web.pojo.User;

 import com.imspa.web.util.RedisConstant;

 import com.imspa.web.util.WebConstant;

 import io.jsonwebtoken.Claims;

 import io.jsonwebtoken.Jwts;

 import org.apache.commons.lang3.StringUtils;

 import org.apache.logging.log4j.LogManager;

 import org.apache.logging.log4j.Logger;

 import org.springframework.data.redis.core.HashOperations;

 import org.springframework.data.redis.hash.HashMapper;

 import org.springframework.util.AntPathMatcher;

 import javax.servlet.Filter;

 import javax.servlet.FilterChain;

 import javax.servlet.FilterConfig;

 import javax.servlet.ServletException;

 import javax.servlet.ServletOutputStream;

 import javax.servlet.ServletRequest;

 import javax.servlet.ServletResponse;

 import javax.servlet.http.HttpServletRequest;

 import javax.servlet.http.HttpServletResponse;

 import java.io.IOException;

 import java.util.Date;

 import java.util.HashMap;

 import java.util.Map;

 import java.util.Optional;

 import java.util.concurrent.TimeUnit;

 /**

  * @author Pann

  * @description TODO

  * @date 2019-08-16 14:39

  */

 public class SecurityFilter implements Filter {

     private static final Logger logger = LogManager.getLogger(SecurityFilter.class);

     private AntPathMatcher matcher = new AntPathMatcher();

     private HashOperations<String, byte[], byte[]> hashOperations;

     private HashMapper<Object, byte[], byte[]> hashMapper;

     public SecurityFilter(HashOperations<String, byte[], byte[]> hashOperations, HashMapper<Object, byte[], byte[]> hashMapper) {

         this.hashOperations = hashOperations;

         this.hashMapper = hashMapper;

     }

     @Override

     public void init(FilterConfig filterConfig) throws ServletException {

     }

     @Override

     public void doFilter(ServletRequest servletRequest, ServletResponse servletResponse, FilterChain chain) throws IOException, ServletException {

         HttpServletRequest request = (HttpServletRequest) servletRequest;

         HttpServletResponse response = (HttpServletResponse) servletResponse;

         Optional<String> optional = PermissionUtil.getAllPermissionUrlItem().stream()

                 .filter(permissionItem -> matcher.match(permissionItem, request.getRequestURI())).findFirst();

         if (!optional.isPresent()) { //TODO some api not config permission will direct do

             chain.doFilter(servletRequest, servletResponse);

             return;

         }

         try {

             validateAuthentication(request, optional.get());

             flushSessionAndToken(((User) request.getAttribute("userInfo")), response);

             chain.doFilter(servletRequest, servletResponse);

         } catch (ForbiddenException e) {

             logger.debug("occur forbidden exception:{}", e.getMessage());

             response.setStatus(403);

             ServletOutputStream output = response.getOutputStream();

             output.print(e.getMessage());

             output.flush();

         } catch (UnauthorizedException e) {

             logger.debug("occur unauthorized exception:{}", e.getMessage());

             response.setStatus(401);

             ServletOutputStream output = response.getOutputStream();

             output.print(e.getMessage());

             output.flush();

         }

     }

     @Override

     public void destroy() {

     }

     private void validateAuthentication(HttpServletRequest request, String permission) {

         String authHeader = request.getHeader("Authorization");

         if (StringUtils.isEmpty(authHeader))

             throw new UnauthorizedException("no auth header");

         Claims claims;

         try {

             claims = Jwts.parser().setSigningKey(WebConstant.WEB_SECRET)

                     .parseClaimsJws(authHeader.replace("Bearer ", ""))

                     .getBody();

         } catch (Exception e) {

             throw new UnauthorizedException(e.getMessage());

         }

         String userName = (String) claims.get("user");

         String roleId = (String) claims.get("role");

         if (StringUtils.isEmpty(userName) || StringUtils.isEmpty(roleId))

             throw new UnauthorizedException("token error,user:" + userName);

         if (new Date().getTime() > claims.getExpiration().getTime())

             throw new UnauthorizedException("token expired,user:" + userName);

         User user = (User) hashMapper.fromHash(hashOperations.entries(RedisConstant.USER_SESSION_INFO_ + userName));

         if (user == null)

             throw new UnauthorizedException("session expired,user:" + userName);

         if (validateRolePermission(permission, user))

             request.setAttribute("userInfo", user);

     }

     private Boolean validateRolePermission(String permission, User user) {

         Role role = (Role) hashMapper.fromHash(hashOperations.entries(RedisConstant.ROLE_PERMISSION_MAPPING_ + user.getRoleId()));

         if (role.getPermissions().contains(Permissions.ALL.getUrl()))

             return Boolean.TRUE;

         if (role.getPermissions().contains(permission))

             return Boolean.TRUE;

         throw new ForbiddenException("do not have permission for this request");

     }

     private void flushSessionAndToken(User user, HttpServletResponse response) {

         hashOperations.getOperations().expire(RedisConstant.USER_SESSION_INFO_ + user.getName(), 30, TimeUnit.MINUTES);

         Map<String, Object> claimsMap = new HashMap<>();

         claimsMap.put("user", user.getName());

         claimsMap.put("role", user.getRoleId());

         response.setHeader("Authorization",TokenAuthenticationService.getAuthenticationToken(claimsMap));

     }

 }
下面是RPC的内容,我是用Netty来实现整个RPC的调用的,其中包含了心跳检测,自动重连的过程,基于Spring Boot的实现,配置和使用都还是很方便的。
我们先看一下service端的写法,我们需要先定义好对外服务的接口,这里我们在application.yml中定义:
 service:

   addr: localhost:8091

   interfaces:

     - 'com.imspa.api.OrderRemoteService'
其中service.addr是对外发布的地址,service.interfaces是对外发布的接口的定义。然后便不需要你再定义其他内容了,是不是很方便?其实现你可以根据它的配置类com.imspa.config.RPCServiceConfig来看:
 package com.imspa.config;

 import com.imspa.rpc.core.RPCRecvExecutor;

 import com.imspa.rpc.model.RPCInterfacesWrapper;

 import org.springframework.beans.factory.annotation.Value;

 import org.springframework.boot.context.properties.ConfigurationProperties;

 import org.springframework.boot.context.properties.EnableConfigurationProperties;

 import org.springframework.context.annotation.Bean;

 import org.springframework.context.annotation.Configuration;

 /**

  * @author Pann

  * @description config order server's RPC service method

  * @date 2019-08-08 14:51

  */

 @Configuration

 @EnableConfigurationProperties

 public class RPCServiceConfig {

     @Value("${service.addr}")

     private String addr;

     @Bean

     @ConfigurationProperties(prefix = "service")

     public RPCInterfacesWrapper serviceContainer() {

         return new RPCInterfacesWrapper();

     }

     @Bean

     public RPCRecvExecutor recvExecutor() {

         return new RPCRecvExecutor(addr);

     }

 }
在client端,我们也仅仅只需要在com.imspa.config.RPCReferenceConfig中配置一下我们这个工程所需要调用的service 接口(注意所需要配置的内容哦):
 package com.imspa.config;

 import com.imspa.api.OrderRemoteService;

 import com.imspa.rpc.core.RPCSendExecutor;

 import org.springframework.context.annotation.Bean;

 import org.springframework.context.annotation.Configuration;

 /**

  * @author Pann

  * @Description config this server need's reference bean

  * @Date 2019-08-08 16:55

  */

 @Configuration

 public class RPCReferenceConfig {

     @Bean

     public RPCSendExecutor orderService() {

         return new RPCSendExecutor<OrderRemoteService>(OrderRemoteService.class,"localhost:8091");

     }

 }
然后你就可以在代码里面正常的使用了
 package com.imspa.resource.web;

 import com.imspa.api.OrderRemoteService;

 import com.imspa.api.order.OrderDTO;

 import com.imspa.api.order.OrderVO;

 import org.springframework.beans.factory.annotation.Autowired;

 import org.springframework.web.bind.annotation.GetMapping;

 import org.springframework.web.bind.annotation.PathVariable;

 import org.springframework.web.bind.annotation.RequestMapping;

 import org.springframework.web.bind.annotation.RestController;

 import java.math.BigDecimal;

 import java.util.Arrays;

 import java.util.List;

 /**

  * @author Pann

  * @Description TODO

  * @Date 2019-08-08 16:51

  */

 @RestController

 @RequestMapping("/resource")

 public class ResourceController {

     @Autowired

     private OrderRemoteService orderRemoteService;

     @GetMapping("/get/{id}")

     public OrderVO get(@PathVariable("id")String id) {

         OrderDTO orderDTO = orderRemoteService.get(id);

         return new OrderVO().setOrderId(orderDTO.getOrderId()).setOrderPrice(orderDTO.getOrderPrice())

                 .setProductId(orderDTO.getProductId()).setProductName(orderDTO.getProductName())

                 .setStatus(orderDTO.getStatus()).setUserId(orderDTO.getUserId());

     }

     @GetMapping()

     public List<OrderVO> list() {

         return Arrays.asList(new OrderVO().setOrderId("1").setOrderPrice(new BigDecimal(2.3)).setProductName("西瓜"));

     }

 }
以上是本基础架构的大概内容,还有很多其他的内容和后续更新请关注我的github,笔芯。
基于Spring Boot自建分布式基础应用的更多相关文章
- 基于Spring Boot/Spring Session/Redis的分布式Session共享解决方案
分布式Web网站一般都会碰到集群session共享问题,之前也做过一些Spring3的项目,当时解决这个问题做过两种方案,一是利用nginx,session交给nginx控制,但是这个需要额外工作较多 ...
- 基于Spring Boot、Spring Cloud、Docker的微服务系统架构实践
由于最近公司业务需要,需要搭建基于Spring Cloud的微服务系统.遍访各大搜索引擎,发现国内资料少之又少,也难怪,国内Dubbo正统治着天下.但是,一个技术总有它的瓶颈,Dubbo也有它捉襟见肘 ...
- Spring Boot Redis 实现分布式锁,真香!!
之前看很多人手写分布式锁,其实 Spring Boot 现在已经做的足够好了,开箱即用,支持主流的 Redis.Zookeeper 中间件,另外还支持 JDBC. 本篇栈长以 Redis 为例(这也是 ...
- step6----->往工程中添加spring boot项目------->修改pom.xml使得我的project是基于spring boot的,而非直接基于spring framework
文章内容概述: spring项目组其实有多个projects,如spring IO platform用于管理external dependencies的版本,通过定义BOM(bill of mater ...
- 基于Spring Boot和Shiro的后台管理系统FEBS
FEBS是一个简单高效的后台权限管理系统.项目基础框架采用全新的Java Web开发框架 —— Spring Boot 2.0.3,消除了繁杂的XML配置,使得二次开发更为简单:数据访问层采用Myba ...
- 基于spring boot 2.x 的 spring-cloud-admin 实践
spring cloud admin 简介 Spring Boot Admin 用于监控基于 Spring Boot 的应用,它是在 Spring Boot Actuator 的基础上提供简洁的可视化 ...
- 基于Spring Boot和Spring Cloud实现微服务架构学习
转载自:http://blog.csdn.net/enweitech/article/details/52582918 看了几周Spring相关框架的书籍和官方demo,是时候开始总结下这中间的学习感 ...
- 基于Spring Boot和Spring Cloud实现微服务架构学习--转
原文地址:http://blog.csdn.net/enweitech/article/details/52582918 看了几周spring相关框架的书籍和官方demo,是时候开始总结下这中间的学习 ...
- 基于Spring Boot的注解驱动式公众号极速开发框架FastBootWeixin
本框架基于Spring Boot实现,使用注解完成快速开发,可以快速的完成一个微信公众号,重新定义公众号开发. 在使用本框架前建议对微信公众号开发文档有所了解,不过在不了解公众号文档的情况下使用本框架 ...
随机推荐
- ServiceFabric极简文档-4.0 开发环境搭建
1. VS2017安装包启动页,安装Azure.(安装的VS的Tool)2. 下载Service Fabric Web PI,安装Service Fabric(自动安装SDK与Runtime)
- JAVA面试题 线程的生命周期包括哪几个阶段?
面试官:您知道线程的生命周期包括哪几个阶段? 应聘者: 线程的生命周期包含5个阶段,包括:新建.就绪.运行.阻塞.销毁. 新建:就是刚使用new方法,new出来的线程: 就绪:就是调用的线程的star ...
- c语言进阶11-算法设计思想
一. 算法设计的要求: 为什么要学算法? /* 输出Hello word! */ #include "stdio.h" void main() { printf("He ...
- [剑指offer] 46. 孩子们的游戏(圆圈中最后剩下的数)
题目描述 随机指定一个数m,让编号为0的小朋友开始报数.每次喊到m-1的那个小朋友要出列,并且不再回到圈中,从他的下一个小朋友开始,继续0...m-1报数....这样下去....直到剩下最后一个小朋友 ...
- python网络爬虫(14)使用Scrapy搭建爬虫框架
目的意义 爬虫框架也许能简化工作量,提高效率等.scrapy是一款方便好用,拓展方便的框架. 本文将使用scrapy框架,示例爬取自己博客中的文章内容. 说明 学习和模仿来源:https://book ...
- ASP.NET Core Web Api之JWT VS Session VS Cookie(二)
前言 本文我们来探讨下JWT VS Session的问题,这个问题本没有过多的去思考,看到评论讨论太激烈,就花了一点时间去研究和总结,顺便说一句,这就是写博客的好处,一篇博客写出有的可能是经验积累,有 ...
- shiro解析ini文件
来吧,看看shiro是怎么解析ini文件的,这里假设ini文件在classpath下,名字叫做shiro.ini Factory<org.apache.shiro.mgt.SecurityMan ...
- solr集群
一.所需环境 1.linux系统(内存分大点) 2.JDK 3.zookeeper 4.solr 二.安装zookeeper 1.此次安装3个zookeeper 2.tar -zxf zookeepe ...
- TIJ学习--RTTI(Runtime-Time Type Identification)
TIJ学习--RTTI(Runtime-Time Type Identification) RTTI 运行时类型检查机制 获取一个类的Class引用的三种方法 class TestClass{} Te ...
- VS、C#配置R语言开发环境
R语言学习笔记(一)——在Vs.C#中配置R语言开发环境. 最近在学习小众的R语言,所以将遇到的问题记录下来供大家参考,不足之处欢迎大家交流指正. 至于R语言的介绍就不多说了,它集成了复杂的数学算法, ...
