附010.Kubernetes永久存储之GlusterFS超融合部署
一 前期准备
1.1 基础知识
1.2 架构示意

1.3 相关规划
|
主机 |
IP |
磁盘 |
备注 |
|
k8smaster01 |
172.24.8.71 |
Kubernetes master节点 |
|
|
k8smaster02 |
172.24.8.72 |
Kubernetes master节点 |
|
|
k8smaster03 |
172.24.8.73 |
Kubernetes master节点 |
|
|
k8snode01 |
172.24.8.74 |
sdb |
Kubernetes node节点 glusterfs节点 |
|
k8snode02 |
172.24.8.75 |
sdb |
Kubernetes node节点 glusterfs节点 |
|
k8snode03 |
172.24.8.76 |
sdb |
Kubernetes node节点 glusterfs节点 |
磁盘规划
|
k8snode01
|
k8snode02
|
k8snode03
|
|||||||
|
PV
|
sdb1
|
sdb1
|
sdb1
|
||||||
- 必须至少有三个节点用于glusterfs;
- 每个节点必须至少连接一个裸磁盘设备,以供heketi使用。这些设备上不得包含任何数据,heketi将会格式化和分区此设备;
- 每个节点必须打开以下端口才能进行GlusterFS通信:
- 2222:GlusterFS pod的sshd端口;
- 24007:GlusterFS守护程序;
- 24008:GlusterFS管理;
- 49152——49251:主机上每个卷的每个brick都需要有独立的端口。对于每块新brick,将从49152开始使用一个新端口。建议每台主机的默认范围为49152-49251,也可根据需要进行调整。
- 必须加载以下内核模块:
- dm_snapshot
- dm_mirror
- dm_thin_pool
- 对于内核模块,可通过lsmod | grep <name>查看模块是否存在,并modprobe <name>加载给定的模块。
- 每个节点都要求该mount.glusterfs命令可用。在所有基于Red Hat的操作系统下,此命令由glusterfs-fuse软件包提供。
1.5 其他准备
  1 172.24.8.71 k8smaster01

  2 172.24.8.72 k8smaster02

  3 172.24.8.73 k8smaster03

  4 172.24.8.74 k8snode01

  5 172.24.8.75 k8snode02

  6 172.24.8.76 k8snode03
二 规划裸设备
2.1 确认磁盘
1 [root@k8snode01 ~]# fdisk /dev/sdb -l #检查sdb是否为裸磁盘
三 安装glusterfs-fuse
3.1 安装相应RPM源
  1 [root@k8snode01 ~]# yum -y install centos-release-gluster

  2 [root@k8snode01 ~]# yum -y install glusterfs-fuse		#安装glusterfs-fuse
3.2 加载相应模块
  1 [root@k8snode01 ~]# cat > /etc/sysconfig/modules/glusterfs.modules <<EOF

  2 #!/bin/bash

  3

  4 for kernel_module in dm_snapshot dm_mirror dm_thin_pool;do

  5     /sbin/modinfo -F filename \${kernel_module} > /dev/null 2>&1

  6     if [ \$? -eq 0 ]; then

  7         /sbin/modprobe \${kernel_module}

  8     fi

  9 done;

 10 EOF

 11 [root@k8snode01 ~]# chmod +x /etc/sysconfig/modules/glusterfs.modules

 12 [root@k8snode01 ~]# lsmod |egrep "dm_snapshot|dm_mirror|dm_thin_pool"	#所有glusterfs node节点检查
四 Kubernetes部署glusterfs
4.1 Node tag
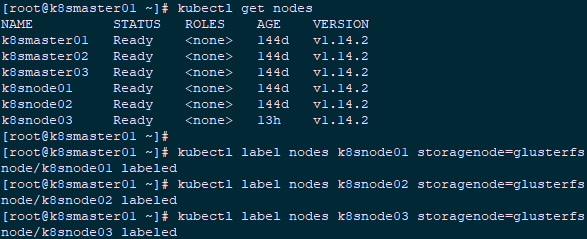
  1 [root@k8smaster01 ~]# kubectl label nodes k8snode01 storagenode=glusterfs

  2 [root@k8smaster01 ~]# kubectl label nodes k8snode02 storagenode=glusterfs

  3 [root@k8smaster01 ~]# kubectl label nodes k8snode03 storagenode=glusterfs
4.2 下载glusterfs-Kubernetes
  1 [root@k8smaster01 ~]# yum -y install git

  2 [root@k8smaster01 ~]# git clone https://github.com/gluster/gluster-kubernetes.git
4.3 修改glusterfs拓扑
  1 [root@k8smaster01 ~]# cd gluster-kubernetes/deploy/

  2 [root@k8smaster01 deploy]# cp topology.json.sample topology.json

  3 [root@k8smaster01 deploy]# vi topology.json
  1 {

  2   "clusters": [

  3     {

  4       "nodes": [

  5         {

  6           "node": {

  7             "hostnames": {

  8               "manage": [

  9                 "k8snode01"

 10               ],

 11               "storage": [

 12                 "172.24.8.74"

 13               ]

 14             },

 15             "zone": 1

 16           },

 17           "devices": [

 18             "/dev/sdb"

 19           ]

 20         },

 21         {

 22           "node": {

 23             "hostnames": {

 24               "manage": [

 25                 "k8snode02"

 26               ],

 27               "storage": [

 28                 "172.24.8.75"

 29               ]

 30             },

 31             "zone": 1

 32           },

 33           "devices": [

 34             "/dev/sdb"

 35           ]

 36         },

 37         {

 38           "node": {

 39             "hostnames": {

 40               "manage": [

 41                 "k8snode03"

 42               ],

 43               "storage": [

 44                 "172.24.8.76"

 45               ]

 46             },

 47             "zone": 1

 48           },

 49           "devices": [

 50             "/dev/sdb"

 51           ]

 52         }

 53       ]

 54     }

 55   ]

 56 }
4.4 配置heketi
  1 [root@k8smaster01 deploy]# cp heketi.json.template heketi.json

  2 [root@k8smaster01 deploy]# vi heketi.json

  3 {

  4     "_port_comment": "Heketi Server Port Number",

  5     "port" : "8080",

  6

  7     "_use_auth": "Enable JWT authorization. Please enable for deployment",

  8     "use_auth" : true,				#开启用户认证

  9

 10     "_jwt" : "Private keys for access",

 11     "jwt" : {

 12         "_admin" : "Admin has access to all APIs",

 13         "admin" : {

 14             "key" : "admin123"			#管理员密码

 15         },

 16         "_user" : "User only has access to /volumes endpoint",

 17         "user" : {

 18             "key" : "xianghy"			#用户密码

 19         }

 20     },

 21

 22     "_glusterfs_comment": "GlusterFS Configuration",

 23     "glusterfs" : {

 24

 25         "_executor_comment": "Execute plugin. Possible choices: mock, kubernetes, ssh",

 26         "executor" : "${HEKETI_EXECUTOR}",	        #本实验使用Kubernetes方式

 27

 28         "_db_comment": "Database file name",

 29         "db" : "/var/lib/heketi/heketi.db",	        #heketi数据存储

 30

 31         "kubeexec" : {

 32             "rebalance_on_expansion": true

 33         },

 34

 35         "sshexec" : {

 36             "rebalance_on_expansion": true,

 37             "keyfile" : "/etc/heketi/private_key",

 38             "port" : "${SSH_PORT}",

 39             "user" : "${SSH_USER}",

 40             "sudo" : ${SSH_SUDO}

 41         }

 42     },

 43

 44     "backup_db_to_kube_secret": false

 45 }
4.5 相关修正
  1 [root@k8smaster01 deploy]# vi gk-deploy

  2 924 #heketi_pod=$(${CLI} get pod --no-headers --show-all --selector="heketi" | awk '{print $1}')

  3 925 heketi_pod=$(${CLI} get pod --no-headers --selector="heketi" | awk '{print $1}')
  1 [root@VPN ~]# docker pull gluster/gluster-centos:latest

  2 [root@VPN ~]# docker pull heketi/heketi:dev

  3 [root@VPN ~]# docker save -o gluster_latest.tar gluster/gluster-centos:latest

  4 [root@VPN ~]# docker save -o heketi_dev.tar heketi/heketi:dev

  5 [root@k8snode01 ~]# docker load -i gluster_latest.tar

  6 [root@k8snode01 ~]# docker load -i heketi_dev.tar

  7 [root@k8snode01 ~]# docker images

  8
4.6 正式部署
  1 [root@k8smaster01 deploy]# ./gk-deploy -h			#查看部署参数

  2 [root@k8smaster01 deploy]# kubectl create ns heketi		#建议部署在独立的namespace中

  3 [root@k8smaster01 deploy]# ./gk-deploy -g -n heketi topology.json --admin-key admin123 --user-key xianghy

  4 ……

  5 Do you wish to proceed with deployment?

  6

  7 [Y]es, [N]o? [Default: Y]: y

  1 [root@k8smaster01 deploy]# ./gk-deploy --abort --admin-key admin123 --user-key xianghy -y -n heketi

  2 [root@k8smaster01 deploy]# kubectl delete -f kube-templates/ -n heketi
  1 [root@k8snode01 ~]# dmsetup ls

  2 [root@k8snode01 ~]# dmsetup remove_all

  3 [root@k8snode01 ~]# rm -rf /var/log/glusterfs/

  4 [root@k8snode01 ~]# rm -rf /var/lib/heketi

  5 [root@k8snode01 ~]# rm -rf /var/lib/glusterd/

  6 [root@k8snode01 ~]# rm -rf /etc/glusterfs/

  7 [root@k8snode01 ~]# dd if=/dev/zero of=/dev/sdb bs=512k count=1

  8 [root@k8snode01 ~]# wipefs -af /dev/sdb
4.7 Kubernetes集群查看验证
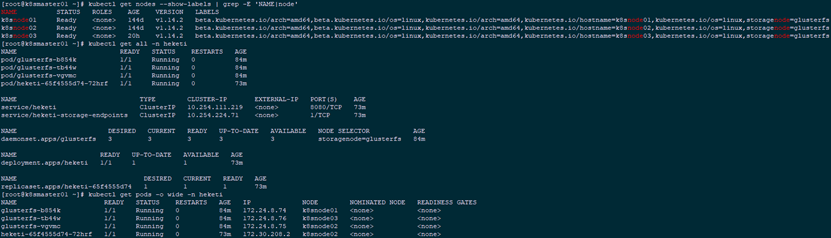
1 [root@k8smaster01 ~]# kubectl get nodes --show-labels | grep -E 'NAME|node'
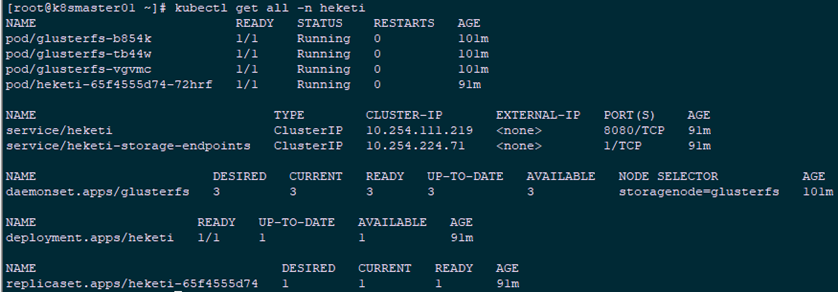
2 [root@k8smaster01 ~]# kubectl get all -n heketi
1 [root@k8smaster01 ~]# kubectl get pods -o wide -n heketi
4.8 gluster集群查看验证
  1 [root@k8smaster01 ~]# kubectl exec -it heketi-65f4555d74-72hrf -n heketi -- heketi-cli cluster list --user admin --secret admin123								#集群列表

  2 [root@k8smaster01 ~]# kubectl -n heketi exec -ti heketi-65f4555d74-72hrf /bin/bash                               [root@heketi-65f4555d74-72hrf /]# heketi-cli cluster list --user admin --secret admin123	#进入heketi容器查看

  3 [root@k8smaster01 ~]# curl http://10.254.111.219:8080/hello

  4 Hello from Heketi
- 使用glusterfs-daemonset.json部署glusterfs DaemonSet;
- 对node节点进行打标签;
- 使用heketi-service-account.json部署Heketi的服务帐户;
- 对Heketi所创建的服务帐户授权;
- 创建secret;
- 转发本地8080端口至deploy-heketi。
五 安装heketi-cli
5.1 安装heketi服务
  1 [root@k8smaster01 ~]# yum -y install centos-release-gluster

  2 [root@k8smaster01 ~]# yum -y install heketi-client
5.2 配置heketi
  1 [root@k8smaster01 ~]# echo "export HEKETI_CLI_SERVER=http://$(kubectl get svc heketi -n heketi -o go-template='{{.spec.clusterIP}}'):8080" >> /etc/profile.d/heketi.sh

  2 [root@k8smaster01 ~]# echo "alias heketi-cli='heketi-cli --user admin --secret admin123'" >> ~/.bashrc

  3 [root@k8smaster01 ~]# source /etc/profile.d/heketi.sh

  4 [root@k8smaster01 ~]# source ~/.bashrc

  5 [root@k8smaster01 ~]# echo $HEKETI_CLI_SERVER

  6 http://heketi:8080
5.3 集群管理
1 [root@k8smaster01 ~]# heketi-cli cluster list
2 Clusters:
3 Id:67004a06fbcb4fa525bcec1fbaa9ef2d [file][block]
4 [root@k8smaster01 ~]# heketi-cli cluster info 67004a06fbcb4fa525bcec1fbaa9ef2d #集群详细信息
5 Cluster id: 67004a06fbcb4fa525bcec1fbaa9ef2d
6 Nodes:
7 40cdd4c1d0c389939193d6dea3c5bfe8
8 62873c54cf61025fda91e6d44433378b
9 d48986357840d28653304e7170599da5
10 Volumes:
11 5f15f201d623e56b66af56313a1975e7
12 Block: true
13
14 File: true
15 [root@k8smaster01 ~]# heketi-cli topology info 67004a06fbcb4fa525bcec1fbaa9ef2d #查看拓扑信息
16 [root@k8smaster01 ~]# heketi-cli node list #查看所有node
17 Id:40cdd4c1d0c389939193d6dea3c5bfe8 Cluster:67004a06fbcb4fa525bcec1fbaa9ef2d
18 Id:62873c54cf61025fda91e6d44433378b Cluster:67004a06fbcb4fa525bcec1fbaa9ef2d
19 Id:d48986357840d28653304e7170599da5 Cluster:67004a06fbcb4fa525bcec1fbaa9ef2d
20 [root@k8smaster01 ~]# heketi-cli node info 40cdd4c1d0c389939193d6dea3c5bfe8 #node节点信息
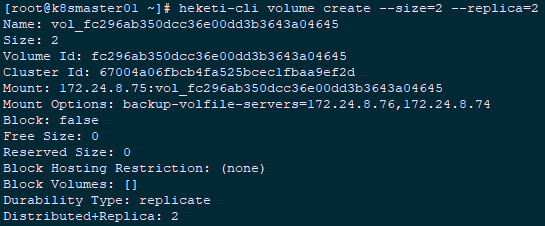
21 [root@k8smaster01 ~]# heketi-cli volume create --size=2 --replica=2 #默认为3副本的replica模式
  1 [root@k8smaster01 ~]# heketi-cli volume list					#列出所有卷

  2 [root@k8smaster01 ~]# heketi-cli volume info fc296ab350dcc36e00dd3b3643a04645	#卷信息

  3 [root@k8smaster01 ~]# heketi-cli volume delete fc296ab350dcc36e00dd3b3643a04645	#删除卷
六 Kubernetes动态挂载glusterfs
6.1 StorageClass动态存储
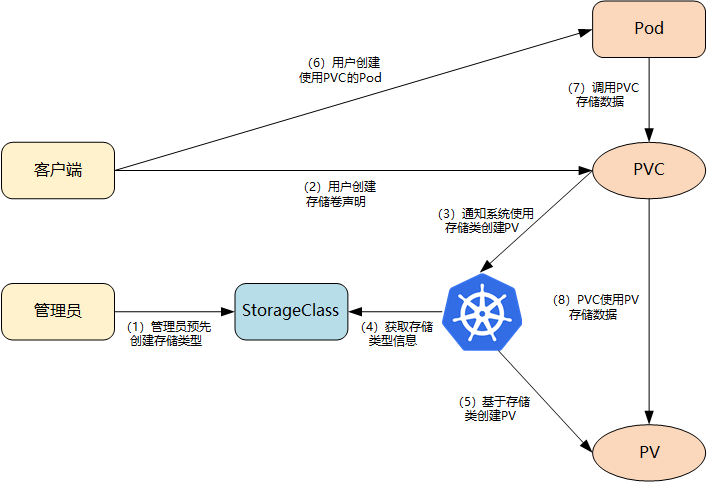
- 集群管理员预先创建存储类(StorageClass);
- 用户创建使用存储类的持久化存储声明(PVC:PersistentVolumeClaim);
- 存储持久化声明通知系统,它需要一个持久化存储(PV: PersistentVolume);
- 系统读取存储类的信息;
- 系统基于存储类的信息,在后台自动创建PVC需要的PV;
- 用户创建一个使用PVC的Pod;
- Pod中的应用通过PVC进行数据的持久化;
- 而PVC使用PV进行数据的最终持久化处理。
6.2 定义StorageClass
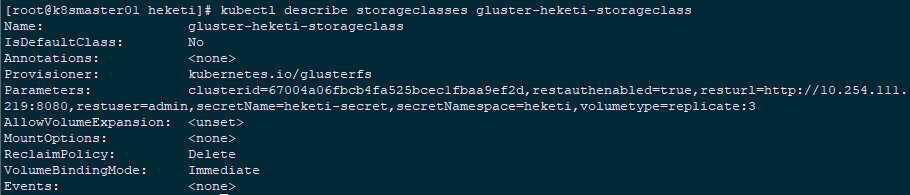
- provisioner:表示存储分配器,需要根据后端存储的不同而变更;
- reclaimPolicy: 默认即”Delete”,删除pvc后,相应的pv及后端的volume,brick(lvm)等一起删除;设置为”Retain”时则保留数据,若需删除则需要手工处理;
- resturl:heketi API服务提供的url;
- restauthenabled:可选参数,默认值为”false”,heketi服务开启认证时必须设置为”true”;
- restuser:可选参数,开启认证时设置相应用户名;
- secretNamespace:可选参数,开启认证时可以设置为使用持久化存储的namespace;
- secretName:可选参数,开启认证时,需要将heketi服务的认证密码保存在secret资源中;
- clusterid:可选参数,指定集群id,也可以是1个clusterid列表,格式为”id1,id2”;
- volumetype:可选参数,设置卷类型及其参数,如果未分配卷类型,则有分配器决定卷类型;如”volumetype: replicate:3”表示3副本的replicate卷,”volumetype: disperse:4:2”表示disperse卷,其中‘4’是数据,’2’是冗余校验,”volumetype: none”表示distribute卷
  1 [root@k8smaster01 ~]# echo -n "admin123" | base64		#将密码转换为64位编码

  2 YWRtaW4xMjM=

  3 [root@k8smaster01 ~]# mkdir -p heketi

  4 [root@k8smaster01 ~]# cd heketi/

  5 [root@k8smaster01 ~]# vi heketi-secret.yaml			#创建用于保存密码的secret

  6 apiVersion: v1

  7 kind: Secret

  8 metadata:

  9   name: heketi-secret

 10   namespace: heketi

 11 data:

 12   # base64 encoded password. E.g.: echo -n "mypassword" | base64

 13   key: YWRtaW4xMjM=

 14 type: kubernetes.io/glusterfs

 15 [root@k8smaster01 heketi]# kubectl create -f heketi-secret.yaml	#创建heketi

 16 [root@k8smaster01 heketi]# kubectl get secrets -n heketi

 17 NAME                                 TYPE                                  DATA   AGE

 18 default-token-6n746                  kubernetes.io/service-account-token   3      144m

 19 heketi-config-secret                 Opaque                                3      142m

 20 heketi-secret                        kubernetes.io/glusterfs               1      3m1s

 21 heketi-service-account-token-ljlkb   kubernetes.io/service-account-token   3      143m

 22 [root@kubenode1 heketi]# vim gluster-heketi-storageclass.yaml	#正式创建StorageClass

 23 apiVersion: storage.k8s.io/v1

 24 kind: StorageClass

 25 metadata:

 26   name: gluster-heketi-storageclass

 27 parameters:

 28   resturl: "http://10.254.111.219:8080"

 29   clusterid: "67004a06fbcb4fa525bcec1fbaa9ef2d"

 30   restauthenabled: "true"					#若heketi开启认证此处也必须开启auth认证

 31   restuser: "admin"

 32   secretName: "heketi-secret"					#name/namespace与secret资源中定义一致

 33   secretNamespace: "heketi"

 34   volumetype: "replicate:3"

 35 provisioner: kubernetes.io/glusterfs

 36 reclaimPolicy: Delete

 37 [root@k8smaster01 heketi]# kubectl create -f gluster-heketi-storageclass.yaml
  1 [root@k8smaster01 heketi]# kubectl get storageclasses		#查看确认

  2 NAME                          PROVISIONER               AGE

  3 gluster-heketi-storageclass   kubernetes.io/glusterfs   85s

  4 [root@k8smaster01 heketi]# kubectl describe storageclasses gluster-heketi-storageclass
6.3 定义PVC
  1 [root@k8smaster01 heketi]# vi gluster-heketi-pvc.yaml

  2 apiVersion: v1

  3 kind: PersistentVolumeClaim

  4 metadata:

  5   name: gluster-heketi-pvc

  6   annotations:

  7     volume.beta.kubernetes.io/storage-class: gluster-heketi-storageclass

  8 spec:

  9   accessModes:

 10   - ReadWriteOnce

 11   resources:

 12     requests:

 13       storage: 1Gi
- ReadWriteOnce:简写RWO,读写权限,且只能被单个node挂载;
- ReadOnlyMany:简写ROX,只读权限,允许被多个node挂载;
- ReadWriteMany:简写RWX,读写权限,允许被多个node挂载。
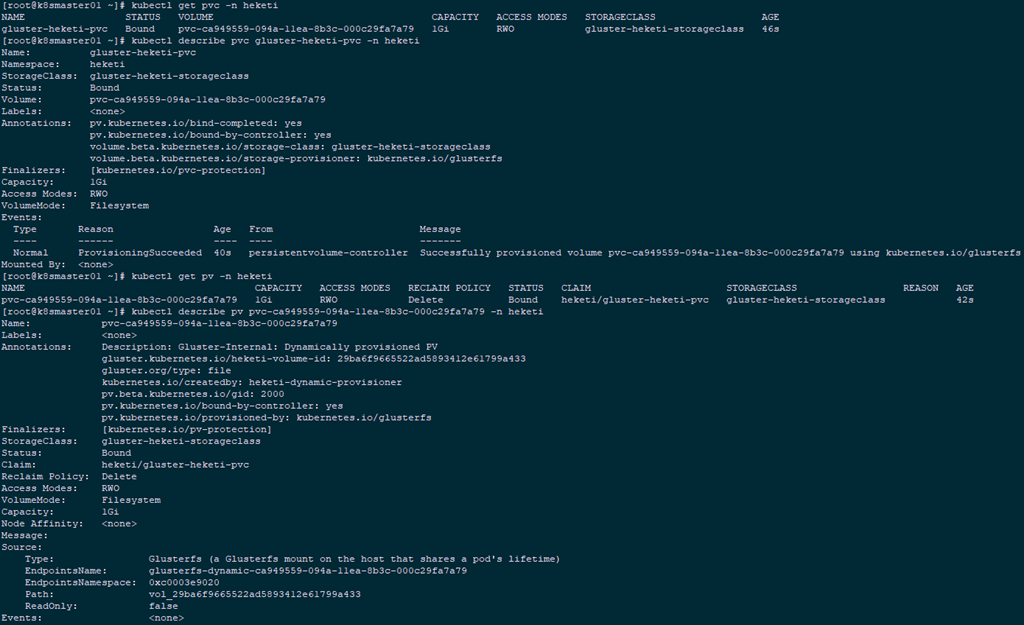
  1 [root@k8smaster01 heketi]# kubectl create -f gluster-heketi-pvc.yaml -n heketi

  2 [root@k8smaster01 heketi]# kubectl get pvc -n heketi

  3 [root@k8smaster01 heketi]# kubectl describe pvc gluster-heketi-pvc -n heketi

  4 [root@k8smaster01 heketi]# kubectl get pv -n heketi

  5 [root@k8smaster01 heketi]# kubectl describe pv pvc-ca949559-094a-11ea-8b3c-000c29fa7a79 -n heketi
1 [root@k8smaster01 heketi]# kubectl describe endpoints glusterfs-dynamic-ca949559-094a-11ea-8b3c-000c29fa7a79 -n heketi

6.4 确认查看
- volume与brick已经创建;
- 主挂载点(通信)在172.24.8.41节点,其余两个节点备选;
- 三副本的情况下,所有节点都会创建brick。
  1 [root@k8smaster01 ~]# kubectl get pod -n heketi

  2 [root@k8smaster01 ~]# kubectl exec -ti glusterfs-b854k -n heketi -- lsblk	#glusterfs节点查看

  3 [root@k8smaster01 ~]# kubectl exec -ti glusterfs-b854k -n heketi -- df -hT	#glusterfs节点查看

  4 [root@k8smaster01 ~]# kubectl exec -ti glusterfs-b854k -n heketi -- gluster volume list

  5 [root@k8smaster01 ~]# kubectl exec -ti glusterfs-b854k -n heketi -- gluster volume info vol_29ba6f9665522ad5893412e61799a433				#glusterfs节点查看

6.5 Pod挂载测试
  1 [root@xxx ~]# yum -y install centos-release-gluster

  2 [root@xxx ~]# yum -y install glusterfs-fuse					#安装glusterfs-fuse
  1 [root@k8smaster01 heketi]# vi gluster-heketi-pod.yaml

  2 kind: Pod

  3 apiVersion: v1

  4 metadata:

  5   name: gluster-heketi-pod

  6 spec:

  7   containers:

  8   - name: gluster-heketi-container

  9     image: busybox

 10     command:

 11     - sleep

 12     - "3600"

 13     volumeMounts:

 14     - name: gluster-heketi-volume			#必须和volumes中name一致

 15       mountPath: "/pv-data"

 16       readOnly: false

 17   volumes:

 18   - name: gluster-heketi-volume

 19     persistentVolumeClaim:

 20       claimName: gluster-heketi-pvc	  	 	#必须和5.3创建的PVC中的name一致

 21 [root@k8smaster01 heketi]# kubectl create -f gluster-heketi-pod.yaml -n heketi	#创建Pod
6.6 确认验证
  1 [root@k8smaster01 ~]# kubectl get pod -n heketi | grep gluster-heketi

  2 gluster-heketi-pod        1/1     Running   0          4m58s

  3 [root@k8smaster01 ~]# kubectl exec -it gluster-heketi-pod /bin/sh -n heketi 	#进入Pod写入测试文件

  4 / # cd /pv-data/

  5 /pv-data # echo "This is a file!" >> a.txt

  6 /pv-data # echo "This is b file!" >> b.txt

  7 /pv-data # ls

  8 a.txt  b.txt

  9 [root@k8smaster01 ~]# kubectl exec -it gluster-heketi-pod -n heketi -- df -h	#查看所挂载的glusterfs

1 [root@k8smaster01 ~]# kubectl get pods -n heketi -o wide #查看对应的glusterfs node

  1 [root@k8smaster01 ~]# kubectl exec -ti glusterfs-b854k -n heketi -- cat /var/lib/heketi/mounts/vg_2c7a02d1b1b7c1f165283b6691062102/brick_16e37a18a5e5fd40e14338ba78d99565/brick/a.txt

  2 This is a file!
6.7 删除资源
  1 [root@k8smaster01 ~]# cd heketi/

  2 [root@k8smaster01 heketi]# kubectl delete -f gluster-heketi-pod.yaml -n heketi

  3 [root@k8smaster01 heketi]# kubectl delete -f gluster-heketi-pvc.yaml

  4 [root@k8smaster01 heketi]# kubectl get pvc -n heketi

  5 [root@k8smaster01 heketi]# kubectl get pv -n heketi

  6 [root@k8smaster01 heketi]# kubectl exec -ti glusterfs-b854k -n heketi gluster volume list | grep gluster

附010.Kubernetes永久存储之GlusterFS超融合部署的更多相关文章
- 附009.Kubernetes永久存储之GlusterFS独立部署
一 前期准备 1.1 基础知识 Heketi提供了一个RESTful管理界面,可以用来管理GlusterFS卷的生命周期.Heketi会动态在集群内选择bricks构建所需的volumes,从而确保数 ...
- 附013.Kubernetes永久存储Rook部署
一 Rook概述 1.1 Ceph简介 Ceph是一种高度可扩展的分布式存储解决方案,提供对象.文件和块存储.在每个存储节点上,将找到Ceph存储对象的文件系统和Ceph OSD(对象存储守护程序)进 ...
- 附024.Kubernetes全系列大总结
Kubernetes全系列总结如下,后期不定期更新.欢迎基于学习.交流目的的转载和分享,禁止任何商业盗用,同时希望能带上原文出处,尊重ITer的成果,也是尊重知识.若发现任何错误或纰漏,留言反馈或右侧 ...
- 附014.Kubernetes Prometheus+Grafana+EFK+Kibana+Glusterfs整合解决方案
一 glusterfs存储集群部署 注意:以下为简略步骤,详情参考<附009.Kubernetes永久存储之GlusterFS独立部署>. 1.1 架构示意 略 1.2 相关规划 主机 I ...
- 附014.Kubernetes Prometheus+Grafana+EFK+Kibana+Glusterfs整合性方案
一 glusterfs存储集群部署 注意:以下为简略步骤,详情参考<附009.Kubernetes永久存储之GlusterFS独立部署>. 1.1 架构示意 略 1.2 相关规划 主机 I ...
- 基于 VMware 的超融合, 解析 vSAN 与 SmartX ZBS 的优劣差异
在企业级IT领域从业多年,最近越来越多地听到圈内人谈论起超融合技术的种种好处.的确,超融合技术已越来越走向成熟,带来的价值也逐渐凸显.它可靠性高,资源消耗低,尤其是运维部署非常便捷.在企业基础架构领域 ...
- 部署oVirt4.2+Gluster超融合架构
首先下载最新ovirt-node iso镜像 准备3台机器,配置为2核,16G内存,两块硬盘,1块100G装系统,1块300G做存储 node1.com(192.168.105.221) node2. ...
- 【原创译文】基于Docker和Rancher的超融合容器云架构
基于Docker和Rancher的超融合容器云架构 ---来自Rancher和Redapt 超融合架构在现代数据中心是一项巨大的变革.Nutanix公司发明了超融合架构理论,自从我听说他们的“iPho ...
- 奔跑吧,OpenStack现场分享:超融合架构如何抹平物理硬件差异?
转自:https://www.ustack.com/blog/moping/ “通过引入OpenStack这一中间层,实现了云平台统一的管理调度支配向上交付,解决了业务的灵活性问题.但是在抹平下层物理 ...
随机推荐
- ios 11 系统CPU过高,xib中textfield使用导致出过高
ios11 发布之后,作为开发肯定是第一时间进行了升级测试,全新的系统不免会带来这样那样的问题.项目中使用xib的小伙伴们会发现,项目的cpu使用率非常高,尤其是初始化的时候,并没有线程的操作,CPU ...
- 网络攻防实验任务三_(2)X-Scan通用漏洞扫描实验
首先在宿主机中打开xscan_gui.exe,结果系统直接将它删掉了. 大概是因为开了防火墙的缘故. 于是我在win7虚拟机中运行这个程序. 并且关闭防火墙,在win7中可以运行 我再试了一下win1 ...
- C# WPF基础巩固
时间如流水,只能流去不流回. 学历代表你的过去,能力代表你的现在,学习能力代表你的将来. 学无止境,精益求精. 一.写作目的 做C# WPF开发,无论是工作中即将使用,还是只应付跳槽面试,开发基础是非 ...
- Spring自定义日志注解
JDK1.5中引入注解,spring框架把java注解发扬光大 一 创建自定义注解 import java.lang.annotation.Retention; import java.lang.a ...
- java面试官:兄弟简单谈谈Static、final、Static final各种用法吧
前言 对Static.final.Static final这几个关键词熟悉又陌生?想说却又不知怎么准确说出口?好的,本篇博客文章将简短概要出他们之间的各自的使用,希望各位要是被你的面试官问到了,也能从 ...
- zepto源码分析·event模块
准备知识 事件的本质就是发布/订阅模式,dom事件也不例外:先简单说明下发布/订阅模式,dom事件api和兼容性 发布/订阅模式 所谓发布/订阅模式,用一个形象的比喻就是买房的人订阅楼房消息,售楼处发 ...
- JSP HTML 各种 乱码 解决方法|jsp include html乱码|include 乱码|MyEclipse 中文乱码
笔者花了一整天研究这个问题 .最终解决了所有的中文乱码问题. 不用 写 过滤器,不用改 tomcat 的配置文件 笔者使用的 软件是 MyEclipse2013 professional 版 JSP ...
- Redis(十五)Redis 的一些常用技术(Spring 环境下)
一.Redis 事务与锁机制 1.Redis的基础事务 在Redis中开启事务的命令是 multi 命令, 而执行事务的命令是 exec 命令.multi 到 exec 命令之间的 Redis 命令将 ...
- JVM(7) Java内存模型与线程
衡量一个服务性能的高低好坏,每秒事务处理数(Transactions Per Second,TPS)是最重要的指标之一,它代表着一秒内服务端平均能响应的请求总数,而 TPS 值与程序的并发能力又有非常 ...
- Cannot read property 'forEach' of undefined
在singer-detail组件中,有一个_normalizeSongs()方法,遍历数组 _normalizeSongs(list) { let ret = []; list.forEach(ite ...