Kubernetes2-K8s的集群部署
一、简介
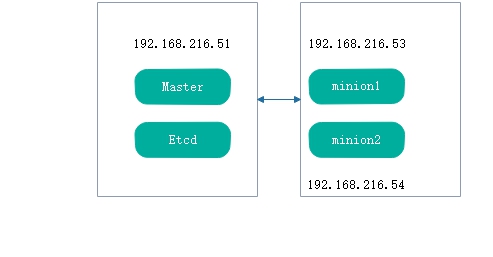
1、架构参考
2、实例架构
192.168.216.51 master etcd
192.168.216.53 node1
192.168.216.54 node1
3、拓扑
4、软件版本
[root@master ~]# cat /etc/redhat-release

CentOS Linux release 7.6. (Core)

[root@master ~]# uname -a

Linux master 3.10.-957.21..el7.x86_64 # SMP Tue Jun  :: UTC  x86_64 x86_64 x86_64 GNU/Linux

[root@master ~]#

[root@master ~]# docker version

Client:

 Version:         1.13.

 API version:     1.26
kubernetes版本请见下面安装时候的依赖关系
二、部署软件
1、修改主机名
1)按照如下名称修改主机名每台主机分别修改
     hostnamectl set-hostname master

     #hostnamectl set-hostname etcd 暂时不用此节点和master公用一个节点

     hostnamectl set-hostname node1

     hostnamectl set-hostname node2
2)并修改hosts文件
三台主机都修改hosts文件
[root@node2 yum.repos.d]# cat >>/etc/hosts<<eof

> 127.0.0.1   localhost localhost.localdomain localhost4 localhost4.localdomain4

> ::1         localhost localhost.localdomain localhost6 localhost6.localdomain6

> 192.168.216.51 master

> 192.168.216.52 etcd   #因为做实验时候虚拟机有点问题,暂时不用此节点etcd和master一个节点

> 192.168.216.53 node1

> 192.168.216.54 node2

> eof
2、时间同步
三台节点都启用chronyd,保证时间同步
systemctl start chronyd
systemctl enable chronyd
3、安装软件
master/etcd:kubenetes flannel etcd
yum install kubernetes etcd flannel ntp -y
Installed:

  etcd.x86_64 :3.3.-.el7.centos   flannel.x86_64 :0.7.-.el7   kubernetes.x86_64 :1.5.-0.7.git269f928.el7

Dependency Installed:

  conntrack-tools.x86_64 :1.4.-.el7_7.                 docker.x86_64 :1.13.-.git7f2769b.el7.centos

  docker-client.x86_64 :1.13.-.git7f2769b.el7.centos  docker-common.x86_64 :1.13.-.git7f2769b.el7.centos

  kubernetes-client.x86_64 :1.5.-0.7.git269f928.el7      kubernetes-master.x86_64 :1.5.-0.7.git269f928.el7

  kubernetes-node.x86_64 :1.5.-0.7.git269f928.el7        libnetfilter_cthelper.x86_64 :1.0.-.el7_7.

  libnetfilter_cttimeout.x86_64 :1.0.-.el7_7.          libnetfilter_queue.x86_64 :1.0.-.el7_2

  socat.x86_64 :1.7.3.2-.el7

Updated:

  ntp.x86_64 :4.2.6p5-.el7.centos

Dependency Updated:

  ntpdate.x86_64 :4.2.6p5-.el7.centos

Complete!

[root@master backup1]#
node1/node2
[root@node4 ~]# yum install kubernetes flannel ntp -y
[root@node3 ~]# yum install kubernetes flannel ntp -y
三、配置
1、配置etct
1)修改第6,10,23行为第7、11、24行的内容即可,也就是标红部分
[root@etcd ~]# vim /etc/etcd/etcd.conf

  #ETCD_LISTEN_CLIENT_URLS="http://localhost:2379"

  7 ETCD_LISTEN_CLIENT_URLS="http://localhost:2379,http://192.168.216.51:2379"

  #ETCD_NAME="default"

 11 ETCD_NAME="etcd"

  #ETCD_ADVERTISE_CLIENT_URLS="http://localhost:2379"

 24 ETCD_ADVERTISE_CLIENT_URLS="http://192.168.216.51:2379"
2)配置文件含义
  ETCD_NAME="etcd"
 #etcd节点名称,如果etcd机器只有一台etcd可以不修改,保持默认default

  ETCD_DATA_DIR="/var/lib/etcd/default.etcd"
 #数据存储目录

  ETCD_LISTEN_CLIENT_URLS="http://localhost:2379,http://192.168.216.51:2379"
  #etcd对外服务监听地址,一般指定2379端口,如果为0.0.0.0将会监听所有端口

  ETCD_ADVERTISE_CLIENT_URLS="http://192.168.216.51:2379"
  #这个是通知客户端的urls
3)启动服务
systemctl start etcd
systemctl status etcd
systemctl enable etcd
4)监听端口 2379
netstat -antup |grep 2379
5)查看成员列表
[root@master ~]# etcdctl member list
8e9e05c52164694d: name=etcd peerURLs=http://localhost:2380 clientURLs=http://192.168.216.51:2379 isLeader=true
[root@master ~]#
2、配置master服务器
1)修改kubernetes配置文件
修改第22行标红的
[root@master ~]# vim /etc/kubernetes/config

22 KUBE_MASTER="--master=http://192.168.216.51:8080"
2)配置文件意思
   ###

   # kubernetes system config

   #

   # The following values are used to configure various aspects of all

   # kubernetes services, including

   #   kube-apiserver.service

   #   kube-controller-manager.service

   #   kube-scheduler.service

  #   kubelet.service

  #   kube-proxy.service

  # logging to stderr means we get it in the systemd journal

 13 KUBE_LOGTOSTDERR="--logtostderr=true"

 14 #---表示错误日志记录道文件还是输出道stderr标准错误输出

  # journal message level,  is debug

 16 KUBE_LOG_LEVEL="--v=0"

 17 #---日志等级

  # Should this cluster be allowed to run privileged docker containers

 19 KUBE_ALLOW_PRIV="--allow-privileged=false"

 20 #---是否运行运行特权容器,false是不允许

  # How the controller-manager, scheduler, and proxy find the apiserver

 22 KUBE_MASTER="--master=http://192.168.216.51:8080"

 23 #---监听端口

~
3)修改apiserver配置文件
修改标红部分
[root@master ~]# vim /etc/kubernetes/apiserver

   ###

   # kubernetes system config

   #

   # The following values are used to configure the kube-apiserver

   #

   # The address on the local server to listen to.

   #KUBE_API_ADDRESS="--insecure-bind-address=127.0.0.1"

  9 KUBE_API_ADDRESS="--insecure-bind-address=0.0.0.0"

 10 #---监听的接口,修改为0.0.0.0监听所有端口

  # The port on the local server to listen on.

  # KUBE_API_PORT="--port=8080"

  # Port minions listen on

  # KUBELET_PORT="--kubelet-port=10250"

  # Comma separated list of nodes in the etcd cluster

  #KUBE_ETCD_SERVERS="--etcd-servers=http://127.0.0.1:2379"

 19 KUBE_ETCD_SERVERS="--etcd-servers=http://192.168.216.51:2379"

 20 #---etcd服务地址,之前配置的etcd服务

  # Address range to use for services

 22 KUBE_SERVICE_ADDRESSES="--service-cluster-ip-range=10.254.0.0/16"

 23 #---kubernetes可以分配的ip的范围,kubernetes启动的每个pod以及service都会分配一个地址这里定义一个ip池

  # default admission control policies

  #KUBE_ADMISSION_CONTROL="--admission-control=NamespaceLifecycle,NamespaceExists,LimitRanger,SecurityContextDeny,

    ServiceAccount,ResourceQuota"

 26 KUBE_ADMISSION_CONTROL="--admission-control=AlwaysAdmit"

 27 #---不做限制,允许所有节点可以访问apiserver,对所有请求的允许
# Add your own! KUBE_API_ARGS="" ~
4)配置kube-controller-manager配置文件
这里保持默认即可,先不用修改
[root@master ~]# cat /etc/kubernetes/controller-manager

###

# The following values are used to configure the kubernetes controller-manager

# defaults from config and apiserver should be adequate

# Add your own!

KUBE_CONTROLLER_MANAGER_ARGS=""

[root@master ~]#
5)配置kube-schedule
[root@master ~]# vim /etc/kubernetes/scheduler

###

# kubernetes scheduler config

# default config should be adequate

# Add your own!

KUBE_SCHEDULER_ARGS="0.0.0.0"

#---改为监听所有

~
3、设置etcd网络
etcdctl mkdir /k8s/network
#---创建一个k8s/network用于存储flannel网络信息

etcdctl set /k8s/network/config '{"Network": "10.255.0.0/16"}'
#---给/k8s/network/config 赋一个字符串的值'{"Network": "10.255.0.0/16"}',这个配置将用于flannel分配给每个docker的虚拟ip地址段,用于配置在minion上的dockerip地址
[root@master ~]# etcdctl get /k8s/network/config
#---查看etcd网络配置记录
{"Network": "10.255.0.0/16"}
[root@master ~]#
4、flanneld
[root@master ~]# vim /etc/sysconfig/flanneld
# Flanneld configuration options
# etcd url location. Point this to the server where etcd runs
FLANNEL_ETCD_ENDPOINTS="http://192.168.216.51:2379"
#---etcd url位置信息,指向运行的etcd服务器
# etcd config key. This is the configuration key that flannel queries
# For address range assignment
FLANNEL_ETCD_PREFIX="/k8s/network"
#---指定网络配置目录
# Any additional options that you want to pass
FLANNEL_OPTIONS="--iface=ens33"
#---指定网卡
[root@master ~]# systemctl restart flanneld
[root@master ~]# systemctl status flanneld
● flanneld.service - Flanneld overlay address etcd agent
Loaded: loaded (/usr/lib/systemd/system/flanneld.service; enabled; vendor preset: disabled)
Active: active (running) since Tue 2019-10-29 17:21:54 CST; 42min ago
Main PID: 12715 (flanneld)
CGroup: /system.slice/flanneld.service
└─12715 /usr/bin/flanneld -etcd-endpoints=http://192.168.216.51:2379 -etcd-prefix=/k8s/network --iface...
Oct 29 17:21:53 master systemd[1]: Starting Flanneld overlay address etcd agent...
Oct 29 17:21:54 master flanneld-start[12715]: I1029 17:21:54.022949 12715 main.go:132] Installing signal handlers
Oct 29 17:21:54 master flanneld-start[12715]: I1029 17:21:54.023985 12715 manager.go:149] Using interface w...6.51
Oct 29 17:21:54 master flanneld-start[12715]: I1029 17:21:54.024047 12715 manager.go:166] Defaulting extern....51)
Oct 29 17:21:54 master flanneld-start[12715]: I1029 17:21:54.048791 12715 local_manager.go:134] Found lease...sing
Oct 29 17:21:54 master flanneld-start[12715]: I1029 17:21:54.068556 12715 manager.go:250] Lease acquired: 1...0/24
Oct 29 17:21:54 master flanneld-start[12715]: I1029 17:21:54.069202 12715 network.go:98] Watching for new s...ases
Oct 29 17:21:54 master systemd[1]: Started Flanneld overlay address etcd agent.
Oct 29 17:38:56 master flanneld-start[12715]: I1029 17:38:56.822596 12715 network.go:191] Subnet added: 10....0/24
Oct 29 17:56:05 master flanneld-start[12715]: I1029 17:56:05.501411 12715 network.go:191] Subnet added: 10....0/24
Hint: Some lines were ellipsized, use -l to show in full.
[root@master ~]#
查看子网信息
[root@master ~]# ifconfig
ens33: flags=4163<UP,BROADCAST,RUNNING,MULTICAST> mtu 1500
inet 192.168.216.51 netmask 255.255.255.0 broadcast 192.168.216.255
inet6 fe80::3409:e73d:1ef:2e1 prefixlen 64 scopeid 0x20<link>
inet6 fe80::9416:80e8:f210:1e24 prefixlen 64 scopeid 0x20<link>
inet6 fe80::39cb:d8d1:a78b:9be1 prefixlen 64 scopeid 0x20<link>
ether 00:0c:29:1c:8b:39 txqueuelen 1000 (Ethernet)
RX packets 124978 bytes 149317395 (142.4 MiB)
RX errors 0 dropped 0 overruns 0 frame 0
TX packets 47636 bytes 5511781 (5.2 MiB)
TX errors 0 dropped 0 overruns 0 carrier 0 collisions 0
flannel0: flags=4305<UP,POINTOPOINT,RUNNING,NOARP,MULTICAST> mtu 1472
inet 10.255.16.0 netmask 255.255.0.0 destination 10.255.16.0
inet6 fe80::1837:1885:18c6:5e52 prefixlen 64 scopeid 0x20<link>
unspec 00-00-00-00-00-00-00-00-00-00-00-00-00-00-00-00 txqueuelen 500 (UNSPEC)
RX packets 0 bytes 0 (0.0 B)
RX errors 0 dropped 0 overruns 0 frame 0
TX packets 3 bytes 144 (144.0 B)
TX errors 0 dropped 0 overruns 0 carrier 0 collisions 0
lo: flags=73<UP,LOOPBACK,RUNNING> mtu 65536
inet 127.0.0.1 netmask 255.0.0.0
inet6 ::1 prefixlen 128 scopeid 0x10<host>
loop txqueuelen 1000 (Local Loopback)
RX packets 178940 bytes 55467759 (52.8 MiB)
RX errors 0 dropped 0 overruns 0 frame 0
TX packets 178940 bytes 55467759 (52.8 MiB)
TX errors 0 dropped 0 overruns 0 carrier 0 collisions 0
virbr0: flags=4099<UP,BROADCAST,MULTICAST> mtu 1500
inet 192.168.122.1 netmask 255.255.255.0 broadcast 192.168.122.255
ether 52:54:00:23:a5:7c txqueuelen 1000 (Ethernet)
RX packets 0 bytes 0 (0.0 B)
RX errors 0 dropped 0 overruns 0 frame 0
TX packets 0 bytes 0 (0.0 B)
TX errors 0 dropped 0 overruns 0 carrier 0 collisions 0
[root@master ~]#
[root@master ~]# cat /run/flannel/subnet.env
#---查看子网信息,之后会有一个脚本将subnet.env转写成一个docker的环境变量文件/run/flannel/docker
FLANNEL_NETWORK=10.255.0.0/16
FLANNEL_SUBNET=10.255.16.1/24
FLANNEL_MTU=1472
FLANNEL_IPMASQ=false
[root@master ~]#
[root@etcd ~]# cat /run/flannel/docker

DOCKER_OPT_BIP="--bip=10.255.93.1/24"

DOCKER_OPT_IPMASQ="--ip-masq=true"

DOCKER_OPT_MTU="--mtu=1472"

DOCKER_NETWORK_OPTIONS=" --bip=10.255.93.1/24 --ip-masq=true --mtu=1472"

[root@etcd ~]#
5、配置node1
1)配置flanneld服务
[root@node1 ~]# vim /etc/sysconfig/flanneld

# Flanneld configuration options

# etcd url location.  Point this to the server where etcd runs

FLANNEL_ETCD_ENDPOINTS="http://192.168.216.51:2379"

#---指定etcd服务器url

# etcd config key.  This is the configuration key that flannel queries

# For address range assignment

FLANNEL_ETCD_PREFIX="/k8s/network"

#---指定网络配置目录

# Any additional options that you want to pass

#FLANNEL_OPTIONS="--iface=ens33"
2)配置master地址和kube-proxy
[root@node1 ~]# vim /etc/kubernetes/config

###

# kubernetes system config

#

# The following values are used to configure various aspects of all

# kubernetes services, including

#

#   kube-apiserver.service

#   kube-controller-manager.service

#   kube-scheduler.service

#   kubelet.service

#   kube-proxy.service

# logging to stderr means we get it in the systemd journal

KUBE_LOGTOSTDERR="--logtostderr=true"

# journal message level,  is debug

KUBE_LOG_LEVEL="--v=0"

# Should this cluster be allowed to run privileged docker containers

KUBE_ALLOW_PRIV="--allow-privileged=false"

# How the controller-manager, scheduler, and proxy find the apiserver

KUBE_MASTER="--master=http://192.168.216.51:8080"
#---指定master url地址
3)配置kube-proxy
主要是负责service的实现,就是实现内部从pod到service
这里保持默认即可
[root@node1 ~]# grep -v '^#' /etc/kubernetes/proxy

KUBE_PROXY_ARGS=""

[root@node1 ~]#
4)配置node1的kubelet
kubelet组件管理pod,pod中容器及容器的镜像和卷等信息
[root@node1 ~]# vim /etc/kubernetes/kubelet
1 ###
2 # kubernetes kubelet (minion) config
3
4 # The address for the info server to serve on (set to 0.0.0.0 or "" for all interfaces)
5 KUBELET_ADDRESS="--address=0.0.0.0"
6 #---监听所有地址
7 # The port for the info server to serve on
8 # KUBELET_PORT="--port=10250"
9
10 # You may leave this blank to use the actual hostname
11 KUBELET_HOSTNAME="--hostname-override=node1"
12
13 # location of the api-server
14 KUBELET_API_SERVER="--api-servers=http://192.168.216.51:8080"
15 #---api-servers-url地址
16 # pod infrastructure container
17 KUBELET_POD_INFRA_CONTAINER="--pod-infra-container-image=registry.access.redhat.com/rhel7/pod-infrastructure:lat est"
18
19 # Add your own!
20 KUBELET_ARGS=""
~
~
~
5)启动相关服务
[root@node1 ~]# systemctl restart flanneld kube-proxy kubelet docker

[root@node1 ~]# systemctl enable flanneld kube-proxy kubelet docker
[root@node1 ~]# systemctl status flanneld kube-proxy kubelet docker
注意:这里kubelet可能无法正常启动,请见最后排错
6)查看ifconfig信息,及端口监听
[root@node1 ~]# ifconfig
docker0: flags=4099<UP,BROADCAST,MULTICAST> mtu 1500
inet 10.255.41.1 netmask 255.255.255.0 broadcast 0.0.0.0
ether 02:42:22:ac:66:2f txqueuelen 0 (Ethernet)
RX packets 0 bytes 0 (0.0 B)
RX errors 0 dropped 0 overruns 0 frame 0
TX packets 0 bytes 0 (0.0 B)
TX errors 0 dropped 0 overruns 0 carrier 0 collisions 0
ens33: flags=4163<UP,BROADCAST,RUNNING,MULTICAST> mtu 1500
inet 192.168.216.53 netmask 255.255.255.0 broadcast 192.168.216.255
inet6 fe80::3409:e73d:1ef:2e1 prefixlen 64 scopeid 0x20<link>
inet6 fe80::9416:80e8:f210:1e24 prefixlen 64 scopeid 0x20<link>
ether 00:0c:29:79:23:62 txqueuelen 1000 (Ethernet)
RX packets 2490 bytes 802004 (783.2 KiB)
RX errors 0 dropped 0 overruns 0 frame 0
TX packets 1853 bytes 397450 (388.1 KiB)
TX errors 0 dropped 0 overruns 0 carrier 0 collisions 0
flannel0: flags=4305<UP,POINTOPOINT,RUNNING,NOARP,MULTICAST> mtu 1472
inet 10.255.41.0 netmask 255.255.0.0 destination 10.255.41.0
unspec 00-00-00-00-00-00-00-00-00-00-00-00-00-00-00-00 txqueuelen 500 (UNSPEC)
RX packets 0 bytes 0 (0.0 B)
RX errors 0 dropped 0 overruns 0 frame 0
TX packets 0 bytes 0 (0.0 B)
TX errors 0 dropped 0 overruns 0 carrier 0 collisions 0
lo: flags=73<UP,LOOPBACK,RUNNING> mtu 65536
inet 127.0.0.1 netmask 255.0.0.0
inet6 ::1 prefixlen 128 scopeid 0x10<host>
loop txqueuelen 1 (Local Loopback)
RX packets 76 bytes 6004 (5.8 KiB)
RX errors 0 dropped 0 overruns 0 frame 0
TX packets 76 bytes 6004 (5.8 KiB)
TX errors 0 dropped 0 overruns 0 carrier 0 collisions 0
virbr0: flags=4099<UP,BROADCAST,MULTICAST> mtu 1500
inet 192.168.122.1 netmask 255.255.255.0 broadcast 192.168.122.255
ether 52:54:00:23:a5:7c txqueuelen 1000 (Ethernet)
RX packets 0 bytes 0 (0.0 B)
RX errors 0 dropped 0 overruns 0 frame 0
TX packets 0 bytes 0 (0.0 B)
TX errors 0 dropped 0 overruns 0 carrier 0 collisions 0
[root@node1 ~]# netstat -antup |grep proxy

tcp               127.0.0.1:10249         0.0.0.0:*               LISTEN      /kube-proxy

tcp               192.168.216.53:    192.168.216.51:     ESTABLISHED /kube-proxy

tcp               192.168.216.53:    192.168.216.51:     ESTABLISHED /kube-proxy

[root@node1 ~]#
7)验证
master节点上通过kubectl命令查看
[root@master ~]# kubectl get node

NAME      STATUS    AGE

node1     Ready     17h

[root@master ~]#
看到node1 Ready 17h,就是成功了
6、配置node2,基本和node1一致
1)从node1发送配置文件到node2
scp /etc/sysconfig/flanneld 192.168.216.54:/etc/sysconfig/

scp /etc/kubernetes/config 192.168.216.54:/etc/kubernetes/

scp /etc/kubernetes/proxy 192.168.216.54:/etc/kubernetes/

scp /etc/kubernetes/kubelet 192.168.216.54:/etc/kubernetes/
2)只需要改一个文件
把node1换成node2
[root@node2 ~]# vim /etc/kubernetes/kubelet

###

# kubernetes kubelet (minion) config

# The address for the info server to serve on (set to 0.0.0.0 or "" for all interfaces)

KUBELET_ADDRESS="--address="0.0.0.0"

# The port for the info server to serve on

# KUBELET_PORT="--port=10250"

# You may leave this blank to use the actual hostname

KUBELET_HOSTNAME="--hostname-override=node2"

# location of the api-server

KUBELET_API_SERVER="--api-servers=http://192.168.216.51:8080"

# pod infrastructure container

KUBELET_POD_INFRA_CONTAINER="--pod-infra-container-image=registry.access.redhat.com/rhel7/pod-infrastructure:latest"

# Add your own!

KUBELET_ARGS=""

~

~
3)启动服务,并开机运行
systemctl restart flanneld kube-proxy kubelet docker

systemctl enable flanneld kube-proxy kubelet docker
7、master验证节点是否加入进来
看到status 为Ready状态证明成功加入到集群了
[root@master ~]# kubectl get node

NAME      STATUS    AGE

node1     Ready     17h

node2     Ready     1m

[root@master ~]#
四、排错
针对无法启用kubelet的问题
1、查看启动详情
[root@node1 ~]# systemctl status -l kubelet

● kubelet.service - Kubernetes Kubelet Server

   Loaded: loaded (/usr/lib/systemd/system/kubelet.service; enabled; vendor preset: disabled)

   Active: failed (Result: start-limit) since Fri -- :: CST; 2s ago

     Docs: https://github.com/GoogleCloudPlatform/kubernetes

  Process:  ExecStart=/usr/bin/kubelet $KUBE_LOGTOSTDERR $KUBE_LOG_LEVEL $KUBELET_API_SERVER $KUBELET_ADDRESS $KUBELET_PORT $KUBELET_HOSTNAME $KUBE_ALLOW_PRIV $KUBELET_POD_INFRA_CONTAINER $KUBELET_ARGS (code=exited, status=/MEMORY)

 Main PID:  (code=exited, status=/MEMORY)

Oct  :: node1 systemd[]: kubelet.service: main process exited, code=exited, status=/MEMORY

Oct  :: node1 systemd[]: Unit kubelet.service entered failed state.

Oct  :: node1 systemd[]: kubelet.service failed.

Oct  :: node1 systemd[]: kubelet.service holdoff time over, scheduling restart.

Oct  :: node1 systemd[]: start request repeated too quickly for kubelet.service

Oct  :: node1 systemd[]: Failed to start Kubernetes Kubelet Server.

Oct  :: node1 systemd[]: Unit kubelet.service entered failed state.

Oct  :: node1 systemd[]: kubelet.service failed.

[root@node1 ~]# journalctl -f -u kubelet

-- Logs begin at Thu -- :: CST. --

Oct  :: node1 systemd[]: Started Kubernetes Kubelet Server.

Oct  :: node1 systemd[]: Starting Kubernetes Kubelet Server...

Oct  :: node1 systemd[]: kubelet.service: main process exited, code=exited, status=/MEMORY

Oct  :: node1 systemd[]: Unit kubelet.service entered failed state.

Oct  :: node1 systemd[]: kubelet.service failed.

Oct  :: node1 systemd[]: kubelet.service holdoff time over, scheduling restart.

Oct  :: node1 systemd[]: start request repeated too quickly for kubelet.service

Oct  :: node1 systemd[]: Failed to start Kubernetes Kubelet Server.

Oct  :: node1 systemd[]: Unit kubelet.service entered failed state.

Oct  :: node1 systemd[]: kubelet.service failed.
2、查看日志
[root@master ~]# kubectl logs nginx--0vkvm

Error from server (BadRequest): container "nginx" in pod "nginx-2187705812-0vkvm" is waiting to start: ContainerCreating

[root@master ~]# kubectl describe pod

Name:           nginx--0vkvm

Namespace:      default

Node:           node1/192.168.216.53

Start Time:     Mon,  Nov  :: +

Labels:         pod-template-hash=

                run=nginx

Status:         Pending

IP:

Controllers:    ReplicaSet/nginx-

Containers:

  nginx:

    Container ID:

    Image:                      docker.io/nginx

    Image ID:

    Port:                       /TCP

    State:                      Waiting

      Reason:                   ContainerCreating

    Ready:                      False

    Restart Count:

    Volume Mounts:              <none>

    Environment Variables:      <none>

Conditions:

  Type          Status

  Initialized   True

  Ready         False

  PodScheduled  True

No volumes.

QoS Class:      BestEffort

Tolerations:    <none>

Events:

  FirstSeen     LastSeen        Count   From                    SubObjectPath   Type            Reason             Message

  ---------     --------        -----   ----                    -------------   --------        ------             -------

  3m            3m                     {default-scheduler }                    Normal          Scheduled          Successfully assigned nginx--0vkvm to node1

  <invalid>     <invalid>             {kubelet node1}                         Warning         MissingClusterDNS  kubelet does not have ClusterDNS IP configured and cannot create Pod using "ClusterFirst" policy. Falling back to DNSDefault policy.

  <invalid>     <invalid>             {kubelet node1}                         Warning         FailedSync         Error syncing pod, skipping: failed to "StartContainer" for "POD" with RunContainerError: "runContainer: Error response from daemon: {\"message\":\"oci runtime error: container_linux.go:235: starting container process caused \\\"process_linux.go:258: applying cgroup configuration for process caused \\\\\\\"Cannot set property TasksAccounting, or unknown property.\\\\\\\"\\\"\\n\"}"
3、交换内存
对应方法是禁用 swap
swapoff -a
4、kubelet文件驱动默认cgroupfs, 而我们安装的docker使用的文件驱动是systemd,更改驱动
1)方法1,这个方法不行,修改后启动docker有问题
#修改daemon.json

vi /etc/docker/daemon.json

#添加如下属性

"exec-opts": [

    "native.cgroupdriver=systemd"

]
2)方法2,修改docker.service
# 修改docker.service

vi /lib/systemd/system/docker.service

找到

--exec-opt native.cgroupdriver=systemd \

修改为:

--exec-opt native.cgroupdriver=cgroupfs \
查看是否更改成功
docker info
4、虚拟机问题,就重新做了一遍就ok了
如果上面都不行,估计和我这里一样应该是虚拟机问题,重新恢复镜像重新做了一遍发现没问题
五、配置流程总结:

转载请注明出处:https://www.cnblogs.com/zhangxingeng/p/11721035.html
Kubernetes2-K8s的集群部署的更多相关文章
- 这一篇 K8S(Kubernetes)集群部署 我觉得还可以!!!
点赞再看,养成习惯,微信搜索[牧小农]关注我获取更多资讯,风里雨里,小农等你,很高兴能够成为你的朋友. 国内安装K8S的四种途径 Kubernetes 的安装其实并不复杂,因为Kubernetes 属 ...
- K8s 离线集群部署(二进制包无dashboard)
https://www.cnblogs.com/cocowool/p/install_k8s_offline.html https://www.jianshu.com/p/073577bdec98 h ...
- 手把手带你部署K8s二进制集群
集群环境准备: [etcd集群证书生成] #mkdir -p k8s/{k8s-cert,etcd-cert}#cd k8s/etcd-cert/ #cat > ca-config.json & ...
- k8s 组件介绍__单Master集群部署
参考链接:https://github.com/opsnull/follow-me-install-kubernetes-cluster kubernetes 概述 1.kubernetes 是什么 ...
- Kubernetes(k8s)集群部署(k8s企业级Docker容器集群管理)系列目录
0.目录 整体架构目录:ASP.NET Core分布式项目实战-目录 k8s架构目录:Kubernetes(k8s)集群部署(k8s企业级Docker容器集群管理)系列目录 一.感谢 在此感谢.net ...
- Kubernetes(k8s)集群部署(k8s企业级Docker容器集群管理)系列之集群部署环境规划(一)
0.前言 整体架构目录:ASP.NET Core分布式项目实战-目录 k8s架构目录:Kubernetes(k8s)集群部署(k8s企业级Docker容器集群管理)系列目录 一.环境规划 软件 版本 ...
- Kubernetes(k8s)集群部署(k8s企业级Docker容器集群管理)系列之自签TLS证书及Etcd集群部署(二)
0.前言 整体架构目录:ASP.NET Core分布式项目实战-目录 k8s架构目录:Kubernetes(k8s)集群部署(k8s企业级Docker容器集群管理)系列目录 一.服务器设置 1.把每一 ...
- Kubernetes(k8s)集群部署(k8s企业级Docker容器集群管理)系列之flanneld网络介绍及部署(三)
0.前言 整体架构目录:ASP.NET Core分布式项目实战-目录 k8s架构目录:Kubernetes(k8s)集群部署(k8s企业级Docker容器集群管理)系列目录 一.flanneld介绍 ...
- Kubernetes(k8s)集群部署(k8s企业级Docker容器集群管理)系列之部署master/node节点组件(四)
0.前言 整体架构目录:ASP.NET Core分布式项目实战-目录 k8s架构目录:Kubernetes(k8s)集群部署(k8s企业级Docker容器集群管理)系列目录 1.部署master组件 ...
- (视频)asp.net core系列之k8s集群部署视频
0.前言 应许多网友的要求,特此录制一下k8s集群部署的视频.在录制完成后发现视频的声音存在一点瑕疵,不过不影响大家的观感. 一.视频说明 1.视频地址: 如果有不懂,或者有疑问的欢迎留言.视频分为两 ...
随机推荐
- BOM之定时器
JavaScript中的时间是通过定时器控制的,他们分别是window.setInterval和window.setTimeout,我们当然可以省略window,直接使用方法名称调用. 一 s ...
- AMD vs. CommonJS?
js开发者对js模块加载的尝试和创新从来都没有停止过,尤其是当nodejs的出现后,模块化加载的必要性更加凸显.本文不讨论如何在nodejs环境来模块化加载(创造者已经利用commonJS机制解决), ...
- liunx帮助whatis使用方法
liunx帮助 获取帮助的能力决定了技术的能力! 1.whatis ♢只显示命令的简短描述,相对功能比较单一. [09:42:22 root@centos ~]# ...
- java Swing 界面化查询数据库表
两天从0基础写的.没有按钮对话框功能,只是简单的实现. 当然代码上有很多需要优化的,基本需要重写哈哈哈.但是我怕以后有需要所以还是存一下好了.<把RS结果集,放vector里面,用vector构 ...
- Python2与Python3的map()
1. map()函数 Python2中,map(func, seq1[,seq2[...[,seqn)将func作用于seq*的每个序列的索引相同的元素,并最终生成一个[func(seq1[0], s ...
- Apache和Tomcat 配置负载均衡(mod-proxy方式)-无session共享、无粘性session
转:https://blog.csdn.net/wangjunjun2008/article/details/38268483 mod-proxy方式实现负载均衡是利用了Apache 2.x版本自带的 ...
- codeforce-1201-C题解
题目:给你一个包含n个整数的数组A(n为奇数),对A做k次以下操作: 对数组排序使数组以非递减顺序排列. 选取数组的中位数,然后加一 最终使得数组的中位数最大. 输入:第一行输入两个数字 n 和 k ...
- 报表统计——java实现查询某年某月每天数据,没数据补0
一般图表绘制例如echarts等,返回数据格式都大同小异.重点是利用sql或者java实现数据格式的转型,接下来是关键部分: 1.前提:提供的工具方法——获取某月有多少天 //通过年份和月份确定该月的 ...
- xampp修改mysql 启动脚本
打开xmapp,点击mysql对应的config按钮进入my.ini文件,如图所示: 修改mysqld服务的port参数3306为你想要设置的port,如图2所示: 重新启动mysql服务即可用客户端 ...
- linux 设置查看文本行数
在一般模式下,即摁下esc按键下的模式: 设置行数为:set nu(此处的冒号需要带上) 取消行号为:set nonu(此处的冒号需要带上)