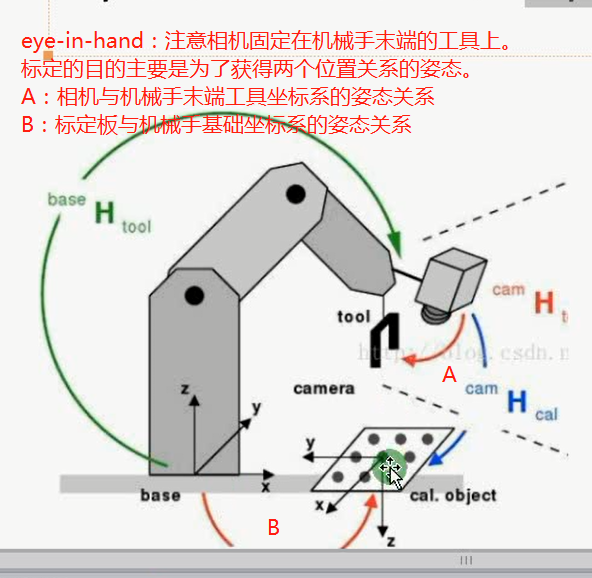
手眼标定之相机随动eye-in-hand 示例:handeye_movingcam_calibration
*
* This example explains how to use the hand eye calibration for the case where
* the camera is attached to the robot tool and the calibration object
* is stationary with respect to the robot.
*这个示例展示了如何使用手眼标定,针对相机固定在机械手末端且标定板相对于机械手基础坐标系静止的情形。
* The robot positions the camera with respect to the calibration plate.
*机械手相对与相机姿态反映在标定板上。
* In this case, the goal of the hand eye calibration is to determine two unknown poses:
*在这种情况下,手眼标定的目标是得到两个未知的姿态。
* - the pose of the robot base in the coordinate system
* of the calibration object (CalObjInBasePose).
*标定板相对机械手基础坐标系的姿态
* - the pose of the camera in the coordinate system of the
* tool center point (ToolInCamPose).
*机器手末端工具坐标系相对于相机的姿态
* Theoretically, as input the method needs at least 3 poses of the
* calibration object in the camera coordinate system.
* However, it is recommended to use at least 10 Poses.
* The corresponding poses of the robot tool in the robot base coordinate system
* (ToolInBasePose) changes for each calibration image,
* because it describes the pose of the robot moving the camera.
* The poses of the calibration object are obtained from images of the
* calibration object recorded with the camera attached to the robot.
* To obtain good calibration results, it its essential to position
* the camera with respect to the calibration object so that the object appears
* tilted in the image.
* After the hand eye calibration, the computed transformations are
* extracted and used to compute the pose of the calibration object in the
* camera coordinate system.
dev_update_off ()
* Directories with calibration images and data files
ImageNameStart := '3d_machine_vision/handeye/movingcam_calib3cm_'
DataNameStart := 'handeye/movingcam_'
NumImages := 14
read_image (Image, ImageNameStart + '00')
dev_close_window ()
get_image_size (Image, Width, Height)
dev_open_window (0, 0, Width, Height, 'black', WindowHandle)
dev_set_line_width (2)
dev_set_draw ('margin')
dev_display (Image)
set_display_font (WindowHandle, 14, 'mono', 'true', 'false')
* Load the calibration plate description file.
*加载标定板描述文件
* Make sure that the file is in the current directory or
* in HALCONROOT/calib, or use an absolute path.
*确保文件在正确的路径或使用相对路径
CalTabFile := 'caltab_30mm.descr'
* Read the initial values for the internal camera parameters
*读取相机的内参
read_cam_par (DataNameStart + 'start_campar.dat', StartCamParam)
* Create the calibration model for the hand eye calibration
* where the calibration object is observed with a camera
*创建一个手眼标定模板,标定板在相机视野内
create_calib_data ('hand_eye_moving_cam', 1, 1, CalibDataID)
* Set the camera type used
*设置相机内参
set_calib_data_cam_param (CalibDataID, 0, 'area_scan_division', StartCamParam)
* Set the calibration object
*设置标定板参数
set_calib_data_calib_object (CalibDataID, 0, CalTabFile)
* Start the loop over the calibration images
* Set the opitmization method to be used
set_calib_data (CalibDataID, 'model', 'general', 'optimization_method', 'nonlinear')
disp_message (WindowHandle, 'The calibration data model was created', 'window', 12, 12, 'black', 'true')
disp_continue_message (WindowHandle, 'black', 'true')
stop ()
for I := 0 to NumImages - 1 by 1
read_image (Image, ImageNameStart + I$'02d')
* Search for the calibration plate, extract the marks and the
* pose of it, and store the results in the calibration data
* The poses are stored in the calibration data model for use by
* the hand eye calibration and do not have to be set explicitly
find_calib_object (Image, CalibDataID, 0, 0, I, [], [])
get_calib_data_observ_contours (Caltab, CalibDataID, 'caltab', 0, 0, I)
get_calib_data_observ_points (CalibDataID, 0, 0, I, RCoord, CCoord, Index, PoseForCalibrationPlate)
* Visualize the extracted calibration marks and the estimated pose (coordinate system)
dev_set_color ('green')
dev_display (Image)
dev_display (Caltab)
dev_set_color ('yellow')
disp_cross (WindowHandle, RCoord, CCoord, 6, 0)
dev_set_colored (3)
disp_3d_coord_system (WindowHandle, StartCamParam, PoseForCalibrationPlate, 0.01)
* Read pose of tool in robot base coordinates (ToolInBasePose)
*读机械手基础坐标系下的末端工具的姿态,每张图只要机械手末端相对标定板有XYZ方向的平移或旋转,此姿态就会不一样。
read_pose (DataNameStart + 'robot_pose_' + I$'02d' + '.dat', ToolInBasePose)
* Set the pose tool in robot base coordinates in the calibration data model
set_calib_data (CalibDataID, 'tool', I, 'tool_in_base_pose', ToolInBasePose)
* Uncomment for inspection of visualization
* disp_message (WindowHandle, 'Extracting data from calibration image ' + (I + 1) + ' of ' + NumImages, 'window', 12, 12, 'black', 'true')
* disp_continue_message (WindowHandle, 'black', 'true')
* stop ()
endfor
disp_message (WindowHandle, 'All relevant data has been set in the calibration data model', 'window', 12, 12, 'black', 'true')
disp_continue_message (WindowHandle, 'black', 'true')
stop ()
* Perform the hand eye calibration and store the results to file
* The calibration of the cameras is done internally prior
* to the hand eye calibration
dev_display (Image)
disp_message (WindowHandle, 'Performing the hand-eye calibration', 'window', 12, 12, 'black', 'true')
calibrate_hand_eye (CalibDataID, Errors)
* Query the camera parameters and the poses
get_calib_data (CalibDataID, 'camera', 0, 'params', CamParam)
* Get poses computed by the hand eye calibration
*tool_in_cam_pose:在相机坐标系下工具坐标系的关系
get_calib_data (CalibDataID, 'camera', 0, 'tool_in_cam_pose', ToolInCamPose)
*obj_in_base_pose:在机械手基础坐标系下标定板的姿态
get_calib_data (CalibDataID, 'calib_obj', 0, 'obj_in_base_pose', CalObjInBasePose)
dev_get_preferences ('suppress_handled_exceptions_dlg', PreferenceValue)
dev_set_preferences ('suppress_handled_exceptions_dlg', 'true')
try
* Handle situation where user does not have the permission
* to write in the current directory.
*
* Store the camera parameters to file
*保存一个相机的内参
write_cam_par (CamParam, DataNameStart + 'final_campar.dat')
* Save the hand eye calibration results to file
*保存工具坐标系(机械手末端)相对于相机的姿态参数
write_pose (ToolInCamPose, DataNameStart + 'final_pose_cam_tool.dat')
*保存标定板相对于机械手基础坐标系的姿态参数
write_pose (CalObjInBasePose, DataNameStart + 'final_pose_base_calplate.dat')
catch (Exception)
* do nothing
endtry
dev_set_preferences ('suppress_handled_exceptions_dlg', PreferenceValue)
dev_display (Image)
* Display calibration errors
Message := 'Quality of the results: root mean square maximum'
Message[1] := 'Translation part in meter: ' + Errors[0]$'6.4f' + ' ' + Errors[2]$'6.4f'
Message[2] := 'Rotation part in degree: ' + Errors[1]$'6.4f' + ' ' + Errors[3]$'6.4f'
disp_message (WindowHandle, Message, 'window', 12, 12, 'black', 'true')
disp_continue_message (WindowHandle, 'black', 'true')
stop ()
* For the given camera, get the corresponding pose indices and calibration object indices
query_calib_data_observ_indices (CalibDataID, 'camera', 0, CalibObjIdx, PoseIds)
* Compute the pose of the calibration object in the camera coordinate
* system via calibrated poses and the ToolInBasePose and visualize it.
for I := 0 to NumImages - 1 by 1
read_image (Image, ImageNameStart + I$'02d')
dev_display (Image)
* Obtain the pose of the tool in robot base coordinates used in the calibration.
* The index corresponds to the index of the pose of the observation object.
get_calib_data (CalibDataID, 'tool', PoseIds[I], 'tool_in_base_pose', ToolInBasePose)
* Compute the pose of the calibration object relative to the camera
calc_calplate_pose_movingcam (CalObjInBasePose, ToolInCamPose, ToolInBasePose, CalObjInCamPose)
* Display the coordinate system
dev_set_colored (3)
disp_3d_coord_system (WindowHandle, CamParam, CalObjInCamPose, 0.01)
Message := 'Using the calibration results to display '
Message[1] := 'the coordinate system in image ' + (I + 1) + ' of ' + NumImages
disp_message (WindowHandle, Message, 'window', 12, 12, 'black', 'true')
if (I < NumImages - 1)
disp_continue_message (WindowHandle, 'black', 'true')
stop ()
endif
endfor
* Clear the data model
clear_calib_data (CalibDataID)
*
* After the hand-eye calibration the computed pose
* ToolInCamPose can be used in robotic grasping applications.
* If the tool coordinate system is placed at the gripper
* and a detected object ObjInCamPose shall be grasped
* (here the calibration object),
* the pose of the detected object relative
* to the robot base coordinate system has to be computed.
*姿态反转
pose_invert (ToolInCamPose, CamInToolPose)
*由两个已知姿态得到第三个姿态,相当于两个分数乘法,其中一个分子与另一个分母相等,相约的情况
pose_compose (ToolInBasePose, CamInToolPose, CamInBasePose)
pose_compose (CamInBasePose, CalObjInCamPose, ObjInBasePose)
手眼标定之相机随动eye-in-hand 示例:handeye_movingcam_calibration的更多相关文章
- 手眼标定eye-to-hand 示例:handeye_stationarycam_calibration
* * This example explains how to use the hand eye calibration for the case where* the camera is stat ...
- halcon 手眼标定的坐标转换原理讲解
原文链接:https://blog.csdn.net/opencv_learner/article/details/82113323 一直以来,对于手眼标定所涉及到的坐标系及坐标系之间的转换关系都没能 ...
- ROS标定IDS相机
参考 ROS 相机标定http://blog.csdn.net/ArtistA/article/details/51125560 ROS里的标定程序只要使用了OPNCV的标定程序: opencv 相机 ...
- 相机标定:PNP基于单应面解决多点透视问题
利用二维视野内的图像,求出三维图像在场景中的位姿,这是一个三维透视投影的反向求解问题.常用方法是PNP方法,需要已知三维点集的原始模型. 本文做了大量修改,如有不适,请移步原文: ...
- 相机标定简介与MatLab相机标定工具箱的使用(未涉及原理公式推导)
相机标定 一.相机标定的目的 确定空间物体表面某点的三维几何位置与其在图像中对应点之间的相互关系,建立摄像机成像的几何模型,这些几何模型参数就是摄像机参数. 二.通用摄像机模型 世界坐标系.摄像机坐标 ...
- 相机标定:kalibr标定工具箱使用总结
1 多相机标定 1.1采集图像和IMU 1.2制作Bag包 1)组织文件结构 ~/kalibr_workspace/test/stereo_calib bagsrc cam0 (1+time(0))* ...
- MATLAB二维相机标定的解决方案 calibration
第一步,在命令行下面输入cameraCalibrator,启动MATLAB相机标定.相机矫正界面 cameraCalibrator 第二步:拍照.如果你是做相机标定,你应该知道,你需要一些calibr ...
- 直接线性变换解法(DLT)用于标定相机
直接线性变换法是建立像点坐标和相应物点物方空间坐标之间直接的线性关系的算法.特点:不需要内外方位元素:适合于非量测相机:满足中.低精度的测量任务:可以标定单个相机. 1 各坐标系之间的关系推导直接线性 ...
- 相机标定过程(opencv) + matlab参数导入opencv + matlab标定和矫正
%%%%%%%%%%%%%%%%%%%%%%%%%%%%%%%%%%%%%%%%%% 辛苦原创所得,转载请注明出处 %%%%%%%%%%%%%%%%%%%%%%%%%%%%%%%%%%%%%%%%%% ...
随机推荐
- 关于FIFO异步复位的问题
关于FIFO异步复位的问题 FIFO异步复位的宽度,需要保证至少3个较慢时钟的时钟周期长度. 怎样对一个脉冲加宽呢? `timescale 1ns / 1ps //////////////////// ...
- [UE4]让箭头保持水平
如图所示,当手柄前后左右转动的时候,箭头也会跟着转动,我们的目标是要求箭头紧贴着地面,不会跟着手柄前后左右转动. 分析上图坐标系可以知道,只要让箭头绕着Z轴转动就可以了,不需要绕着X轴和Y轴旋转.
- DATA 步数据纵向串接
DATA A;A='1';RUN; %MACRO M_A();DATA B;SET %DO I=1 %TO 10;A%END;;RUN;%MEND; %M_A(); PROC PRINT DATA=B ...
- scheduleAtFixedRate 与 scheduleWithFixedDelay 的区别
总结: scheduleAtFixedRate ,是以上一个任务开始的时间计时,period时间过去后,检测上一个任务是否执行完毕,如果上一个任务执行完毕,则当前任务立即执行,如果上一个任务没有执行完 ...
- myeclipse破解软件(jar包分析)
cracker.jar 第root层com 第1层crack 第二层me-->active 第4层ui 第5层find 第5层replace 第6层stream 第5层writer 第1层gen ...
- WebApp的自动测试工具: protractor和selenium
Protractor是Selenium的扩充,支持Angularjs element(by.css('my-css')).click(); 一.用by的各种Locator定位元素 选中1个元素: el ...
- Java之框架Spring(一)
1. Spring是什么? Spring是一个开源框架 Spring为简化企业级应用而生.可以实现以前只有EJB才能实现的功能 Spring是一个IOC(DI)和AOP容器框架 具体描述:轻量级:Sp ...
- flask+redis实现抢购(秒杀)功能
今天面试了 一家非常高大上的公司,问了我关于redis的实用性问题,但是答的不是很好,所以下午通过再次学习 redis,实现相关实用性功能的一种. 对于抢购功能,难点在于 抢购时 由于高并发请求,导致 ...
- nvm 查看node版本
1. 查看有哪些 node 版本 命令: nvm ls-remote 2. 查看本地node版本 nvm list 3. 版本切换 nvm use 版本号
- 网络通信协议tcp,udp区别
1 网络通信协议 Tcp udp的区别 重点(*****) Tcp三次握手四次挥手(******) udp客户端多人聊天 import socket udp_client = socket.socke ...