ovirt-engine安装
一、安装
1、更新系统
原来是centos4.5
#yum update
升级后到6.7版本。
[root@localhost ~]# cat /etc/redhat-release

CentOS release 6.7 (Final)
2、新建用户
#adduser liuxiaoyan

#passwd liuxiaoyan
3、安装snapshot库(root用户)
[root@localhost ~]# yum -y install http://resources.ovirt.org/releases/ovirt-release/ovirt-release35.rpm
4、安装图形显示包(root用户)
[root@localhost ~]# yum -y install mailcap
5、安装第三方包(3rd party packages)(root用户)
[root@localhost ~]# yum install openssl m2crypto python-psycopg2 python-cheetah python-daemon libxml2-python unzip
应该是如果不成功再安装下面安装办法装。--nogpgcheck代表不检查签名。
# yum install python-daemon (--nogpgcheck)
6、安装jdk(root用户)
[root@localhost ~]# yum install -y java-1.7.0-openjdk-devel
7、安装git
[root@localhost ~]# yum install -y git
8、安装ovirt包
[root@localhost ~]# yum install wget
[root@localhost ~]# yum install ovirt-host-deploy
安装时遇到一个问题:
[root@localhost ~]# yum install -y ovirt-host-deploy

Loaded plugins: fastestmirror

Setting up Install Process

Loading mirror speeds from cached hostfile

 * base: mirrors.skyshe.cn

 * extras: mirrors.skyshe.cn

 * ovirt-3.5-epel: mirror01.idc.hinet.net

 * ovirt-3.5-jpackage-6.0-generic: ftp.heanet.ie

 * ovirt-3.5-pre: resources.ovirt.org

 * updates: mirrors.skyshe.cn

Resolving Dependencies

--> Running transaction check

---> Package ovirt-host-deploy.noarch 0:1.3.2-1.el6 will be installed

--> Processing Dependency: otopi for package: ovirt-host-deploy-1.3.2-1.el6.noarch

--> Finished Dependency Resolution

Error: Package: ovirt-host-deploy-1.3.2-1.el6.noarch (ovirt-3.5-pre)

           Requires: otopi

 You could try using --skip-broken to work around the problem

 You could try running: rpm -Va --nofiles --nodigest
所以用--skip-broken跳过该问题。
[root@localhost ~]# yum install -y ovirt-host-deploy --skip-broken

Loaded plugins: fastestmirror

Setting up Install Process

Loading mirror speeds from cached hostfile

 * base: mirrors.skyshe.cn

 * extras: mirrors.skyshe.cn

 * ovirt-3.5-epel: mirror01.idc.hinet.net

 * ovirt-3.5-jpackage-6.0-generic: ftp.heanet.ie

 * ovirt-3.5-pre: resources.ovirt.org

 * updates: mirrors.skyshe.cn

Resolving Dependencies

--> Running transaction check

---> Package ovirt-host-deploy.noarch 0:1.3.2-1.el6 will be installed

--> Processing Dependency: otopi for package: ovirt-host-deploy-1.3.2-1.el6.noarch

Packages skipped because of dependency problems:

    ovirt-host-deploy-1.3.2-1.el6.noarch from ovirt-3.5-pre
跳过了这个问题。
[root@localhost ~]# yum install http://resources.ovirt.org/releases/ovirt-release/ovirt-release35-snapshot.rpm
9、安装maven (liuxiaoyan用户)
在https://maven.apache.org/download.cgi目录下载apache-maven-3.3.3-bin.tar.gz。
然后解压。
[liuxiaoyan@localhost ~]$ tar -xvf apache-maven-3.3.3-bin.tar.gz
[liuxiaoyan@localhost ~]$ export PATH=$HOME/apache-maven-3.3.3/bin:$PATH

[liuxiaoyan@localhost ~]$ mvn -version

Apache Maven 3.3.3 (7994120775791599e205a5524ec3e0dfe41d4a06; 2015-04-22T07:57:37-04:00)

Maven home: /home/liuxiaoyan/apache-maven-3.3.3

Java version: 1.7.0_85, vendor: Oracle Corporation

Java home: /usr/lib/jvm/java-1.7.0-openjdk-1.7.0.85.x86_64/jre

Default locale: en_US, platform encoding: UTF-8

OS name: "linux", version: "2.6.32-358.el6.x86_64", arch: "amd64", family: "unix"
Maven 自定义配置
[liuxiaoyan@localhost ~]$ mkdir ~/.m2

[liuxiaoyan@localhost ~]$ cat > ~/.m2/settings.xml <<"EOT"

<settings xmlns="http://maven.apache.org/POM/4.0.0"

          xmlns:xsi="http://www.w3.org/2001/XMLSchema-instance"

          xsi:schemaLocation="http://maven.apache.org/POM/4.0.0

                              http://maven.apache.org/xsd/settings-1.0.0.xsd">

<!--**************************** PROFILES ****************************-->

        <activeProfiles>

                        <activeProfile>oVirtEnvSettings</activeProfile>

        </activeProfiles>

        <profiles>

                <profile>

                        <id>oVirtEnvSettings</id>

                        <properties>

                           <jbossHome>${env.JBOSS_HOME}</jbossHome>

                           <JAVA_HOME>${env.JAVA_HOME}</JAVA_HOME>

                        </properties>

                </profile>

         </profiles>

</settings>

EOT
10、安装jboss(root用户)
安装:
[root@localhost ~]# yum install jboss-as
下载非常慢,可到http://resources01.phx.ovirt.org/releases/stable/rpm/EL/6/x86_64/
下载

然后安装:
[root@localhost ~]# ls

anaconda-ks.cfg  install.log  install.log.syslog  jboss-as-7.1.1-11.el6.x86_64.rpm

[root@localhost ~]# rpm -ivh jboss-as-7.1.1-11.el6.x86_64.rpm

Preparing...                ########################################### [100%]

   1:jboss-as               ########################################### [100%]
运行jboss
[root@localhost ~]# /usr/share/jboss-as/bin/standalone.sh
设置环境变量
[root@localhost ~]# export JAVA_HOME=/usr/lib/jvm/java-1.7.0-openjdk.x86_64

[root@localhost ~]# export JBOSS_HOME=/usr/share/jboss-as

[root@localhost ~]# export PATH=$HOME/apache-maven-3.2.1/bin:$PATH
11、安装PostgreSQL DB (root用户)
[root@localhost ~]# yum install –y postgresql-server
初始化数据库
[root@localhost ~]# service postgresql initdb

Initializing database:                                     [  OK  ]
重启
[root@localhost ~]# /etc/init.d/postgresql restart

Stopping postgresql service:                               [  OK  ]

Starting postgresql service:                               [  OK  ]
修改数据库连接
[root@localhost ~]# vi /var/lib/pgsql/data/pg_hba.conf
默认:
# TYPE  DATABASE    USER        CIDR-ADDRESS          METHOD

# "local" is for Unix domain socket connections only

local   all         all                               ident

# IPv4 local connections:

host    all         all         127.0.0.1/32          ident

# IPv6 local connections:

host    all         all         ::1/128               ident
做如下修改:【ps:如果后期有问题,可将ident,password,password都修改为trust】
# TYPE  DATABASE    USER        CIDR-ADDRESS          METHOD

# "local" is for Unix domain socket connections only

local   all         all                               ident

# IPv4 local connections:

host    all         all         127.0.0.1/32          password

# IPv6 local connections:

host    all         all         ::1/128               password
重启:# /etc/init.d/postgresql restart
如果重启失败解决方案可参考:service postgresql initdb [FAILED]
创建数据库
[root@localhost data]# su - postgres -c "psql -d template1 -c \"create user engine password 'engine';\""

CREATE ROLE

[root@localhost data]# su - postgres -c "psql -d template1 -c \"create database engine owner engine template template0 encoding 'UTF8' lc_collate 'en_US.UTF-8' lc_ctype 'en_US.UTF-8';\""

CREATE DATABASE
12、下载ovirt engine代码
cd $HOME

$ git clone https://github.com/oVirt/ovirt-engine.git
13、编译(必须在ovirt-engine目录下)
make install-dev PREFIX="$HOME/ovirt-engine"
14、Setup
$ $HOME/ovirt-engine/bin/engine-setup
15、启动服务
$HOME/ovirt-engine/share/ovirt-engine/services/ovirt-engine/ovirt-engine.py start
二、排错
1、编译过程排错
错误1:
编译报错如下
Building locales requires more than 10240 available file descriptors, currently 1024

Refer to README.developer for further instructions
解决办法:
查看README.developer中
$ vi README.developer
有如下一段话;
Build locales requires at least 10240 file descriptors, create the

following file, replace <user> with user that is used for building,

and logout/login:

/etc/security/limits.d/10-nofile.conf

---

<user> hard nofile 10240

#<user> soft nofile 10240  # optional, to apply automatically

---

If soft limit was not set, before building, apply new limit using:

 $ ulimit -n 10240

POSTGRESQL ACCESSIBILITY
普通用户执行ulimit –n 10240会报错:-bash: ulimit: open files: cannot modify limit: Operation not permitted
所以使用Root su到普通用户再执行ulimit -n 10240,这会使得仅仅在某个会话中生效,在该会话中编译通过。
如果还是不能解决问题参考README.developer中的提示。
错误2:
make[2]: mvn: Command not found
make[2]: *** [maven] Error 127
解决办法:
执行:
[liuxiaoyan@localhost ~]$ export PATH=$HOME/apache-maven-3.3.3/bin:$PATH
再执行mvn -version能显示版本信息即oK。
错误3:
编译过程中下载maven-ear-plugin-2.8.pom包一个下载不下来,然后就再次尝试下载。。。编译过不去,信息如下
Downloading: http://repo1.maven.org/maven2/org/apache/maven/plugins/maven-ear-plugin/2.8/maven-ear-plugin-2.8.pom
Aug 31, 2015 9:37:09 PM org.apache.maven.wagon.providers.http.httpclient.impl.execchain.RetryExec execute
INFO: I/O exception (java.net.SocketException) caught when processing request to {}->http://repo1.maven.org:80: Connection timed out
Aug 31, 2015 9:37:09 PM org.apache.maven.wagon.providers.http.httpclient.impl.execchain.RetryExec execute
INFO: Retrying request to {}->http://repo1.maven.org:80
Aug 31, 2015 9:54:14 PM org.apache.maven.wagon.providers.http.httpclient.impl.execchain.RetryExec execute
INFO: I/O exception (java.net.SocketException) caught when processing request to {}->http://repo1.maven.org:80: Connection timed out
Aug 31, 2015 9:54:14 PM org.apache.maven.wagon.providers.http.httpclient.impl.execchain.RetryExec execute
INFO: Retrying request to {}->http://repo1.maven.org:80
解决办法:
下载好安装在目录:
.m2/repository/org/apache/maven/plugins/maven-ear-plugin/2.8/maven-ear-plugin-2.8.pom中,所以可以拷贝一份扔进去。
现在下载了一部分时目录是这样的:
[liuxiaoyan@localhost 2.8]$ ls
maven-ear-plugin-2.8.pom.part maven-ear-plugin-2.8.pom.part.lock
拷贝这些文件:
[liuxiaoyan@localhost 2.8]$ ls
maven-ear-plugin-2.8.jar maven-ear-plugin-2.8.jar.sha1 maven-ear-plugin-2.8.pom maven-ear-plugin-2.8.pom.sha1 _remote.repositories
重新编译OK。
2、SetUP过程排错
错误1:
[liuxiaoyan@localhost bin]$ ./engine-setup
./engine-setup: line 81: /usr/sbin/otopi: No such file or directory
解决方法:
拷贝一个otopi文件即可(长久考虑,有可能是因为没装otopi这个包,安装即可)。
错误2:
[liuxiaoyan@localhost bin]$ ./engine-setup
/usr/bin/python: No module named otopi
解决方法:
[root@localhost ~]# yum -y install otopi
错误3:
[liuxiaoyan@localhost bin]$ ./engine-setup
***L:ERROR Internal error: No module named psycopg2
解决方法:
[root@localhost ~]# yum -y install python-psycopg2
错误4:
[ ERROR ] Host name is not valid: Command 'dig' is required but missing
Host fully qualified DNS name of this server [localhost.localdomain]: 10.1.101.51
[ ERROR ] Host name is not valid: 10.1.101.51 is an IP address and not a FQDN. A FQDN is needed to be able to generate certificates correctly.
Host fully qualified DNS name of this server [localhost.localdomain]:
解决方法:
在/etc/hosts中绑定IP和名字,如下:
10.1.101.119 engine //这里的engine是hostname
错误5:
[ ERROR ] Host name is not valid: Command 'dig' is required but missing
Host fully qualified DNS name of this server [engine]: engine
解决办法:
# yum -y install bind-utils
错误6:
[ ERROR ] Cannot connect to Engine database: Cannot connect to database: could not connect to server: Connection refused Is the server running on host "localhost" and accepting TCP/IP connections on port 5432? could not connect to server: Connection refused Is the server running on host "localhost" and accepting TCP/IP connections on port 5432?
解决办法:
Root用户执行:
[root@engine ~]# /etc/init.d/postgresql restart
Stopping postgresql service: [ OK ]
Starting postgresql service: [ OK ]
错误7:
[ ERROR ] Cannot connect to Engine database: Cannot connect to database: FATAL: password authentication failed for user "engine" FATAL: password authentication failed for user "engine"
解决方法:
修改vi /var/lib/pgsql/data/pg_hba.conf
中的密码为trust即可。
在编译目录ovirt-engine/etc/ovirt-engine/engine.conf.d中有一个README
vi
/home/liuxiaoyan/ovirt-engine/share/ovirt-engine/services/ovirt-engine/ovirt-engine.conf
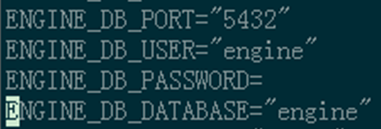
可能是相关配置文件。
3、start过程排错
错误1:
……/ovirt-engine.py start访问报错:
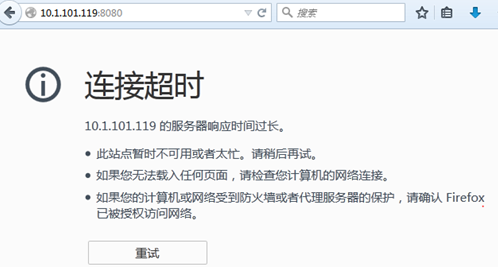
解决办法:
Root用户关闭防火墙即可。
[root@engine ~]# /etc/init.d/iptables stop
iptables: Setting chains to policy ACCEPT: filter [ OK ]
iptables: Flushing firewall rules: [ OK ]
iptables: Unloading modules: [ OK ]
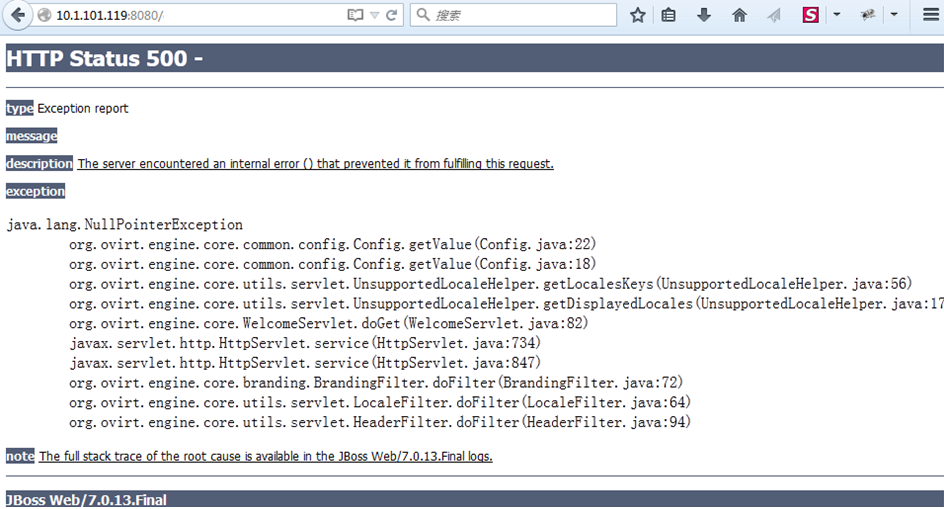
错误2:
界面样式错乱
解决方法:
有些rpm包没有安装。
最主要的是一个patternfly1的包没有装。
通过# yum -y install patternfly1安装即可。
如果不行将所有未安装的包都安装一遍,具体参考项目目录下的README.developer。
安装pyflakes-0.4.0-2.el6.noarch
从下面地址下载pyflakes-0.4.0-2.el6.noarch
http://cbs.centos.org/koji/buildinfo?buildID=753
错误3:
[liuxiaoyan@engine ovirt-engine]$ $HOME/ovirt-engine/share/ovirt-engine/services/ovirt-engine/ovirt-engine.py start
ERROR: transport error 202: bind failed: Address already in use
ERROR: JDWP Transport dt_socket failed to initialize, TRANSPORT_INIT(510)
JDWP exit error AGENT_ERROR_TRANSPORT_INIT(197): No transports initialized [../../../src/share/back/debugInit.c:750]
FATAL ERROR in native method: JDWP No transports initialized, jvmtiError=AGENT_ERROR_TRANSPORT_INIT(197)
ovirt-engine[22588] ERROR run:532 Error: process terminated with status code -6
解决办法:
有进程在用8080端口,kill掉即可。
使用ps –a或者netstat命令。
错误4:
解决办法:
root用户执行:/usr/share/jboss-as/bin/standalone.sh启动jboss服务即可。
错误5:
登录时用户名密码验证失败,删掉数据库,重新建一遍
解决办法:
删除数据库engine然后重新创建。
【如果数据库正在被使用就无法删除,此时在root用户下用命令:ps aux|grep engine然后kill掉】
su - postgres -c "psql -d template1 -c \"drop database engine ;\""
su - postgres -c "psql -d template1 -c \"create database engine owner engine template template0 encoding 'UTF8' lc_collate 'en_US.UTF-8' lc_ctype 'en_US.UTF-8';\""
错误6:
如果出现服务器的连接不上的情况,可能是端口被占用了。
解决办法:
找到8080端口,kill掉进程,然后重新start即可。
本文作者starof,因知识本身在变化,作者也在不断学习成长,文章内容也不定时更新,为避免误导读者,方便追根溯源,请诸位转载注明出处:http://www.cnblogs.com/starof/p/4772890.html有问题欢迎与我讨论,共同进步。
ovirt-engine安装的更多相关文章
- Centos7安装Docker Engine
一.先决条件 首选需要一个64位操作系统和3.10或者更版本的内核. 查看当前内核版本: $ uname -r -.el7.x86_64 二.yum安装Docker Engine 安装Docker E ...
- Install Docker Engine on CentOS 在CentOS 7 上安装Docker
Install Docker Engine on CentOS OS Requirements 系统要求 To install Docker Engine,you need a maintained ...
- ovirt配置为cas登录
准备工作 Ovirt测试机.CAS服务器.AD服务器 cas.crt -- CAS服务器的CA证书 allwinner.cer -- CAS服务器的证书颁发机构根证书 Ovirt测试机要求:apach ...
- Ovirt 简单配置
Ovirt是一款开源的虚拟化平台管理 主要组成: 1.OvirtEngine Server 用于管理和分配资源 ,能通过web管理 2.Hosts 提供虚拟化功能,提供CPU资源和内存资源,用于分配给 ...
- [ kvm ] 学习笔记 8:Ovirt 基础及使用
目录- 1. oVirt 功能介绍- 2. oVirt 安装部署 - 2.1 基础准备 - 2.2 安装 ovirt-engine - 2.3 配置 kvm 主机 - 2.4 ...
- 【云计算】ubuntu下docker安装配置指南
Docker Engine安装配置 以下描述仅Docker在Ubuntu Precise 12.04 (LTS).Ubuntu Trusty 14.04 (LTS).Ubuntu Wily 15.10 ...
- 安装Office时出现windows installer服务不能更新一个或多个受保护的windows文件错误的解决方法
今天在Windows XP上安装Microsoft Office 2010时,总是遇到“Windows Installer服务不能更新一个或多个受保护的windows文件,安装失败,正在回滚更改”提示 ...
- Docker - 容器编排工具 compose 之安装
准备 首先,在使用和安装 docker compose之前,我们应该确保我们已经安装了 docker engine. 安装 官网上面有好多种安装方式,由于我们现在是在使用Docker, 个人感觉应该以 ...
- 基于Java的Arc Engine二次开发的环境的配置
1.软件准备 ArcGIS for Desktop 10.2, Arc engine, jdk-7u60-windows-i586,Eclipse Mar2 2.软件的安装 2.1 ArcGIS fo ...
随机推荐
- (原) 1.1 Zookeeper单机安装
本文为原创文章,转载请注明出处,谢谢 zookeeper 单机安装配置 1.安装前准备 linux系统(此文环境为Centos6.5) Zookeeper安装包,官网https://zookeeper ...
- 从零开始,做一个NodeJS博客(四):服务器渲染页面与Pjax
标签: NodeJS 0 一个星期没更新了 = = 一直在忙着重构代码,以及解决重构后出现的各种bug 现在CSS也有一点了,是时候把遇到的各种坑盘点一下了 1 听歌排行 API 修复与重构 1.1 ...
- putty保持不掉线
putty连接linux,一会就掉线了,然后再重新输入,比较麻烦. 参考http://www.putty.ws/putty-lianjie这篇文章解决. 如图,30表示每隔30秒putty会发一个空的 ...
- iOS自定义字体
1.下载字体库,如:DINCond-Bold.otf 2.双击,在mac上安装 3.把下载的字体库拖入工程中: 4.配置info.plist文件 5.xib方式设置自定义字体:Font选Custom, ...
- OSX常用快捷键
编辑类 cmd+c复制 cmd+x剪切 cmd+v粘贴 cmd+s保存 cmd+z撤销 文件类 cmd+c cmd+v文件的复制粘贴 cmd+c cmd+ ...
- [UITableView _endCellAnimationsWithContext:]
由于项目需要,做一个UITableView来实现删除功能. 1.TableView是分组的. 2.点击删除按钮后,某行被删除. 出现:[UITableView _endCellAnimat ...
- js DOM Document类型
JavaScript通过Document类型访问文档.在浏览器中,document对象是HTMLDocument(继承自 Document类型)的一个实例,表示整个HTML页面.document对象是 ...
- C#程序猿电脑重装记录
最近比较空了,闲的手痒,将自己的笔记本进行了重装,之前每次重装都没有记录,这次将本次重装过程记录下来,以便下次参考 1 首先不用说了WIN7旗舰版装好,驱动装好 2 开启Administrator用户 ...
- informatica powercenter学习笔记(LookUp 使用)
LOOKUP TRANSFORMATION的使用点评: LOOKUP基本用法不熟的话请参考下附属信息. 用法感受: 1 LOOKUP的作用跟我们以前在EXCEL的函数功能类似,就是隔表取值.优点就是用 ...
- Linux SendMail发送邮件失败诊断案例(三)
一Linux服务器突然发送不出邮件,检查了很多地方都没有发现异常,检查/var/log/maillog发现如下具体信息: Apr 12 00:36:04 mylinux sendmail[4685]: ...