python基于百度unit实现语音识别与语音交互
一、百度Unit新建机器人
网址:https://ai.baidu.com/tech/speech/asr:
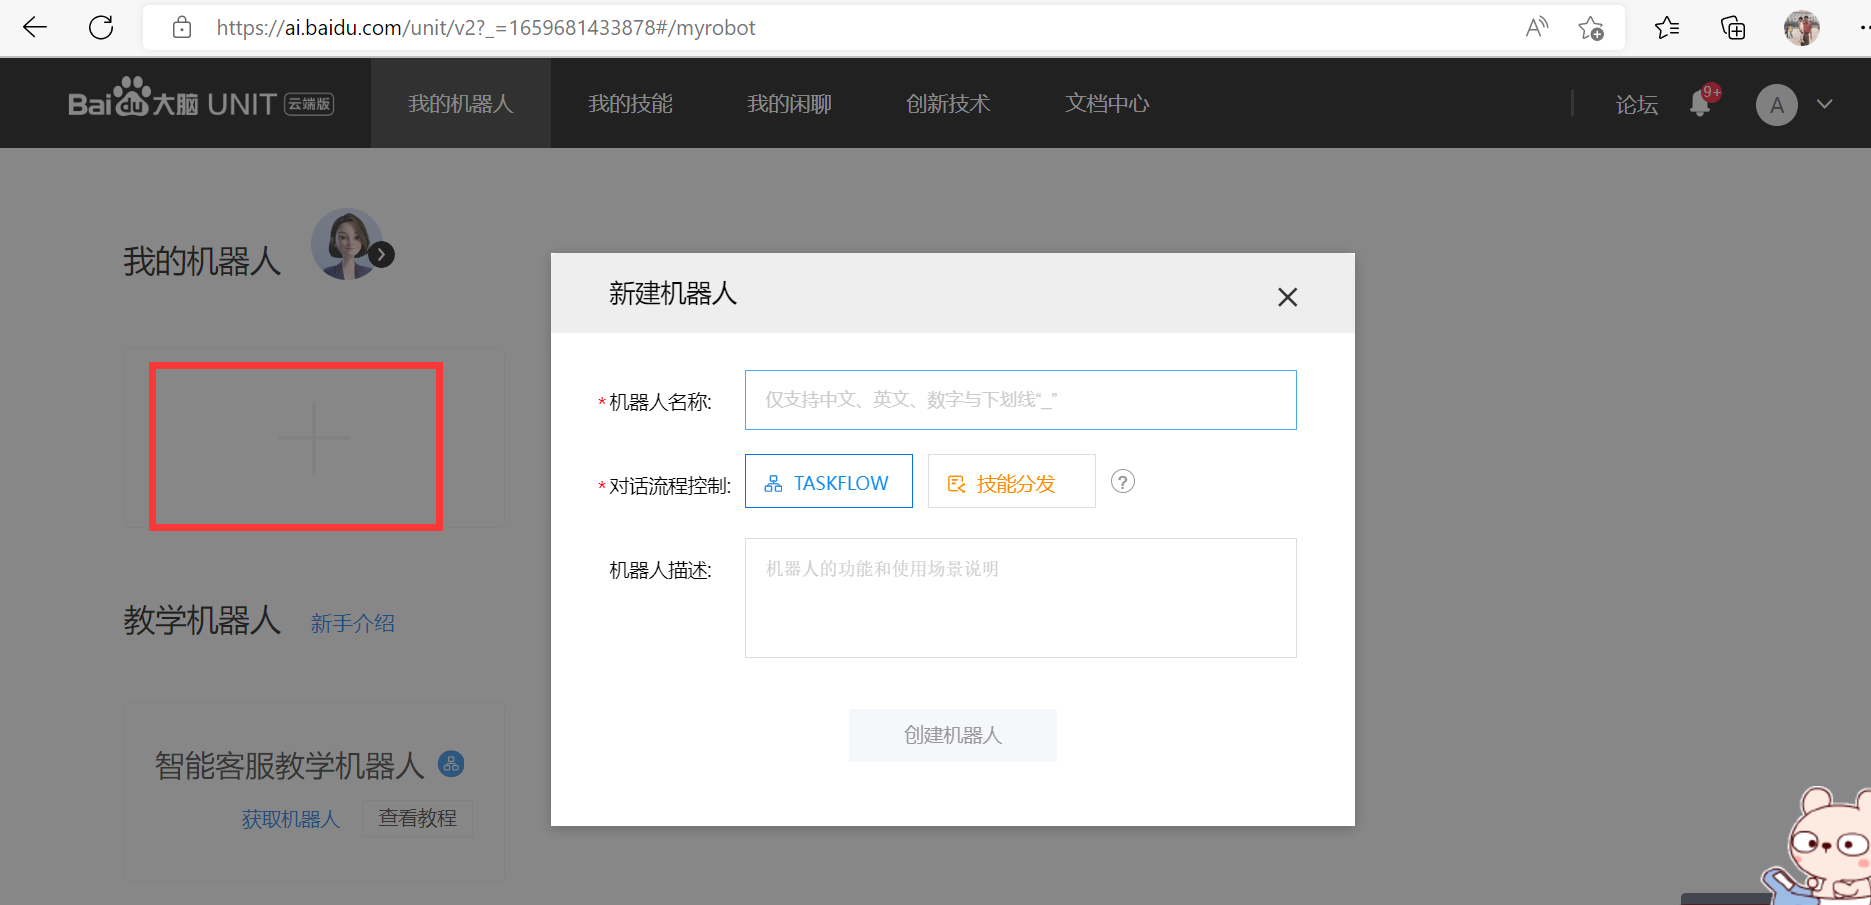
1、新建机器人并添加预置技能步骤
(1)、新建机器人(添加预置技能),并填写机器人具体信息
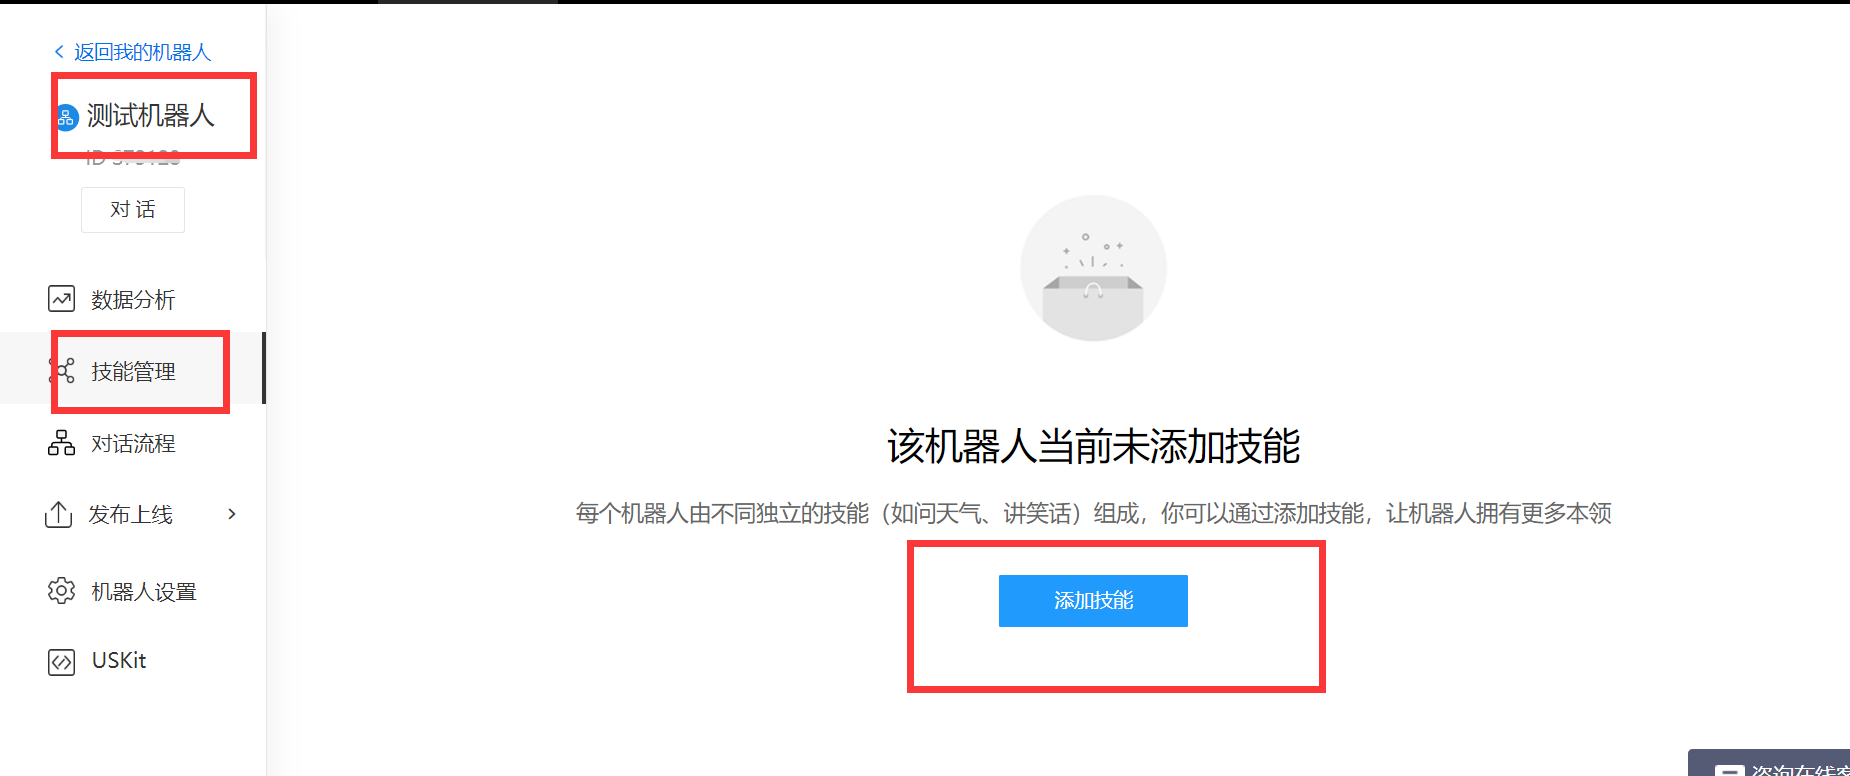
(2)、进入新建的机器人 -> 选择技能管理 -> 添加技能
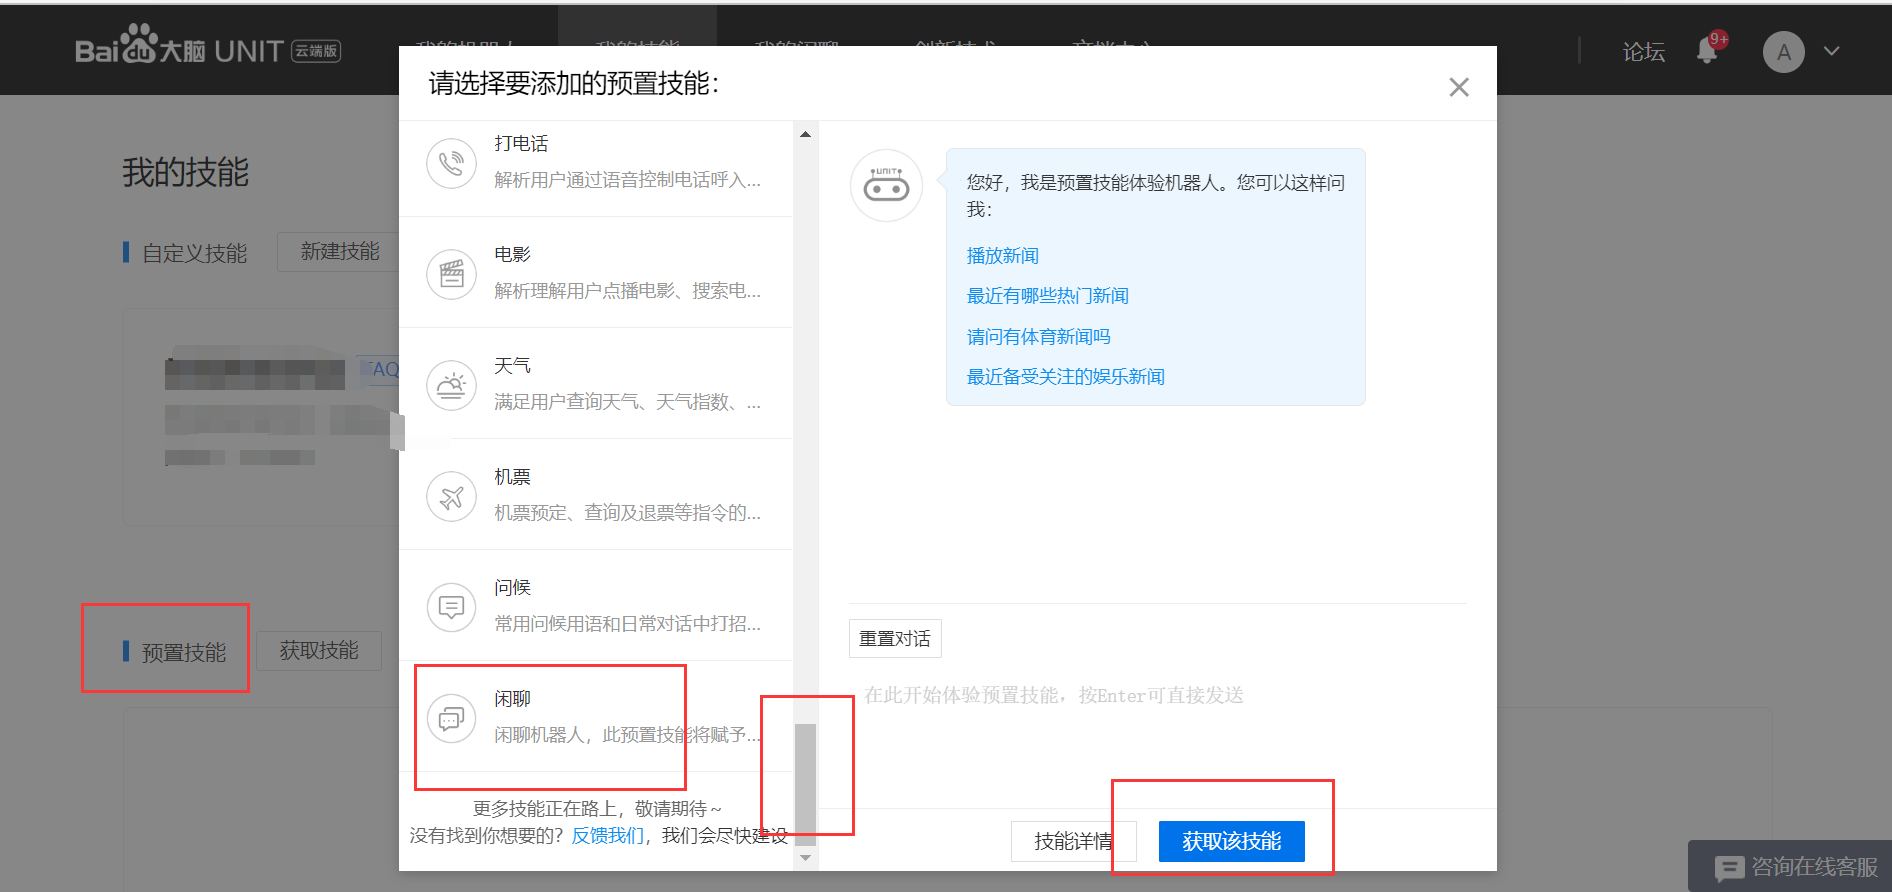
(3)、可以选择预置技能 -> 进度条拉到最后 -> 闲聊功能 ->获取该技能
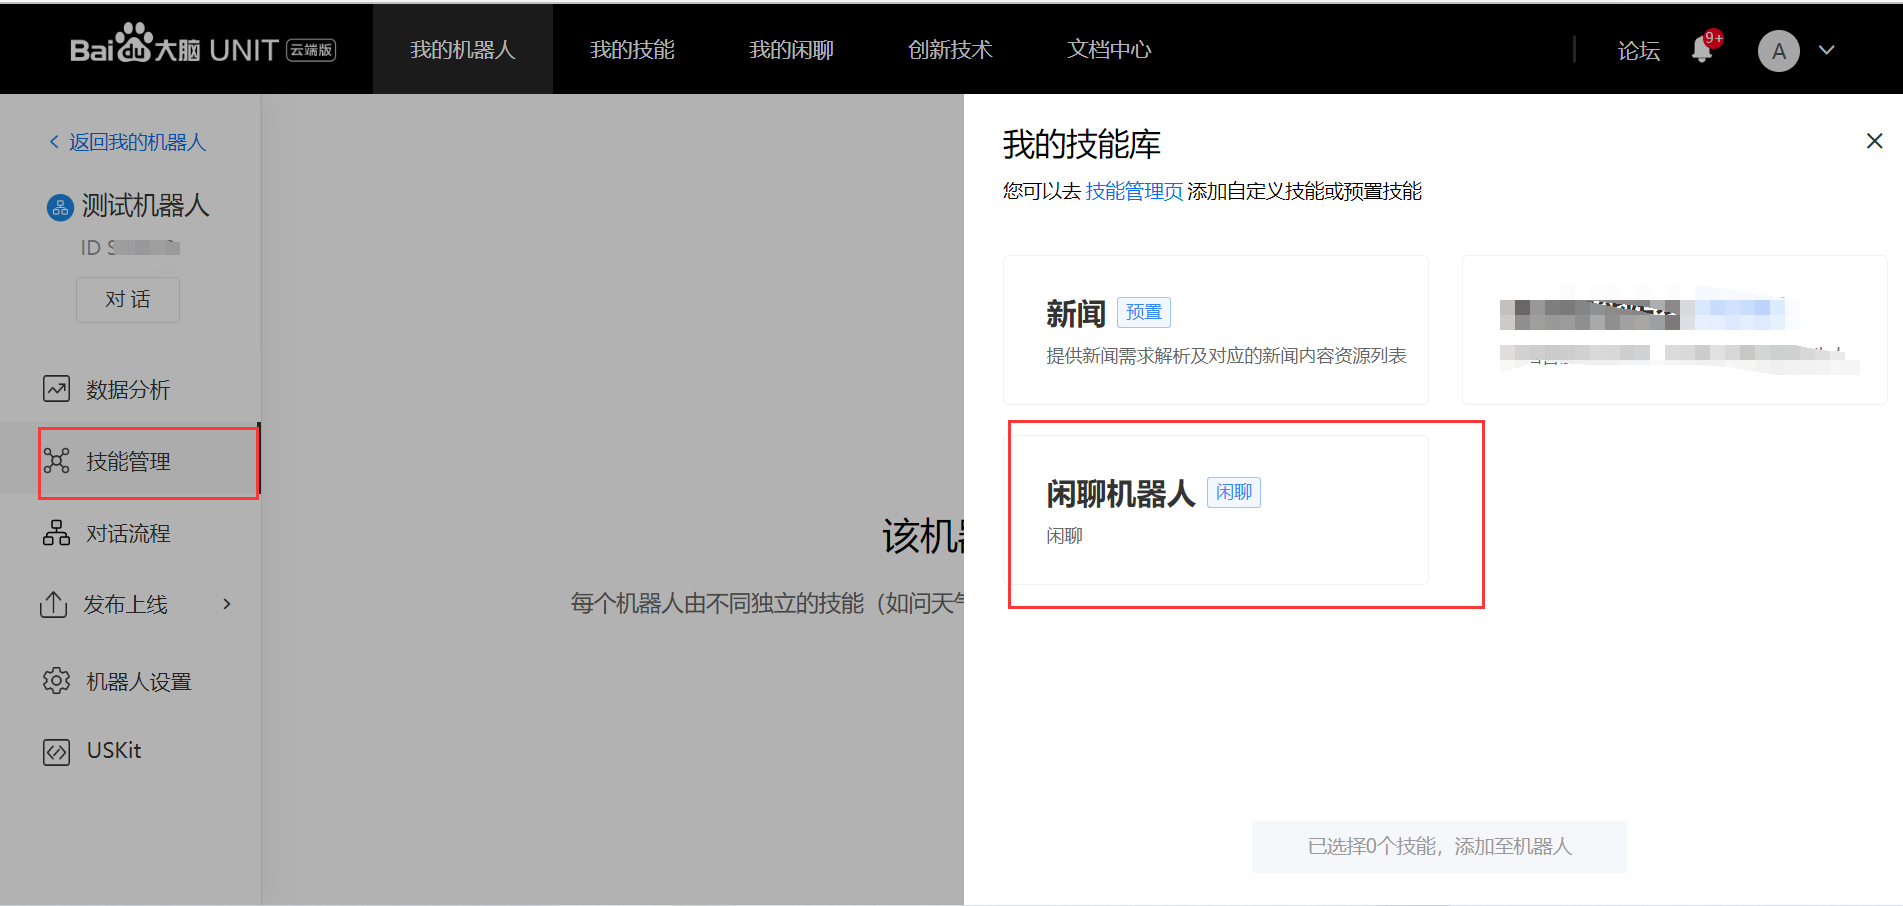
(4)、技能管理 ->将闲聊机器人添加到技能中
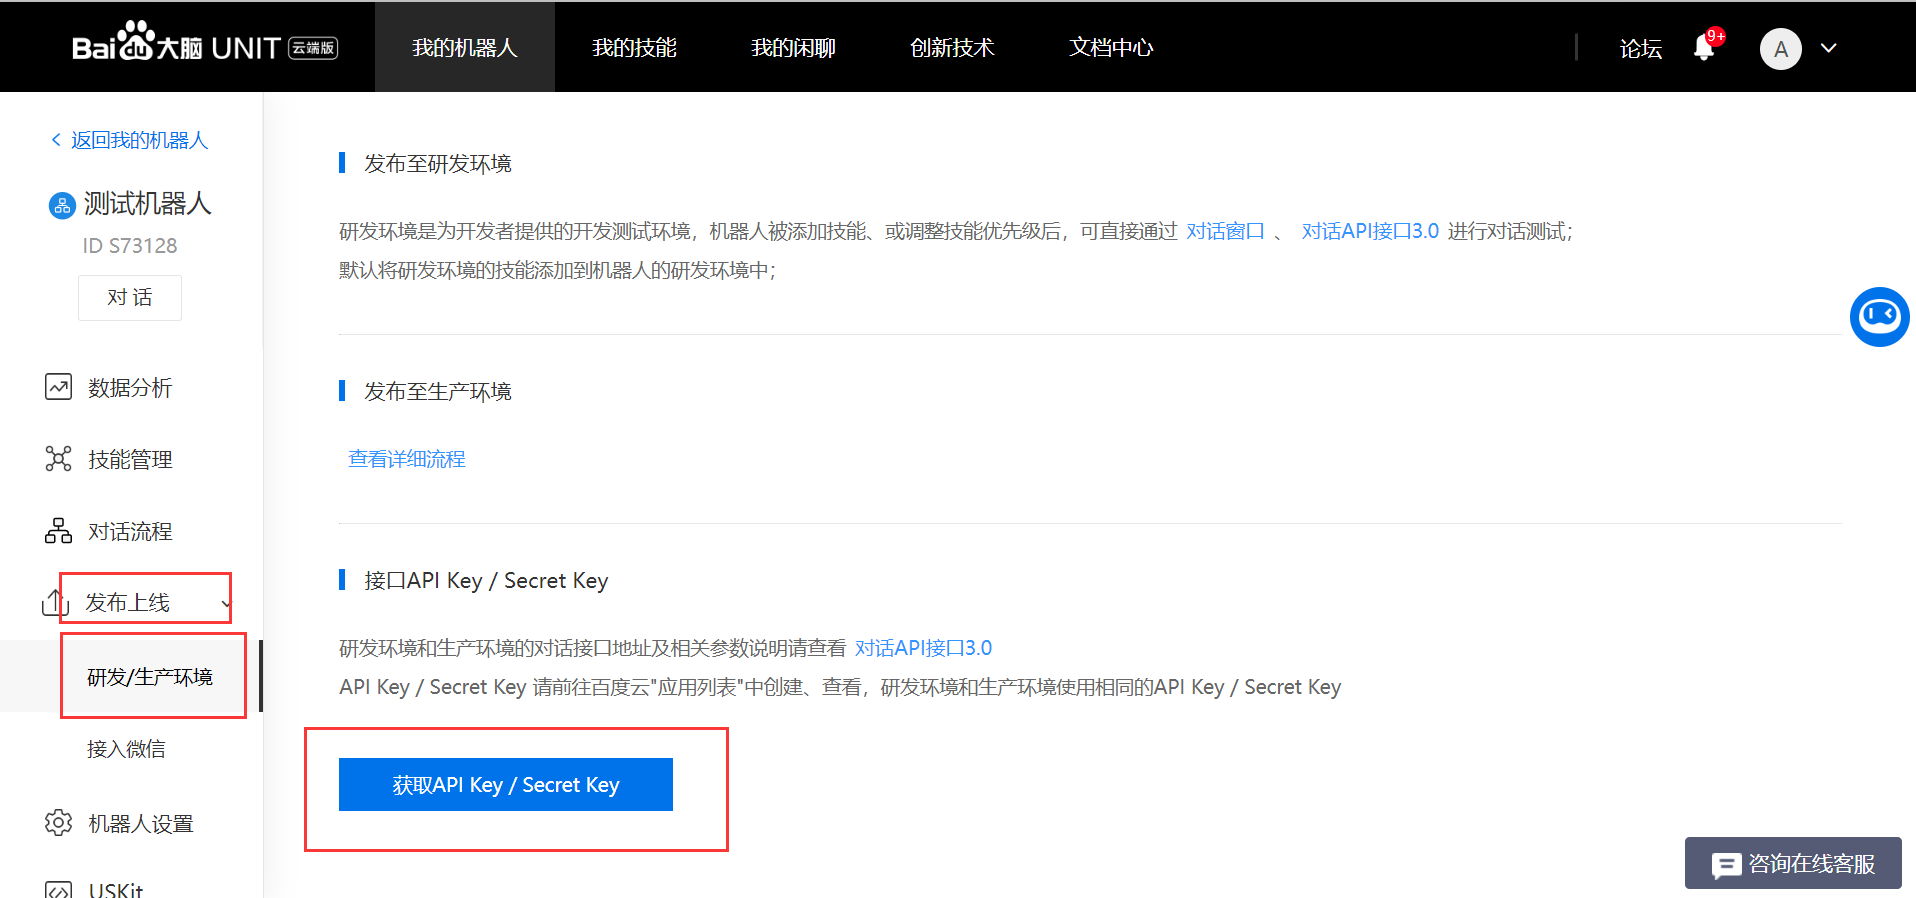
(5)、发布上线 -> 研发环境 ->获取API key / Secret Key
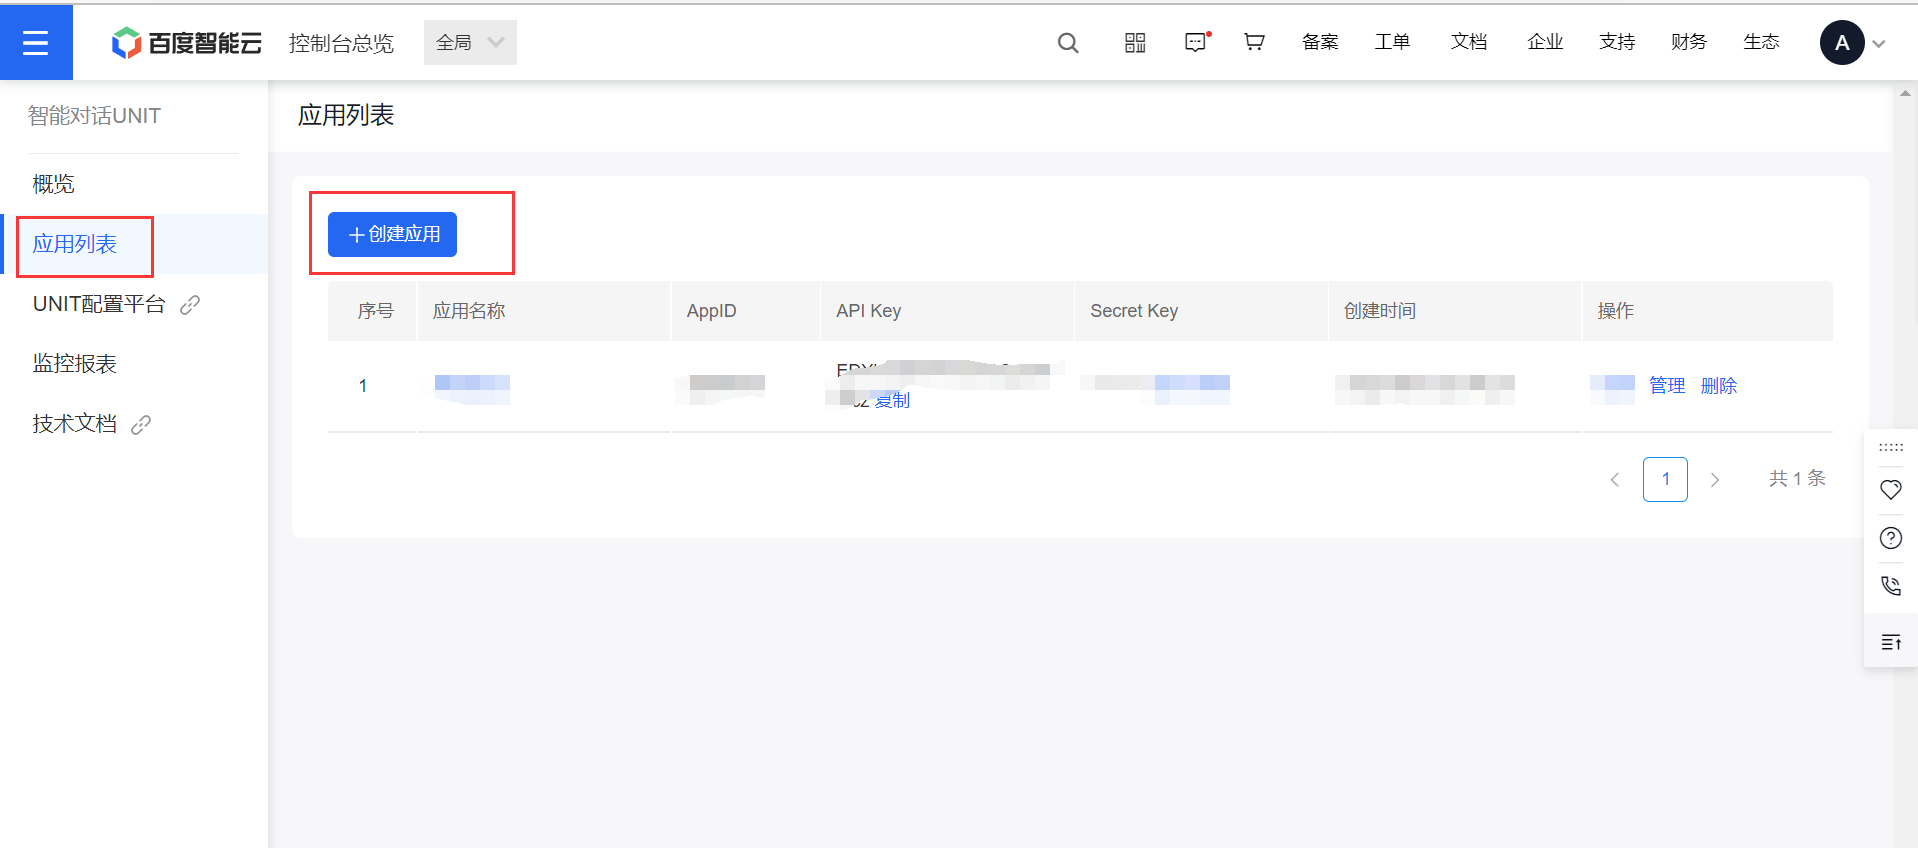
(6)、应用列表 -> 创建应用
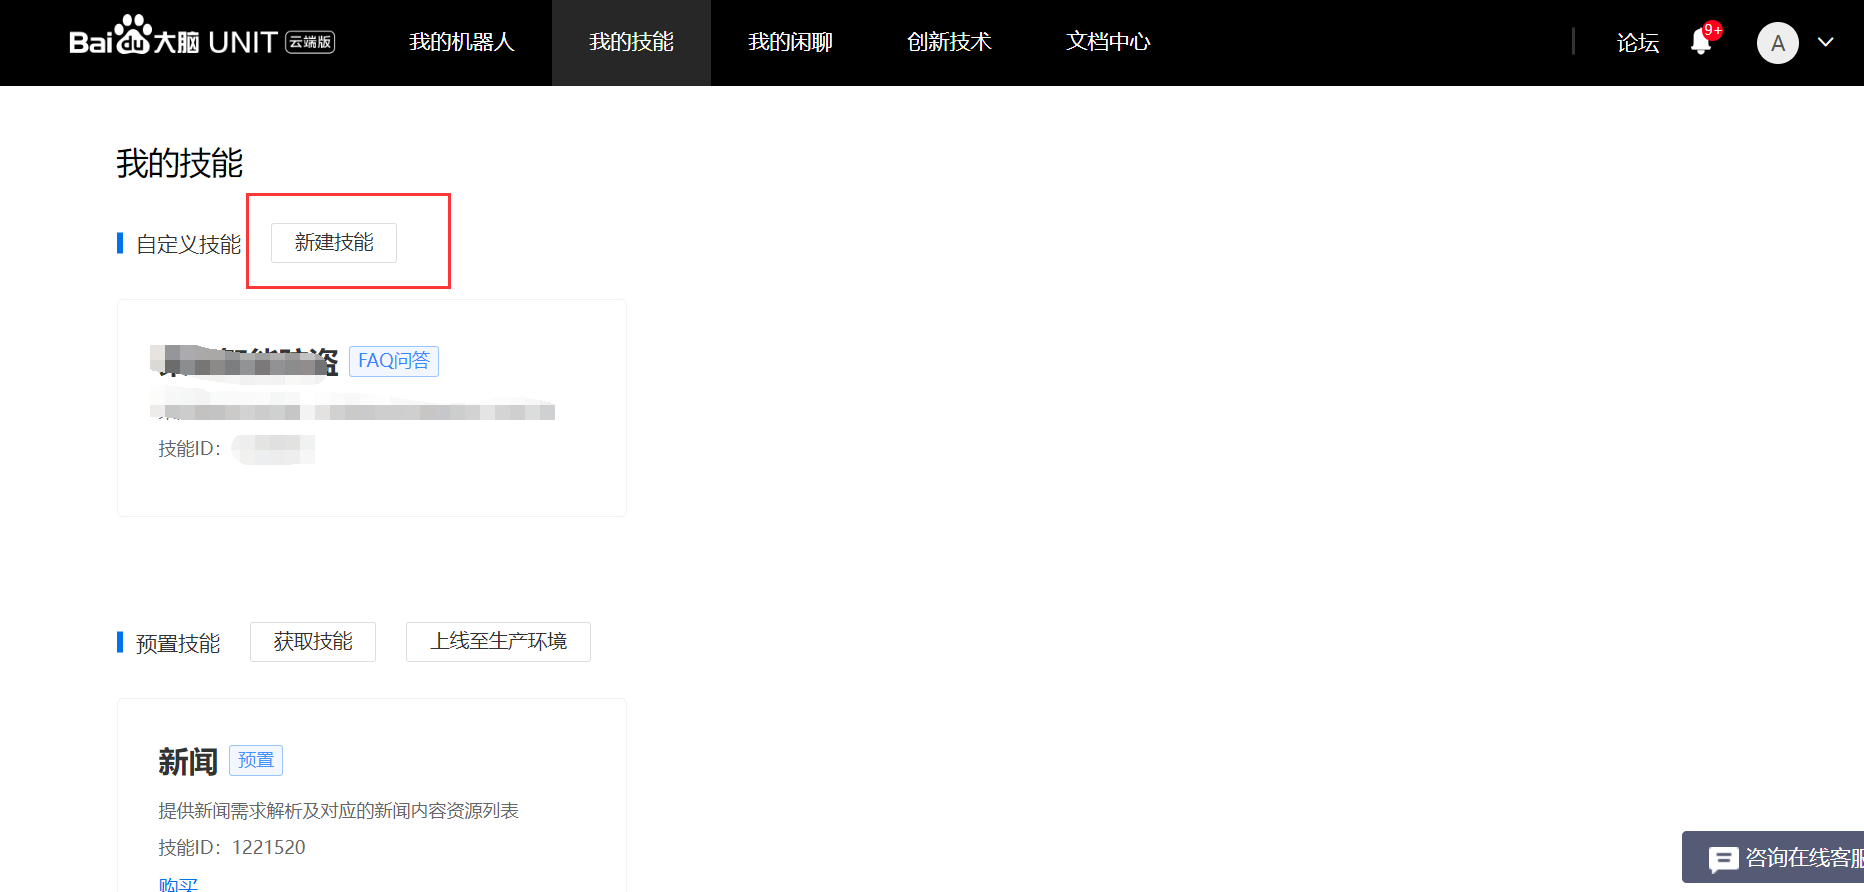
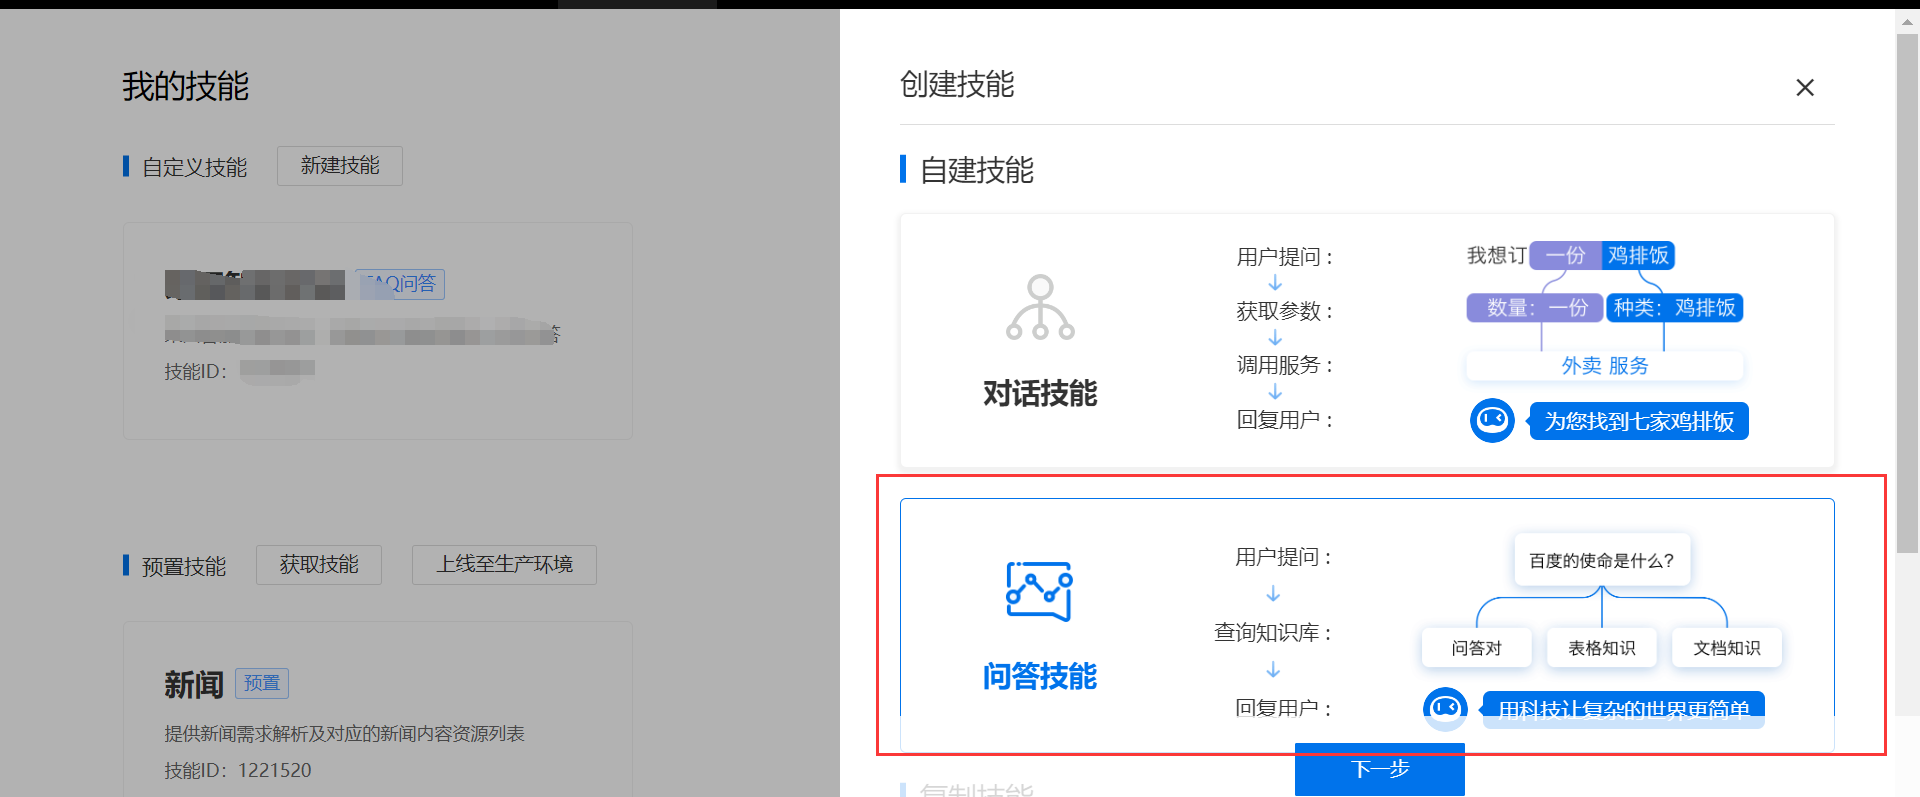
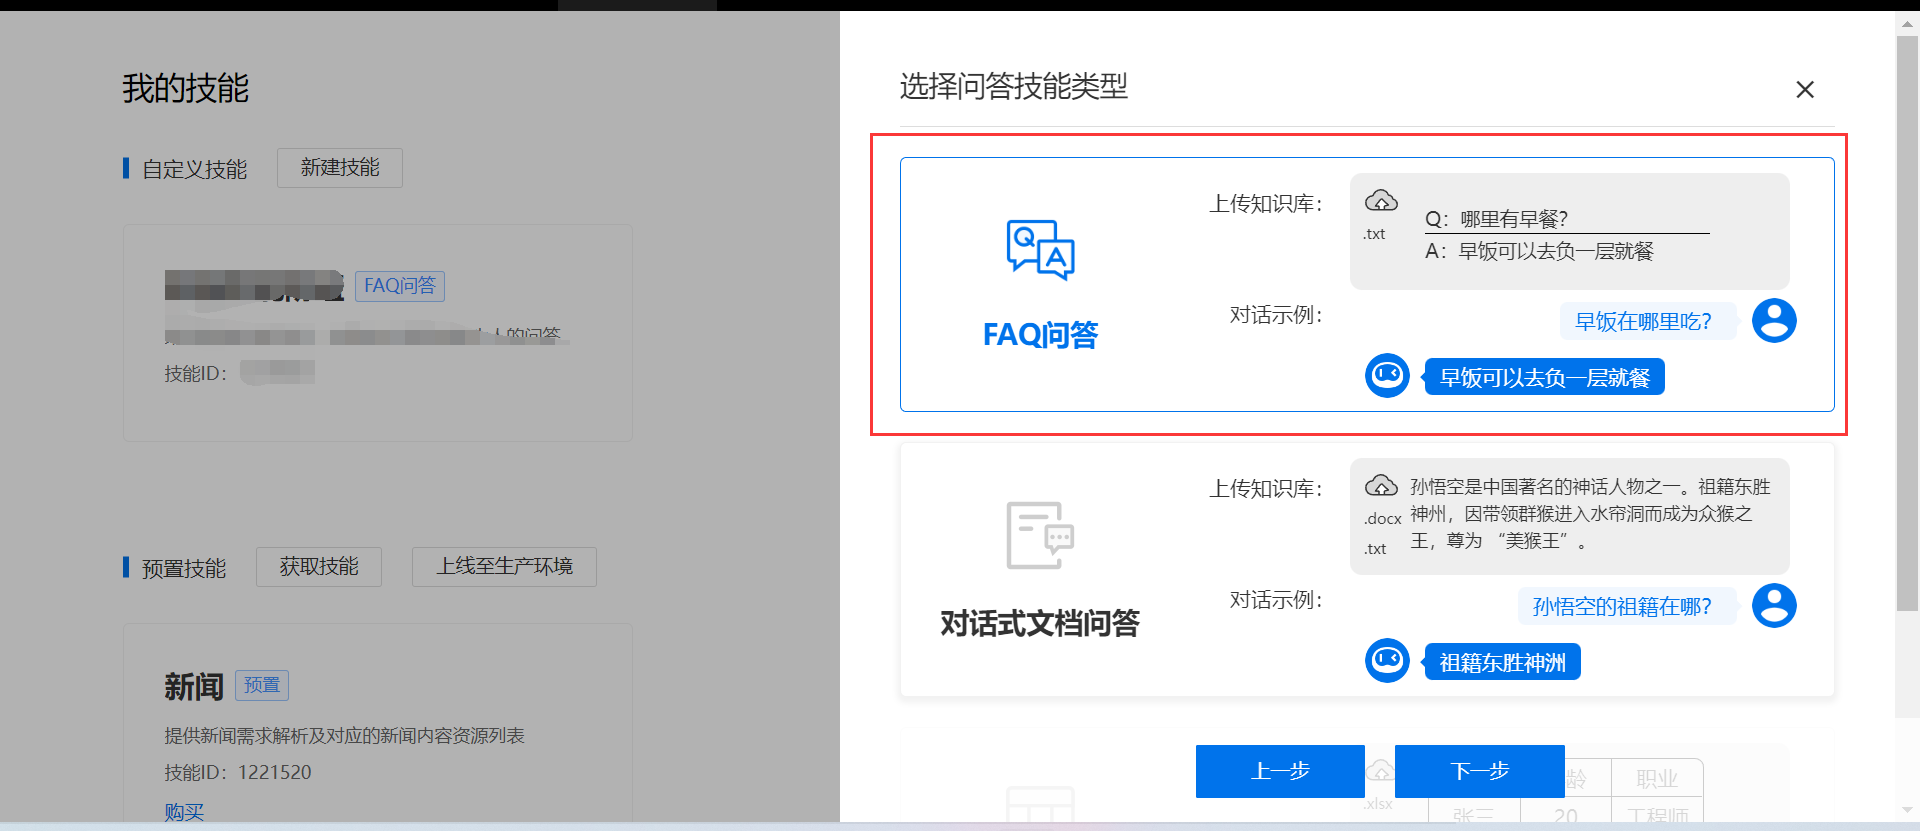
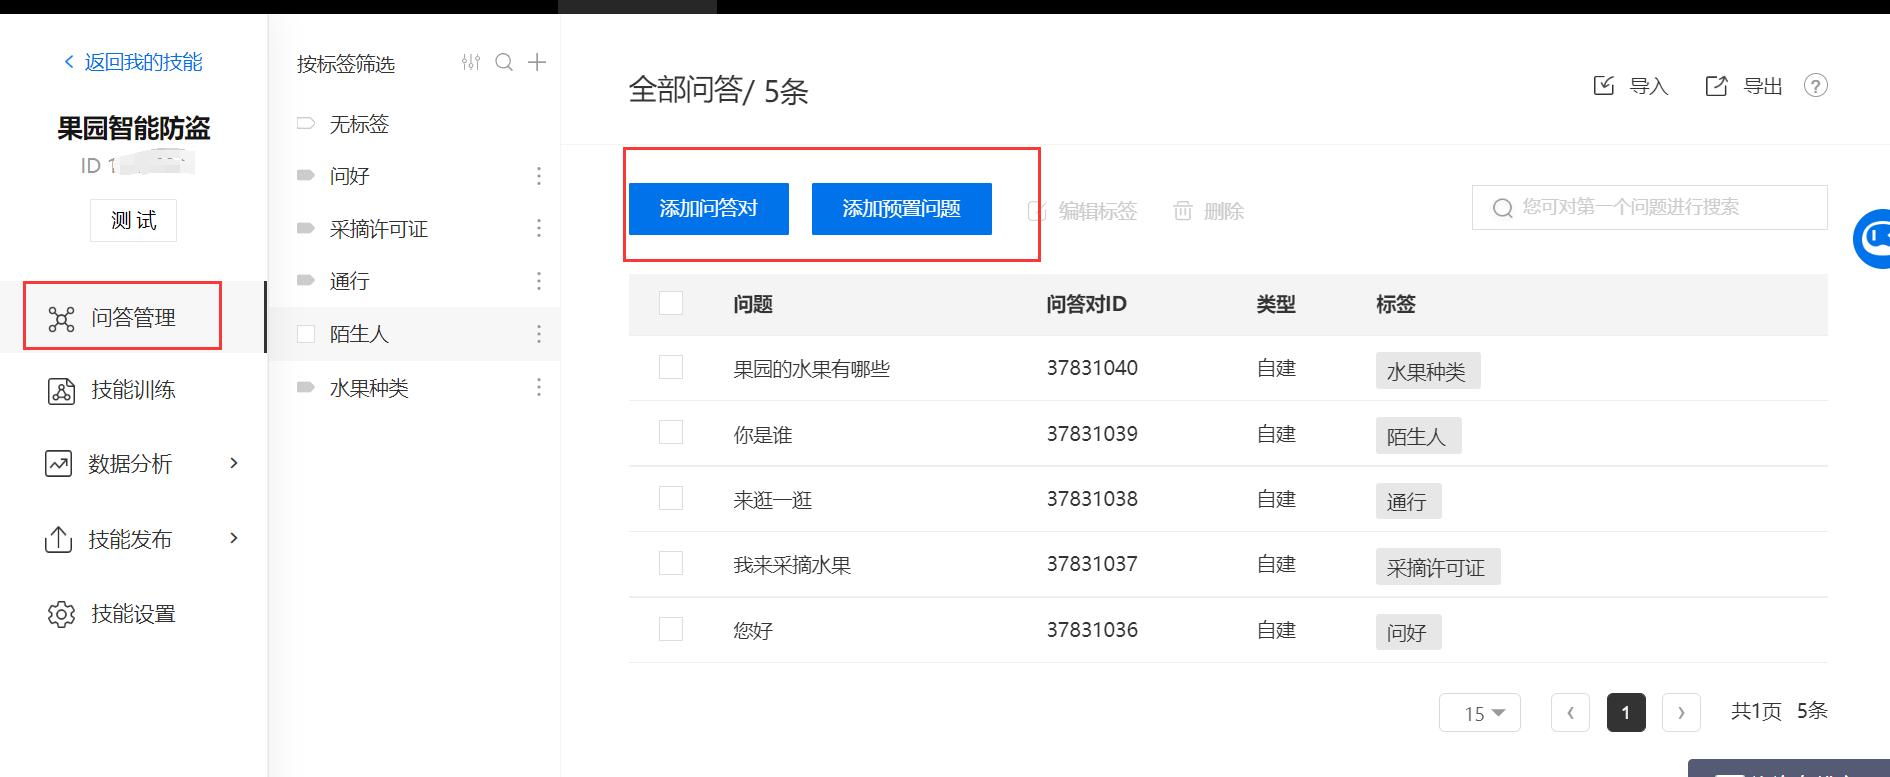
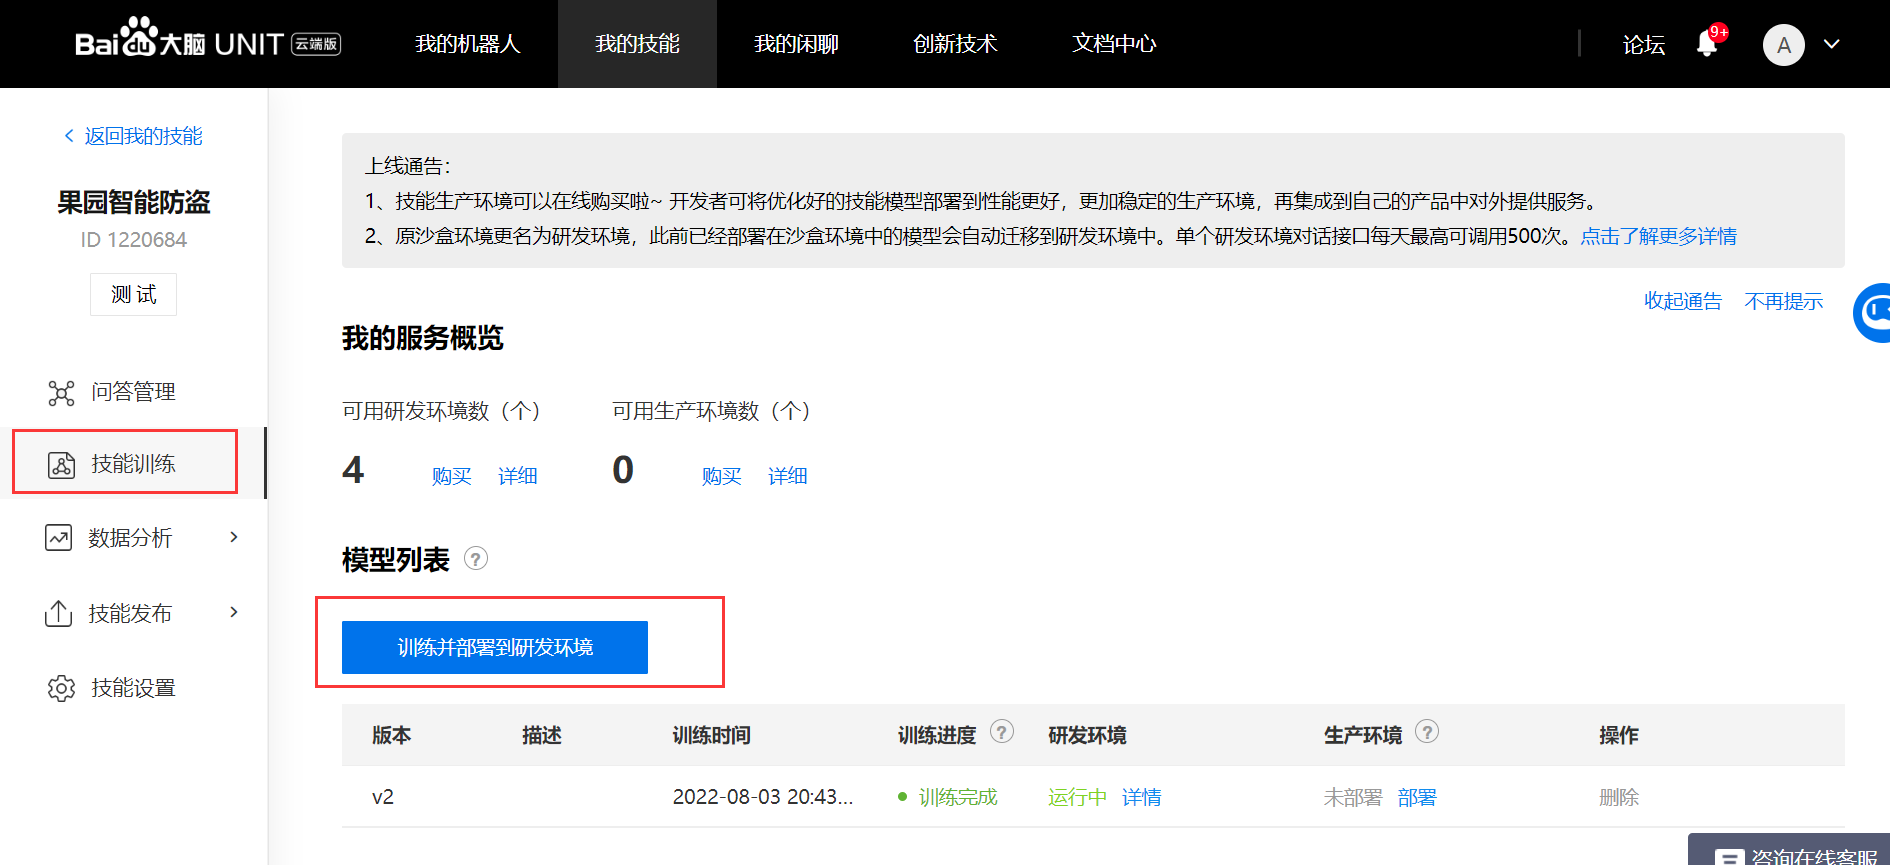
2、新建机器人并添加自定义技能步骤
二、代码
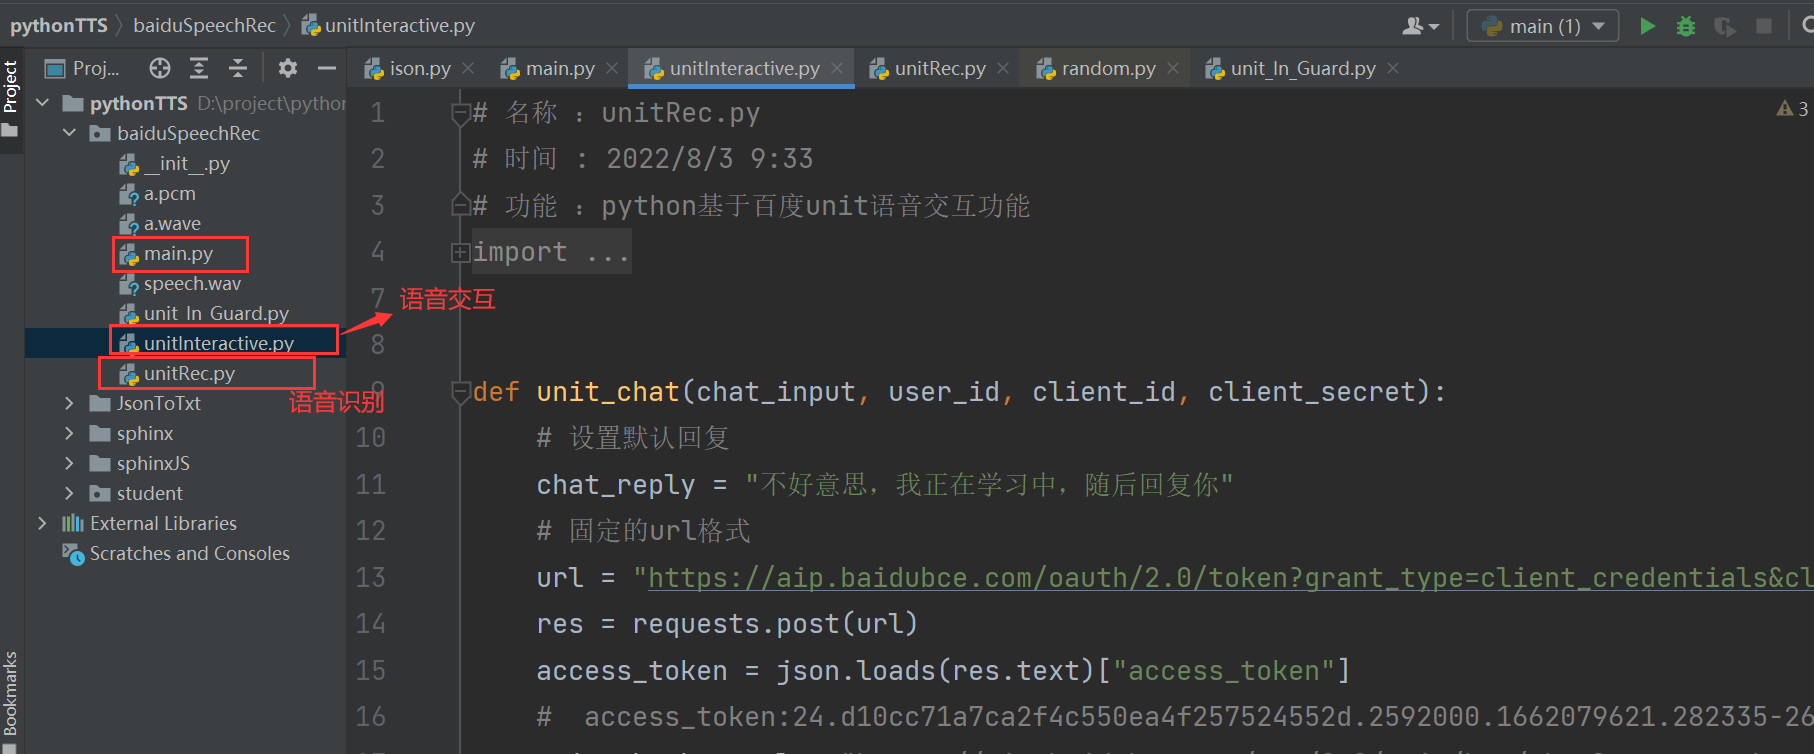
unitRec.py:
# 名称 :unitRec.py

# 时间 : 2022/8/3 9:33

# 功能 :python基于百度unit语音识别功能

import wave

import requests

import time

import base64

from pyaudio import PyAudio, paInt16

import webbrowser

framerate = 16000  # 采样率

num_samples = 2000  # 采样点

channels = 1  # 声道

sampwidth = 2  # 采样宽度2bytes

def getToken(host):

    res = requests.post(host)

    return res.json()['access_token']

def save_wave_file(filepath, data):

    wf = wave.open(filepath, 'wb')

    wf.setnchannels(channels)

    wf.setsampwidth(sampwidth)

    wf.setframerate(framerate)

    wf.writeframes(b''.join(data))

    wf.close()

def my_record(FILEPATH):

    pa = PyAudio()

    stream = pa.open(format=paInt16, channels=channels,

                     rate=framerate, input=True, frames_per_buffer=num_samples)

    my_buf = []

    # count = 0

    t = time.time()

    # print('正在录音...')

    while time.time() < t + 3:  # 秒

        string_audio_data = stream.read(num_samples)

        my_buf.append(string_audio_data)

    # print('录音结束.')

    save_wave_file(FILEPATH, my_buf)

    stream.close()

def get_audio(file):

    with open(file, 'rb') as f:

        data = f.read()

    return data

def speech2text(speech_data, token, dev_pid):

    FORMAT = 'wav'

    RATE = '16000'

    CHANNEL = 1

    CUID = '*******'

    SPEECH = base64.b64encode(speech_data).decode('utf-8')

    data = {

        'format': FORMAT,

        'rate': RATE,

        'channel': CHANNEL,

        'cuid': CUID,

        'len': len(speech_data),

        'speech': SPEECH,

        'token': token,

        'dev_pid': dev_pid

    }

    url = 'https://vop.baidu.com/server_api'

    headers = {'Content-Type': 'application/json'}

    # r=requests.post(url,data=json.dumps(data),headers=headers)

    # print('正在识别...')

    r = requests.post(url, json=data, headers=headers)

    Result = r.json()

    if 'result' in Result:

        return Result['result'][0]

    else:

        return Result

def openbrowser(text):

    maps = {

        '百度': ['百度', 'baidu'],

        '腾讯': ['腾讯', 'tengxun'],

        '网易': ['网易', 'wangyi']

    }

    if text in maps['百度']:

         webbrowser.open_new_tab('https://www.baidu.com')

    elif text in maps['腾讯']:

        webbrowser.open_new_tab('https://www.qq.com')

    elif text in maps['网易']:

        webbrowser.open_new_tab('https://www.163.com/')

    else:

        webbrowser.open_new_tab('https://www.baidu.com/s?wd=%s' % text)
unitInteractive.py:
# 名称 :unitInteractive.py

# 时间 : 2022/8/3 9:33

# 功能 :python基于百度unit语音交互功能

import json

import random

import requests

def unit_chat(chat_input, user_id, client_id, client_secret):

    # 设置默认回复

    chat_reply = "不好意思,我正在学习中,随后回复你"

    # 固定的url格式

    url = "https://aip.baidubce.com/oauth/2.0/token?grant_type=client_credentials&client_id=%s&client_secret=%s"%(client_id, client_secret)

    res = requests.post(url)

    access_token = json.loads(res.text)["access_token"]

    #  access_token:24.d10cc71a7ca2f4c550ea4f257524552d.2592000.1662079621.282335-26807073

    unit_chatbot_url = "https://aip.baidubce.com/rpc/2.0/unit/bot/chat?access_token=" + access_token

    # 拼装聊天接口对应请求

    post_data = {

                    "log_id": str(random.random()),  # 登陆的id,是什么不重要,我们用随机数生成一个id即可

                    "request": {

                        "query": chat_input,  # 用户输入的内容

                        "user_id": user_id    # 用户id

                    },

                    "session_id": "",
            # 机器人ID:机器人下面带着的id

                    "service_id": "****",

                    "version": "2.0",

                    "encode": "utf-8",

                    # 技能id 闲聊ID: 12****  防盗系统ID:12****

                    "bot_id": "1220***",

                }

    # 将聊天接口对应请求数据转为json数据

    res = requests.post(url=unit_chatbot_url, json=post_data)

    # 获取聊天接口返回数据

    unit_chat_obj = json.loads(res.content)

    # print(unit_chat_obj)

    # 判断聊天接口返回数据是否出错(error_code == 0则表示请求正确)

    if unit_chat_obj["error_code"] != 0:

        return chat_reply

    # 解析聊天接口返回数据,找到返回文本内容 result -> response -> action_list -> say

    unit_chat_obj_result = unit_chat_obj["result"]

    # print(unit_chat_obj_result)

    unit_chat_response = unit_chat_obj_result["response"]

    unit_chat_response_schema = unit_chat_response["schema"]

    # print(unit_chat_response_schema.slots)

    unit_chat_response_slots_list = unit_chat_response_schema["slots"]

    unit_chat_response_slots_obj = random.choice(unit_chat_response_slots_list)

    unit_chat_response_reply = unit_chat_response_slots_obj["normalized_word"]

    return unit_chat_response_reply

# if __name__ == "__main__":

#     while True:

#         chat_input = input("请输入:")

#         if chat_input == 'Bye' or chat_input == "bye":

#             break

#         chat_reply = unit_chat(chat_input)

#         print("Unit:", chat_reply)
main.py:
# 名称 : mian.py
# 时间 : 2022/8/3 9:33

# 功能 :主函数

import unitRec

import unit_In_Guard as UI

import pyttsx3

base_url = "https://openapi.baidu.com/oauth/2.0/token?grant_type=client_credentials&client_id=%s&client_secret=%s"

# 填写自己的语音识别接口key和secretkey
# 语音识别百度unit网址:https://console.bce.baidu.com/ai/#/ai/speech/app/list


APIKey = "oPm6vuaOKjFwr8tOBq***"

SecretKey = "cidsvzuO75snttKOnTmtw****"

# 填写自己的语音交互key和secretkey
# 语音交互百度unit网址:https://ai.baidu.com/unit/v2#/myrobot


client_id = "EDYbuiSbkYK1skiG****"

client_key = "HLhTqZ4zDl1B4coeRG7xj***

HOST = base_url % (APIKey, SecretKey)

FILEPATH = 'speech.wav'

# 语音ttx初始化

engine = pyttsx3.init()

if __name__ == '__main__':

    while True:

        # devpid = input('1536:普通话(简单英文),1537:普通话(有标点),1737:英语,1637:粤语,1837:四川话\n')

        print('请普通话语音输入: ')

        unitRec.my_record(FILEPATH)

        TOKEN = unitRec.getToken(HOST)

        speech = unitRec.get_audio(FILEPATH)

        # 设置语音输入默认为普通话 int(devpid) = 1537

        result = unitRec.speech2text(speech, TOKEN, 1537)

        if 'result' in result:

            print(result['result'][0])

        else:

            print("语音输入内容: ", result)

        chat_input = result

        if chat_input == '拜拜' or chat_input == "拜。":

            break

        user_id = "88888"  # 默认user_id都为88888

        chat_reply = UI.unit_chat(chat_input, user_id, client_id, client_key)

        print("交互输出: ", chat_reply)

        engine.say(chat_reply)  # 合成并播放语音

        engine.runAndWait()  # 等待语音播放完
三、反思
(1)可使用postman查看接口是否调通
(2)交互接口返回的json格式有区别,注意打印调试
(3)语音播放使用Python中的TTS
python基于百度unit实现语音识别与语音交互的更多相关文章
- python基于百度AI开发文字识别
很多场景都会用到文字识别,比如app或者网站里都会上传身份证等证件以及财务系统识别报销证件等等 第一步,你需要去百度AI里去注册一个账号,然后新建一个文字识别的应用 然后你将得到一个API Key 和 ...
- 使用Python基于百度等OCR API的文字识别
百度OCR Baidu OCR API:一定额度免费,目前是每日500次 Python SDK文档:https://cloud.baidu.com/doc/OCR/OCR-Python-SDK.htm ...
- ros下基于百度语音的,语音识别和语音合成
代码地址如下:http://www.demodashi.com/demo/13153.html 概述: 本demo是ros下基于百度语音的,语音识别和语音合成,能够实现文字转语音,语音转文字的功能. ...
- 基于百度语音识别API的Python语音识别小程序
一.功能概述 实现语音为文字,可以扩展到多种场景进行工作,这里只实现其基本的语言接收及转换功能. 在语言录入时,根据语言内容的多少与停顿时间,自动截取音频进行转换. 工作示例: 二.软件环境 操作系统 ...
- Python人工智能-基于百度AI接口
参考百度AI官网:http://ai.baidu.com/ 准备工作: 支持Python版本:2.7.+ ,3.+ 安装使用Python SDK有如下方式 >如果已经安装了pip,执行 pip ...
- Python使用websocket调用语音识别,语音转文字
@ 目录 0. 太长不看系列,直接使用 1. Python调用标贝科技语音识别websocket接口,实现语音转文字 1.1 环境准备: 1.2 获取权限 1.2.1 登录 1.2.2 创建新应用 1 ...
- 基于flask和百度AI接口实现前后端的语音交互
话不多说,直接怼代码,有不懂的,可以留言 简单的实现,前后端的语音交互. import os from uuid import uuid4 from aip import AipSpeech from ...
- 从零开始实现基于微信JS-SDK的录音与语音评价功能
最近接受了一个新的需求,希望制作一个基于微信的英语语音评价页面.即点击录音按钮,用户录音说出预设的英文,根据用户的发音给出对应的评价.以下是简单的Demo: 人脸识别 在Web界面上传人的照片,后台使用Java技术接收图片,然后对图片进行解码,调用云平台接口识别人脸特征,接收平台返回的人员年龄.性别.颜 ...
- python使用vosk进行中文语音识别
操作系统:Windows10 Python版本:3.9.2 vosk是一个离线开源语音识别工具,它可以识别16种语言,包括中文. 这里记录下使用vosk进行中文识别的过程,以便后续查阅. vosk地址 ...
随机推荐
- python_pandas常用操作
df:任意的Pandas DataFrame对象 s:任意的Pandas Series对象 raw:行标签 col:列标签 导入依赖包: import pandas as pd import nump ...
- flutter tabbar指示器indicator宽度高度自定义
在tabbar中indicator宽度是无法修改的,所以需要咱们去自定义indicator. 下面是自定义的代码,直接拷贝使用,已做好修改. // Copyright 2018 The Chromiu ...
- k8s中pv和pvc
转载: https://blog.csdn.net/echizao1839/article/details/125766826
- AWT+Swing区别
AWT 是Abstract Window ToolKit (抽象窗口工具包)的缩写,这个工具包提供了一套与本地图形界面进行交互的接口.AWT 中的图形函数与操作系统所提供的图形函数之间有着一一对应的关 ...
- 用FineBI实现hive图表的可视化
图表的可视化,本来我以为很麻烦,因为看着图就感觉很难的样子,其实用FineBI来做很简单. 1.安装FineBI 2将下列jar包导入FineBI,webapps\webroot\WEB-INF\li ...
- MybatisPlus #{param}和${param}的用法详解
作用 mybatis-plus接口mapper方法中的注解(如@Select)或者xml(如)传入的参数是通过#{param}或者${param}来获取值. 区别 1.解析方式: #{param}:会 ...
- 【服务器数据恢复】VSAN节点容量盘故障离线的数据恢复案例
VSAN简介:VSAN是以vSphere内核为基础开发,可以扩展使用的分布式存储架构.该架构在vSphere集群主机中安硬盘及闪存构建VSAN存储层,通过存储进行管理与控制,最终形成一个共享存储层.V ...
- img,video标签禁用鼠标右键功能
场景描述: 在网页中显示图片,当用户右键点击图片时,禁止用户右键操作. 这里会用到一个新属性,即 oncontextmenu. 例如: <img src="图片地址" cla ...
- vbox批量管理工具 VirtualBox硬件级虚拟机大众网络版v2019/v2020/v2021 免费版下载地址
浪潮vbox批量管理器-基础网络版 大众版 免费版 免激活码 免注册码 V2021下载地址: https://d1.crsky.com/software2/20210107/VBoxMgr_v2 ...
- form 表单中input 使用disable属性
记录一下今天踩得坑. 在使用form表单提交的时候,input用了disable属性,在查找了好久之后,找到原因,万万没想到是因为disable. 修改方法:disable改为readonly dis ...
