ShardingSphere-proxy-5.0.0分布式雪花ID生成(三)
一、目的
保证在分库分表中每条数据具有唯一性
二、修改配置文件config-sharding.yaml,并重启服务
- #
- # Licensed to the Apache Software Foundation (ASF) under one or more
- # contributor license agreements. See the NOTICE file distributed with
- # this work for additional information regarding copyright ownership.
- # The ASF licenses this file to You under the Apache License, Version 2.0
- # (the "License"); you may not use this file except in compliance with
- # the License. You may obtain a copy of the License at
- #
- # http://www.apache.org/licenses/LICENSE-2.0
- #
- # Unless required by applicable law or agreed to in writing, software
- # distributed under the License is distributed on an "AS IS" BASIS,
- # WITHOUT WARRANTIES OR CONDITIONS OF ANY KIND, either express or implied.
- # See the License for the specific language governing permissions and
- # limitations under the License.
- #
- ######################################################################################################
- #
- # Here you can configure the rules for the proxy.
- # This example is configuration of sharding rule.
- #
- ######################################################################################################
- #
- #schemaName: sharding_db
- #
- #dataSources:
- # ds_0:
- # url: jdbc:postgresql://127.0.0.1:5432/demo_ds_0
- # username: postgres
- # password: postgres
- # connectionTimeoutMilliseconds: 30000
- # idleTimeoutMilliseconds: 60000
- # maxLifetimeMilliseconds: 1800000
- # maxPoolSize: 50
- # minPoolSize: 1
- # ds_1:
- # url: jdbc:postgresql://127.0.0.1:5432/demo_ds_1
- # username: postgres
- # password: postgres
- # connectionTimeoutMilliseconds: 30000
- # idleTimeoutMilliseconds: 60000
- # maxLifetimeMilliseconds: 1800000
- # maxPoolSize: 50
- # minPoolSize: 1
- #
- #rules:
- #- !SHARDING
- # tables:
- # t_order:
- # actualDataNodes: ds_${0..1}.t_order_${0..1}
- # tableStrategy:
- # standard:
- # shardingColumn: order_id
- # shardingAlgorithmName: t_order_inline
- # keyGenerateStrategy:
- # column: order_id
- # keyGeneratorName: snowflake
- # t_order_item:
- # actualDataNodes: ds_${0..1}.t_order_item_${0..1}
- # tableStrategy:
- # standard:
- # shardingColumn: order_id
- # shardingAlgorithmName: t_order_item_inline
- # keyGenerateStrategy:
- # column: order_item_id
- # keyGeneratorName: snowflake
- # bindingTables:
- # - t_order,t_order_item
- # defaultDatabaseStrategy:
- # standard:
- # shardingColumn: user_id
- # shardingAlgorithmName: database_inline
- # defaultTableStrategy:
- # none:
- #
- # shardingAlgorithms:
- # database_inline:
- # type: INLINE
- # props:
- # algorithm-expression: ds_${user_id % 2}
- # t_order_inline:
- # type: INLINE
- # props:
- # algorithm-expression: t_order_${order_id % 2}
- # t_order_item_inline:
- # type: INLINE
- # props:
- # algorithm-expression: t_order_item_${order_id % 2}
- #
- # keyGenerators:
- # snowflake:
- # type: SNOWFLAKE
- # props:
- # worker-id: 123
- ######################################################################################################
- #
- # If you want to connect to MySQL, you should manually copy MySQL driver to lib directory.
- #
- ######################################################################################################
- # 连接mysql所使用的数据库名
- schemaName: MyDb
- dataSources:
- ds_0:
- url: jdbc:mysql://127.0.0.1:3306/MyDb?serverTimezone=UTC&useSSL=false
- username: root # 数据库用户名
- password: mysql123 # 登录密码
- connectionTimeoutMilliseconds: 30000
- idleTimeoutMilliseconds: 60000
- maxLifetimeMilliseconds: 1800000
- maxPoolSize: 50
- minPoolSize: 1
- # ds_1:
- # url: jdbc:mysql://127.0.0.1:3306/demo_ds_1?serverTimezone=UTC&useSSL=false
- # username: root
- # password:
- # connectionTimeoutMilliseconds: 30000
- # idleTimeoutMilliseconds: 60000
- # maxLifetimeMilliseconds: 1800000
- # maxPoolSize: 50
- # minPoolSize: 1
- #
- # 规则
- rules:
- - !SHARDING
- tables:
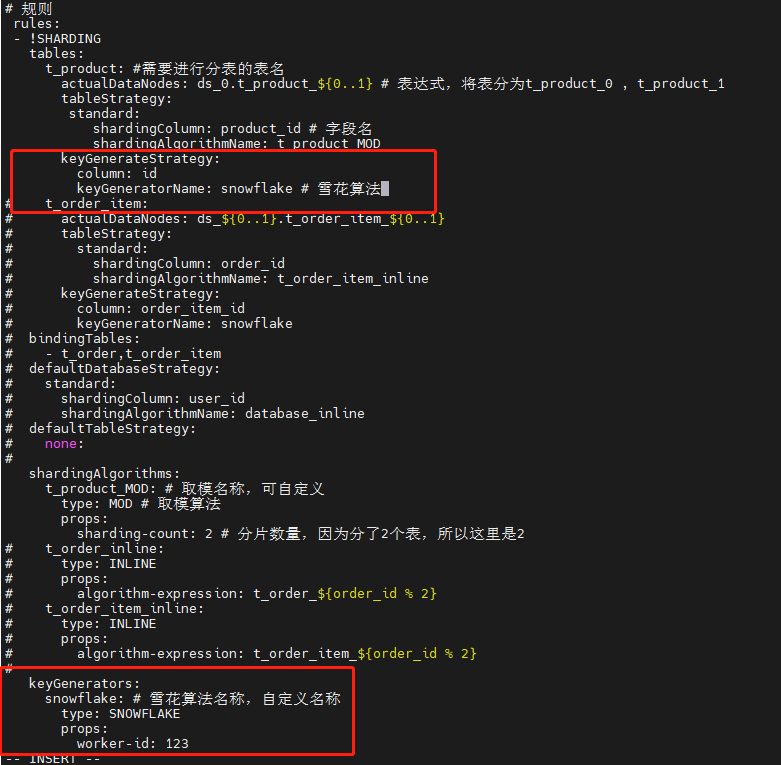
- t_product: #需要进行分表的表名
- actualDataNodes: ds_0.t_product_${0..1} # 表达式,将表分为t_product_0 , t_product_1
- tableStrategy:
- standard:
- shardingColumn: product_id # 字段名
- shardingAlgorithmName: t_product_MOD
- keyGenerateStrategy:
- column: id
- keyGeneratorName: snowflake #雪花算法
- # t_order_item:
- # actualDataNodes: ds_${0..1}.t_order_item_${0..1}
- # tableStrategy:
- # standard:
- # shardingColumn: order_id
- # shardingAlgorithmName: t_order_item_inline
- # keyGenerateStrategy:
- # column: order_item_id
- # keyGeneratorName: snowflake
- # bindingTables:
- # - t_order,t_order_item
- # defaultDatabaseStrategy:
- # standard:
- # shardingColumn: user_id
- # shardingAlgorithmName: database_inline
- # defaultTableStrategy:
- # none:
- #
- shardingAlgorithms:
- t_product_MOD: # 取模名称,可自定义
- type: MOD # 取模算法
- props:
- sharding-count: 2 # 分片数量,因为分了2个表,所以这里是2
- # t_order_inline:
- # type: INLINE
- # props:
- # algorithm-expression: t_order_${order_id % 2}
- # t_order_item_inline:
- # type: INLINE
- # props:
- # algorithm-expression: t_order_item_${order_id % 2}
- #
- keyGenerators:
- snowflake: # 雪花算法名称,自定义名称
- type: SNOWFLAKE
- props:
- worker-id: 123
三、数据准备
- -- 创建表
- SET NAMES utf8mb4;
- SET FOREIGN_KEY_CHECKS = 0;
- -- ----------------------------
- -- Table structure for t_product_0
- -- ----------------------------
- DROP TABLE IF EXISTS `t_product`;
- CREATE TABLE `t_product_0` (
- `id` varchar(225) CHARACTER SET utf8mb4 COLLATE utf8mb4_general_ci NOT NULL,
- `product_id` int(11) NOT NULL,
- `product_name` varchar(255) CHARACTER SET utf8mb4 COLLATE utf8mb4_general_ci NOT NULL,
- PRIMARY KEY (`id`, `product_id`) USING BTREE
- ) ENGINE = InnoDB CHARACTER SET = utf8mb4 COLLATE = utf8mb4_general_ci ROW_FORMAT = Dynamic;
- SET FOREIGN_KEY_CHECKS = 1;
- -- 插入表数据
- INSERT INTO t_product(product_id,product_name) VALUES(1,'apple');
- INSERT INTO t_product(product_id,product_name) VALUES(2,'banana');
四、查看数据
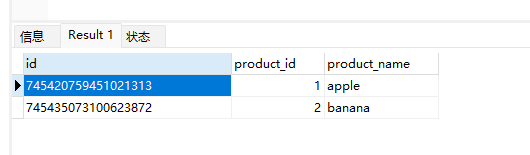
1、查看shardingsphere中间件t_product表数据,其中id字段会自动生成唯一id
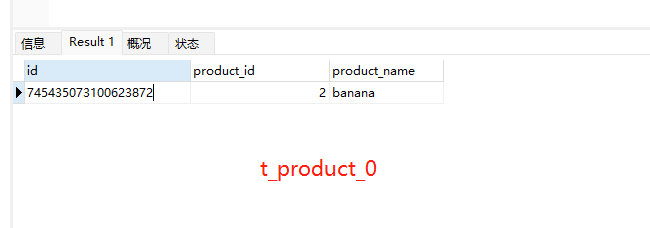
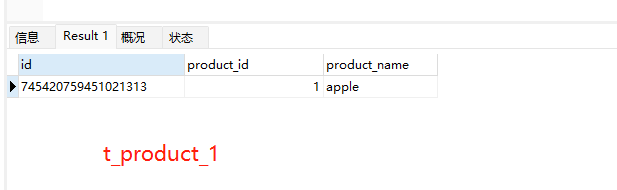
2、查看t_product_0、t_product_1表数据,同时对数据进行了分表存储(因为配置文件中有做分表配置)
ShardingSphere-proxy-5.0.0分布式雪花ID生成(三)的更多相关文章
- 分布式唯一ID生成算法-雪花算法
在我们的工作中,数据库某些表的字段会用到唯一的,趋势递增的订单编号,我们将介绍两种方法,一种是传统的采用随机数生成的方式,另外一种是采用当前比较流行的“分布式唯一ID生成算法-雪花算法”来实现. 一. ...
- 开源项目|Go 开发的一款分布式唯一 ID 生成系统
原文连接: 开源项目|Go 开发的一款分布式唯一 ID 生成系统 今天跟大家介绍一个开源项目:id-maker,主要功能是用来在分布式环境下生成唯一 ID.上周停更了一周,也是用来开发和测试这个项目的 ...
- SnowFlakeId 分布式雪花id算法
package com.jn.baseservice.utils; import com.jn.baseservice.common.Number; import lombok.Getter; imp ...
- 分布式唯一ID生成方案选型!详细解析雪花算法Snowflake
分布式唯一ID 使用RocketMQ时,需要使用到分布式唯一ID 消息可能会发生重复,所以要在消费端做幂等性,为了达到业务的幂等性,生产者必须要有一个唯一ID, 需要满足以下条件: 同一业务场景要全局 ...
- 分布式全局ID生成方案
传统的单体架构的时候,我们基本是单库然后业务单表的结构.每个业务表的ID一般我们都是从1增,通过AUTO_INCREMENT=1设置自增起始值,但是在分布式服务架构模式下分库分表的设计,使得多个库或多 ...
- 分布式唯一ID生成方案是什么样的?(转)
一.前言 分布式系统中我们会对一些数据量大的业务进行分拆,如:用户表,订单表.因为数据量巨大一张表无法承接,就会对其进行分库分表. 但一旦涉及到分库分表,就会引申出分布式系统中唯一主键ID的生成问题, ...
- 一线大厂的分布式唯一ID生成方案是什么样的?
本人免费整理了Java高级资料,涵盖了Java.Redis.MongoDB.MySQL.Zookeeper.Spring Cloud.Dubbo高并发分布式等教程,一共30G,需要自己领取.传送门:h ...
- 分布式唯一ID生成服务
SNService是一款基于分布式的唯一ID生成服务,主要用于提供大数量业务数据建立唯一ID的需要;服务提供最低10K/s的唯一ID请求处理.如果你部署服务的CPU资源达到4核的情况下那该服务最低可以 ...
- 基于数据库构建分布式的ID生成方案
在分布式系统中,生成全局唯一ID,有很多种方案,但是在这多种方案中,每种方案都有有缺点,下面我们之针对通过常用数据库来生成分布式ID的方案,其它方法会在其它文中讨论: 1,RDBMS生成ID: 这里我 ...
随机推荐
- Docker操作容器2
Docker操作容器1:https://blog.csdn.net/Kevinnsm/article/details/ 1.如何更改docker容器中的配置文件(如nginx容器中的nginx.con ...
- 防抖-小程序-input输入频繁时搜索出bug
html: <input type="text" class="input_search" placeholder="搜索周边店铺" ...
- Codeforces Round #720 (Div. 2) B. Nastia and a Good Array(被坑好几次)1300
原题链接 Problem - B - Codeforces 题意 给一串数,要把任意两个相邻的数的最大公约数=1 每次可以进行一个操作: 取下标为i, j的数,和任意二数x,y,且min(ai,aj) ...
- Java语言学习day03--6月30日
今日内容介绍 1.变量 2.运算符 ###01变量概述 * A: 什么是变量? * a: 变量是一个内存中的小盒子(小容器),容器是什么?生活中也有很多容器,例如水杯是容器,用 ...
- properties、yml配置文件映射对象
1.properties文件内容映射到类对象(属性),如Resource目录下的1.properties文件已配置前缀为com.imooc.people相关的信息,然后: pom添加依赖:spring ...
- 攻防世界-MISC:give_you_flag
这是攻防世界新手练习区的第四题,题目如下: 点击附件一下载,打开后发现是一个gif动图 可以看到动图有一瞬间出现了一个二维码,找一个网站给他分离一下 得到一张不完整的二维码(然后就不知道该怎么办了,菜 ...
- FreeRTOS --(9)任务管理之启动调度器
转载自 https://blog.csdn.net/zhoutaopower/article/details/107057528 在使用 FreeRTOS 的时候,一般的,先创建若干任务,但此刻任务并 ...
- 『现学现忘』Git基础 — 19、在Git中进行忽略文件操作
目录 1.忽略文件说明 2.忽略文件的原则 3..gitignore忽略规则 4.忽略文件的三种方式 (1)忽略单个仓库中的文件(远程共用) (2)忽略单个仓库中的文件(本地使用) (3)全局忽略 1 ...
- ONNXRuntime学习笔记(三)
接上一篇完成的pytorch模型训练结果,模型结构为ResNet18+fc,参数量约为11M,最终测试集Acc达到94.83%.接下来有分两个部分:导出onnx和使用onnxruntime推理. 一. ...
- 卧槽!华为《Linux中文手册》火了,完整版 PDF 开放下载!
这是华为工程师基于最新的Linux编写,循序渐进地对Linux进行讲解.对于零基础可以作为Linux的快速入门教材.我希望能为大家提供切实的帮助. 资料介绍 涵盖基础.系统管理.应用.开发.服务器配置 ...