solr的认识、linux下安装、java下使用(含下载资源)

一、solr的大概认识
(1)在互联网项目里面,绝大部分是用全文检索服务器,
lucense(基于java的全文检索api)和solr(基于lucense的全文检索服务器)都可以实现。用lucense需要自己来管理维护索引库,进行索引库的优化,缓存的添加。而solr配置一下就好了,比较方便。
(2)solr本质上是一个war包,然后部署到servlet容器中,容器你可以选择用tomcat,也可以选择更加轻量级的jetty
(3)反正solr就是:比如 好多好多商品,每个都好长名字。那我比如搜索 '漂亮手机' 的时候,solr自动划分字段(比如划分成 ‘漂亮’,‘手机’),自动去匹配数据库中对应的商品名列表,商品名列表也会被划分,完全匹配的就会展示出来
(4)solr使用的时候分两部分:把商品名列表放到solr;搜索商品
二、solr安装
(1)安装jdk(省略)
(2)下载 solr-4.10.3.tgz.tgz并解压
链接:https://pan.baidu.com/s/1G6-aLXboFKThzRiDtUV-Xg
提取码:0j9o
(3)安装tomcat(省略)
(4)拷贝solr的war包到tomcat下
[root@localhost apache-tomcat-7.0.47]# cp /usr/solr/solr-4.10.3/dist/solr-4.10.3.war webapps/solr.war
(5)启动tomcat自动解压缩war包:
[root@localhost apache-tomcat-7.0.47]# bin/startup.sh
(6)查看控制台,检查tomcat启动情况:
[root@localhost apache-tomcat-7.0.47]# tail -f logs/catalina.out
(7)关闭tomcat
[root@localhost apache-tomcat-7.0.47]# bin/shutdown.sh
(8)删除war包
[root@localhost apache-tomcat-7.0.47]# rm -f webapps/solr.war
(9)把一些jar包放到solr工程下面去:
[root@localhost apache-tomcat-7.0.47]# cp /usr/solr/solr-4.10.3/example/lib/ext/* webapps/solr/WEB-INF/lib/
(10)配置solrhome
[root@localhost solr-4.10.3]# cp -r example/solr /usr/solr/solrhome[root@localhost apache-tomcat-7.0.47]# cd webapps/solr/WEB-INF/[root@localhost WEB-INF]# vim web.xml
修改solr/home的地址,并且去掉注释

(11)再次开启tomcat
[root@localhost apache-tomcat-7.0.47]# bin/startup.sh
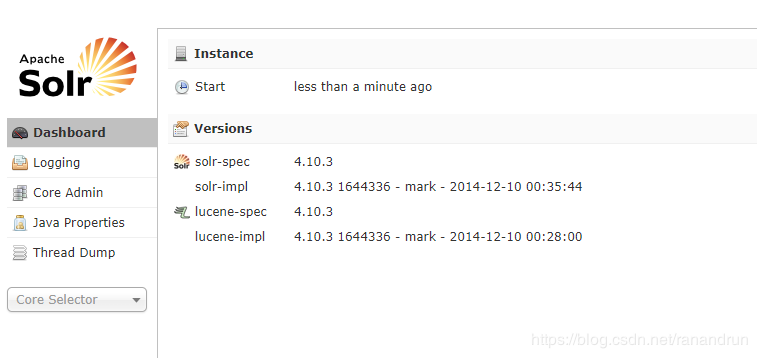
(12)在Windows那边访问solr
http://192.168.25.128:8080/solr/

三、solr的深度认识
用户可以通过http请求,向搜索引擎服务器提交一定格式的XML文件或数据,生成索引;也可以通过Http Get操作提出查找请求,并得到XML格式的返回结果。
四、solr的使用
(1)由于我们用到中文,所以需要中文分析器,这里我用IK Analyzer 2012FF_hf1
链接:https://pan.baidu.com/s/15TUJaTJir9d0A0FRaiBl_A
提取码:5xrw
下载好IK Analyzer 2012FF_hf1文件后,安装步骤:
<1>拷贝IKAnalyzer2012FF_u1.jar到tomcat的solr项目下的lib中:
[root@localhost apache-tomcat-7.0.47]# cd webapps/solr/WEB-INF/lib[root@localhost lib]# cp /usr/solr/IK_Analyzer_2012FF_hf1/IKAnalyzer2012FF_u1.jar .
<2>拷贝三个文件到tomcat的solr项目下的classes文件中
[root@localhost lib]# cd ..[root@localhost WEB-INF]# mkdir classes[root@localhost IK_Analyzer_2012FF_hf1]# cp ext_stopword.dic IKAnalyzer.cfg.xml mydict.dic /usr/tomcat/apache-tomcat-7.0.47/webapps/solr/WEB-INF/classes
<3>在solrhome里面的schema.xml定义一个fieldtype,来指定IK分析器。
<fieldType name="text_ik" class="solr.TextField"><analyzer class="org.wltea.analyzer.lucene.IKAnalyzer"/></fieldType>
(2)同时在schema.xml指定好业务域 field name......
由于solr本身就定义了id,所以我们用solr的id来保存我们要的id就可以了。
注意:string类型的是不可拆分的,而TextField类型的是可拆分的
<field name="item_title" type="text_ik" indexed="true" stored="true"/><field name="item_sell_point" type="text_ik" indexed="true" stored="true"/><field name="item_price" type="long" indexed="true" stored="true"/><field name="item_image" type="string" indexed="false" stored="true" /><field name="item_category_name" type="string" indexed="true" stored="true" /><field name="item_desc" type="text_ik" indexed="true" stored="false" />
(3)同时在schema.xml配置复制域
就是说你找一个商品的时候,可以在item_keywords中的四个域中找
<field name="item_keywords" type="text_ik" indexed="true" stored="false" multiValued="true"/><copyField source="item_title" dest="item_keywords"/><copyField source="item_sell_point" dest="item_keywords"/><copyField source="item_category_name" dest="item_keywords"/><copyField source="item_desc" dest="item_keywords"/>
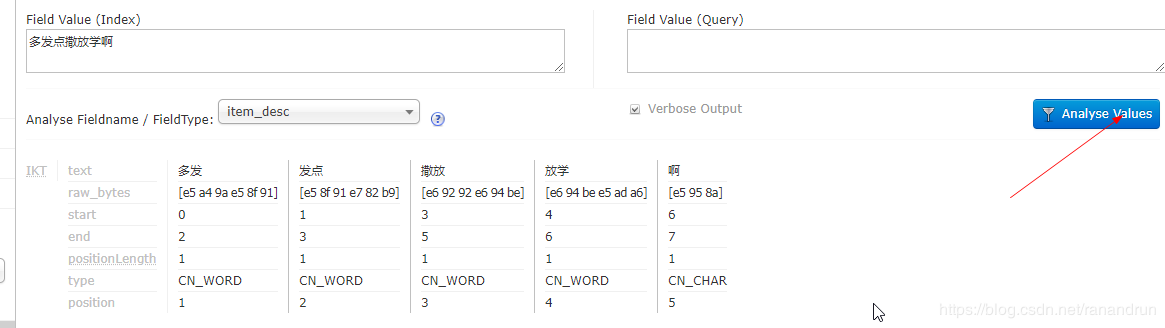
(4)启动solr看看业务域是否能用
[root@localhost apache-tomcat-7.0.47]# bin/startup.sh
进入http://192.168.25.128:8080/solr/里面的collection1的Analyse ,选择一个域,比如:
五、用java代码增删data到solr中
(1)导包
<!-- 添加solrJ的依赖 --><dependency><groupId>org.apache.solr</groupId><artifactId>solr-solrj</artifactId></dependency>
(2)测试一下
import org.apache.solr.client.solrj.SolrServer;import org.apache.solr.client.solrj.impl.HttpSolrServer;import org.apache.solr.client.solrj.response.QueryResponse;import org.apache.solr.common.SolrDocument;import org.apache.solr.common.SolrDocumentList;import org.apache.solr.common.SolrInputDocument;import org.junit.Test;public class TestSolrJ {@Testpublic void testAddDocument() throws Exception {//创建一个SolrServer对象。创建一个HttpSolrServer对象//需要指定solr服务的urlSolrServer solrServer = new HttpSolrServer("http://192.168.25.128:8080/solr/collection1");//创建一个文档对象SolrInputDocumentSolrInputDocument document = new SolrInputDocument();//向文档中添加域,必须有id域,域的名称必须在schema.xml中定义document.addField("id", "1234");document.addField("item_title", "测试商品2");document.addField("item_price", 1000);//把文档对象写入索引库solrServer.add(document);//提交solrServer.commit();}@Testpublic void deleteDocumentById() throws Exception {SolrServer solrServer = new HttpSolrServer("http://192.168.25.128:8080/solr/collection1");solrServer.deleteById("123");//提交solrServer.commit();}@Testpublic void deleteDocumentByQuery() throws Exception {SolrServer solrServer = new HttpSolrServer("http://192.168.25.128:8080/solr/collection1");solrServer.deleteByQuery("item_title:测试商品3");solrServer.commit();}}
六、实际开发中导入数据库数据到solr的data中的步骤
<1>定义一个 (将数据库的部分数据导入到solr的data中的)接口
import com.wine.common.pojo.WineResult;public interface SearchItemService {WineResult importItemsToIndex();}
<2>实现上方接口
@Servicepublic class SearchItemServiceImpl implements SearchItemService {@Autowiredprivate SearchItemMapper searchItemMapper;@Autowiredprivate SolrServer solrServer;@Overridepublic WineResult importItemsToIndex() {try {//1、先查询所有商品数据List<SearchItem> itemList = searchItemMapper.getItemList();//2、遍历商品数据添加到索引库for (SearchItem searchItem : itemList) {//创建文档对象SolrInputDocument document = new SolrInputDocument();//向文档中添加域document.addField("id", searchItem.getId());document.addField("item_title", searchItem.getTitle());document.addField("item_sell_point", searchItem.getSell_point());document.addField("item_price", searchItem.getPrice());document.addField("item_image", searchItem.getImage());document.addField("item_category_name", searchItem.getCategory_name());document.addField("item_desc", searchItem.getItem_desc());//把文档写入索引库solrServer.add(document);}//3、提交solrServer.commit();} catch (Exception e) {e.printStackTrace();return WineResult.build(500, "数据导入失败");}//4、返回添加成功return WineResult.ok();}}
<3>solr连接文件applicationContext-solr.xml
<?xml version="1.0" encoding="UTF-8"?><beans xmlns="http://www.springframework.org/schema/beans"xmlns:context="http://www.springframework.org/schema/context" xmlns:p="http://www.springframework.org/schema/p"xmlns:aop="http://www.springframework.org/schema/aop" xmlns:tx="http://www.springframework.org/schema/tx"xmlns:xsi="http://www.w3.org/2001/XMLSchema-instance"xsi:schemaLocation="http://www.springframework.org/schema/beans http://www.springframework.org/schema/beans/spring-beans-4.2.xsdhttp://www.springframework.org/schema/context http://www.springframework.org/schema/context/spring-context-4.2.xsdhttp://www.springframework.org/schema/aop http://www.springframework.org/schema/aop/spring-aop-4.2.xsd http://www.springframework.org/schema/tx http://www.springframework.org/schema/tx/spring-tx-4.2.xsdhttp://www.springframework.org/schema/util http://www.springframework.org/schema/util/spring-util-4.2.xsd"><!-- 单机版solr的连接 --><bean id="httpSolrServer" class="org.apache.solr.client.solrj.impl.HttpSolrServer"><constructor-arg name="baseURL" value="http://192.168.25.128:8080/solr/collection1"/></bean><!-- 集群版solr连接 --><!-- <bean id="cloudSolrServer" class="org.apache.solr.client.solrj.impl.CloudSolrServer"><constructor-arg name="zkHost" value="192.168.25.128:2181,192.168.25.128:2182,192.168.25.128:2183"></constructor-arg><property name="defaultCollection" value="collection2"/></bean> --></beans>
七、实际开发中实现搜索功能步骤
(1)首先测试一下,输入测试商品,看看搜索出什么东西:
@Testpublic void searchDocumet() throws Exception {//创建一个SolrServer对象SolrServer solrServer = new HttpSolrServer("http://192.168.25.128:8080/solr/collection1");//创建一个SolrQuery对象SolrQuery query = new SolrQuery();//设置查询条件、过滤条件、分页条件、排序条件、高亮//query.set("q", "*:*");query.setQuery("测试商品");//分页条件query.setStart(0);query.setRows(10);//设置默认搜索域query.set("df", "item_keywords");//设置高亮query.setHighlight(true);//高亮显示的域query.addHighlightField("item_title");query.setHighlightSimplePre("<div>");query.setHighlightSimplePost("</div>");//执行查询,得到一个Response对象QueryResponse response = solrServer.query(query);//取查询结果SolrDocumentList solrDocumentList = response.getResults();//取查询结果总记录数System.out.println("查询结果总记录数:" + solrDocumentList.getNumFound());for (SolrDocument solrDocument : solrDocumentList) {System.out.println(solrDocument.get("id"));//取高亮显示Map<String, Map<String, List<String>>> highlighting = response.getHighlighting();List<String> list = highlighting.get(solrDocument.get("id")).get("item_title");String itemTitle = "";if (list != null && list.size() >0) {itemTitle = list.get(0);} else {itemTitle = (String) solrDocument.get("item_title");}System.out.println(itemTitle);System.out.println(solrDocument.get("item_sell_point"));System.out.println(solrDocument.get("item_price"));System.out.println(solrDocument.get("item_image"));System.out.println(solrDocument.get("item_category_name"));System.out.println("=============================================");}}
结果:(注意:sol按照匹配次数多的来排序)
我已经在solor中插入了数据(id,title,....):(123456, 测试商品2,...),(1,测试2商品,...),(2,2商品测试,...),(,7,66测试66商品,...),(5,2测试,...),(6,2商品,...)
查询结果总记录数:6123456<div>测试</div><div>商品</div>2null1000nullnull=============================================1<div>测试</div>2<div>商品</div>null1000nullnull=============================================22<div>商品</div><div>测试</div>null1000nullnull=============================================766<div>测试</div>66<div>商品</div>null1000nullnull=============================================52<div>测试</div>null1000nullnull=============================================62<div>商品</div>null1000nullnull=============================================
(2)具体代码实现
<1>添加一个访问solr的dao:
/*** 查询索引库商品dao*/@Repositorypublic class SearchDao {@Autowiredprivate SolrServer solrServer;/**SearchResult 这个pojo类里面的数据:private long totalPages;private long recordCount;private List<SearchItem> itemList;**/public SearchResult search(SolrQuery query) throws Exception{//根据query对象进行查询QueryResponse response = solrServer.query(query);//取查询结果SolrDocumentList solrDocumentList = response.getResults();//取查询结果总记录数long numFound = solrDocumentList.getNumFound();SearchResult result = new SearchResult();result.setRecordCount(numFound);List<SearchItem> itemList = new ArrayList<>();//把查询结果封装到SearchItem对象中for (SolrDocument solrDocument : solrDocumentList) {SearchItem item = new SearchItem();item.setCategory_name((String) solrDocument.get("item_category_name"));item.setId((String) solrDocument.get("id"));//取一张图片String image = (String) solrDocument.get("item_image");if (StringUtils.isNotBlank(image)) {image = image.split(",")[0];}item.setImage(image);item.setPrice((long) solrDocument.get("item_price"));item.setSell_point((String) solrDocument.get("item_sell_point"));//取高亮显示Map<String, Map<String, List<String>>> highlighting = response.getHighlighting();List<String> list = highlighting.get(solrDocument.get("id")).get("item_title");String title = "";if (list != null && list.size() > 0) {title = list.get(0);} else {title = (String) solrDocument.get("item_title");}item.setTitle(title);//添加到商品列表itemList.add(item);}//把结果添加到SearchResult中result.setItemList(itemList);//返回return result;}}
<2>添加调用dao的service类:
/*** 搜索服务功能实现*/@Servicepublic class SearchServiceImpl implements SearchService {@Autowiredprivate SearchDao searchDao;@Overridepublic SearchResult search(String queryString, int page, int rows) throws Exception {//根据查询条件拼装查询对象//创建一个SolrQuery对象SolrQuery query = new SolrQuery();//设置查询条件query.setQuery(queryString);//设置分页条件if (page < 1) page =1;query.setStart((page - 1) * rows);if (rows < 1) rows = 10;query.setRows(rows);//设置默认搜索域query.set("df", "item_title");//设置高亮显示query.setHighlight(true);query.addHighlightField("item_title");query.setHighlightSimplePre("<font color='red'>");query.setHighlightSimplePost("</font>");//调用dao执行查询SearchResult searchResult = searchDao.search(query);//计算查询结果的总页数long recordCount = searchResult.getRecordCount();long pages = recordCount / rows;if (recordCount % rows > 0) {pages++;}searchResult.setTotalPages(pages);//返回结果return searchResult;}}
<3>控制层
@Controllerpublic class SearchController {@Autowiredprivate SearchService searchService;@Value("${SEARCH_RESULT_ROWS}")private Integer SEARCH_RESULT_ROWS;@RequestMapping("/search")public String search(@RequestParam("q")String queryString,@RequestParam(defaultValue="1")Integer page, Model model) throws Exception {//int a = 1/0;//调用服务执行查询//把查询条件进行转码,解决get乱码问题queryString = new String(queryString.getBytes("iso8859-1"), "utf-8");SearchResult searchResult = searchService.search(queryString, page, SEARCH_RESULT_ROWS);//把结果传递给页面model.addAttribute("query", queryString);model.addAttribute("totalPages", searchResult.getTotalPages());model.addAttribute("itemList", searchResult.getItemList());model.addAttribute("page", page);//返回逻辑视图return "search";}}
solr的认识、linux下安装、java下使用(含下载资源)的更多相关文章
- Linux下安装Java环境配置
1.下载安装文件 下载地址:http://www.oracle.com/technetwork/java/javase/downloads/jdk8-downloads-2133151.html 2. ...
- Kali下安装Java环境
<-----教你在Kali下安装Java环境-----> 1. 下载1.8u121的JAVA JDK 下载地址:http://java.sun.com/javase/downloads/i ...
- 求助下 Ubuntu 15.10(64 位)下安装 pyspider 下的问题 - V2EX
https://www.v2ex.com/t/279405 求助下 Ubuntu 15.10(64 位)下安装 pyspider 下的问题 - V2EX pip 更新到最新 sudo apt inst ...
- Linux中安装java JDK
Linux中安装java JDK 1.下载jdk 下载地址:https://www.oracle.com/java/technologies/javase/javase-jdk8-downloads. ...
- Linux下安装Java环境配置步骤详述
0.下载jdk8 登录网址:http://www.oracle.com/technetwork/java/javase/downloads/jdk8-downloads-2133151.html选择对 ...
- linux下安装java
搞了一年IT了,作为IT人没怎么玩过linux挺丢脸的,要好好整整. 先从熟悉的来,在linux下开发java,首先要搭建环境. linux有一个工具yum,非常好用. 1.yum install j ...
- Linux SSH下安装Java并设置环境
我是用Xshell进行远程连接阿里云服务器的,所以jdk不好下载. 我使用的是Winscp远程软件,在window上下载了jdk然后再上传到Linux服务器上 下面是安装的步骤 1.下载jdk8 登录 ...
- Linux下安装java的jdk和配置环境变量
每次感觉配这个超级简单 但是每次都要查下 记一下好了 Linux下安装jdk,步骤如下 1:下载jdk包:本章使用的为后缀为tar.gz的文件(不需要安装),如jdk-8u111-linux-x64. ...
- [转]Linux下安装Java环境配置步骤详述
1.下载jdk8 登录网址:http://www.oracle.com/technetwork/java/javase/downloads/jdk8-downloads-2133151.html 选择 ...
- Linux环境下安装java的方法
linux安装java步骤 方式一:yum方式下载安装 1.查找java相关的列表 yum -y list java* 或者 yum search jdk 2.安装jdk yum install ja ...
随机推荐
- 软件性能测试技术树(二)----Linux服务器性能
全图: 测试目的: 测试范围&性能指标: 测试与生产环境服务器配置不同的处理方法: 实时CPU监控: 实时内存监控: 实时网络监控: 实时磁盘监控: 万能命令: Linux下的进程追踪命令: ...
- 原生javascript写自己的运动库(匀速运动篇)
网上有很多JavaScript的运动库,这里和大家分享一下用原生JavaScript一步一步写一个运动函数的过程,如读者有更好的建议欢迎联系作者帮助优化完善代码.这个运动函数完成后,就可以用这个运动函 ...
- .NET开发微信小程序(基础配置)
1.微信小程序的必备Model public class WxConfig { /// <summary> /// 小程序的appId /// 登录小程序可以直接看到 /// </s ...
- 利用JavaScriptSerializer转json实用方法
项目中经常碰到需要输出的是json数据,使用JavaScriptSerializer转换,以前老的方法如下. JavaScriptSerializer jss = new JavaScriptSeri ...
- 微信小程序函数调用监控
微信小程序之无埋点函数调用监控 有时候,面对一个bug,左思右想就是无法理解为什么. 我就有过这样的经历,耗时整个一个晚上,后来还是放弃了.不得不在所有可能的点都加上日志,部署等待再次报错,真的很让人 ...
- Mac命令行
参考:http://www.cnblogs.com/-ios/p/4949923.html 必读 涵盖范围: 这篇文章对刚接触命令行的新手以及具有命令行使用经验的人都有用处.本文致力于做到覆盖面广(尽 ...
- Spring Boot Hikari
Guys, I got the following properties to work, kind of. The following creates 2 pools. One connection ...
- 1.用互联网的产品思维打造一本app后端的书
刚刚接触app后端,是做完adidas中国的官方商城的时候,那时不清楚app后端应该怎么架构,只能摸着石头过河,网络上只有一些零散的资料,遇到问题,只能不断地搜索,思考,务必找到解决问题的方法. 在从 ...
- nodejs中处理回调函数的异常
如果是使用nodejs+express3这个经典的组合,那么有一种很方面的处理回调函数异常的方法: 1. 安装模块:express-domain-middleware 2. 加入如下的代码: app. ...
- python 写日志
简单配置 日志级别 级别 何时使用 DEBUG 详细信息,典型地调试问题时会感兴趣. INFO 证明事情按预期工作. WARNING 表明发生了一些意外,或者不久的将来会发生问题(如'磁盘满了').软 ...