Spring boot+ maven + thymeleaf + HTML 实现简单的web项目
第一步: 创建一个SpringBoot应用
第二步: 创建一个实体,用来存储数据,在src/main/java/com/example/first下创建包entity , 在entity下创建Person.java文件
- package com.example.first.entity;
- public class Person {
- private String name;
- private int age;
- //seter , getter,toString方法
- }
第三步: 创建resource, 在src/main/java/com/example/first下创建包resource, resource下创建PersonResource.java
- package com.example.first.resource;
- import com.example.first.entity.Person;
- import org.springframework.stereotype.Controller;
- import org.springframework.ui.ModelMap;
- import org.springframework.web.bind.annotation.RequestMapping;
- import org.springframework.web.bind.annotation.RequestMethod;
- import org.springframework.web.bind.annotation.RequestParam;
- @Controller
- @RequestMapping("/person")
- public class PersonResource {
- @RequestMapping(value = "/show",method = RequestMethod.GET) /**请求地址: localhost:8080/person/show?name=zhang&age=23 请求方式是get*/
- private String show(@RequestParam("name")String name,@RequestParam("age")int age,ModelMap map){ /**@RequestParam("name")绑定请求地址中的name到参数name中 ModelMap map 存放返回内容*/
- Person person = new Person();
- person.setName(name);
- person.setAge(age);
- map.addAttribute("person",person);
- return "index"; /**返回的是显示数据的html的文件名*/
- }
- }
第三步:创建index.html文件
- <!DOCTYPE html>
- <html xmlns:th="http://www.thymeleaf.org" lang="zh">
- <head>
- <meta charset="UTF-8"/>
- <title>Title</title>
- </head>
- <body>
- <span th:text="${person.name}"></span><hr/>
- <span th:text="${person.age}"></span><hr/>
- <span th:text="${person}"></span>
- </body>
- </html>
第四步:在application.properties中添加模板引擎
- spring.thymeleaf.prefix=classpath:/templates/
- spring.thymeleaf.suffix=.html
- spring.thymeleaf.mode = HTML5
第五步: 在pom文件中添加依赖
- <?xml version="1.0" encoding="UTF-8"?>
- <project xmlns="http://maven.apache.org/POM/4.0.0" xmlns:xsi="http://www.w3.org/2001/XMLSchema-instance"
- xsi:schemaLocation="http://maven.apache.org/POM/4.0.0 http://maven.apache.org/xsd/maven-4.0.0.xsd">
- <modelVersion>4.0.0</modelVersion>
- <groupId>com.example.first</groupId>
- <artifactId>springboot</artifactId>
- <version>0.0.1-SNAPSHOT</version>
- <packaging>jar</packaging>
- <name>springboot</name>
- <description>Demo project for Spring Boot</description>
- <parent>
- <groupId>org.springframework.boot</groupId>
- <artifactId>spring-boot-starter-parent</artifactId>
- <version>1.5.6.RELEASE</version>
- <relativePath/> <!-- lookup parent from repository -->
- </parent>
- <properties>
- <project.build.sourceEncoding>UTF-8</project.build.sourceEncoding>
- <project.reporting.outputEncoding>UTF-8</project.reporting.outputEncoding>
- <java.version>1.8</java.version>
- </properties>
- <dependencies>
- <dependency>
- <groupId>org.springframework.boot</groupId>
- <artifactId>spring-boot-starter-web</artifactId>
- </dependency>
- <dependency>
- <groupId>org.springframework.boot</groupId>
- <artifactId>spring-boot-starter-test</artifactId>
- <scope>test</scope>
- </dependency>
- <dependency>
- <groupId>org.springframework.boot</groupId>
- <artifactId>spring-boot-starter-thymeleaf</artifactId>
- </dependency>
- </dependencies>
- <build>
- <plugins>
- <plugin>
- <groupId>org.springframework.boot</groupId>
- <artifactId>spring-boot-maven-plugin</artifactId>
- </plugin>
- </plugins>
- </build>
- </project>
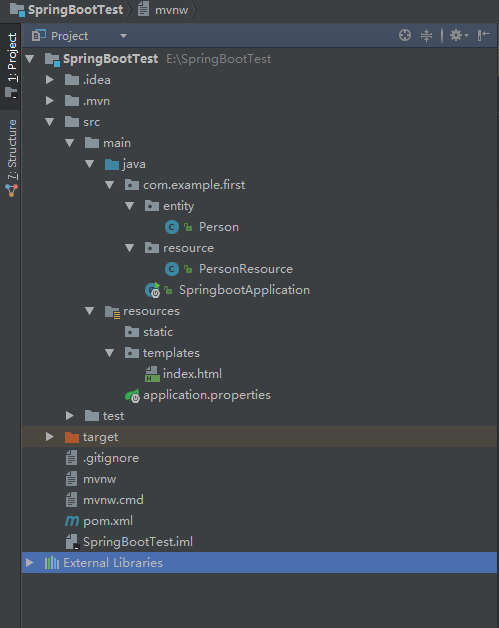
第五步:启动前目录结构
第六步: 配置启动

第七步:启动SpringbootApplication
- package com.example.first;
- import org.springframework.boot.SpringApplication;
- import org.springframework.boot.autoconfigure.SpringBootApplication;
- import org.springframework.web.bind.annotation.RestController;
- @RestController
- @SpringBootApplication
- public class SpringbootApplication {
- public static void main(String[] args) {
- SpringApplication.run(SpringbootApplication.class, args);
- }
- }
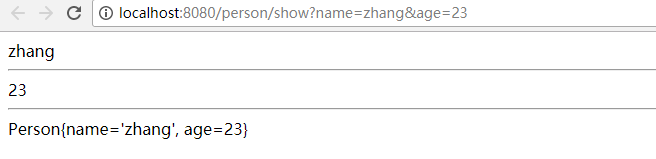
第八步:在地址栏输入http://localhost:8080/person/show?name=zhang&age=23
第九步: 显示效果
Spring boot+ maven + thymeleaf + HTML 实现简单的web项目的更多相关文章
- Spring Boot从入门到实战:整合Web项目常用功能
在Web应用开发过程中,一般都涵盖一些常用功能的实现,如数据库访问.异常处理.消息队列.缓存服务.OSS服务,以及接口日志配置,接口文档生成等.如果每个项目都来一套,则既费力又难以维护.可以通过Spr ...
- idea+Spring+Mybatis+jersey+jetty构建一个简单的web项目
一.先使用idea创建一个maven项目. 二.引入jar包,修改pom.xml <dependencies> <dependency> <groupId>org. ...
- 配置Maven环境并创建简单的web项目步骤
Maven的介绍 主要包含以下三个内容: 1.POM(Project Object Model):即An xml file(pom.xml):依赖管理.生命周期和插件的需要等都在pom.xml文件中完 ...
- 一个小demo熟悉Spring Boot 和 thymeleaf 的基本使用
目录 介绍 零.项目素材 一. 创建 Spring Boot 项目 二.定制首页 1.修改 pom.xml 2.引入相应的本地 css.js 文件 3.编辑 login.html 4.处理对 logi ...
- Spring Boot Maven Plugin(二):run目标
简介 Spring Boot Maven Plugin插件提供spring boot在maven中的支持.允许你打包可运行的jar包或war包. 插件提供了几个maven目标和Spring Boot ...
- Spring Boot Maven Plugin(一):repackage目标
简介 Spring Boot Maven Plugin插件提供spring boot在maven中的支持.允许你打包可运行的jar包或war包. 插件提供了几个maven目标和Spring Boot ...
- Spring Boot 整合 Thymeleaf 完整 Web 案例
Thymeleaf 是一种模板语言.那模板语言或模板引擎是什么?常见的模板语言都包含以下几个概念:数据(Data).模板(Template).模板引擎(Template Engine)和结果文档(Re ...
- Spring Boot2 系列教程(九)Spring Boot 整合 Thymeleaf
虽然现在慢慢在流行前后端分离开发,但是据松哥所了解到的,还是有一些公司在做前后端不分的开发,而在前后端不分的开发中,我们就会需要后端页面模板(实际上,即使前后端分离,也会在一些场景下需要使用页面模板, ...
- 极简 Spring Boot 整合 Thymeleaf 页面模板
虽然现在慢慢在流行前后端分离开发,但是据松哥所了解到的,还是有一些公司在做前后端不分的开发,而在前后端不分的开发中,我们就会需要后端页面模板(实际上,即使前后端分离,也会在一些场景下需要使用页面模板, ...
随机推荐
- Eureka编程
在一些场景下,我们需要监听eureka服务中心的一些状态,譬如某个微服务挂掉了,我们希望能监听到,并给管理员发送邮件通知或钉钉告警. 一.Eureka的监听事件,可以用来监控.告警EurekaInst ...
- ETCD&Flannel安装
.ETCD 安装: nohup etcd --name etcd0 \ --advertise-client-urls http://172.31.24.246:2379,http://127.0.0 ...
- 火热的线上APP的源码分享,开箱即用
这篇文章是写给iOS的程序员或产品经理的,同样,对于入门学习iOS开发的人,也是一个很好的实战演练,因为这里分享的是一个已经上架的.拿了源码就能正常运行起来的项目. 在介绍这个项目的源码分享之前,小编 ...
- Java并发编程笔记之StampedLock锁源码探究
StampedLock是JUC并发包里面JDK1.8版本新增的一个锁,该锁提供了三种模式的读写控制,当调用获取锁的系列函数的时候,会返回一个long 型的变量,该变量被称为戳记(stamp),这个戳记 ...
- vi常用命令总结
1. 打开文件 > vi 文件 //该模式是命令模式 2. 尾行模式操作 > :q //该模式是“尾行模式” > :w //保存已经修改的文档 > :wq //保存并退出 &g ...
- BizTalk Orchestration execute Flat file disassembler ReceivePipeline
需求是这样,在一个inbound XML中有个一点节点使用平文件的方式存放,还要解析比如固定长度或根据特殊字符截取字段 也就是需要在流程里面先把输入的XML的节点先读出来,这个方式有很多可以直接升级属 ...
- KM算法及其应用
在二分图匹配中有最大匹配问题,使用匈牙利算法或者网络流相关算法解决,如果给每条边增加一个权值,求权值和最大的匹配方案就叫做最大权匹配问题.其实之前所说的最大匹配就是权值为1的最大权匹配. 求最大权完备 ...
- [转]Windows下配置Node.js和Cordova
本文转自:https://blog.csdn.net/weixin_37730482/article/details/74388056?locationNum=3&fps=1 本文讲解在win ...
- HTML DOM querySelector() 方法
Document 对象 实例 获取文档中 id="demo" 的元素: document.querySelector("#demo"); <!DOCTY ...
- C# json反序列化 对象中嵌套数组 (转载)
看图: 这里可以看到是二层嵌套!!使用C#如何实现?? 思路:使用list集合实现 → 建立类 → list集合 → 微软的 Newtonsoft.Json (一款.NET中开源的Json序列化 ...